"I accidentally replaced file, how to recover it on Mac without Time Machine".
Stuck with something similar? Accidentally replacing a file on your Mac can be a frustrating experience, especially when that file was important. Many users rely on Time Machine for backups, but what happens if you don't have a backup? Is all hope lost? Fortunately, there are several methods to recover replaced files on Mac without Time Machine.
In this article, we'll explore various easy methods to recover your replaced files. Whether you accidentally replaced a document, photo, or any other type of file, these solutions can help you get it back. Let's dive into how you can recover replaced file Mac without Time Machine and ensure your data is safe.
In this article
Part 1: Can I Recover Replaced File Mac Without Time Machine?
Yes, you can recover a replaced file on your Mac without Time Machine. Even though Time Machine is a convenient tool for backups, not everyone uses it. Fortunately, there are several other ways to recover replaced files on your Mac. By using built-in tools, third-party software, and cloud backups, you can retrieve your lost files.
Losing a file due to accidental replacement doesn't mean it's gone forever. The key is to act quickly and use the right methods to recover your data. Let's explore where overwritten files go on Mac and how to recover them.
Part 2: Where Do Overwritten Files Go on Mac?
Ever wondered where overwritten files on your Mac end up? When you replace a file, the original data isn't always lost immediately. Mac often stores these overwritten files in various temporary locations.
Understanding where these files go can help you recover important data if you act quickly.
- Temporary Files: Sometimes, macOS stores overwritten files as temporary files before they are permanently replaced.
- Trash Bin: Check your Trash Bin as the original file may still be there before being completely overwritten.
- System Snapshots: Recent versions of macOS might have system snapshots that include the files before they were overwritten.
- Cache Files: Some apps keep cache files that might contain the previous versions of your replaced files.
- Application Data: Certain applications may have their own backup or version history of files.
Part 3: How To Recover Replaced Files On Mac
Accidentally replacing a file on your Mac can feel like a disaster, but there's hope. Whether you lack a Time Machine backup or not, there are several ways to recover those important files. Here's a guide on how to recover replaced files on Mac using various methods.
Method 1: Use the Recoverit to Restore Replaced Files
Wondershare Recoverit is an excellent data recovery tool that can help you get back replaced files on your Mac. It's designed to quickly and effectively find and retrieve lost or overwritten files.
Why Use Recoverit:
- Easy to Use: With a user-friendly interface, anyone can use it without needing technical skills.
- Quick Recovery: It works fast to scan and recover your lost files, saving you time and hassle.
- Effective Results: Recoverit has advanced features to accurately locate and restore a wide range of file types.
- Supports Various Scenarios: Whether you've lost files due to accidental deletion, system crashes, or virus attacks, Recoverit can handle it all.
- Comprehensive File Support: It recovers a wide range of file types, including documents, photos, videos, and more.
- Preview Before Recovery: You can preview the files before recovery to ensure you're restoring the correct ones.
- High Success Rate: Many users trust Recoverit for its high success rate in recovering lost data.
- 24/7 Support: If you encounter any issues, Recoverit's customer support is available 24/7 to help you out.
Steps:
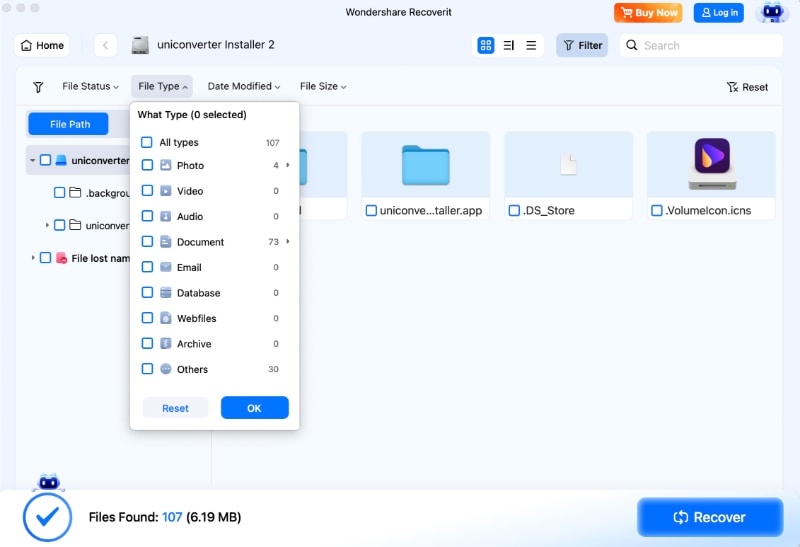
- Install Wondershare Recoverit on your Mac. Open Recoverit and select the location where the file was originally stored. Click on "Start".

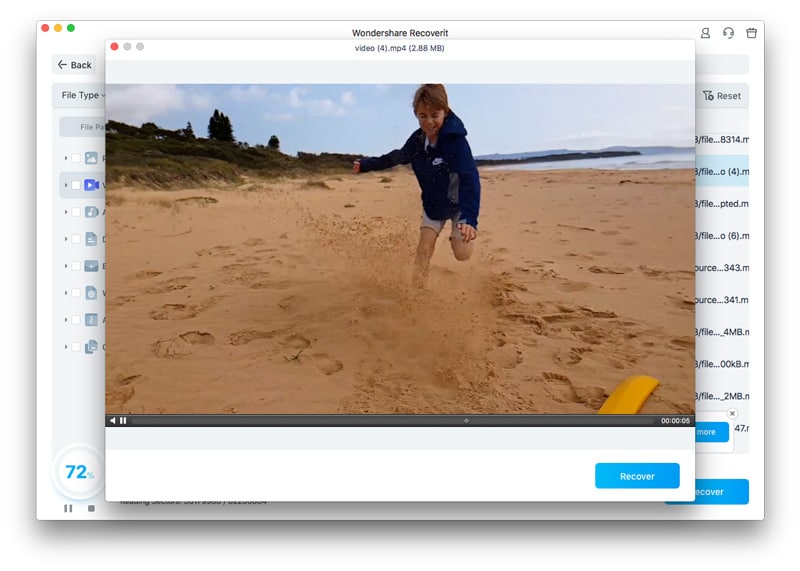
- Wait for the scanning process.

- You can even filter the scanning results to search for a particular file type.

- Preview the files after the scanning process. Select the ones you need. Click "Recover" to save files.

Learn more >>:
How To Recover Deleted Pages Files On Mac?
Method 2: Use Time Machine Local Backup
Even if you don't have an external Time Machine backup, your Mac might still have local snapshots you can use to recover replaced files. These snapshots are like mini backups that your Mac creates automatically. They can save your data from being lost if something goes wrong.
You can access these snapshots through the Time Machine feature on your Mac, which helps you restore previous versions of files, even if you haven't connected an external backup drive. This means you have a built-in safety net for your files.
Here’s how to undo a replaced file Mac:
- Navigate to the folder where the file was originally stored. Then, click on the Time Machine icon in the menu bar and choose "Enter Time Machine."

- Navigate through the local snapshots to find the version of the file you need. Select the file and click "Restore."

Method 3: Use Cloud Backups
If you use cloud services like iCloud, Dropbox, or Google Drive, there's a good chance you can recover replaced files from their backup histories. These services often keep previous versions of your files, which means you can go back and restore an earlier version if you've accidentally replaced it. This is a helpful feature that acts as a safety net, ensuring that your important files are never truly lost.
Simply log in to your cloud account, navigate to the file, and check the version history to restore the version you need. This makes cloud backups a reliable and accessible way to recover replaced files on your Mac.
Steps:
- Access your cloud storage account. Go to the folder where the file was stored.

- Use the version history feature to find the previous versions of the file. Select the version you want to restore and follow the prompts to recover the file.
Method 4: Use the Revert To Option (App-Specific)
Some Mac applications that have a "Revert To" option include:
- Pages: Apple's word processing software.
- Numbers: Apple's spreadsheet software.
- Keynote: Apple's presentation software.
- TextEdit: A simple text editor that comes with macOS.
- Preview: An app for viewing images and PDFs.
These apps allow you to easily access and restore previous versions of your files directly within the application, making it convenient to recover replaced files without needing additional software.
Here’s how to restore replaced files on Mac:
- Launch the application where the file was created. Open the replaced file within the app. Go to File > Revert To > Browse All Versions.

- Select the version you want to recover and click "Restore."
Part 4: Tips To Recover Replaced File Mac Without Time Machine
Losing a file due to accidental replacement can be a stressful experience, especially if you don't have a Time Machine backup. Fortunately, there are several effective methods to recover these files without relying on Time Machine.
Here are some handy tips to help you recover replaced files on your Mac and get back your important data.
- Act Quickly: The sooner you try to recover the file, the better your chances of success. Data can be overwritten quickly, so time is of the essence.
- Check the Trash Bin: Sometimes, the replaced file might still be in the Trash Bin. Open the Trash and see if you can restore the file from there.
- Use Data Recovery Software: Tools like Wondershare Recoverit can scan your Mac for lost files and help you recover replaced files.
- Look for Local Snapshots: Even without an external Time Machine backup, your Mac might have local snapshots that you can use to recover replaced files.
- Use Cloud Backups: If you use cloud services like iCloud, Dropbox, or Google Drive, check their version history to restore previous versions of your files.
- Revert to Option in Apps: Some applications, like Pages, Numbers, and Keynote, have a "Revert To" option that allows you to restore previous versions of a file within the app itself.
- Undo Command: Use the Undo command (Command+Z) in the app where you replaced the file. This can sometimes revert the action and restore the original file.
- Consult Official Documentation: Refer to Apple’s official documentation for detailed instructions and troubleshooting tips related to file recovery.
By following these tips, you can increase your chances of recovering replaced files on your Mac without relying on Time Machine.
Related Video: How to Backup Mac to External Hard Drive with Time Machine?
Conclusion
Accidentally replacing a file on your Mac can be a stressful experience, especially if you don't have a Time Machine backup. However, with the methods outlined in this article, you can recover your replaced files without Time Machine. Whether you use third-party recovery tools, local snapshots, cloud backups, or app-specific options, there are multiple ways to restore your lost data.
Remember to act quickly and use reliable software to increase your chances of success. By following these tips and maintaining regular backups, you can protect your data and recover replaced files on your Mac with ease.
FAQ
-
Q1: How can I recover a replaced file on Mac without Time Machine?
There are several ways to recover replaced files on a Mac even if you don't have a Time Machine backup. You can use data recovery tools like Wondershare Recoverit, which scan your hard drive for lost files. Additionally, you can check cloud services like iCloud, Dropbox, or Google Drive if you use them, as they often keep backup histories. You can also look for local snapshots on your Mac or use the "Revert To" feature in certain applications to restore previous versions of your files. -
Q2: What should I do if I accidentally replace a file on my Mac?
If you accidentally replace a file on your Mac, the first thing you should do is stop using your Mac to prevent further data overwriting. Check the Trash Bin to see if the original file is still there. You can also use data recovery software like Recoverit to scan for the replaced file. If you use cloud services, check their version history to restore the previous version. Acting quickly increases your chances of successful recovery. -
Q3: Can I use cloud backups to recover replaced files on Mac?
Yes, cloud backups such as iCloud, Dropbox, and Google Drive often have version history features that let you recover previous versions of replaced files. Simply log into your cloud account, navigate to the file location, and use the version history option to select and restore the version you need. This makes cloud services a reliable way to recover replaced files on your Mac.


 ChatGPT
 Perplexity
 Google AI Mode
 Grok
Grok


