

 TL;DR:
To instantly toggle the visibility of hidden files on your Mac without permanently altering system settings, press the Command + Shift + Period (.) keys together within any Finder window.
● For a permanent, system-wide display that requires no repetitive toggling, execute the Terminal command `defaults write com.apple.finder AppleShowAllFiles TRUE && killall Finder` (replace TRUE with FALSE to hide them again).
● To specifically access the hidden user Library folder for app troubleshooting, hold the Option key while clicking the Go menu in Finder rather than revealing all system files.
● Modifying or deleting unfamiliar hidden configuration files can corrupt your operating system; always back up via Time Machine before editing and re-hide the files immediately after use.
Ask AI for a summary
 ChatGPT
 Perplexity
 Gemini
 Claude
 Grok
Grok
Your Mac hides certain files from you. This is normal. These hidden files keep your system safe. But sometimes you need to see them. Maybe you want to fix a problem. Or perhaps you need to access special folders.
Learning how to view hidden files on Mac is easy. You don't need to be a tech expert. This guide shows you simple ways to do it. We'll cover six different methods. Each one works well.
Hidden files exist for good reasons. They protect important system data. But when you need them, you should know where to look. This article teaches you everything about macOS show hidden files.
Let's get started.
Table of Contents
Part 1: Why Are Files Hidden on Mac?
Here's why files stay hidden on your Mac:
- System Protection: Hidden files prevent accidental deletion. You can't delete what you can't see. This keeps macOS stable and working.
- Clutter Reduction: Your folders look cleaner without system files. You only see documents you created. This makes navigation easier.
- Prevent User Errors: New users might delete important files. Hidden status adds a safety layer. It reduces the risk of system damage.
- Configuration Files: Apps store settings in hidden files. These files start with a dot. They control how programs behave.
- Cache Storage: Temporary data lives in hidden folders. This includes app caches and system caches. They speed up your Mac.
- Security Measures: Some hidden files contain sensitive data. Passwords and keys stay protected. Only admin users should access them.
- System Preferences: macOS stores preferences as hidden files. They remember your settings. Each app has its own preference files.
- Development Tools: Programmers need access to hidden files. Code repositories use hidden folders. Version control systems depend on them.
Part 2: Easy Methods: View Hidden Files on Mac
You have multiple ways to macOS view hidden files. Each method works differently. Some are quick and temporary. Others make permanent changes. Choose the method that fits your needs best.
Method 1: Use Keyboard Shortcut in Finder
The keyboard shortcut is the fastest way. It works instantly in Finder. This method is perfect for quick access. You don't change any system settings. The shortcut toggles hidden files on and off.
This approach is ideal for beginners. No technical knowledge is required. You can use it anywhere in Finder. The results show immediately. When you're done, just toggle back. Your hidden files disappear again.
How It Helps:
- Instant Access: Press the keys and see hidden files right away. No waiting or loading required.
- No Settings Changed: Your system stays the same. This method makes no permanent changes to macOS.
- Easy to Remember: The keyboard combination is simple. Most users memorize it after one use.
- Works Everywhere: Use it in any Finder window. It works on the Desktop and all folders.
Step 1. Open Finder on your Mac. Click on any folder you want to check.

Step 2. Press Command + Shift + Period (.) keys together. Hidden files appear instantly. Press the same keys again to hide them.
Method 2: Use Terminal Command
Terminal offers powerful control over hidden files. This method uses text commands. It's more permanent than the keyboard shortcut. The command changes your Finder settings. You'll see hidden files until you reverse it.
Terminal might seem scary at first. But the command is actually simple. You just copy and paste it. Then press Enter. This method is popular among developers. It gives you full control over file visibility.
How It Helps:
- Permanent Display: Hidden files stay visible always. You don't need to toggle each time.
- System-Wide Effect: The change applies to all Finder windows. Every folder shows hidden files now.
- Professional Method: Developers prefer this approach. It's the standard way to show hidden files on a Mac.
- Complete Control: You can easily reverse the command. Just type the opposite command later.
Step 1. Open Terminal from Applications > Utilities folder. Or search for it using Spotlight.
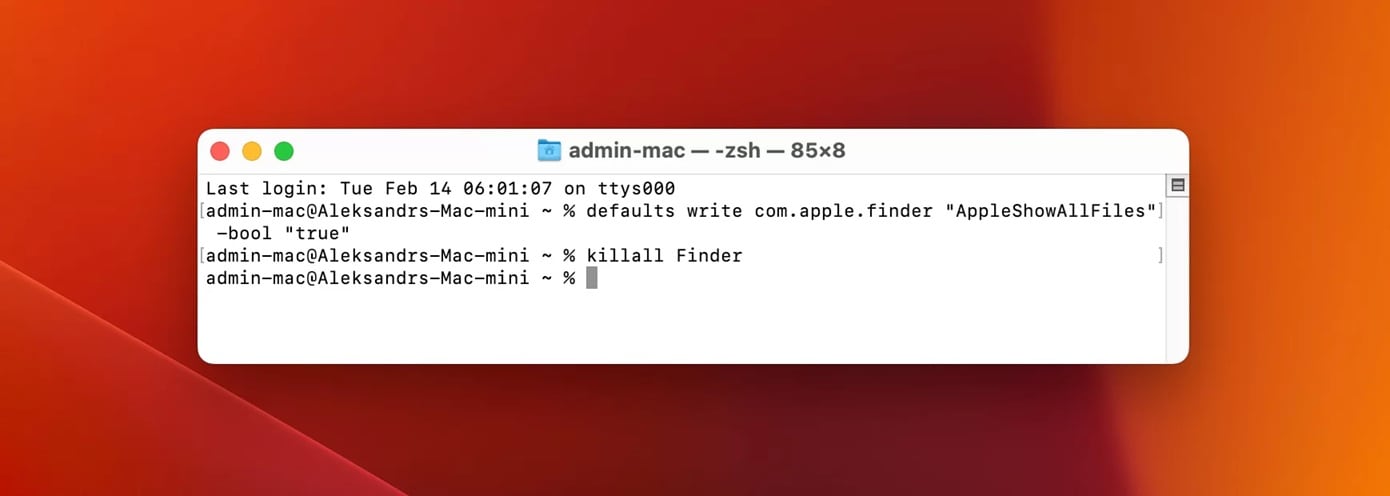
Step 2. Type this command: defaults write com.apple.finder AppleShowAllFiles TRUE && killall Finder. Press Enter. Finder restarts and shows hidden files. Set the value to FALSE to hide them again.
Method 3: Enable Hidden Files via Finder Settings
Finder Settings offers a built-in solution. This method doesn't require Terminal knowledge. You access it through Finder preferences. It's a more user-friendly approach. The settings give you visual control.
This method works well for regular users. You can see exactly what you're changing. No command line skills are needed. The interface guides you through the process. You can enable or disable hidden files anytime.
How It Helps:
- User-Friendly Interface: No typing of commands required. Everything is visual and clear.
- Safe Changes: You can't make typing mistakes. Click options instead of entering text.
- Quick Reversal: Turn hidden files off anytime. Just uncheck the same option.
- Clear Understanding: You see what each setting does. This helps you learn macOS better.
Step 1. Open Finder and click Finder in the menu bar. Select Settings or Preferences from the dropdown.
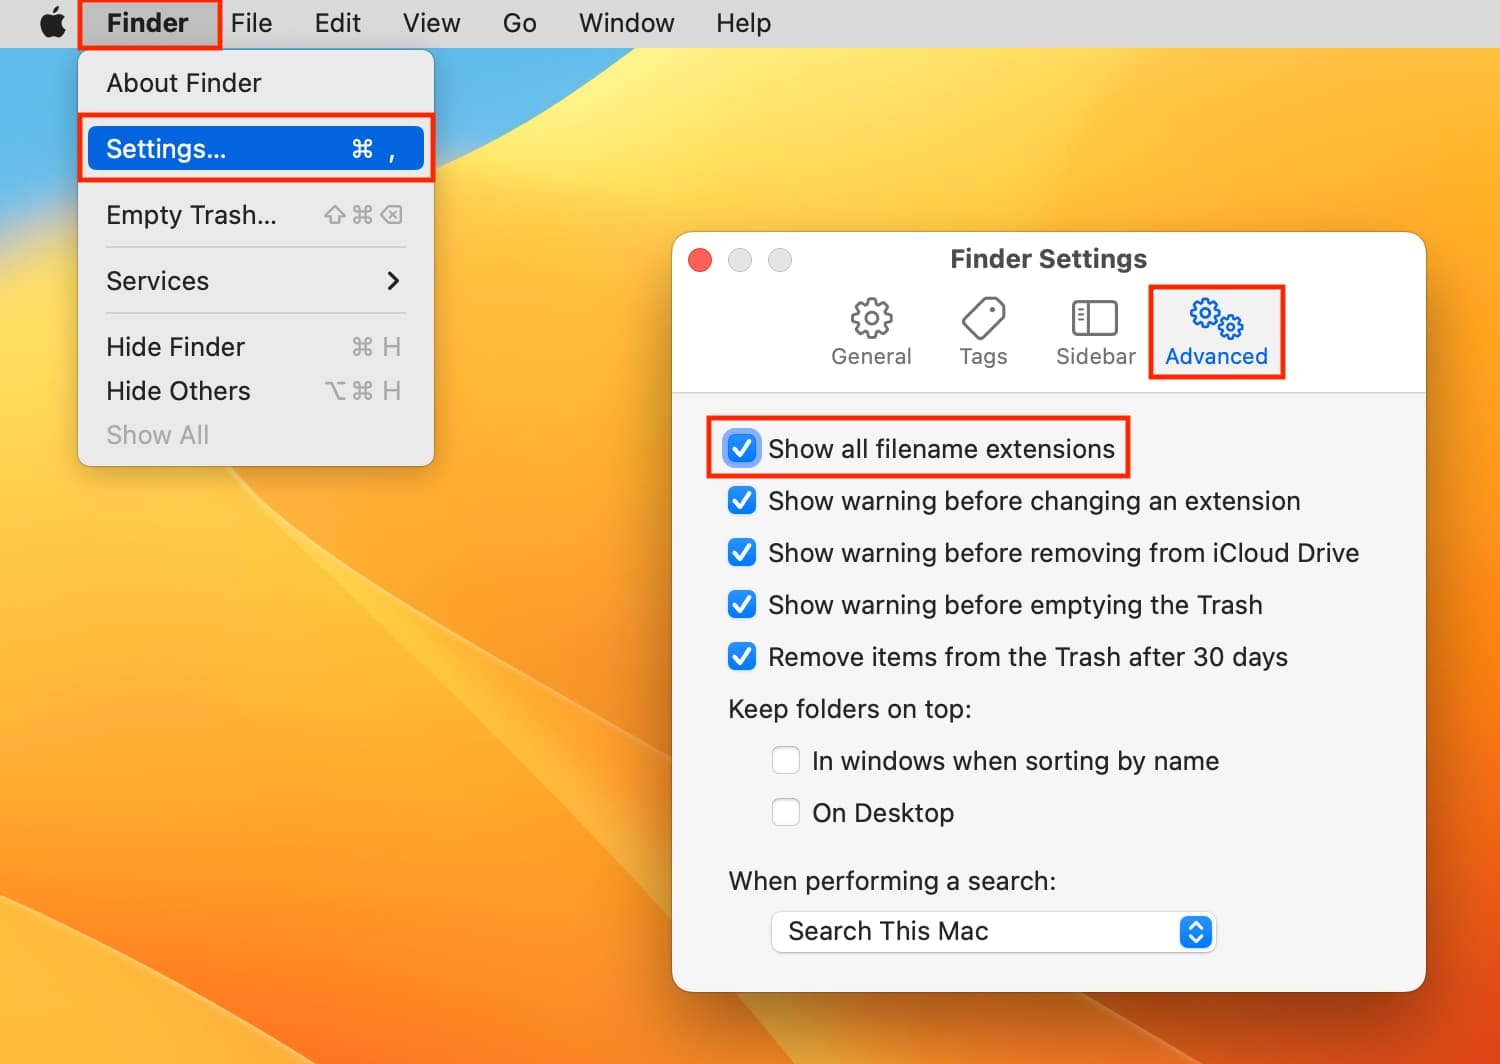
Step 2. Go to the Advanced tab. Check the box that says "Show all filename extensions." While this doesn't show all hidden files, combine it with Method 1 for the best results.
Method 4: Use Third-Party File Managers
Third-party apps offer enhanced features. They provide better control than Finder. Many file managers show hidden files by default. You get more options for file management. These tools are designed for power users.
Popular apps include Path Finder and Commander One. They add professional features to macOS. You can customize how files display. These managers make how to reveal hidden files on Mac simple. They often include other useful tools too.
How It Helps:
- Enhanced Features: Get more than just hidden file viewing. These apps offer advanced file operations.
- Better Organization: Manage files more efficiently. Dual-pane views and tabs improve workflow.
- Automatic Display: Hidden files show without toggling. The setting stays on always.
- Additional Tools: Many include FTP clients and file comparison. You get multiple tools in one app.
Step 1. Download a file manager like Commander One. Install it on your Mac following the standard process.
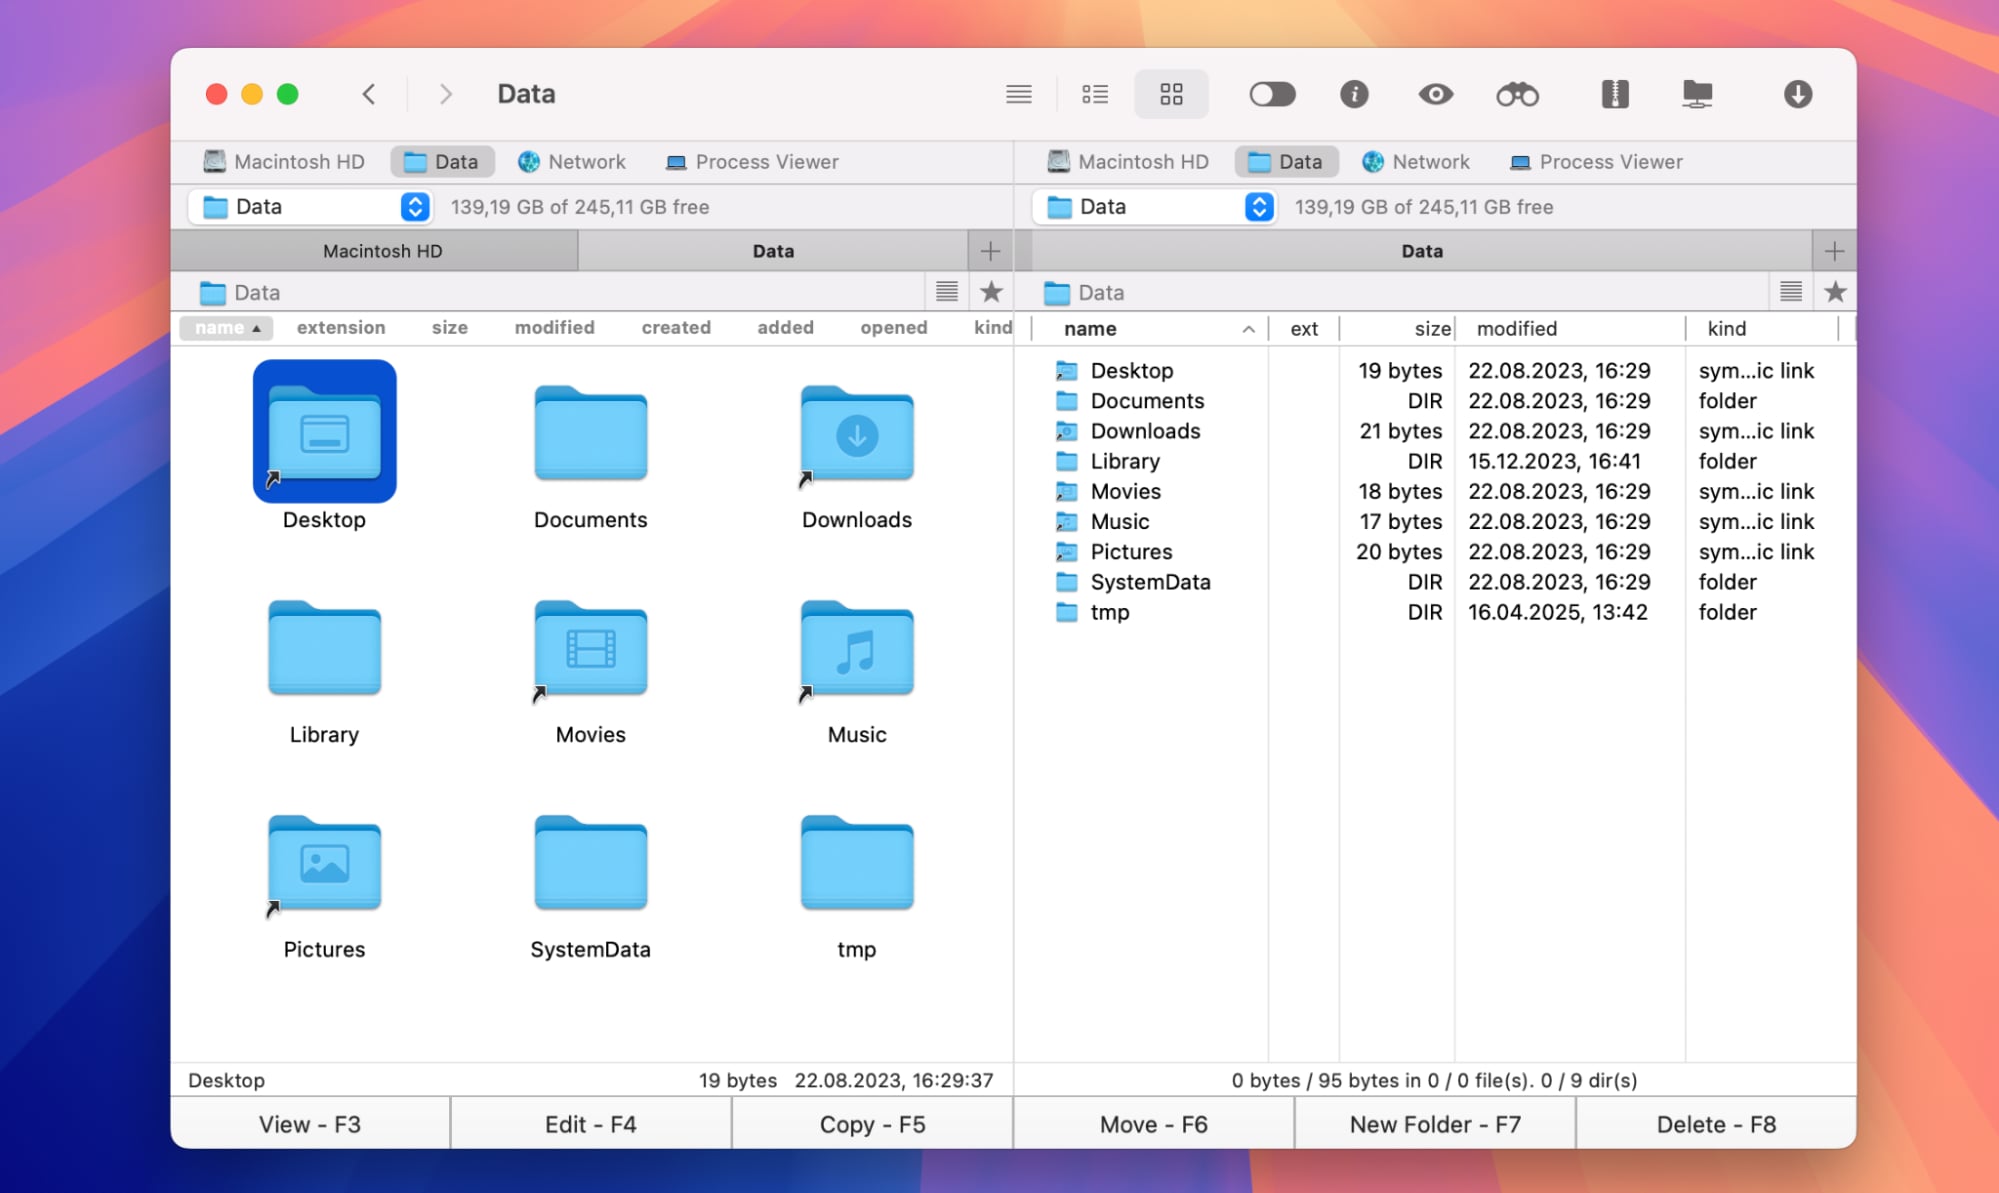
Step 2. Open the application and access its preferences. Enable the option to show hidden files. The setting is usually in View or Display preferences.
Method 5: Access Hidden Library Folder
The Library folder is commonly hidden. It contains important user data. App settings live here. So do caches and preferences. Many troubleshooting steps require Library access.
You need to know how to display hidden files on Mac specifically for the Library. This folder is hidden by default. But macOS provides a special way to reach it. You don't need to show all hidden files. Just access the Library when needed.
How It Helps:
- Targeted Access: View only the Library folder. Other hidden files stay hidden.
- Troubleshooting: Fix app problems by accessing preferences. Delete corrupted settings files easily.
- Clean Installation: Remove all app data completely. This helps when reinstalling software.
- Space Management: Find large cache files to delete. Free up disk space quickly.
Step 1. Open Finder and click Go in the menu bar. Hold down the Option key on your keyboard.
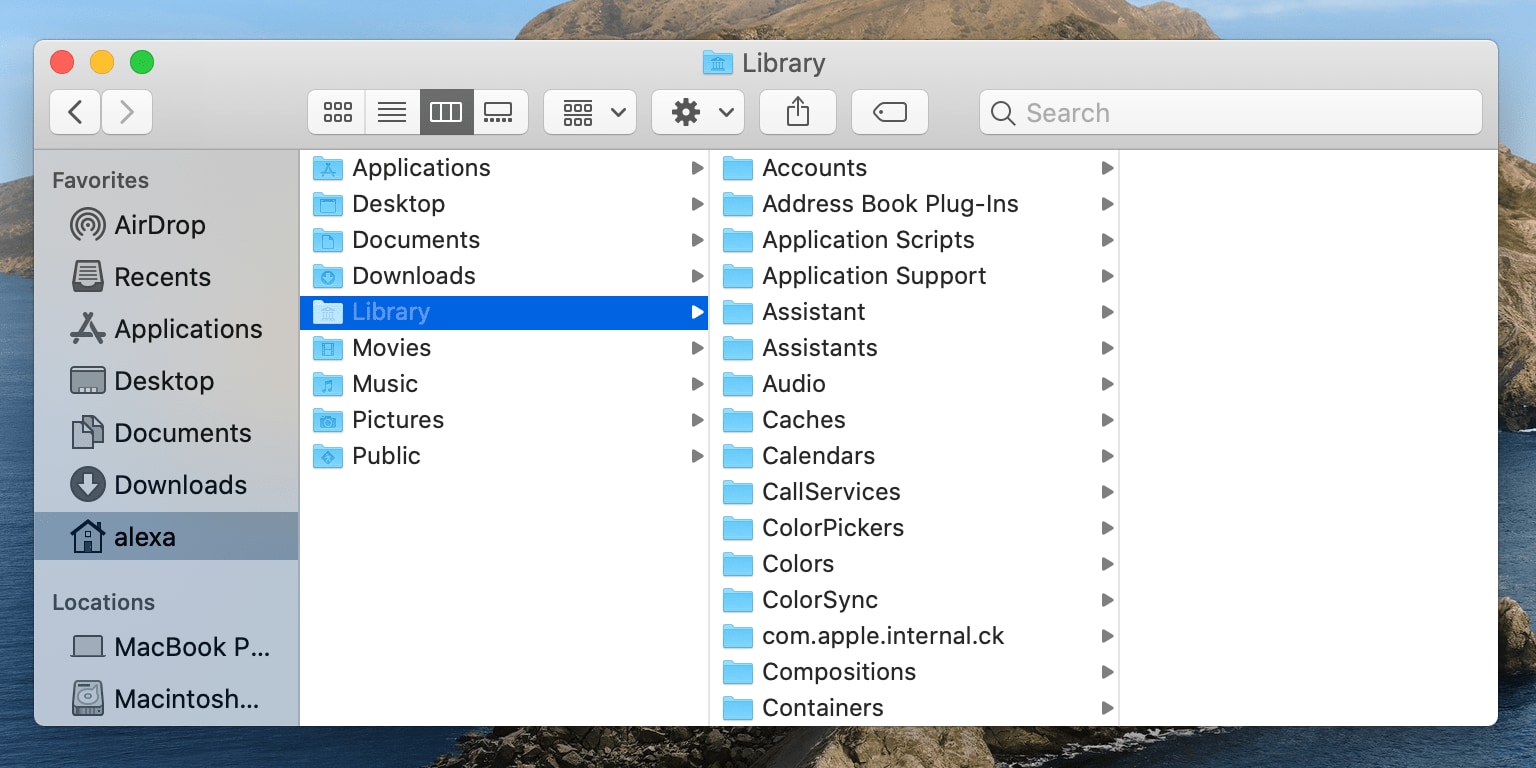
Step 2. The Library option appears in the Go menu. Click it to access your hidden Library folder. Release Option after clicking.
Method 6: Use Automator to Reveal Hidden Files
Automator is a built-in Mac tool. It creates custom shortcuts and workflows. You can make a button to toggle hidden files. This gives you one-click access. The workflow stays in your menu bar.
This method combines convenience and power. You don't need to remember keyboard shortcuts. Just click your custom button. Automator creates a permanent solution. It's perfect if you frequently need to how to show hidden files on macOS.
How It Helps:
- Custom Solution: Create a workflow that fits your needs. Make it work exactly how you want.
- Menu Bar Access: Add a quick action to your menu. Click it anytime you need hidden files.
- No Memorization: Forget keyboard shortcuts completely. Just click your custom button.
- Reusable Workflow: Save it for future use. Share it with other Mac users too.
Step 1. Open Automator from Applications folder. Choose "Quick Action" as your document type when prompted.
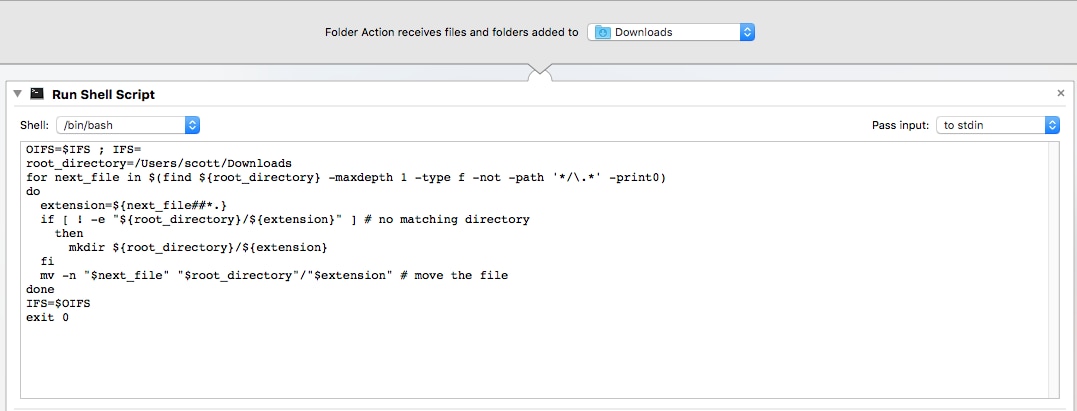
Step 2. Search for "Run Shell Script" in the actions list. Drag it to the workflow area. Paste the Terminal command from Method 2. Save your workflow with a clear name. It now appears in your Services menu.
Part 3: Lost Files on macOS? Use Recoverit Data Recovery Tool Today!
Sometimes files go missing completely. They're not just hidden. You might have deleted them accidentally. Or your Mac crashed unexpectedly. Maybe your hard drive got corrupted. In these cases, you need data recovery software.
Wondershare Recoverit is a powerful recovery tool. It works specifically for Mac computers. The software can recover lost files easily. It doesn't matter how you lost them. Recoverit scans your entire drive thoroughly. It finds files that seem gone forever.
The tool is surprisingly easy to use. You don't need technical expertise. Just launch the app and start scanning. Recoverit does all the hard work. It supports all file types. Photos, videos, documents, and more. The recovery rate is impressive. Many users recover 100% of their lost data.
Why Use Recoverit:
- High Recovery Rate: Get back most of your lost files. The success rate exceeds industry standards.
- Multiple Scenarios: Recover from accidental deletion, formatting, or crashes. It handles all loss situations.
- All File Types: Support for over 1000 file formats. Everything from documents to videos recovers.
- Preview Before Recovery: See files before restoring them. This saves time and storage space.
- Safe and Secure: The tool doesn't overwrite your data. Your existing files stay completely safe.
- User-Friendly Interface: Simple design for everyone to use. No learning curve required at all.
- Professional Support: Get help when you need it. The customer service team responds quickly.
Step 1. Download and install Recoverit on your Mac. Launch the application. Select the drive where the files were lost.

Step 2. Click the Scan button to start recovery. Wait for the scan to complete. This might take time, depending on the drive size.

Step 3. Preview recovered files in the results list. Select the files you want back. Click Recover and choose a safe location. Don't save to the same drive where files were lost.

Part 4: Pro Tips for Managing Hidden Files Safely
Here are essential tips for safe management:
- Make Backups First: Before changing hidden files, back up your Mac. Use Time Machine or another backup solution. This gives you a safety net.
- Don't Delete Unknown Files: Only remove files you understand completely. Research any file before deleting it. Check online forums for information.
- Hide Files Again: After finishing your work, hide files again. Use the same method to reverse visibility. This prevents accidental changes later.
- Use Read-Only Mode: When possible, just view files without editing. This reduces the risk of corruption. Many text editors offer read-only options.
- Keep Notes: Write down what you change and why. This helps if problems appear later. You'll remember what you modified.
- Test Changes Carefully: After modifying hidden files, test everything. Make sure apps still work correctly. Check system stability before moving on.
Conclusion
Learning how to view hidden files on Mac opens new possibilities. You gain better control over your system. Troubleshooting becomes much easier. You can customize macOS to your preferences. The six methods covered here all work well.
Choose the method that suits you best. Whatever you pick, remember to stay safe. Always hide files again when done. Make backups before making changes. With these precautions, you'll manage hidden files like a pro.
Try Recoverit to Recover Lost Files from SD Card
![]() Security Verified. Over 7,302,189 people have downloaded it.
Security Verified. Over 7,302,189 people have downloaded it.
FAQs
-
Q1: Are hidden files dangerous to view?
No, viewing hidden files is completely safe. Just looking at them causes no harm. The risk comes from editing or deleting them. macOS hides files to prevent accidental changes. But viewing alone won't break anything. Just be careful not to modify files you don't understand. -
Q2: Will showing hidden files slow down my Mac?
No, displaying hidden files doesn't affect performance. Your Mac runs the same speed either way. The files were always there on your drive. You're just making them visible now. Finder might take slightly longer to load folders initially. This is because it's displaying more items. But the difference is barely noticeable. -
Q3: Can I permanently delete hidden files I don't need?
Yes, but be extremely careful about this. Some hidden files are completely safe to delete. Cache files and temporary data fall into this category. But system files are critical for macOS operation. Deleting the wrong files can break your system completely. Always research each file before removal.


