
 TL;DR:
Mac Error 69877 "Couldn't open device" occurs when macOS cannot access or unmount a busy storage drive, which requires closing active background processes, forcing an unmount, or utilizing macOS Recovery for active startup disks.
● An active internal startup disk cannot be erased while macOS is running; you must boot the computer into macOS Recovery to bypass the system restriction and erase the volume.
● For external drives, enable "View > Show All Devices" in Disk Utility to target and erase the underlying physical disk rather than just the volume, which overwrites hidden partition map issues causing the error.
● If standard unmounting fails, run the Terminal command `diskutil unmountDisk force /dev/diskN` to forcefully release the drive, but secure critical files beforehand as this operation enables destructive formatting.
Ask AI for a summary
 ChatGPT
 Perplexity
 Gemini
 Claude
 Grok
Grok
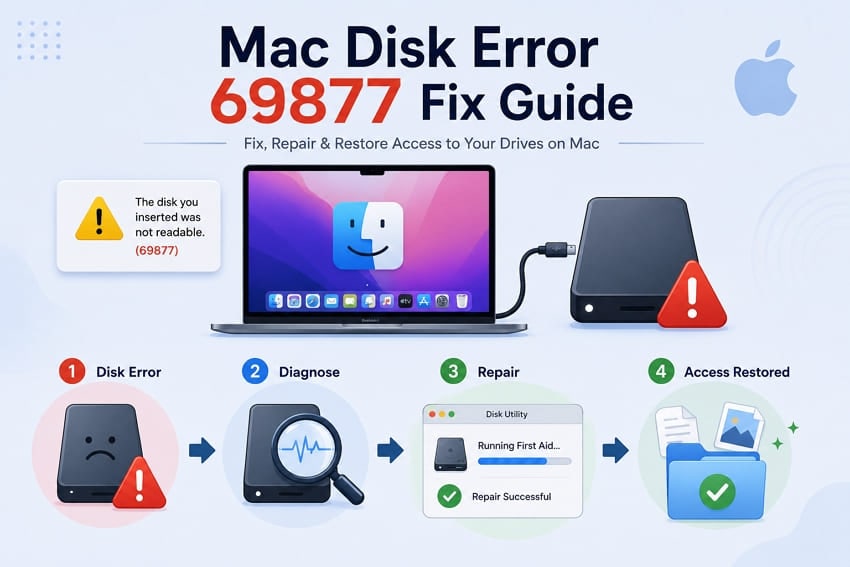
Read the error closely because the erase process may never actually begin. macOS can fail while unmounting the disk, returning an error when it cannot release or access the target device. This changes how you should approach Mac error 69877 “Couldn't open device” safely. The problem often occurs when the disk remains busy or inaccessible.
This practical guide explains the possible causes, including restrictions around erasing an active startup disk. The fixes start with safer troubleshooting steps and recovering important files with Recoverit before moving to destructive methods.
Try Recoverit to Perform Data Recovery
 Security Verified. 3,591,664 people have downloaded it.
In this article
Part 1. What Mac Error 69877 "Couldn't Open Device" Means
The “Couldn't open device” 69877 error often suggests problems beyond physical damage. Understanding its actual cause helps protect important files before attempting risky repairs.
Error -69877 in Disk Utility vs Terminal
Disk Utility may display “error -69877: Couldn't open device” when macOS cannot access the target storage device. The message alone does not identify the exact cause of the failed operation. Terminal may provide more detailed output when “diskutil” performs the same disk-management task.
Check the messages immediately before “error -69877” to determine which stage of the operation failed. For diagnosis, stick to non-destructive commands and avoid erase, partition, or forced-unmount commands until important data is secured.
Why It Appears While Erasing a Disk
Error -69877 can appear when macOS cannot access or properly release the target disk. Unmounting problems are one possible cause, especially when another process still uses the volume. This Apple Developer Forums thread shows the error occurring when diskutil could not unmount a disk because process 0 (kernel) was using it.
Internal Disk vs External Drive
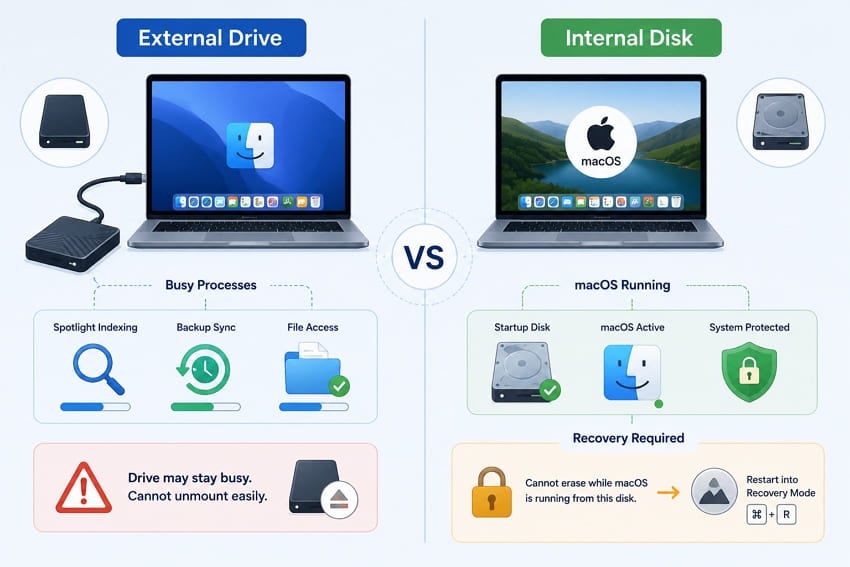
External drives may remain busy when applications or background processes access their files. Spotlight indexing, backup software, or open files can sometimes prevent clean disk unmounting.
However, internal startup disks remain active because macOS currently runs directly from their volumes. Therefore, startup disks require macOS Recovery before users can safely erase those volumes.
Volume-Level vs Physical-Disk Problems
Disk Utility contains both volumes and physical disks within the same device hierarchy. By default, its sidebar may hide physical devices until all devices appear. Erasing only volumes leaves underlying partition maps unchanged, allowing problems to remain.
Does It Mean the Drive Is Damaged?
Error -69877 alone does not confirm that your storage drive has physical damage. A “Couldn't open device” disk failure can occur when macOS cannot access storage properly. Hardware problems become more likely when additional symptoms appear during normal drive use. Repeated disconnections, clicking sounds, or disappearing during scans can indicate physical drive problems.
Part 2. What to Check Before Fixing Error 69877
Simple checks before fixing “Couldn't open device” 69877 can prevent serious data loss. Below are the 5 essential checks you should complete before attempting any fixes:
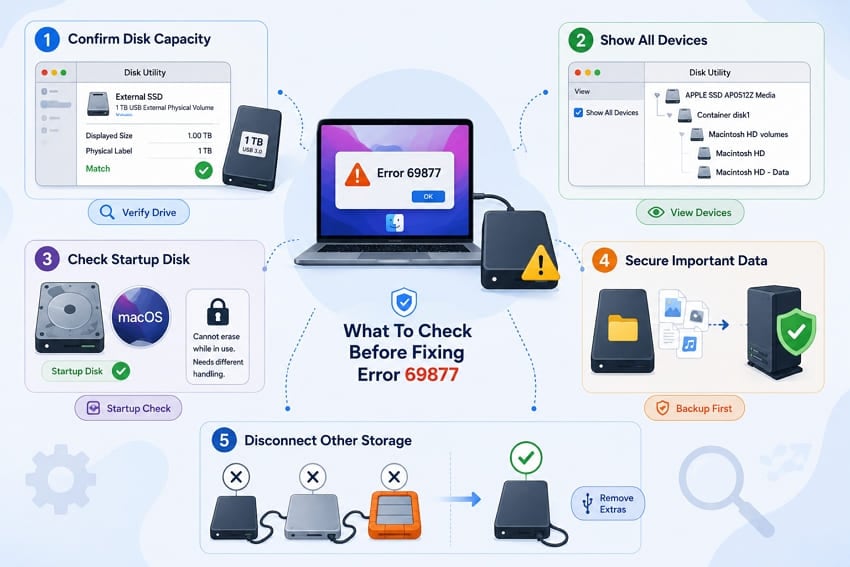
- Confirm the Disk and Its Capacity: Check Disk Utility and match the reported capacity with your physical drive. Disk identifiers can change after reconnection, so verify the correct device before continuing.
- Turn On Show All Devices: Open “Disk Utility > View > Show All Devices.” This reveals the full device hierarchy, including physical devices, containers, and volumes, making it easier to select the correct storage level.
- Check Whether It Is the Startup Disk: Determine whether the selected disk contains the macOS system currently in use. An active startup disk cannot be erased directly and requires macOS Recovery.
- Secure Important Files First: Back up or recover anything important before using destructive repair methods. Erasing or repartitioning the disk can permanently remove its existing data.
- Disconnect Unrelated Storage: Unplug other external drives that are not needed for troubleshooting. This reduces the chance of selecting or accidentally erasing the wrong storage device.
Part 3. Recover Important Files Before Erasing or Repartitioning
A “Couldn't open device” disk failure can put important files at risk. Recover or back up valuable data before erasing or repartitioning the affected drive.
When Error 69877 Creates Data-Loss Risk
Error 69877 itself does not usually erase or remove your stored files. Data loss risks increase when troubleshooting requires destructive actions on the drive. Erasing or repartitioning the physical disk can permanently remove existing stored data.
Apple warns that erasing a storage device deletes everything stored on that device. For the best recovery chances, recover important files before destructive fixes alter or overwrite the existing data.
Recover Accessible Files with Recoverit
Error 69877 can block disk access while important files still remain recoverable inside. This is where Recoverit can scan the affected storage before destructive disk repairs begin. It does not require the files to remain accessible through Finder.
Recoverit supports over 1,000 file types across common Mac storage devices and file systems. You can preview detected files before recovery to identify the data you need. Save recovered files to a different drive before erasing or repartitioning the affected disk.
Key Features
- Deep Storage Scanning: Scans the selected storage device to locate deleted, lost, or inaccessible files that may still be recoverable.
- Automatic Device Detection: Detects connected storage devices automatically, making it easier to select the affected drive and begin scanning.
- Lost Partition Recovery: Scans lost, deleted, or inaccessible partitions for files that may remain recoverable from the underlying storage.
- APFS and HFS+ Support: Supports APFS and HFS+ file systems commonly used on Mac-formatted internal and external storage devices.
- External Storage Recovery: Scans supported external drives connected to a working Mac, including drives removed from another computer and placed in an enclosure.
How to Scan and Recover Your Important Files with Recoverit
Now, follow the steps below to scan the affected drive and recover inaccessible files safely with Recoverit:
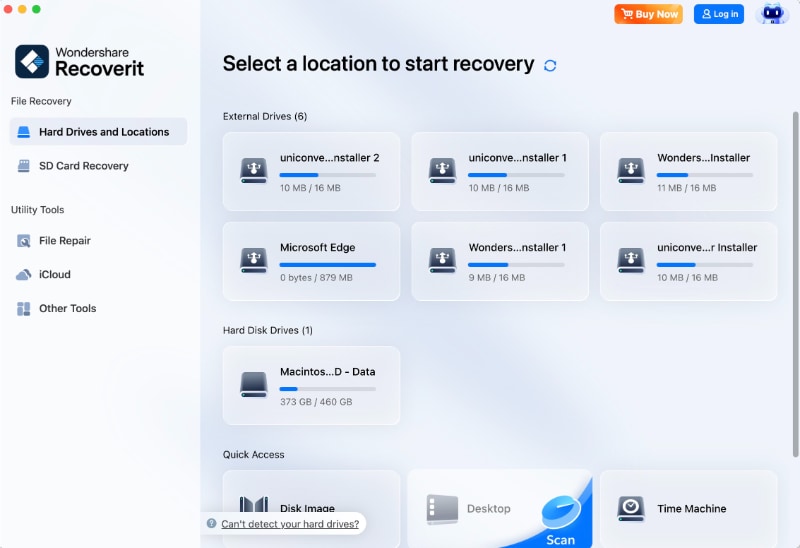
Step 1. Select the Affected Disk
Once you open Recoverit, access “Hard Drives and Location” > Select a particular disk.
Step 2. Let Recoverit Scan the Mac Drive
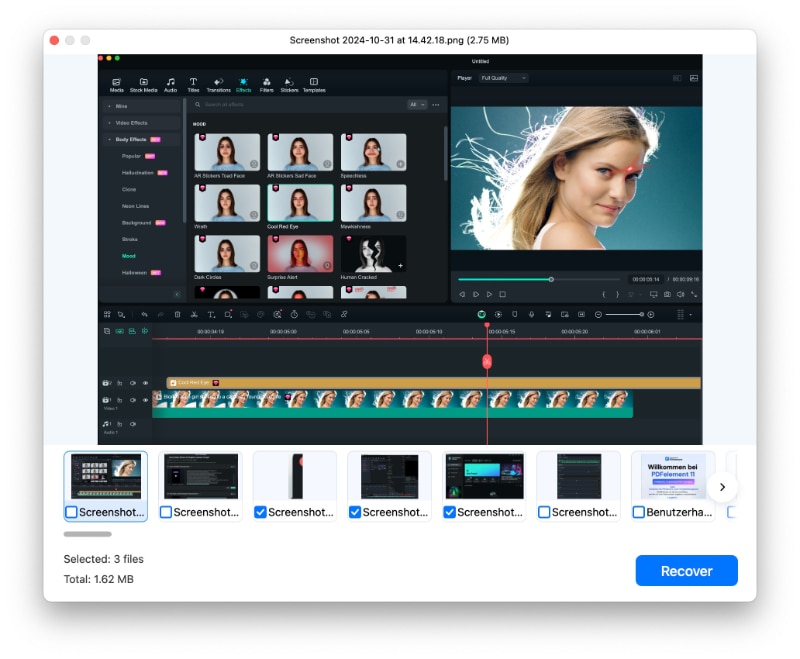
Recoverit automatically starts scanning the selected drive using its AI-powered recovery algorithms to locate recoverable files. You can browse detected folders and files under the “File Path” section.

Step 3. Preview and Save the Restored Files
Once the scan completes, preview the files you need > Press “Recover” > Save them to a different drive to avoid overwriting recoverable data.
Stop If the Drive Disconnects or Reports Hardware Errors
Repeated disconnections, clicking sounds, or unusual spinning can indicate possible drive hardware problems. With Mac error 69877 “Couldn't open device,” stop scanning if these symptoms appear. Continuing recovery attempts on physically failing storage may reduce successful data recovery chances.
Use Professional Recovery for Physical Damage
Liquid exposure, impact damage, or power failures may require professional data recovery services. Specialists can examine damaged storage using equipment designed for serious physical drive problems. Avoid repeated software repairs when the storage device shows clear signs of damage.
Part 4. Try Non-Destructive Fixes First
With important files secured, start with safe fixes that make no disk changes. These methods often resolve couldn't open device disk failure errors without risking your data.
Fix 1. Reconnect the Drive and Change Cable or Port
Unstable connections can make macOS lose access to your drive during operations. A faulty cable or port may trigger the error without drive damage. Here is how to restore its connection:
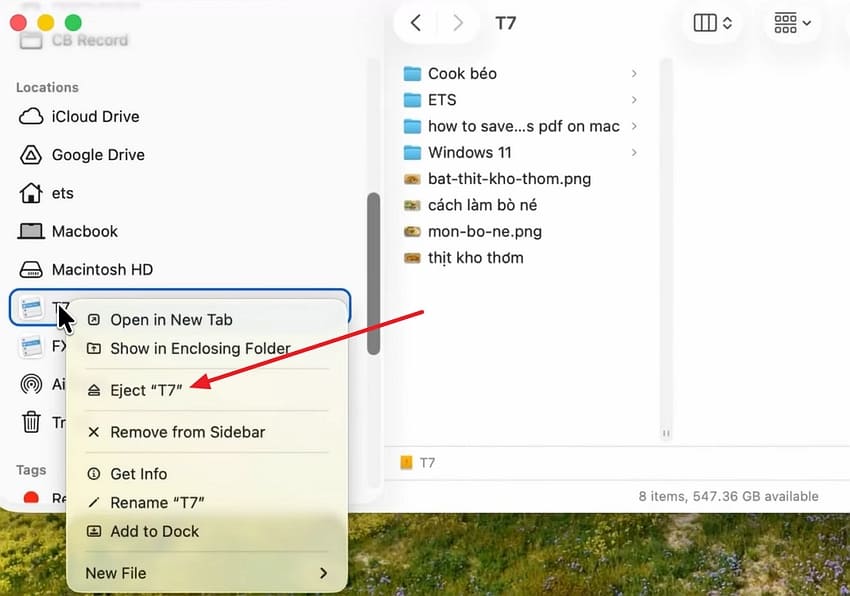
Instructions. If macOS still shows the drive, open Finder > Find your drive under the “Locations” tab > Right-click > Press “Eject.” Reconnect using a different cable and try a port in the opposite direction.
Fix 2. Restart the Mac and Reopen Disk Utility
A restart clears temporary processes that may keep your storage device busy. This can resolve the “Couldn't open device” 69877 error after reconnection fails. To restart everything, follow these simple steps:
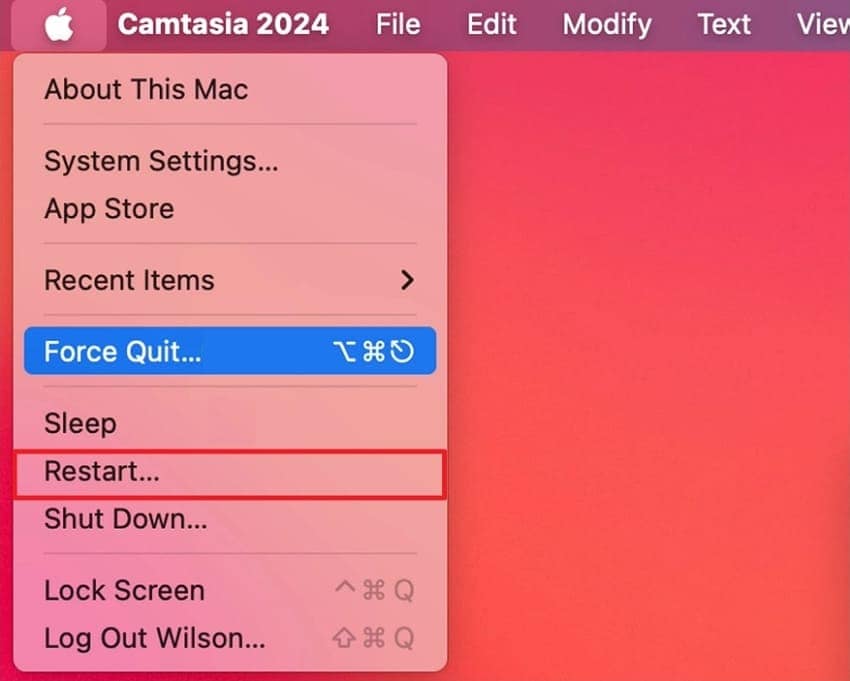
Step 1. Disconnect the external drive > Click “Apple Menu > Restart” > Wait for your Mac to restart completely.
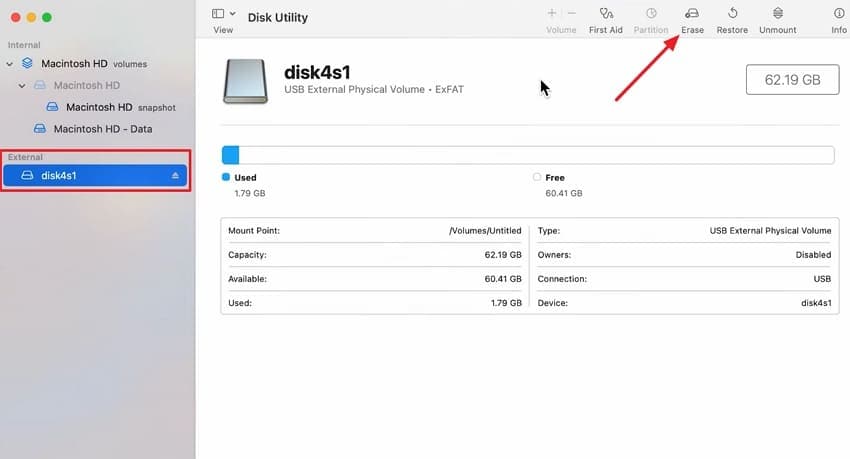
Step 2. Reconnect the drive > Open Disk Utility > Click “View > Show All Devices” > Select the physical device. If your data is already secured, try erasing it again.
Fix 3. Close Apps Using the Drive
Open files can prevent macOS from unmounting an external storage device. Backup tools, media players, and photo apps commonly keep these files active. Here is how to release the drive:
Step 1. First, quit any media player, backup software, or anything browsing the drive.
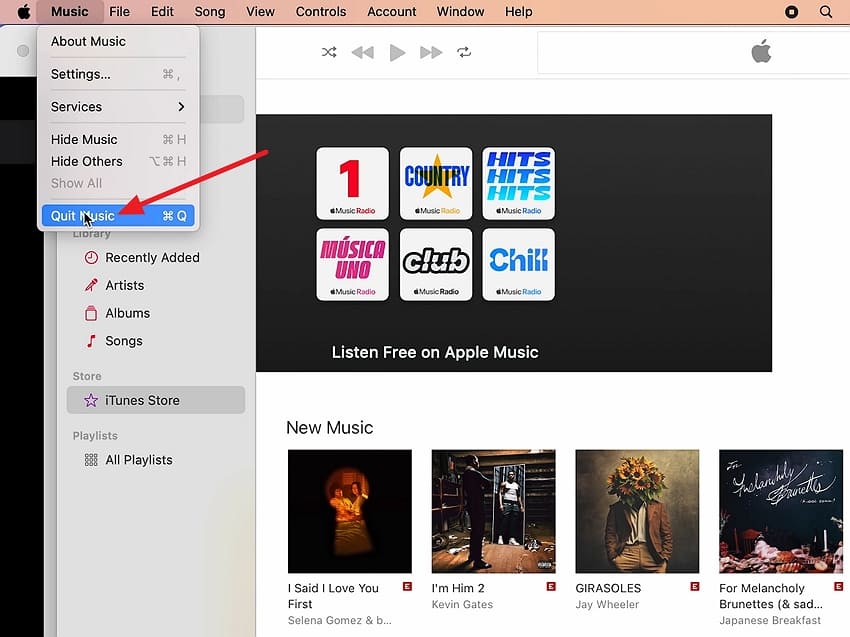
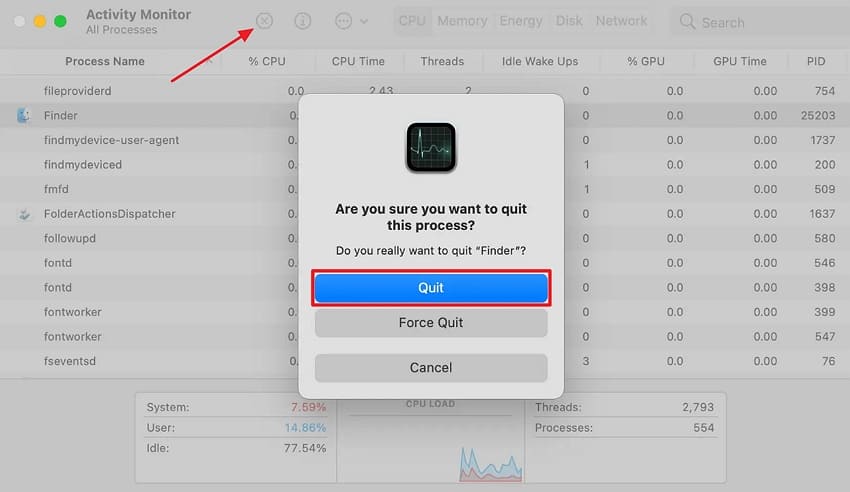
Step 2. Then, open “Activity Monitor” > Search for the suspected app > Press “Stop (X)” > Click “Quit.”
Fix 4. Unmount the Volume Before Erasing
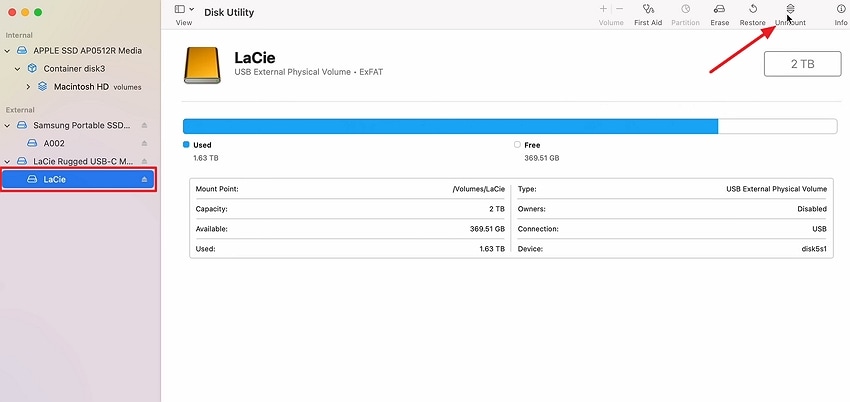
Manually unmounting the volume can release it from active use before another erase attempt. This may resolve Mac error 69877 “Couldn't open device” when macOS cannot unmount the volume automatically. Try unmounting it separately before proceeding with the erase operation.
Step 1. Open Disk Utility > Select the volume of the disk > Click “Unmount” in the toolbar.
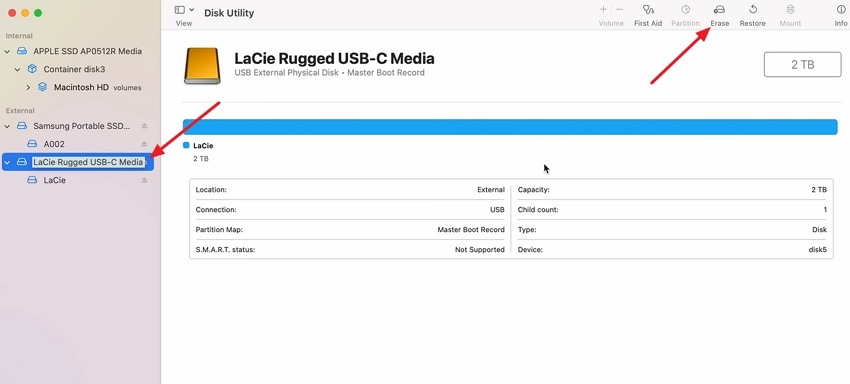
Step 2. Next, choose the physical disk above it > Press “Erase.”
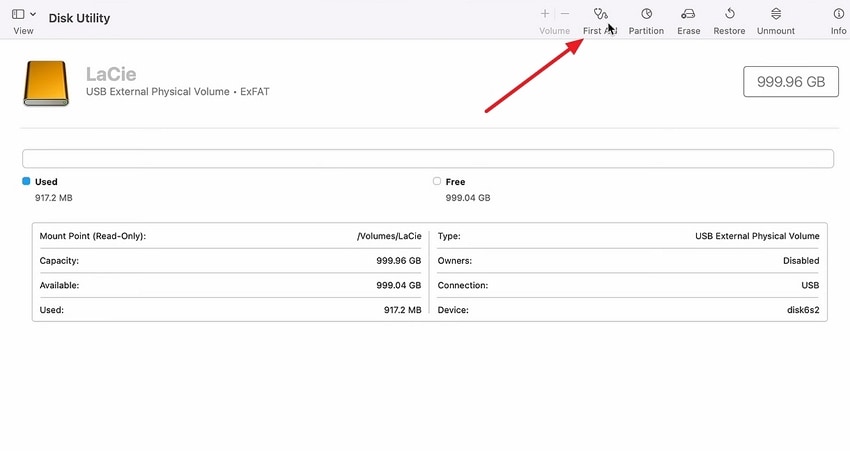
Fix 5. Run Disk Utility First Aid
First Aid checks and repairs file-system structures that may contribute to disk or unmounting problems. Run it in order on each volume, then each container, and finally the physical storage device. Apple recommends this sequence when repairing a storage device with Disk Utility. Here is how to run it:
Step 1. Open Disk Utility > Select the volume > Press “First Aid.”
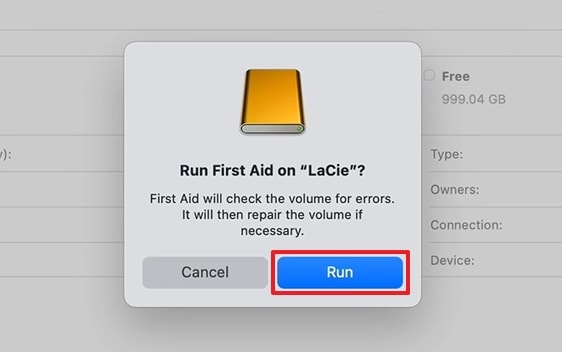
Step 2. Click “Run” > Repeat “First Aid” on the “APFS Container,” then the physical disk.
Part 5. Erase or Repair the Disk Only After Data Is Safe
The remaining fixes modify the disk and may permanently remove stored data. Confirm your recovered files open before proceeding with these advanced methods.
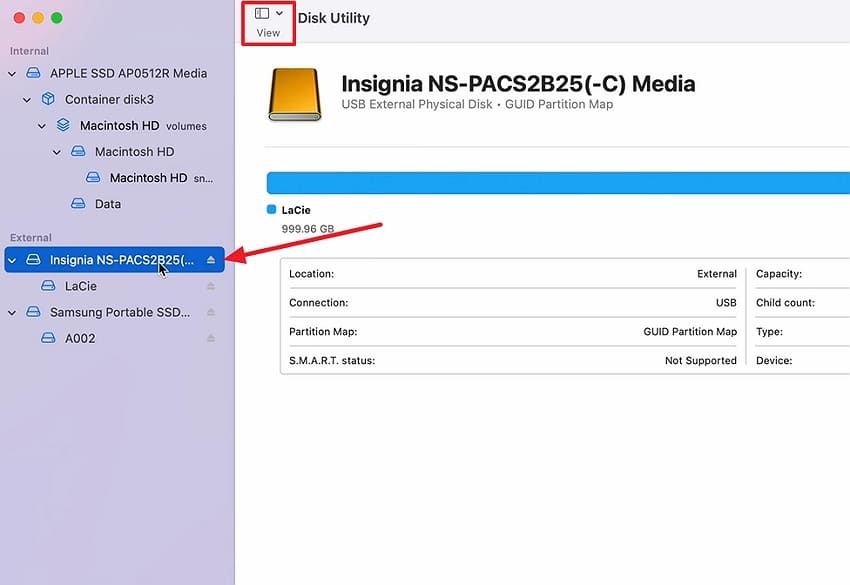
Fix 6. Select the Physical Disk Instead of the Volume
Selecting the wrong level in Disk Utility can leave partition-map problems unresolved and may contribute to Disk Utility won't erase disk 69877 errors. Choosing the physical disk allows macOS to erase the entire device and recreate its partition map. To select the correct disk, follow these steps:
Instructions. In Disk Utility, choose “View > Show All Devices.” Select the physical disk rather than the intended volume behind it.
Fix 7. Erase With the Correct Scheme and Format
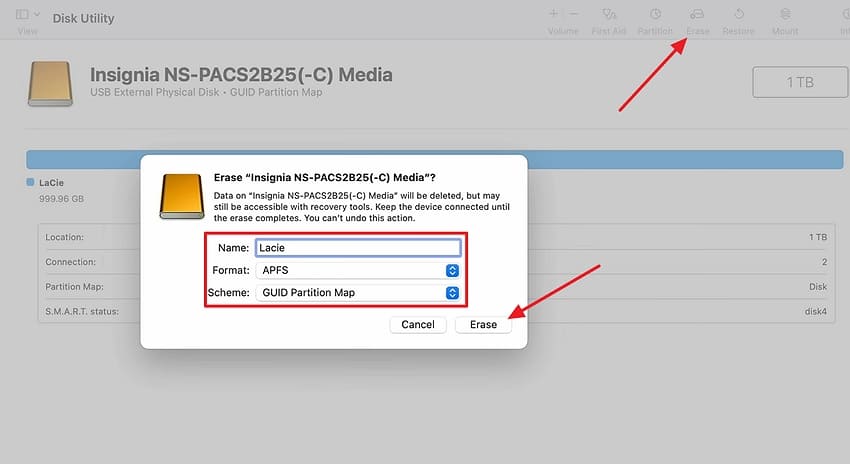
Choosing incompatible settings can make the erased drive unusable on other devices. Select the format and scheme based on how you will use it. Match both settings with your device requirements using the steps provided below:
Instructions. Select the physical disk and click “Erase.” Enter a name > Choose “APFS” for Mac-only use > Select “GUID Partition Map” as the scheme > Press “Erase.”
Fix 8. Unmount and Erase Using Terminal
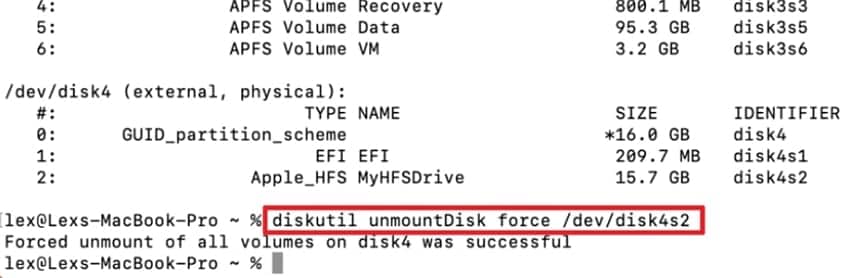
Terminal provides another way to manage external disks when Disk Utility cannot unmount them normally. Using diskutil to force-unmount the target disk before erasing it may resolve “Couldn't open device 69877.” Because these commands can erase data, confirm the correct disk identifier and secure important files first.
Step 1. Open Terminal > Run “diskutil list” > Confirm the affected disk identifier carefully > Run “diskutil unmountDisk force /dev/diskN,” replacing N with the correct disk number.
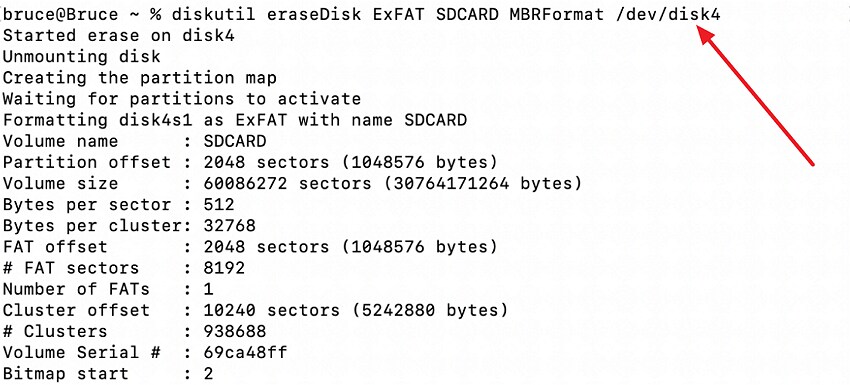
Step 2. After unmounting, run “diskutil eraseDisk ExFAT SDCARD MBRFormat /dev/diskN” to erase and reformat the disk. Replace “N” with the verified physical disk number and “SDCARD” with your preferred volume name.
Fix 9. Use macOS Recovery for an Internal Disk
A running Mac cannot erase the startup volume currently holding its system. Recovery provides separate access needed to erase this internal startup volume. Apple identifies macOS Recovery as the built-in environment for repairing or erasing a startup disk. To complete this process, follow these steps:
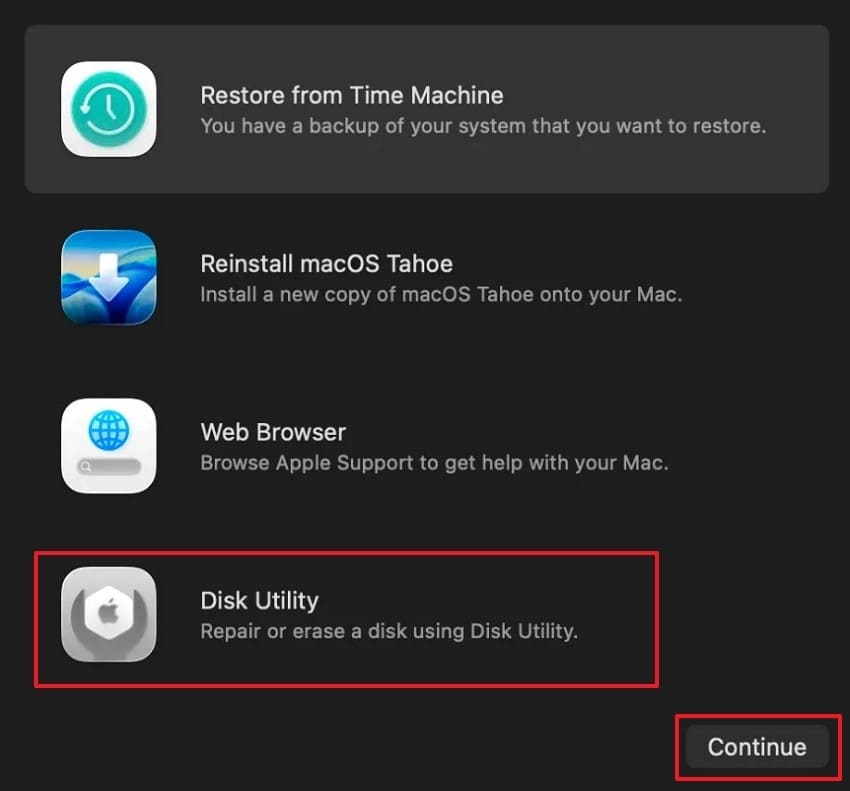
Step 1. On an Apple silicon Mac, shut it down, then press and hold the “Power” button until “Loading Startup Options” appears > Select “Options > Continue” > Open “Disk Utility.” On an Intel Mac, restart while holding “Command + R” > Select “Disk Utility > Continue.”
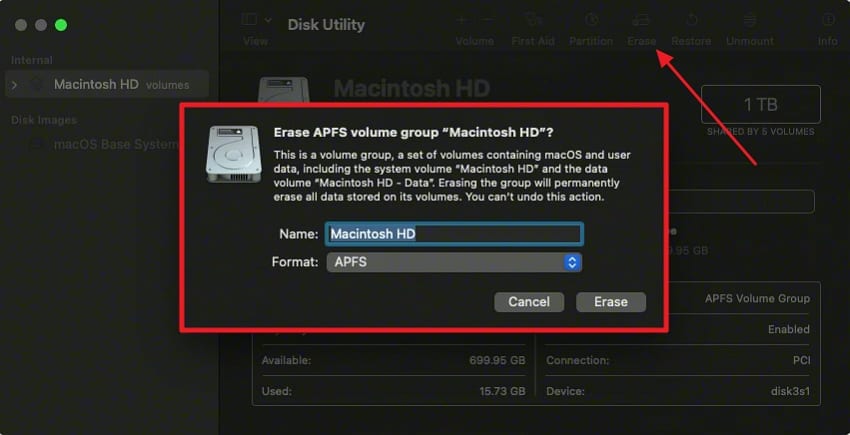
Step 2. Select “Macintosh HD” > Click “Erase” > Choose “APFS” > If “Erase Volume Group” appears, select it; otherwise, click “Erase.” Afterward, quit Disk Utility > Select “Reinstall macOS” from the Recovery window > Follow the onscreen instructions.
Fix 10. Replace or Service the Drive
Repeated errors after every repair often indicate serious hardware problems within storage. Testing the drive on another Mac can help confirm a hardware failure. Manufacturer diagnostic tools may reveal errors showing the drive requires professional service. Check its warranty, as many external drives include 2 to 5 years of coverage. Replace unreliable storage to prevent repeated errors and further data loss.
Part 6. How to Prevent Disk Utility Error 69877
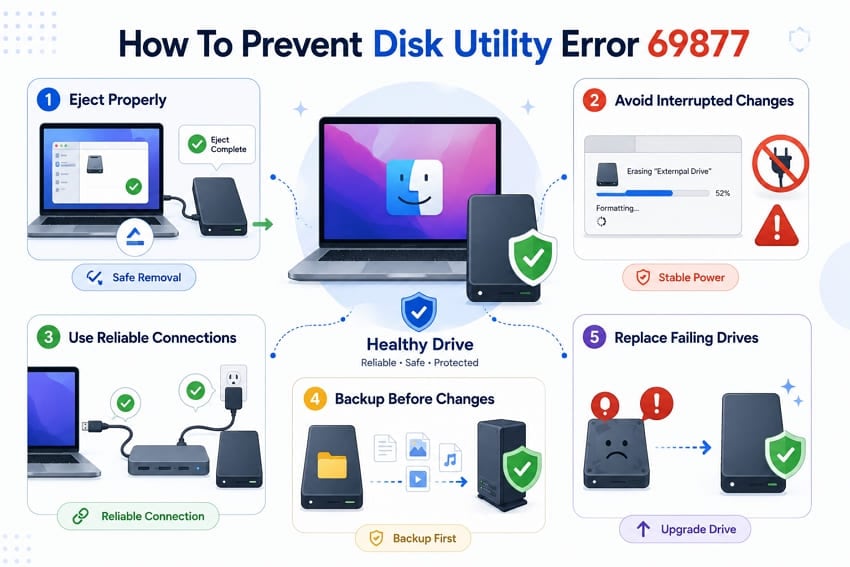
Simple storage habits can help prevent another “Couldn't open device” disk failure later. Now, let's explore 5 practical ways to keep your drives working.
- Eject Drives Properly: Eject external drives through Finder or Disk Utility and wait for them to disappear before physically disconnecting them.
- Avoid Interrupting Disk Operations: Keep your Mac and drive connected to stable power while formatting or repartitioning to avoid incomplete disk changes.
- Use Reliable Cables and Hubs: Damaged cables, adapters, or underpowered hubs can cause unexpected disconnections. Use reliable connections, especially with power-hungry external drives.
- Back Up Before Partition Changes: Create a current backup before erasing, repartitioning, or changing a drive’s file system because these operations can remove stored data.
- Investigate Repeated Drive Errors: If errors continue after software troubleshooting, check the drive’s health and connection. Replace the drive if testing indicates hardware failure.
Conclusion
To summarize, Mac error 69877 “Couldn't open device” often occurs when macOS cannot properly access or release the target disk. Check for unmounting issues and confirm the correct physical device before using destructive fixes. To erase the current startup disk, boot into macOS Recovery first. If important files remain on the affected drive, consider recovering them with Recoverit before erasing or repartitioning it.
FAQ
-
Can error 69877 occur on SD cards and USB flash drives?
Yes, SD cards can show this error because readers or files block access. Damaged partition maps can also cause it, and Terminal may help resolve it. -
Can encryption prevent Disk Utility from opening a drive?
Yes, encryption can prevent macOS from unmounting or erasing a locked storage volume. Unlock FileVault or BitLocker storage first before attempting another erase operation on Mac. -
Why does the drive appear in Disk Utility but not in Finder?
Finder shows mounted volumes, while Disk Utility lists every detected device. A drive visible in one and absent from the other has been found but not mounted, which is consistent with this error. -
Can error 69877 happen after an interrupted format?
Yes, interrupted formatting can leave incomplete partition information that macOS cannot read properly. Erasing the physical device may clear damaged partition structures after securing important files.



