
 TL;DR:
The method to safely factory reset your Mac depends entirely on its hardware and operating system, dictating whether you can use an automated erase assistant or must perform a manual drive wipe and system reinstallation.
● For Macs running macOS Monterey or later equipped with Apple silicon or the Apple T2 Security Chip, utilize the built-in Erase All Content and Settings tool located within System Settings to automatically wipe all data, apps, and settings.
● For Intel-based Macs lacking the T2 chip or running macOS versions prior to Monterey, you must manually sign out of iCloud and iMessage to disable Activation Lock, erase the Macintosh HD volume via Disk Utility, and reinstall the operating system through macOS Recovery.
● An active internet connection is strictly required during the reset process to download and install a fresh copy of macOS from Apple's servers once the hard drive has been wiped.
Ask AI for a summary
 ChatGPT
 Perplexity
 Gemini
 Claude
 Grok
Grok
Whether you're preparing to sell your MacBook, troubleshooting a persistent software issue, or simply want a fresh start, a factory reset for your Mac is the ultimate solution. This process erases all your personal data and returns the device to its original out-of-the-box state, ensuring your information remains private and resolving performance problems.
Wiping your entire system might sound intimidating, but it’s a straightforward process when you follow the correct steps. This guide is designed to walk you through exactly how to factory reset a Mac—including any iMac, MacBook Pro, or MacBook Air—safely and efficiently, so you can proceed with confidence.
🖥️ Mac Hardware & OS Architecture Compatibility Matrix
Before executing a full system wipe, use this structural index to match your specific Mac model and macOS version to its recommended factory reset pipeline:
Mac Processor Architecture |
macOS Version Installed |
Factory Reset Pipeline |
Core Native Mechanism |
| Apple Silicon M1, M2, M3, M4 Series | macOS Monterey, Ventura, Sonoma, Sequoia | Erase All Content & Settings | Cryptographic key demolition; instant user data block instantly unreadable. |
| Intel Core with T2 Security Chip | macOS Monterey, Ventura, Sonoma, Sequoia | Erase All Content & Settings | Hardware-accelerated APFS volume layout destruction. |
| Legacy Intel Core No T2 Security | Any macOS Version | Manual Recovery Mode Wiping | Disk Utility partition format + raw network OS reinstallation. |
| Any Hardware Platform | macOS Big Sur, Catalina, Mojave or older | Manual Recovery Mode Wiping | Classical recovery partition drive sector unlinking. |
Method 1. How To Factory Reset MacBook/iMac Using Erase All Content and Settings
Erase All Content and Settings on Mac, also referred to as the Erase Assistant, is a valuable factory reset option. This useful feature allows Mac users to erase their devices and all their settings, data, and apps and restore them to factory settings safely and efficiently.
1. Tool: Erase All Content and Settings
The “Erase All Content and Settings” tool is only available on macOS versions newer than macOS Ventura and macOS Monterey with Apple silicon or the Apple T2 Security Chip. If you want to factory reset macOS Ventura and Monterey, Erase Assistant is a good tool to use. We will show you how to erase data on Mac using the Erase Assistant with a written tutorial. First, let’s check the macOS version.
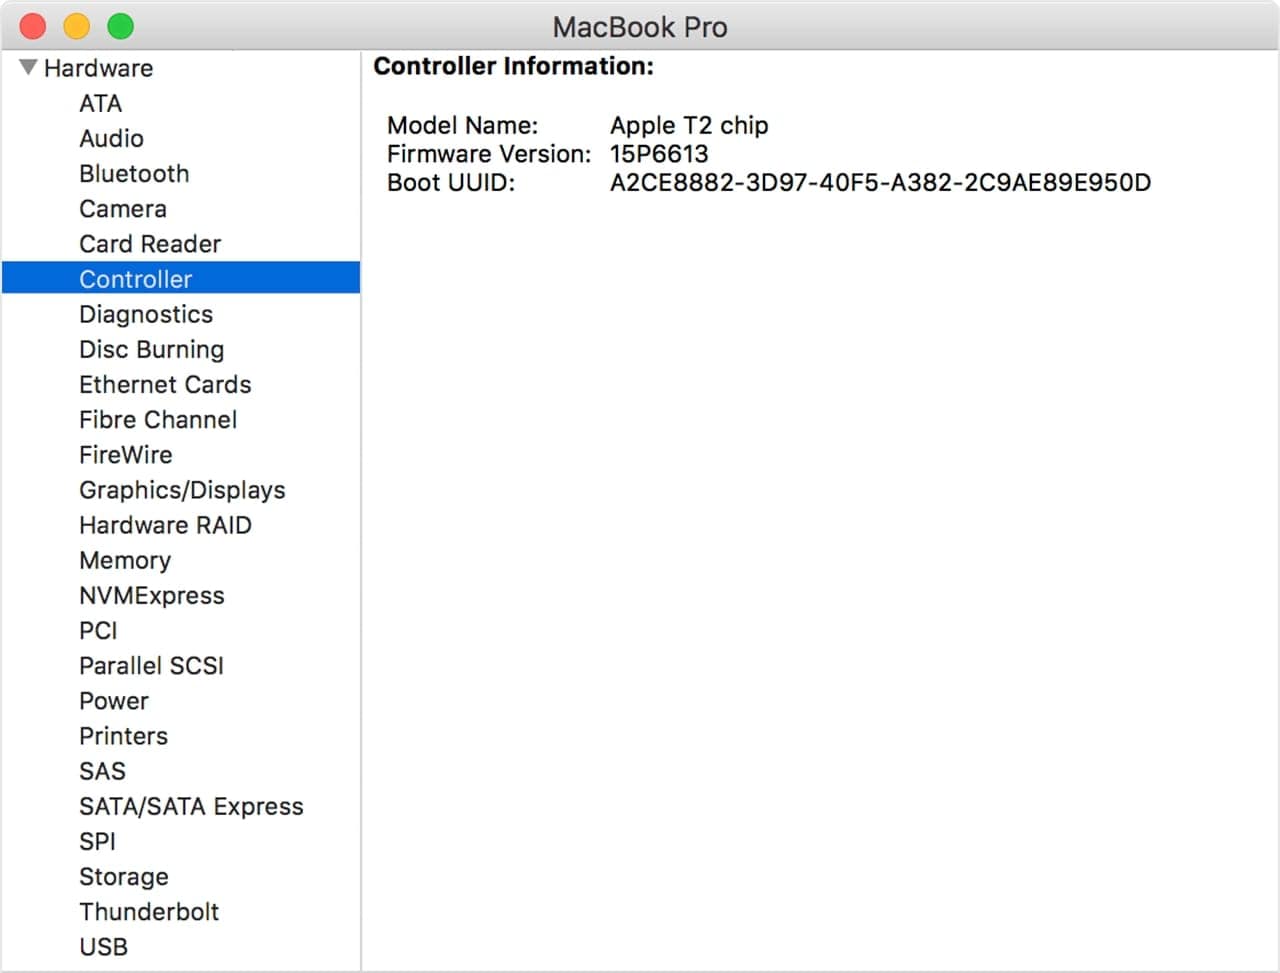
For macOS that has the T2 security chip:
Apple's T2 Security Chip is the company's second-generation custom silicon for Mac. The T2 chip provides your Mac with capabilities such as encrypted storage and secure boot, improved image signal processing, and Touch ID data security.
You can utilize the System Information to determine whether your Mac is equipped with this chip:
Step 1. Hold the Option key and click the Apple menu > System Information.
Step 2. Choose Controller or iBridge from the sidebar, depending on the macOS version. Your Mac has the Apple T2 Security Chip if you see the Apple T2 chip.
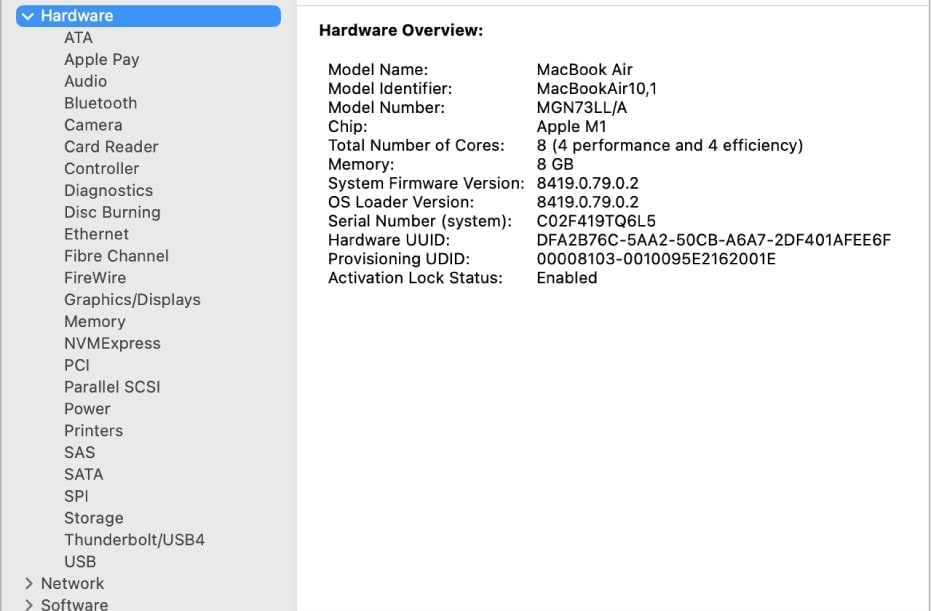
For macOS that has Apple Silicon:
Apple silicon is a line of system-on-a-chip (SoC) and system-in-a-package (SiP) processors created by Apple Inc. that primarily uses ARM architecture. It serves as the foundation for the majority of new Mac devices.
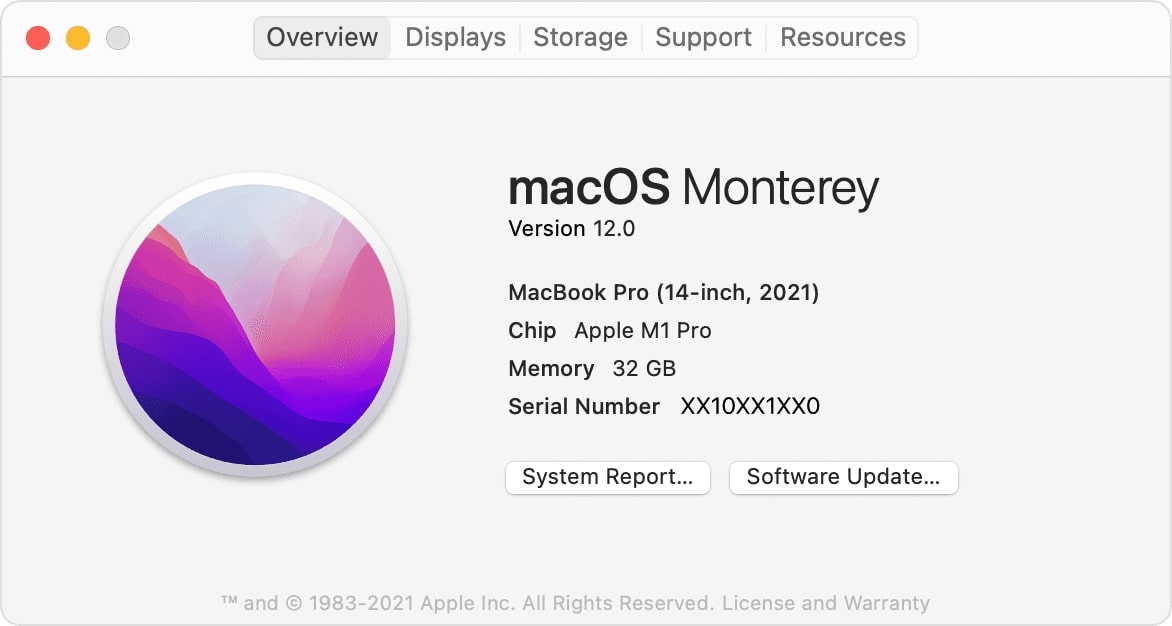
Use “About This Mac” to determine the version of the Mac operating system that is installed:
Step 1. From the Apple menu, choose About This Mac.
Step 2. The macOS name, such as macOS Monterey or macOS Big Sur, should be followed by the version number. If you require the build number, click the version number to see it.
2. How To Access the Erase All Content and Settings
Before performing the Mac factory resetting, follow the steps below to access the Erase All Content and Settings option on macOS Ventura and macOS Monterey:
For macOS Ventura
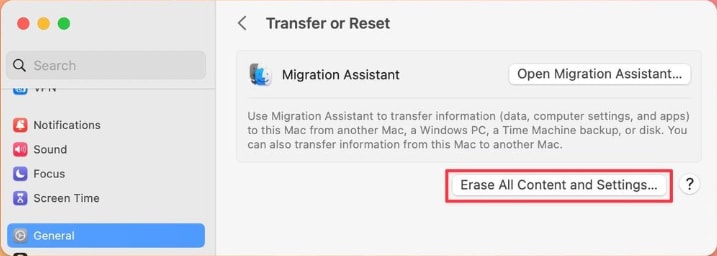
Step 1. Select System Settings from the Apple menu.
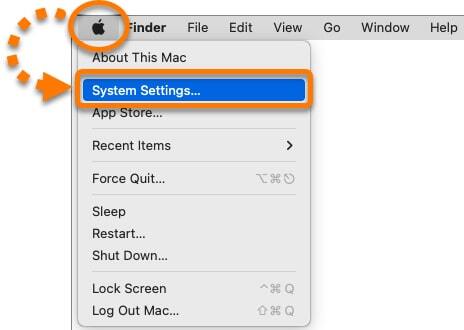
Step 2. In the sidebar, select General. On the right, press Transfer or Reset.
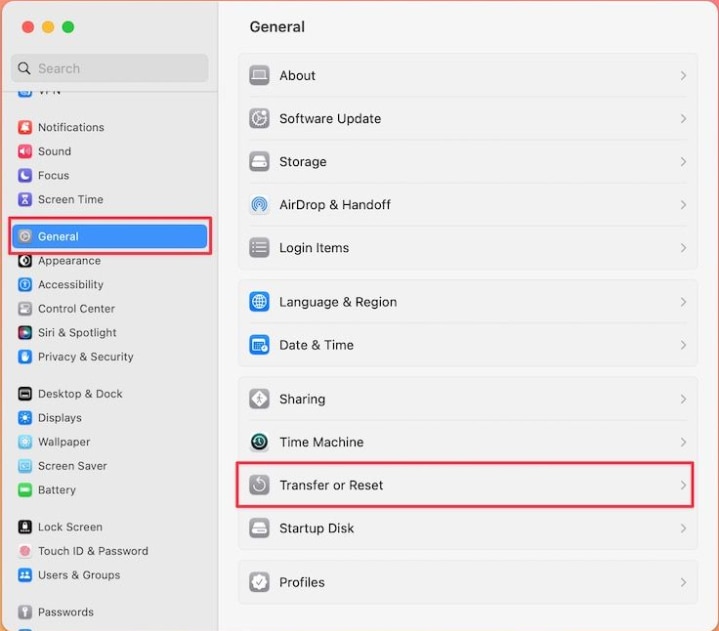
Step 3. Lastly, click Erase All Content and Settings.
For macOS Monterey
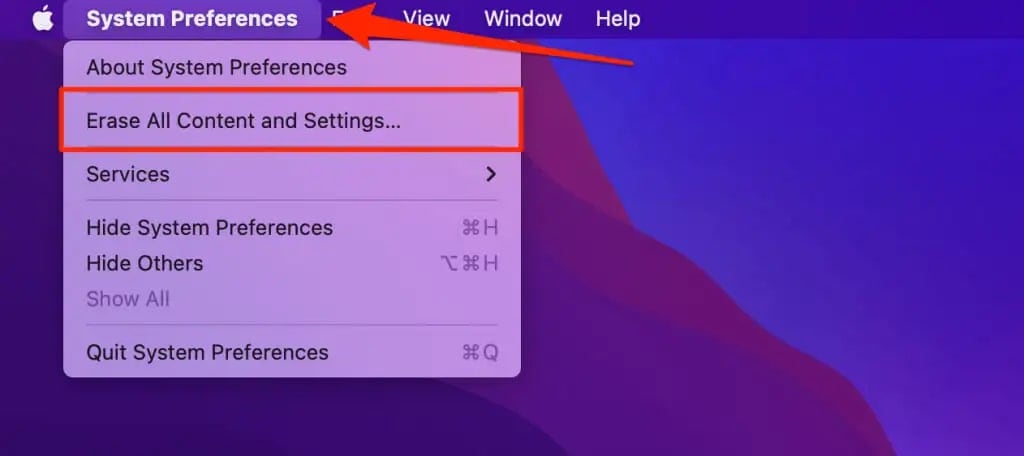
Step 1. Select System Preferences from the Apple menu.
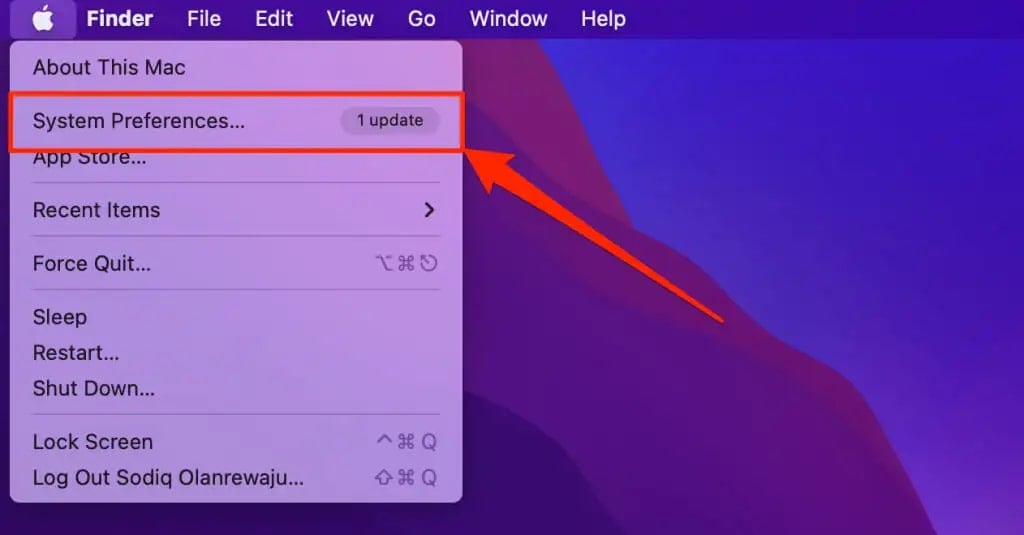
Step 2. From the System Preferences, click Erase All Content and Settings.
3. Steps To Reset Mac To Factory Settings After Choosing Erase All Content And Settings
After selecting Erase All Content and Settings, follow the following steps to reset Mac to factory settings:
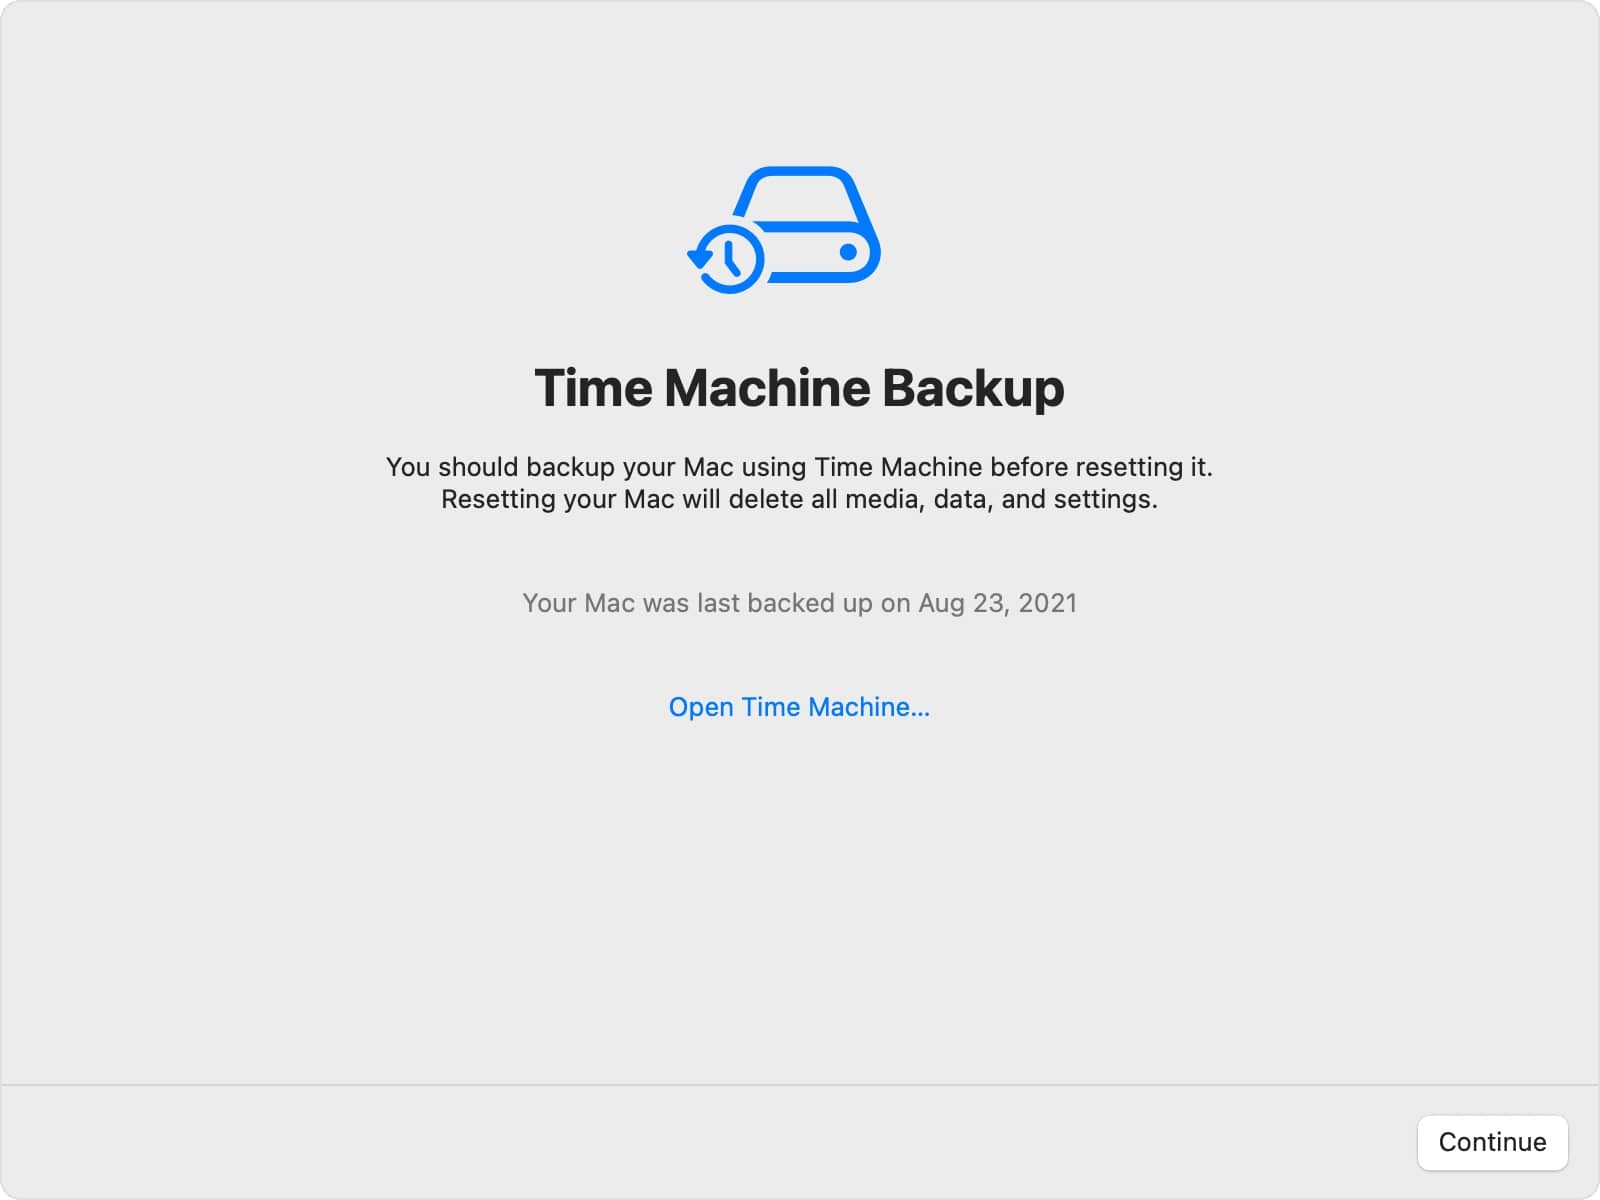
Step 1. Sign in with administrator credentials by an Erase assistant, then click OK. If you're prompted to back up your Mac before resetting it, you can launch Time Machine and back it up to an external storage device. Alternatively, click Continue to proceed without creating a new backup.
Step 2. Tap Continue to allow the removal of your data.
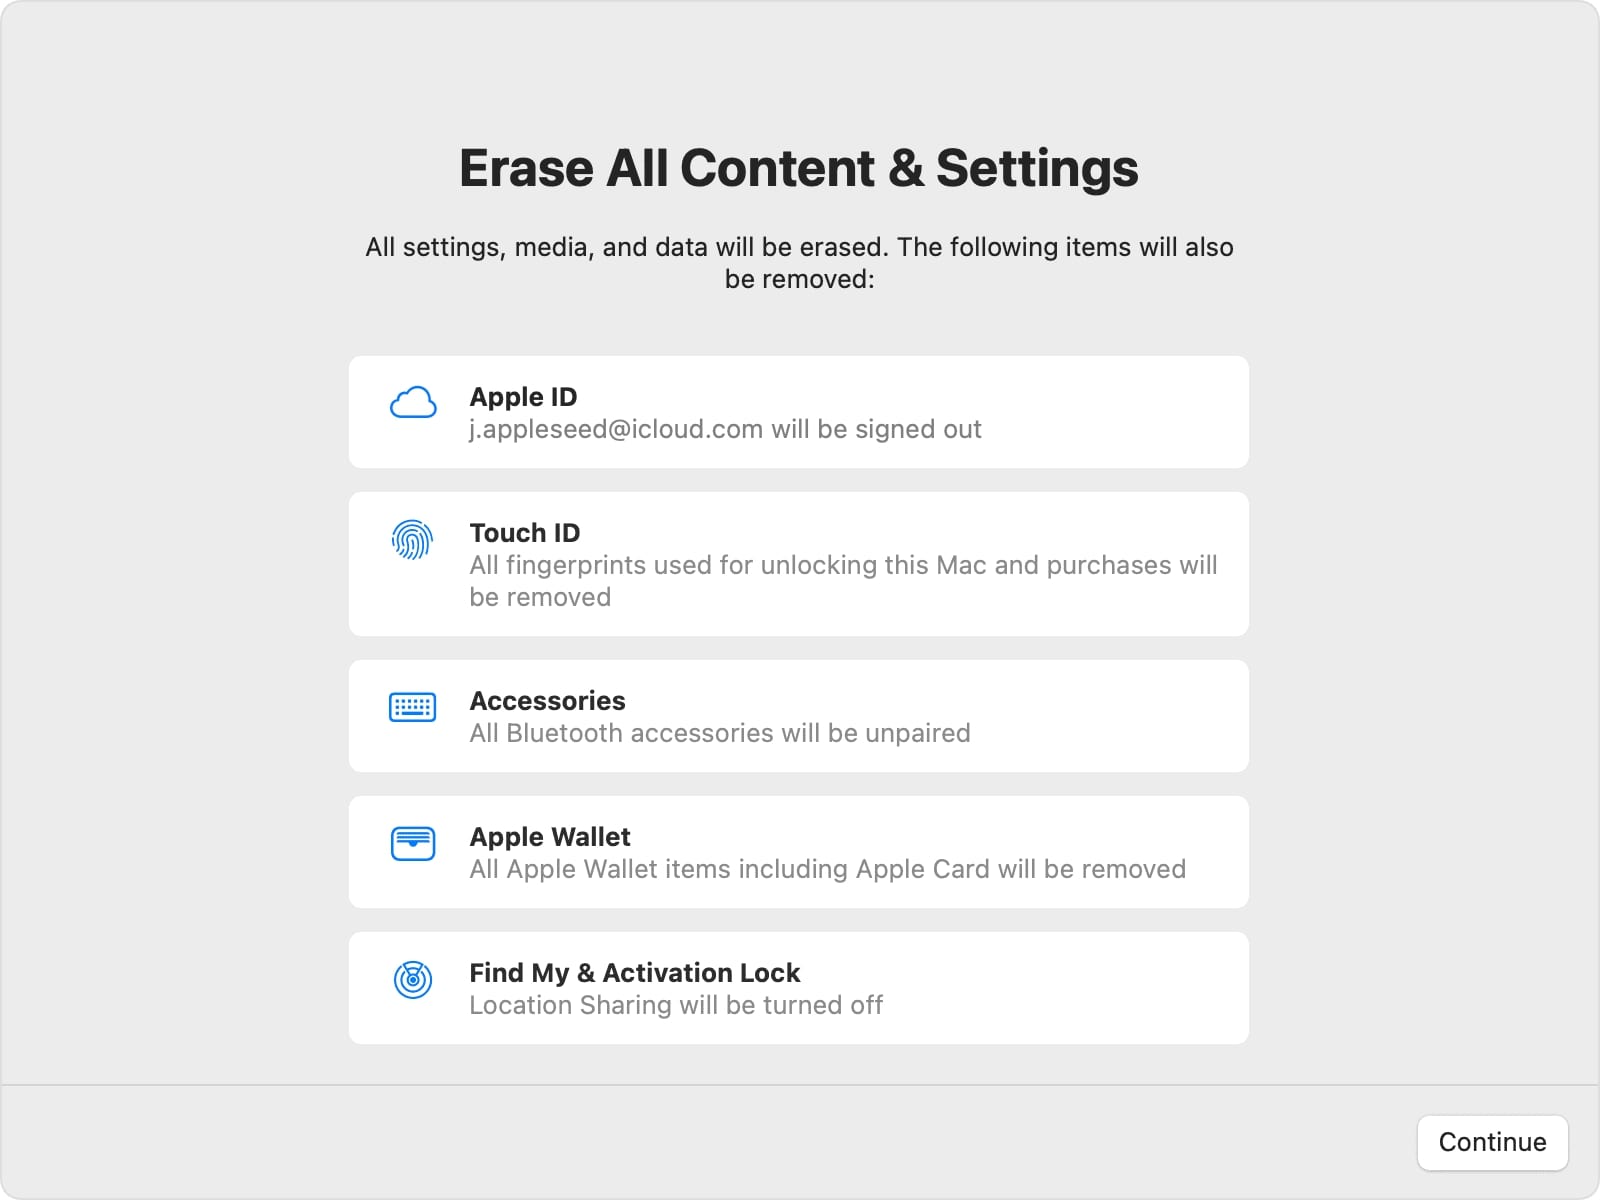
Step 3. Enter your Apple ID password and press Continue to sign out of your Apple ID. To confirm the process, click Erase All Content & Settings.
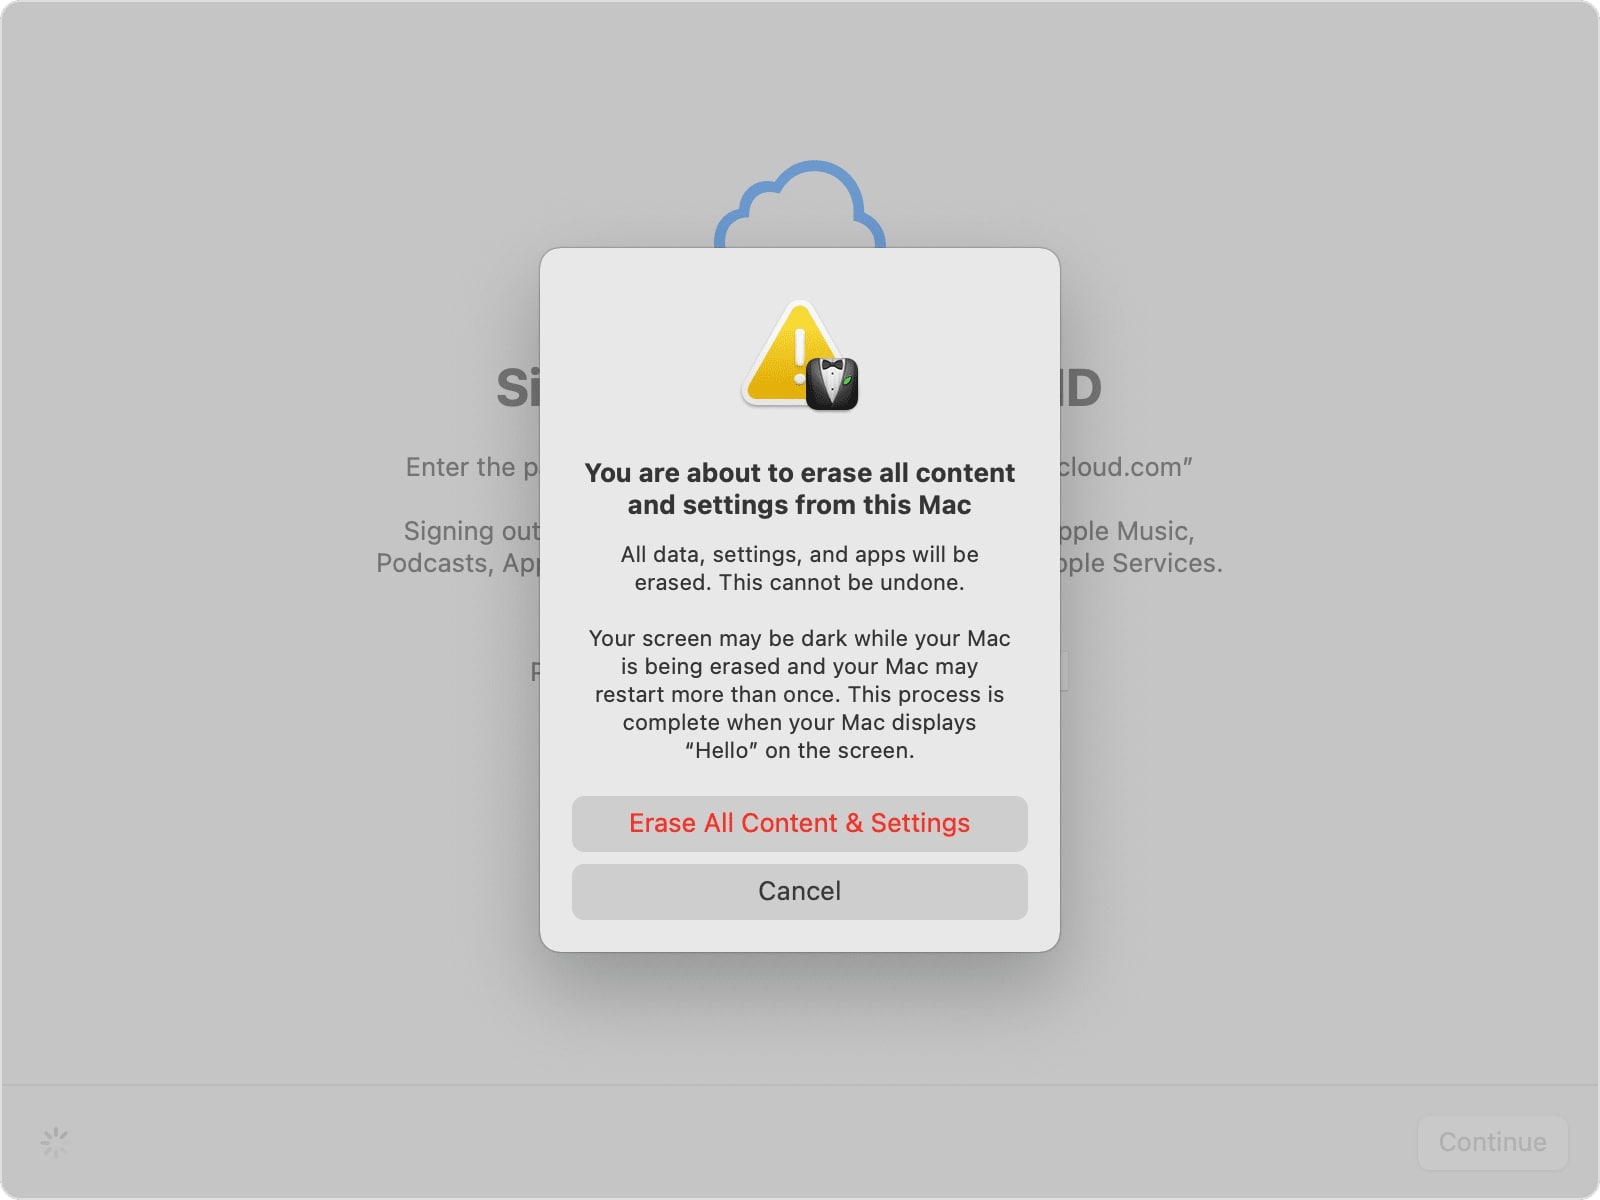
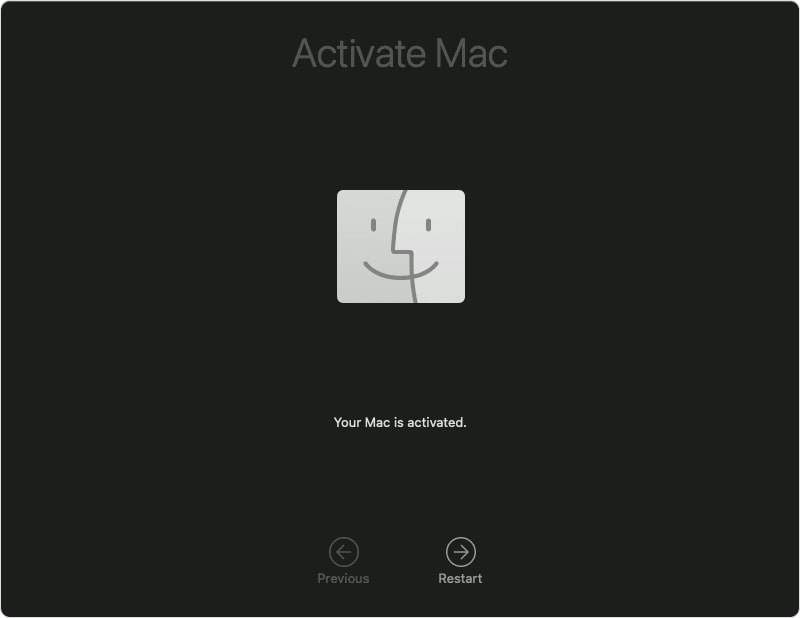
Step 4. Your Mac restarts with a black screen and a progress bar. If it needs to reconnect to a Bluetooth accessory, such as a keyboard or mouse, you may be prompted to do so. If the accessory does not connect within 30 seconds, turn it off and on again. Activate your Mac by connecting to a network, then select Restart. After restarting your Mac, a setup assistant walks you through the setup process.
Method 2. How To Factory Reset MacBook/iMac Without Erase All Content and Settings
The Erase All Content and Settings feature doesn't function on some Mac devices because it is only available in macOS Monterey or later and only on Mac devices equipped with Apple silicon or the Apple T2 Security Chip. However, the Erase All Content and Settings feature is not the only way to factory reset your Mac. You can factory reset your Mac without a password using the following steps:
📋 The Crucial Pre-Reset Account Disconnection Checklist
If your Mac requires the manual recovery method, skipping account de-authorizations can lock your Apple ID or trigger Activation Lock bugs for the next owner. Complete these tasks in order:
System Subsystem App |
Required Action |
Critical Operational Importance |
| iCloud / Find My | Sign Out via System Settings | Breaks hardware connection; prevents anti-theft Activation Lock loops. |
| iMessage / FaceTime | Sign Out via App Settings | De-links your hardware serial number from Apple net push notification network. |
| Apple Music / iTunes | Deauthorize This Computer | Frees up one of your 5 authorized machine slots inside Apple net server DRM database. |
| Bluetooth Peripherals | Unpair All Mice / Keyboards | Prevents your accessories from accidentally waking the Mac if it is packaged in a nearby box. |
| Time Machine | Run Final Local Backup | Creates an uncompressed snapshot sector structure to move onto your next Mac. |
Step 1: Cancel or transfer AppleCare coverage
You can cancel or transfer your AppleCare plan if your Mac is covered by one. Just follow the step-by-step instructions below.
Cancel the AppleCare plan
If you paid for AppleCare in advance, you must contact Apple to cancel it and receive a refund. Before the process, make sure you have the following items on hand:
- The AppleCare contract number
- Your MacBook Pro's serial number
- Your purchase receipt
Do you already have these? Now, proceed as follows.
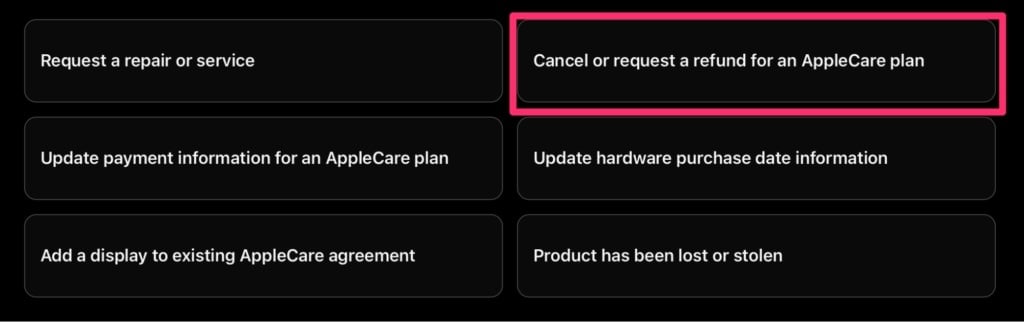
1. Go to the Support page, then select Hardware Coverage, followed by Other Hardware Coverage Topics. Click Cancel or request a refund for an AppleCare plan.
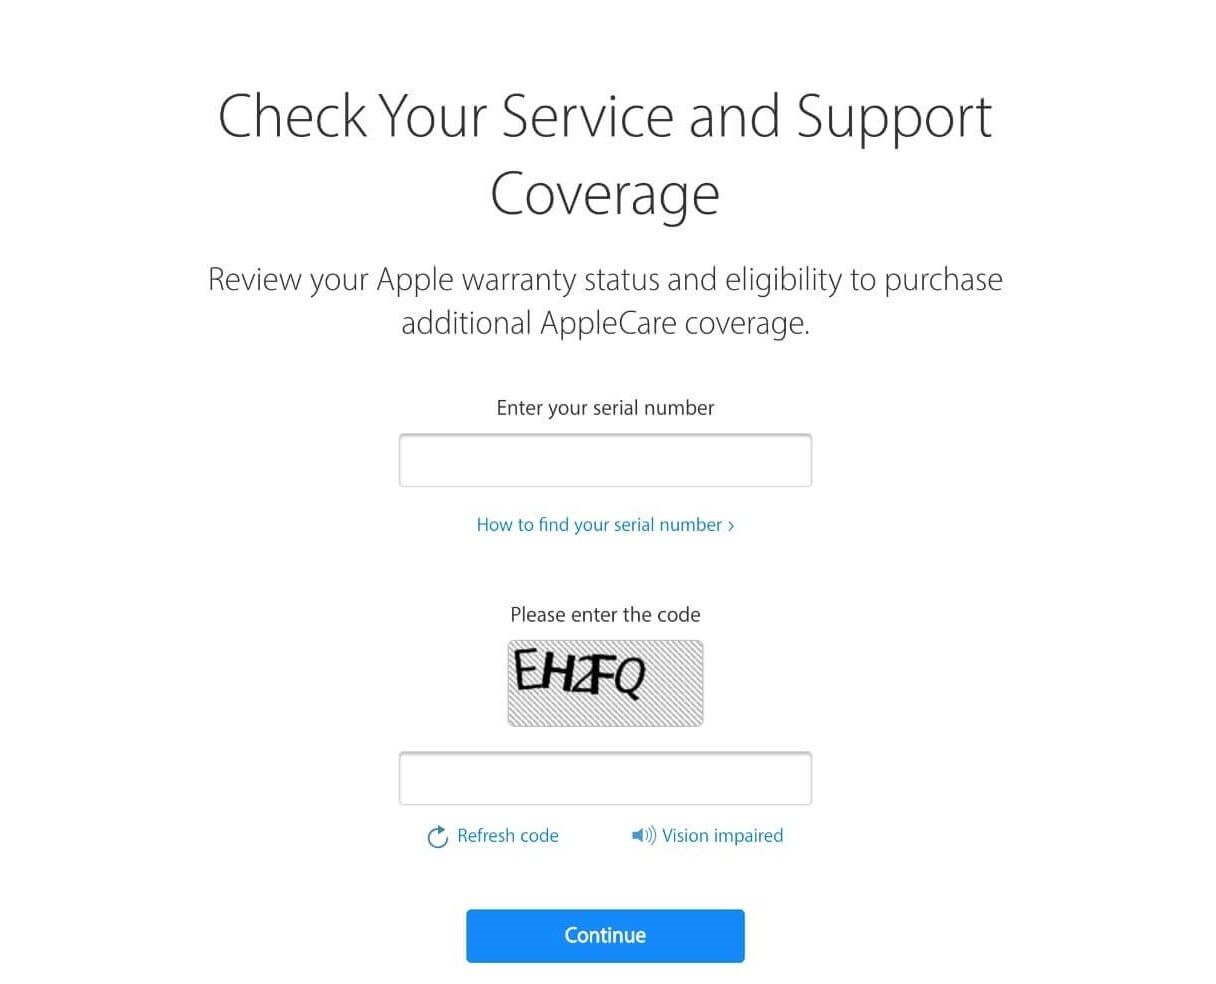
2. Under See your support options, click Continue. You must first sign in before being shown the available options.

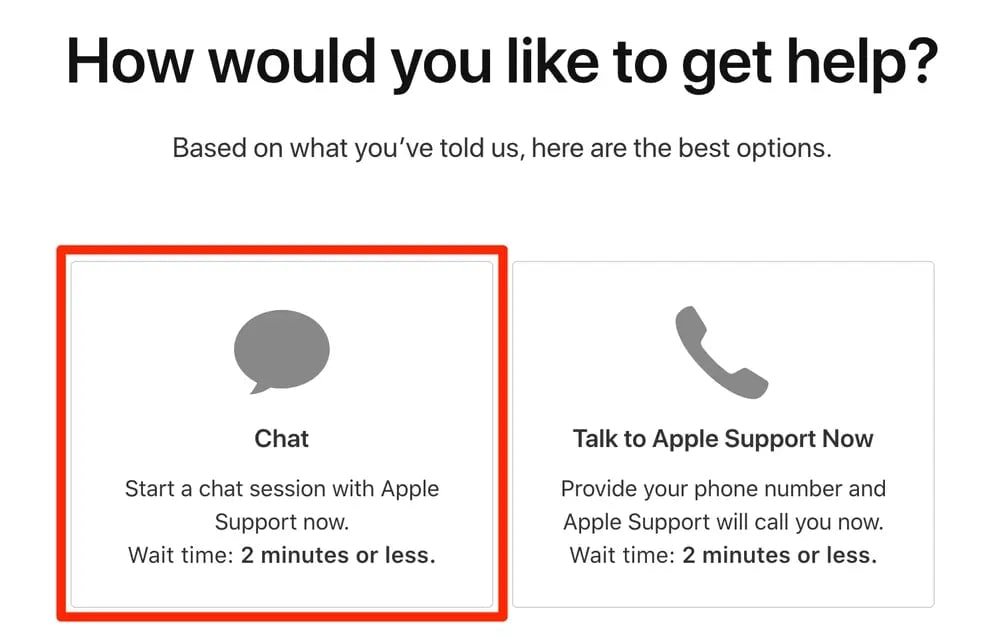
Once you've reached an Apple support representative, inform them that you want to cancel your AppleCare plan. The refund policies associated with this method are difficult to grasp. It largely depends on how many days have passed since the purchase.
Transfer the AppleCare plan to the new owner
You can transfer your AppleCare plan to the new owner if you sell or donate away your Mac device. Follow the steps below for the right process:
1. Sign into My Support to obtain the AppleCare agreement number, the device's serial number, and proof of coverage for the AppleCare plan. Locate the device's original sales receipt. Then, obtain the new owner's name, address, email address, and phone number.
2. Contact Apple Support.
Some AppleCare plan types and some countries or regions may not allow you to transfer an AppleCare plan to a new owner. Review the applicable AppleCare Terms and Conditions for more information. Check your coverage if you need to know which plan you have.
Step 2: Back up or transfer your files
Before you do anything, make a backup or clone of your Mac. It is because, as you might expect, restoring a Mac to factory settings erases all data stored on the machine.
An important reminder: Don't use iCloud to sync all our Apple devices. Yes, you can recover everything you need from the cloud, but if the Mac is completely wiped out, the data for one non-Apple app you used wasn't in the cloud. It is an easy mistake to make in these days of working primarily in the cloud! Sadly, you cannot yet back up your entire Mac to iCloud.
Fortunately, backing up your Mac is simple if you have an external hard drive. You can easily back up your Mac using Time Machine software. The best part about backing up with Time Machine is that it makes it extremely simple to transfer your data to a new Mac afterward. Alternatively, you back up your important files using effective data backup software.
Step 3: Sign out of iTunes
If you're using macOS Catalina or later, you can skip this step because Apple's latest operating system for the Mac lineup, macOS Catalina, has no more iTunes available.
For users who have macOS below Catalina, follow the step to sign out of your iTunes:
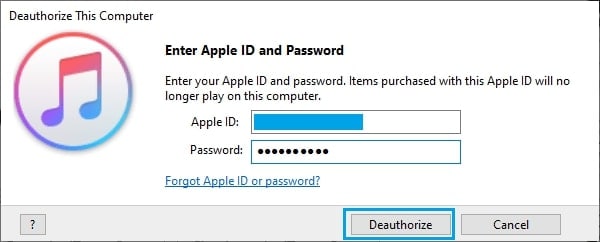
1. Choose Account > Authorizations > Deauthorize This Computer from the iTunes menu bar.

2. Click Deauthorize after entering your Apple ID and password.
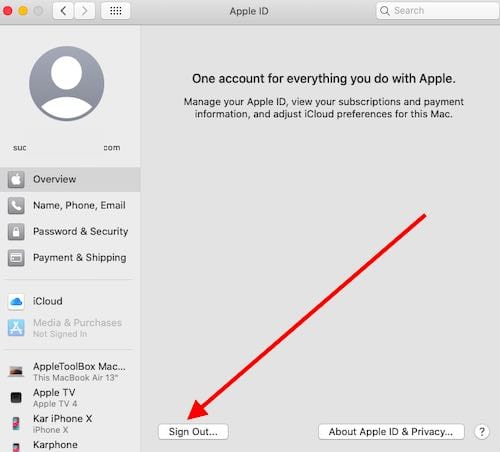
Step 4: Sign out of iCloud
Like the Deauthorization process, the next step is to disable iCloud. It is essential to remove all personal information from your device before selling it. To turn off all iCloud information. To proceed, follow the instructions below.
For macOS Ventura or later:
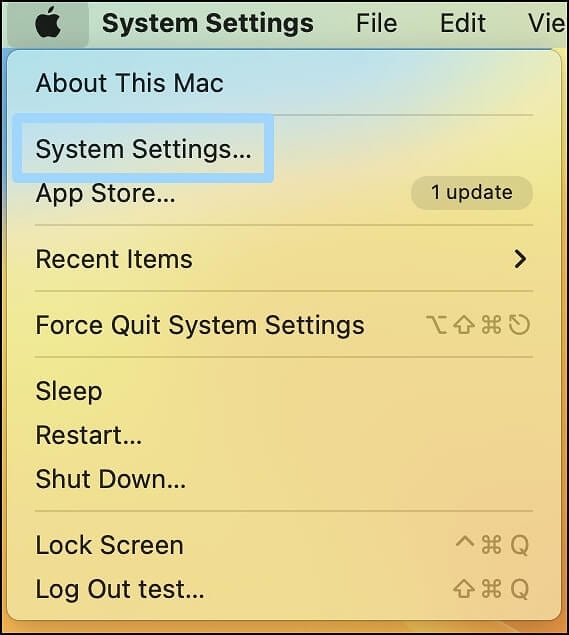
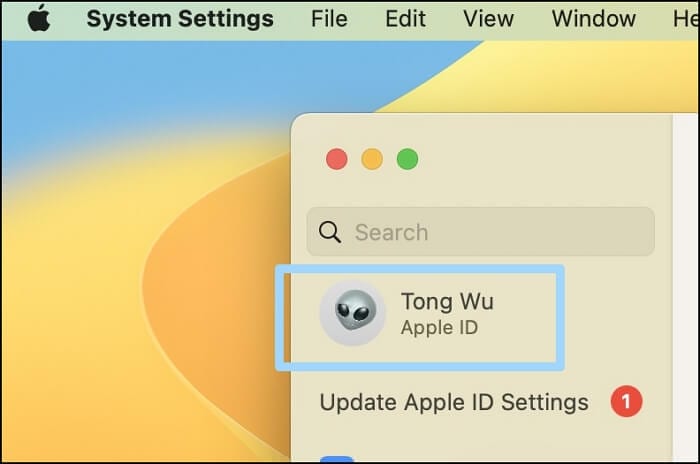
1. Go to the Apple menu > System Settings.
2. Click your Apple ID in the sidebar. Scroll down and click Sign Out.
For macOS Monterey, macOS Big Sur, or macOS Catalina:
1. Choose Apple menu > System Preferences.

2. Click Apple ID.
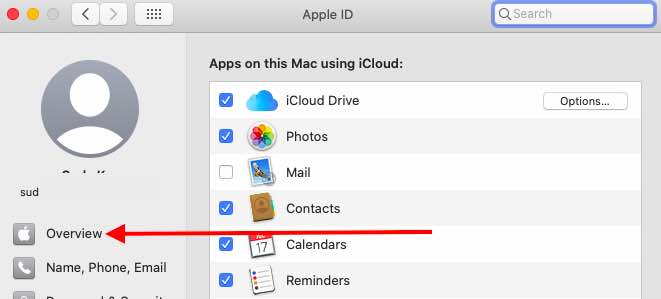
3. In the sidebar, select Overview, then click Sign Out.
For macOS below Catalina:
1. Select Apple menu > System Preferences.
2. Click iCloud, and finally click Sign Out.
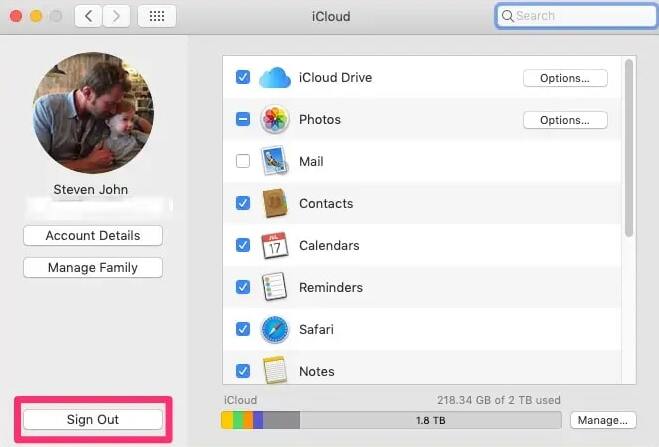
When asked if you want to keep a copy of your iCloud data on this Mac, say “yes” because you will erase your Mac later. Your iCloud data remains in iCloud and on other Apple ID-enabled devices.
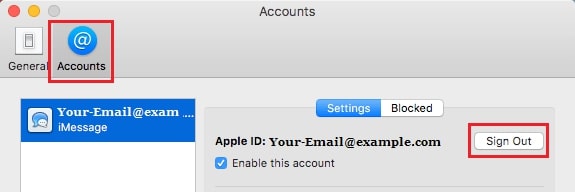
Step 5: Sign out of iMessage
The next Apple built-in application that you should sign out of is iMessage. The steps are as follows:
1. Open iMessage and select Messages from the main menu. From the drop-down menu, select Preferences.
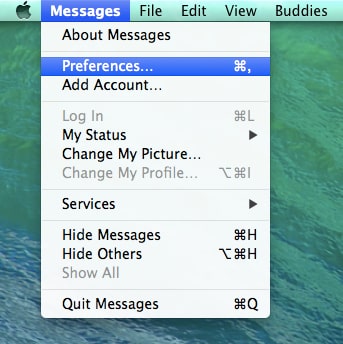
2. Select the iMessage account and click Sign out.
Step 6: Unpair Bluetooth devices (Optional)
You can unpair a Bluetooth keyboard, mouse, or device you intend to keep paired with your Mac. This optional step is especially important if you pass your Mac on to someone close to the Bluetooth range, as any Bluetooth device previously paired with your old Mac may reconnect to the old one.
If you're using a Mac without a built-in keyboard or trackpad, you'll need to connect a USB keyboard and mouse to finish the process.
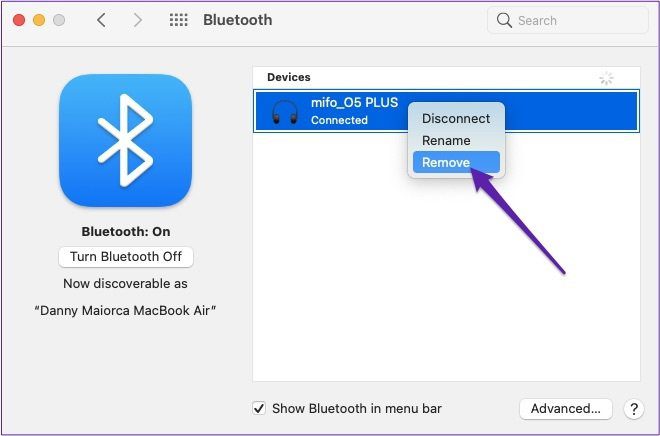
1. Unpair a Bluetooth device by going to the Apple menu > System Settings (or System Preferences) and clicking Bluetooth.
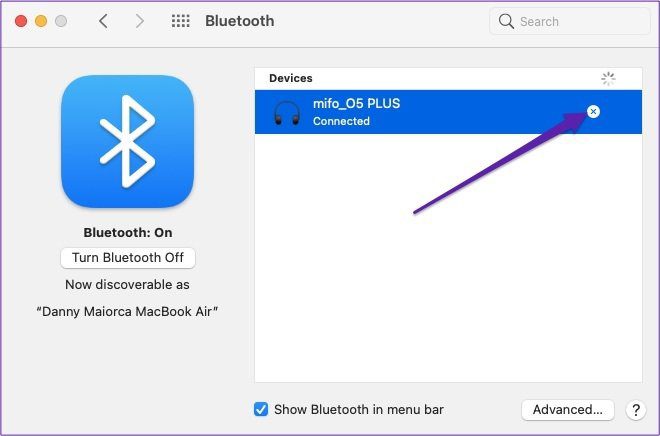
2. Select the device you want to unpair, then click Disconnect or Remove (x).
Step 7: Erase your Mac
This step does not work on Mac computers that use Apple silicon. You can erase an Intel-based Mac with Disk Utility. But before doing this, ensure a backup of any files you want to keep, as erasing your Mac deletes all of its files permanently.
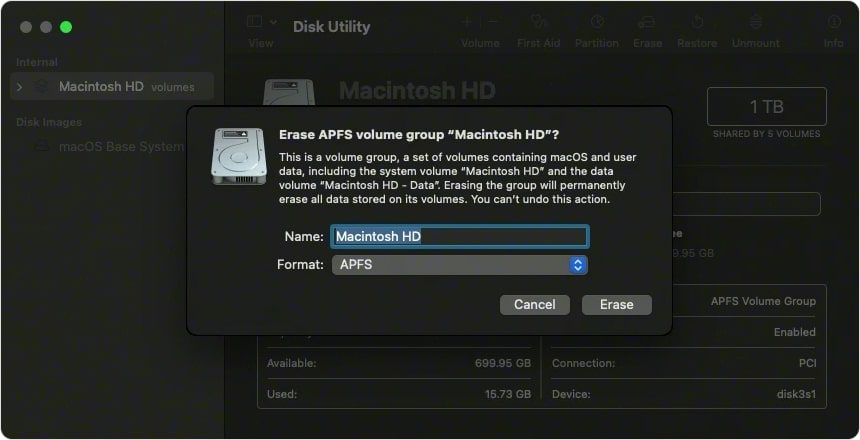
1. Turn on your Mac, then press and hold the Command (⌘) and R keys until you see an Apple logo. If prompted, enter your administrator password. Then, select Disk Utility and press Continue.
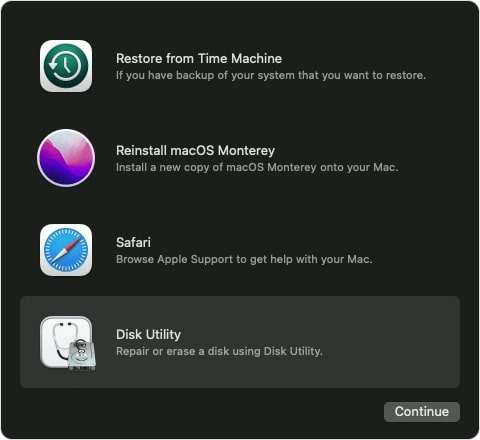
2. Select Macintosh HD and click Erase. Then, enter the following information:
- Name: Macintosh HD
- Format: APFS or Mac OS Extended (Journaled)
Select Erase Volume Group. If you don't see this button, click Erase instead.
Step 8: Reinstall macOS
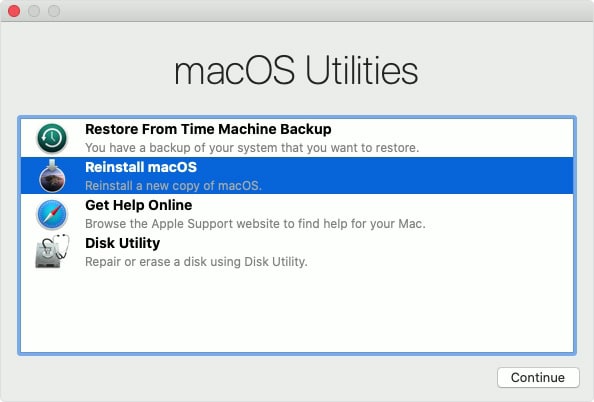
To reinstall the Mac operating system, use macOS Recovery.
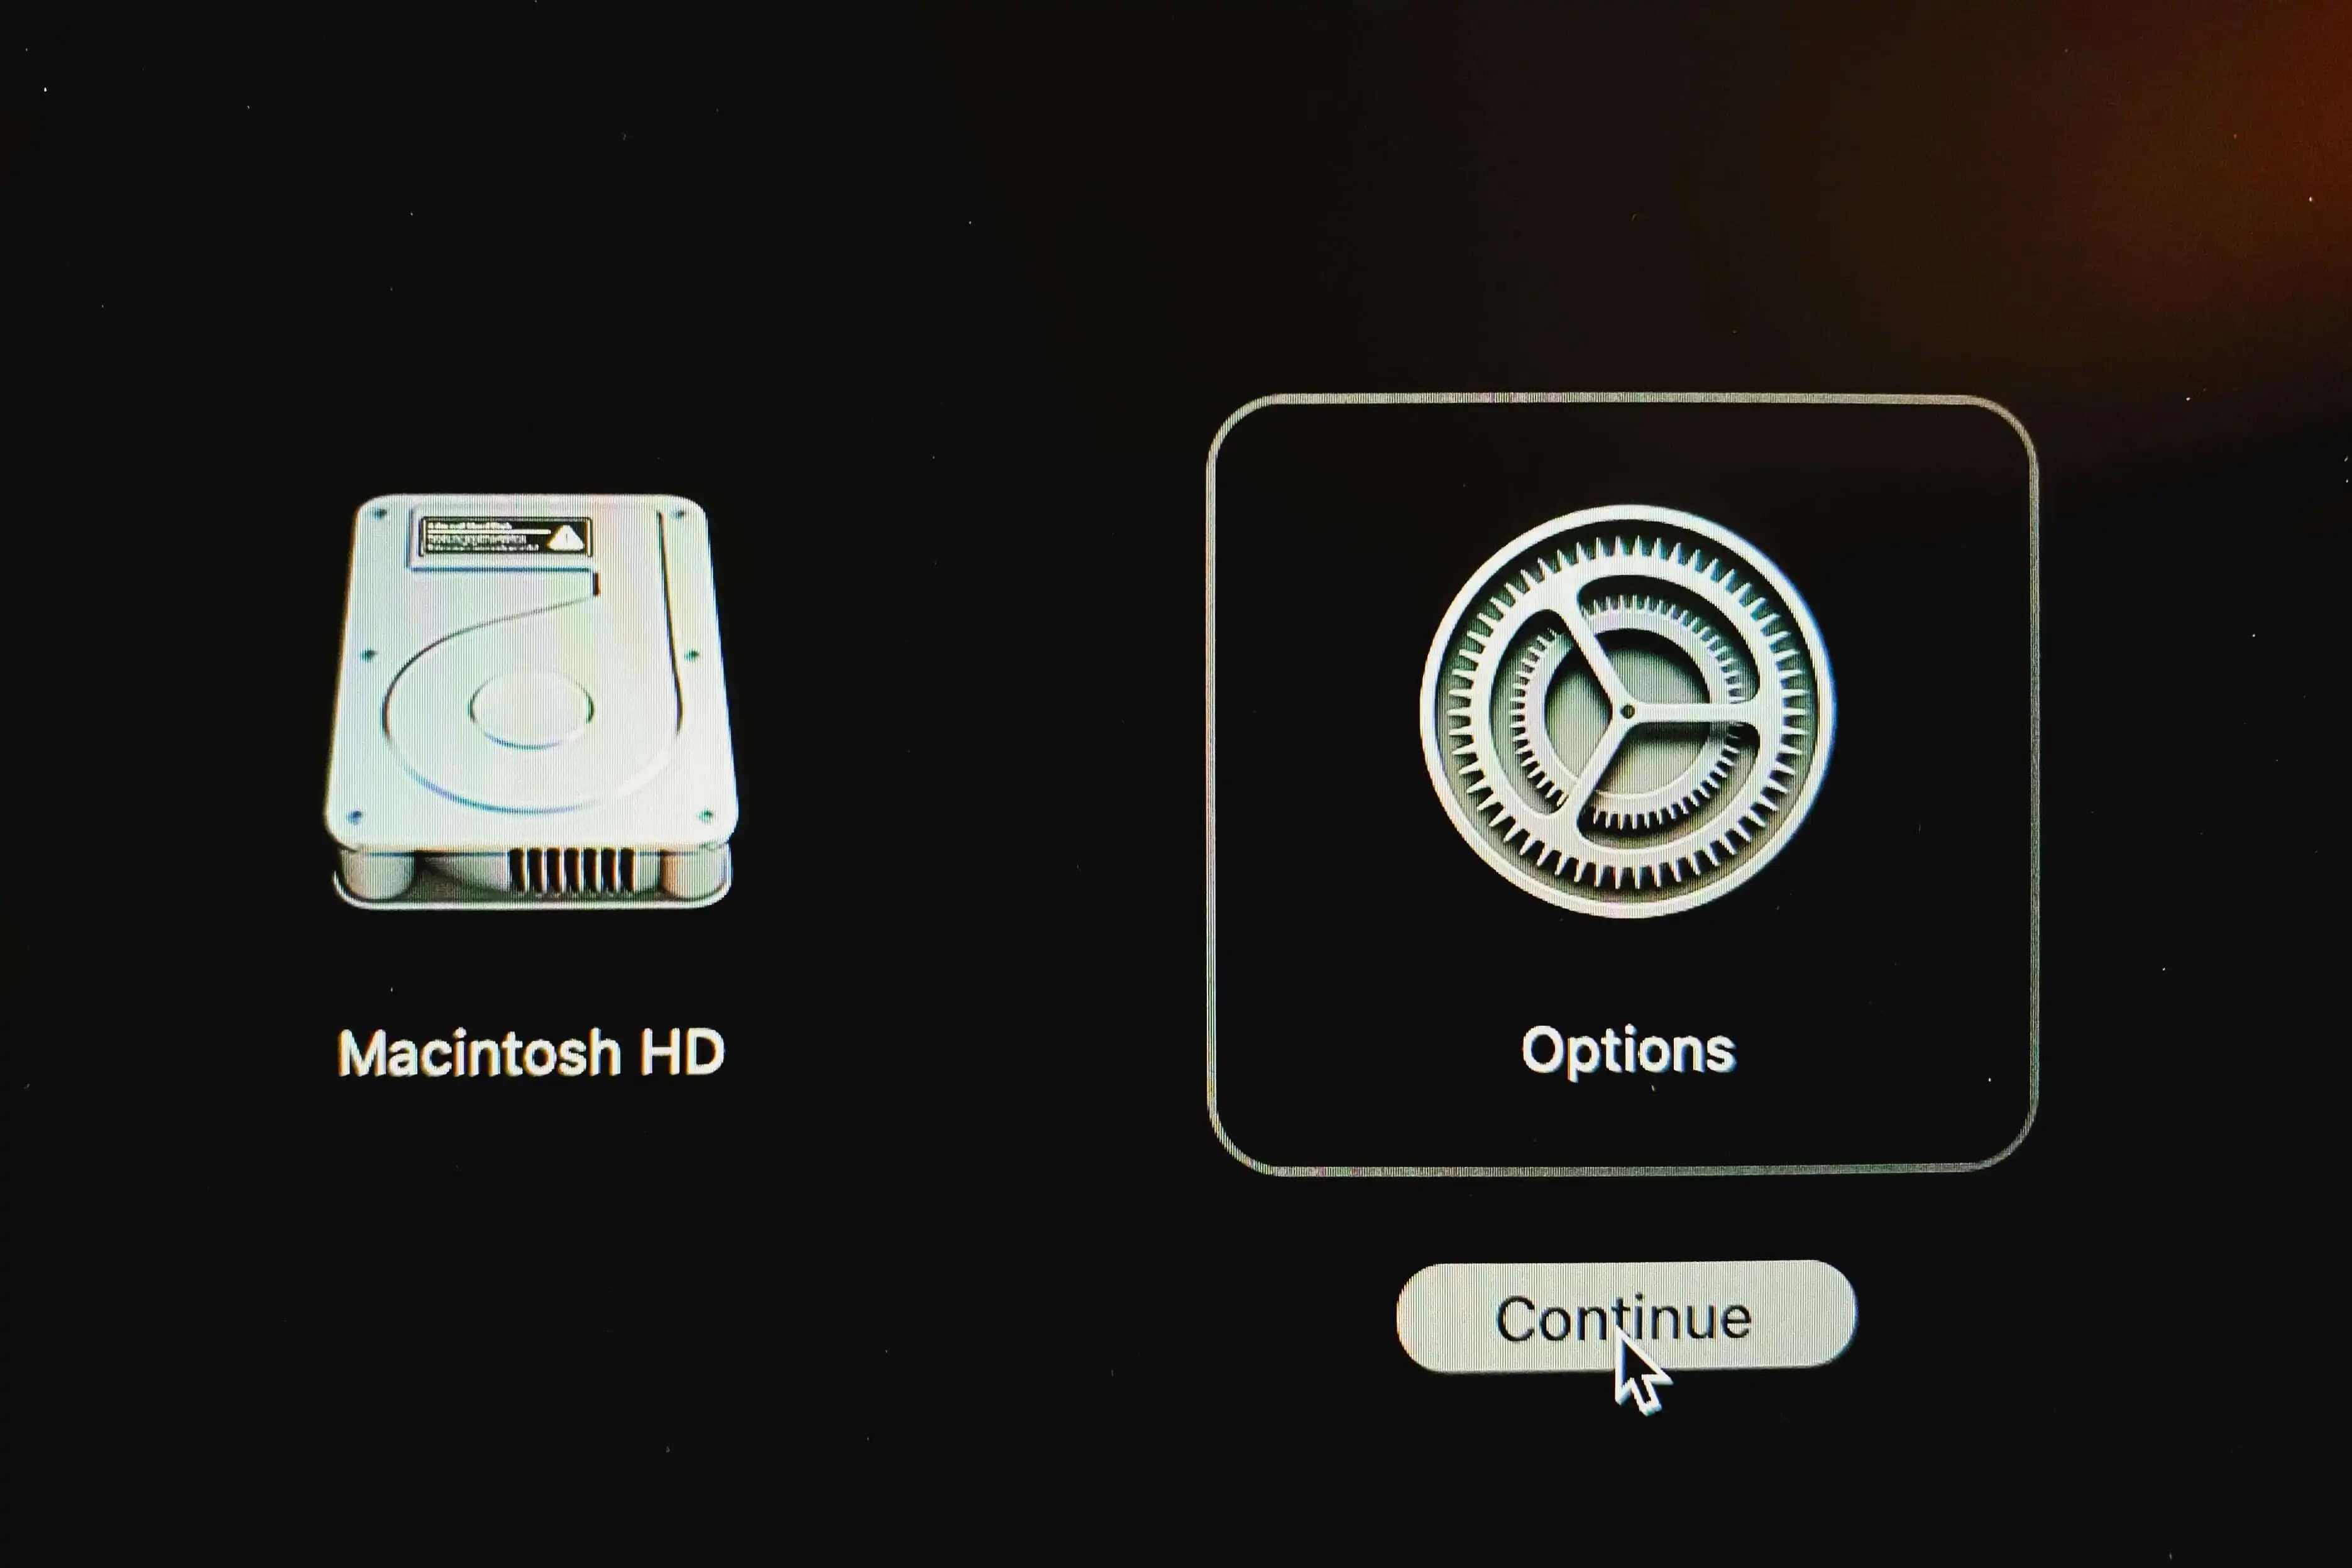
1. Start from the macOS Recovery partition, and ensure your Mac is connected to the internet. Depending on whether you're using a Mac with Apple silicon or Intel Processor, proceed as follows:
- Mac with Apple silicon
Turn on your Mac and hold the power button until the startup options window appears. Click Options, then click Continue.
- Intel Processor
Turn on your Mac and immediately hold Command (⌘) - R until you see the Apple logo. If you're prompted to select a user, click Next and enter their administrator password.

2. Data on your Mac is not erased when you reinstall macOS. Select Reinstall macOS from the utility window in macOS Recovery to begin the installation, then click Continue and follow the onscreen instructions.
Installation guidelines:
- To unlock the disk, enter your sign-in password to your Mac.
- If the installer does not recognize your disk or says it cannot install on your computer or volume, you may need to erase it first.
- If the installer prompts you to install on Macintosh HD or Macintosh HD - Data, select Macintosh HD.
- Allow your Mac to finish installing without putting it to sleep or closing it.
*After you erase and reinstall macOS, your Mac reboots to a setup assistant. Rather than continuing setup, click Command-Q to shut down.
Step 9: Reset NVRAM and shut down
Resetting the NVRAM is another way to ensure that none of your settings remain on the Mac. The NVRAM is a small portion of your Mac's memory to store settings. Resetting it clears your user settings and restores any security features you may have changed.
To reset the NVRAM, follow these steps:
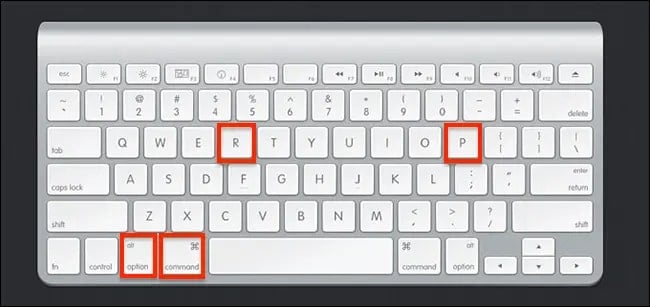
1. Turn off your Mac.

2. Turn on your Mac, then click and hold the following four keys simultaneously: Option, Command, P, R. After around 20 seconds, release the keys, and your Mac may appear to restart.
When your Mac has finished booting up, you may need to adjust any reset system settings. Your Mac returns to the setup assistant. To quit the Mac in its original state, tap Command-Q to shut down rather than continue setup.
How To Recover Data From an Accidental Mac Factory Reset
Reinstalling macOS or factory resetting Mac always follows a system crash or computer slowdown. In addition, you may lose some of your files on your Mac after reinstalling macOS.
When faced with a data loss issue, you may wonder if you can recover files lost. The answer is YES! You can put your worries to rest by using dependable Mac data recovery software. Wondershare Recoverit for Mac guarantees that your data will be recovered with just a few clicks.
📊 Success Analysis: Post-Factory Reset Data Recovery Feasibility
When a Mac undergoes a factory reset, the structural stability of unbacked data clusters varies significantly by format type and hardware generation. Wondershare Recoverit for Mac uses deep sector-carving algorithms to locate and extract lost blocks:
Factory Reset Loss Scenario |
Success Recovery Probability |
Underlying Raw Recovery Mechanics |
| Intel Mac Standard Quick Format | Extremely High 98% | Scans the unlinked APFS / HFS+ file allocation blocks to locate intact media headers. |
| Intel Mac Secure Multi-Pass Erase | Irrecoverable | Overwritten by zero-fill data patterns; original sectors completely zeroed. |
| Apple Silicon Erase Assistant | Targeted Extraction Cache | Wipes primary hardware keys. Looks for secondary app cache blocks and external sync fragments. |
| Reinstalled macOS Overwritten Data | Medium 75% | Restores data fragments that have not yet been overwritten by new system files. |

Wondershare Recoverit – Leader in Data Recovery
5,481,435 people have downloaded it.
Recover over 1000 file types from almost any storage media, such as Windows/Mac/Linux computers, NAS servers, SD cards, USB drives, etc.
Efficiently handle 500+ data loss scenarios, including accidental deletion, formatting, lost partition, virus attack, and factory reset.
Preview the files before recovery. No payment is required if the files are unrecoverable.
In case you don't know how to recover lost files using Recoverit, we have a detailed guide here:
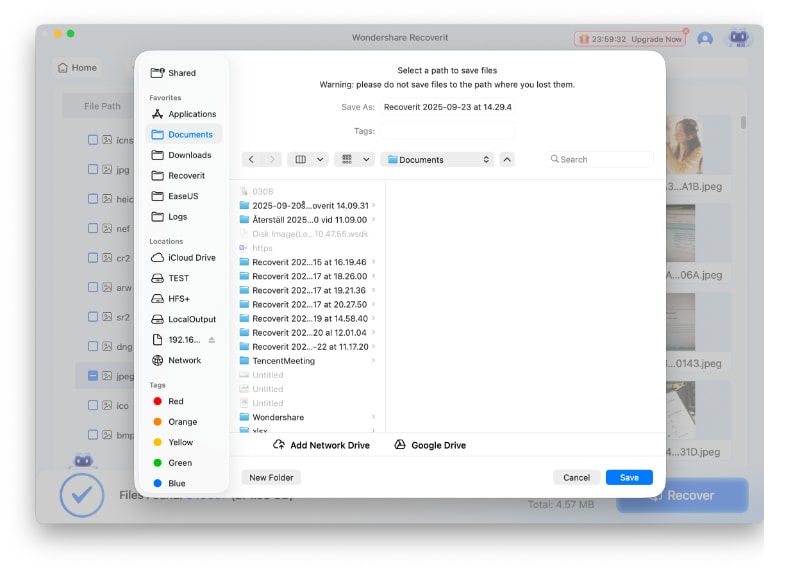
Step 1. Select the Mac Hard Drive
Open Recoverit for Mac and choose the drive where you lost data.

Step 2. Scan for Lost Data on Mac
Recoverit for Mac will start scanning for any deleted or missing files in the selected hard drives on your Mac.

Step 3. Recover Data
If the scanning results generate a lot of files, then you can filter the results through file type, status, created time, etc. to locate your desired files quickly. Finally, select the files and click Recover to recover data from an accidental Mac factory reset.
FAQs
What data is deleted during a Mac computer reset?
A full mac computer factory reset erases everything on your hard drive. This includes all your personal files, photos, applications, settings, and the operating system itself. The goal of the computer reset is to return the Mac to the state it was in when you first bought it, leaving no personal data behind.
Will a factory reset remove my Apple ID from the Mac?
Yes, but you must sign out of iCloud, iMessage, and FaceTime before you start the factory reset process. Erasing the drive alone does not guarantee your device is removed from your Apple ID account. Signing out first ensures that Activation Lock is disabled, which is crucial if you plan to sell or give away the computer.
Do I need an internet connection for a Mac computer factory reset?
Yes, an internet connection is required during the final steps of a mac computer factory reset. After you erase the hard drive, your Mac will need to connect to the internet to download and reinstall a fresh copy of macOS from Apple's servers. Ensure you have a stable Wi-Fi connection available before you begin.
Can a factory reset remove malware?
A factory reset on a computer effectively removes a persistent virus or other malware that you cannot remove otherwise. It can also clean up areas where viruses are stored.
What happens when a factory reset doesn't work?
The data and applications on the device will be erased after a factory reset. And your device may have hardware issues if a factory reset does not work.


