Have you ever been in a situation where you have lost your essential QuickTime Recording and feel stuck? Whether it was a screen recording of an important meeting or a game clip, losing it can be frustrating and affect the workflow, too. Fortunately, various solutions now exist that you can consider to get hold of your recordings without requiring any learning curve.
Hence, no matter if the reason was an app crash, accidental deletion, or a saving error, this guide offers you simple and effective tips to recover QuickTime recording. Review the guide and determine which solution works best for your situation for data recovery, without causing any loss.
In this article
Part 1. The Reasons Behind the Loss of QuickTime Recordings
Before you review the guide to look for the solutions to recover deleted QuickTime recording, have you ever questioned what caused their loss? If so, this section provides you with key reasons behind it, helping you to understand the issue better and choose the right fix:
- App Crash or System Failure: Sometimes your QuickTime or your device may crash in the middle of recording or saving, showing a possibility that the file is not saved correctly. Therefore, this kind of crashing may disrupt the recording process and fail to save the file in the right place.
- Accidental Deletion: Most users clean their folders and trash to free up some space, yet they do not remember that they are also deleting their recording files. Therefore, without any backup or recovery facility, such files will not be recovered and will be lost forever when users do not have any.
- Interrupted Saving Process: If you interrupt the recording saving process midway by quitting the app or losing power, your files will definitely be lost.
- Low Storage Space: Your recording will fail to save or won’t save at all if your device is running low on storage. Before opting for ways to recover unsaved QuickTime recording, know that QuickTime needs enough free space to process and store the file correctly.
- File Corruption: Issues like power outages, disk errors, or software bugs can also affect the QuickTime recording, making it unplayable or unreadable. Moreover, the corrupted files might show up, but they won’t open, which will lead to confusion and data loss.
Part 2. Where are The QuickTime Recording Stored on a Mac?
When opting for the ways to recover QuickTime screen recording, do you know where these recordings are stored on a Mac? Many of you may not know, but by default, these recording files are saved to the desktop unless the user changes the location manually. After the recording, if you simply press the “Save” option, it will be saved on the desktop.

However, if you click the “Browse” menu on the pop-up that appears after hitting the save button, you can determine the file saving location. Conversely, on the older Mac version, you can locate these recordings in the Movies folder or a hidden Screen Recordings folder if they are not explicitly saved. The address to locate these files in your library is “~/Library/ScreenRecordings”, which are less common with recent versions of QuickTime.
Part 3. The Quickest Approach to Recovering Deleted QuickTime Recording: Recoverit
As the foremost solution, you can consider using Recoverit to recover unsaved QuickTime recordings on Mac, since it is 100% secure. Whether you have audio or video recordings, this tool handles multiple data loss scenarios, including accidental deletion, SD Card formatting, and file loss during copy. Despite dealing with basic files, it restores professional recordings that are usually undetectable because of specific parameters.
Additionally, for audio and other file recovery, this tool supports over 1000 file formats, including MP3, WAV, FLAC, AAC, AAF, etc. What makes Recoverit stand out from others is its ability to restore files from external sources, including SD cards, USB drives, and MP3 players. Unlike other solutions, it also offers you the ability to preview the recording before saving it to your device. Plus, users can also recover QuickTime recordings in batches without putting in manual effort.
Key Features
- Broad Device Support: Users can access this solution on Mac with both Intel and Apple Silicon, while launching it on Windows 11/10/8/7/Vista too.
- File Size Filter: Within the recovery process, users can also filter multiple files by size to locate larger or smaller QuickTime recordings.
- Save Unlimited Repaired Files: With all plans, users can seamlessly save unlimited repaired files restored in 75+ formats.
Detailed Guide on How to Restore QuickTime Recording with Recoverit
To recover deleted QuickTime recording through Recoverit, follow the simple tutorial mentioned ahead:
Step 1. Access Recoverit and Locate the File Location from the Given Tabs
Upon launching the tool, head to the “Hard Drives and Locations” tab to pick the file location from “External Drives” or the “Quick Access” tab.

Step 2. Pick the Files or Filter Them to Recover While Scanning
As you navigate the lost files, pick the “Recover” button to start the quick scanning process. There, you can pause the recording or filter the files by size and type to easily locate your missing QuickTime recording.

Step 3. Preview the Recovered Files and Save The QuickTime Recording
When you get the desired file, preview it and select the “Recover” button to fetch it on your device.

Part 4. Recover Unsaved QuickTime Recording via the Recent List
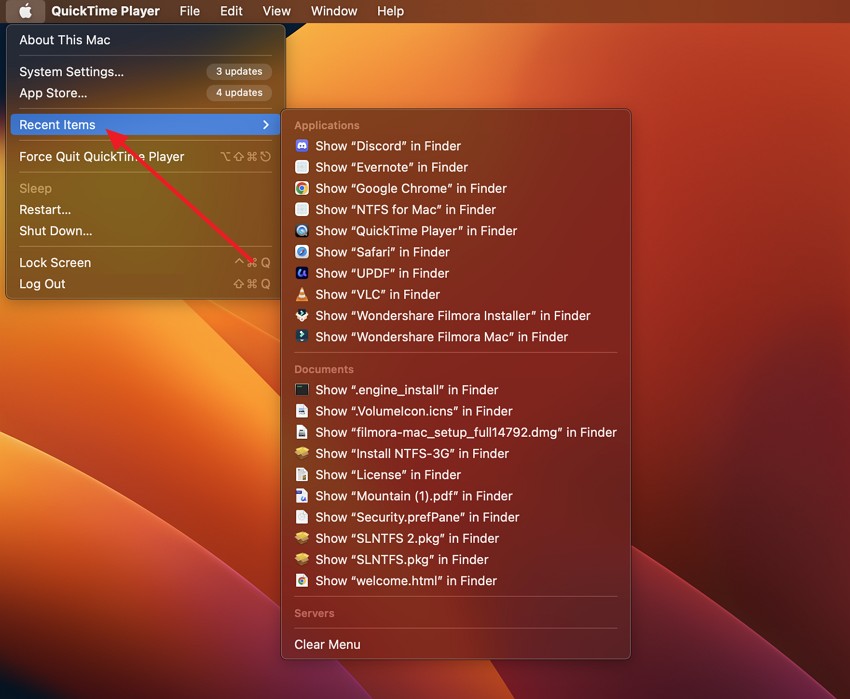
To recover unsaved QuickTime recording, you can also check the recent item list on your Mac as there are chances that the file was temporarily stored there. This will save you time and effort in locating the file through third-party solutions, as it's a built-in and effortless method. So, to determine how you can access the recent list and search for the desired file, review the given steps:
Instructions. Press the “Apple Logo” in the top left corner to select “Recent Items” from the list. Then, choose the unsaved QuickTime recording file names labeled as “Untitled.” After that, open the file in QuickTime and save it in the preferred location manually.
Part 5. Recover QuickTime Screen Recording from the AutoSave Location
Besides the recent folder, you can also consider looking for the auto-save location to recover QuickTime screen recording. This hidden folder saves your unsaved files temporarily, mainly when the app or system crashes. Additionally, it's a built-in recovery option that is reliable and can be located easily through the given steps:
Step 1. On the Finder, start by pressing the “Shift + G” command, after which you have to pick the “Go” option from the pop-up menu that appears.
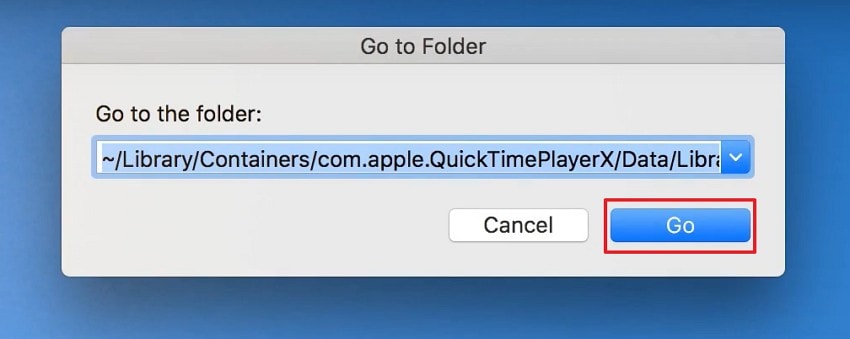
Step 2. Insert the “~/Library/Containers/com.apple.QuickTimePlayerX/Data/Library/Autosave Information/” location in the dialogue box. When the new screen opens, search for the file named “Unsaved QuickTime Player Document.qtpxcomposition” and open it directly in QuickTime.
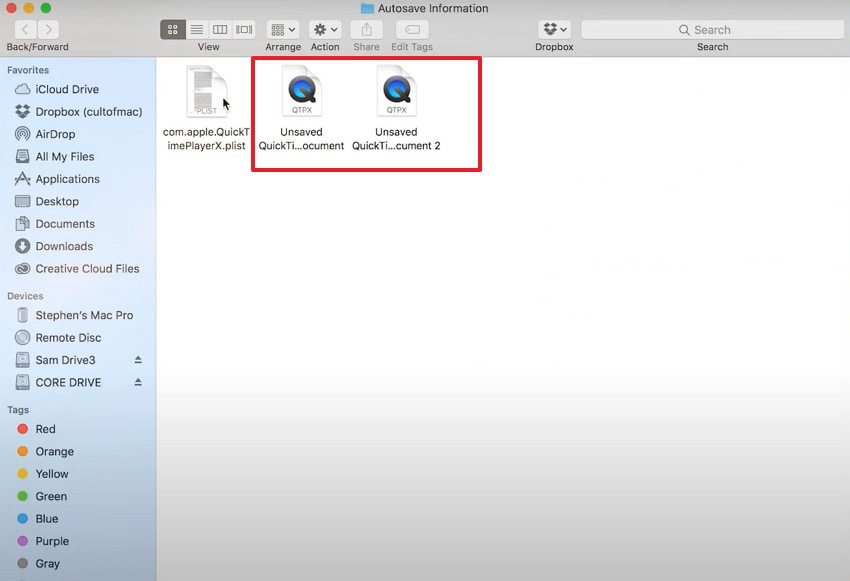
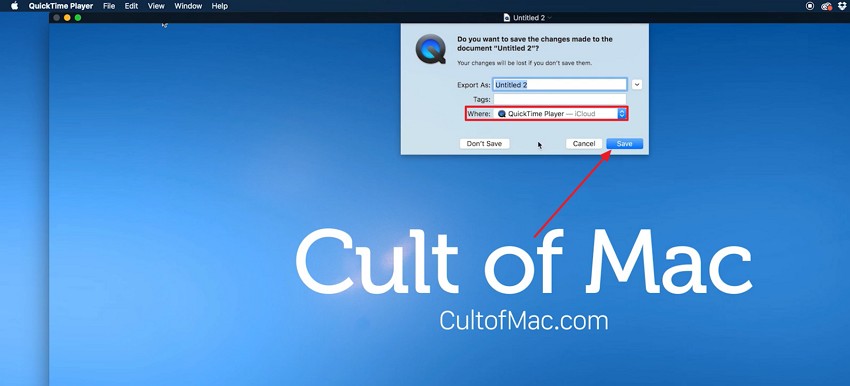
Step 3. From QuickTime, press the “Save” and from the pop-up menu, drag the “Where” menu to choose the file saving location. Press the “Save” button again to confirm and store your recording in the selected folder.
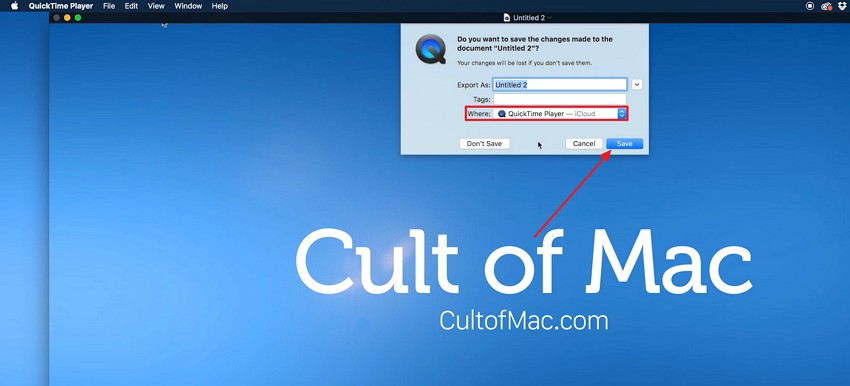
Part 6. Explore the Temporary Folder to Recover Unsaved QuickTime Recordings on Mac
Temporary folder also allows you to recover unsaved QuickTime recordings on Mac as it may store cached versions of files before they are saved. Considering this solution is effective if the app was closed unexpectedly or crashed, affecting the manual saving process. So, offering you a free and immediate way to retrieve a recording, here is how you can access this folder and search for a lost recording:
Step 1. Launch the Terminal on your Mac, write “open $TMPDIR”, and hit the “Enter” key.
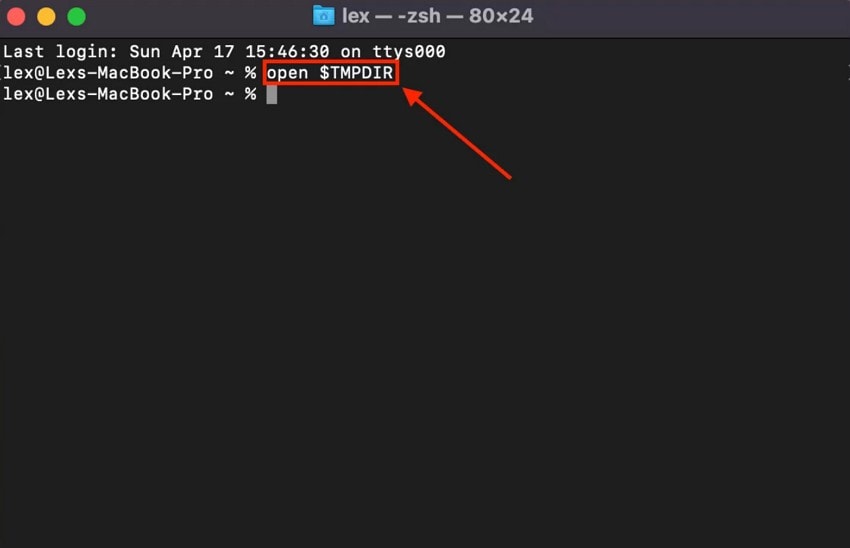
Step 2. Doing so will open the system’s temporary folder in Finder, where you can look for the files that you think are your unsaved recordings.
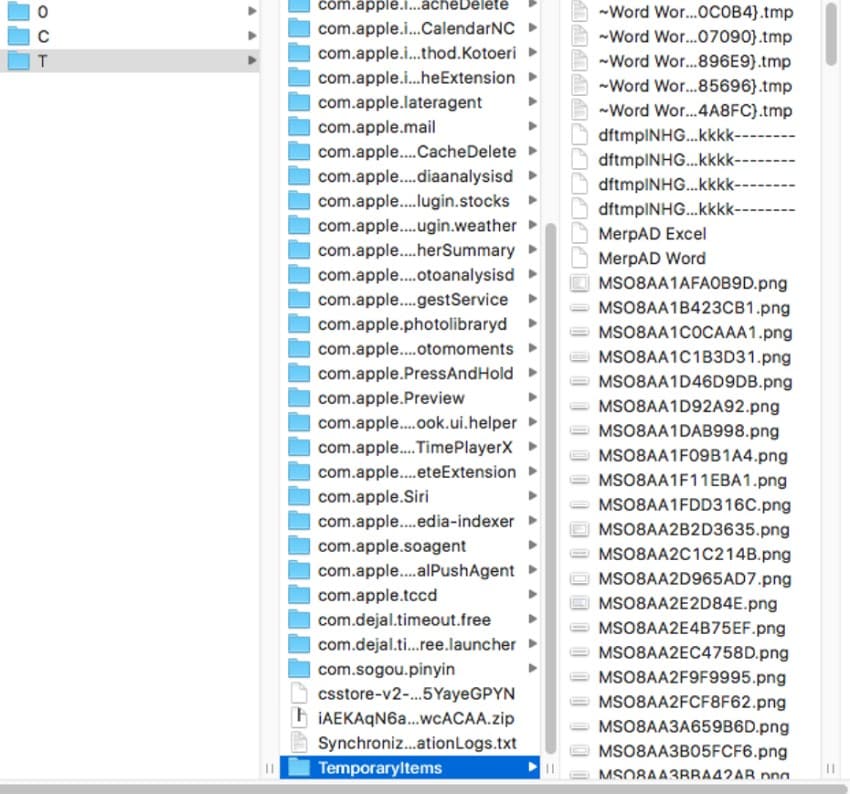
Step 3. Right click on the file to open in QuickTime and press the “Save” button after selecting the desired location from the “Where” menu.
Part 7. Get Back Your Deleted QuickTime Recordings: 3 Ways
Rather than being lost, if you have accidentally deleted your QuickTime recording, this section offers you 3 simple ways to recover QuickTime recording. The foremost aspect is that all the methods are built-in, secure, and don’t require third-party tools or a learning curve.
Way 1. Trash Folder
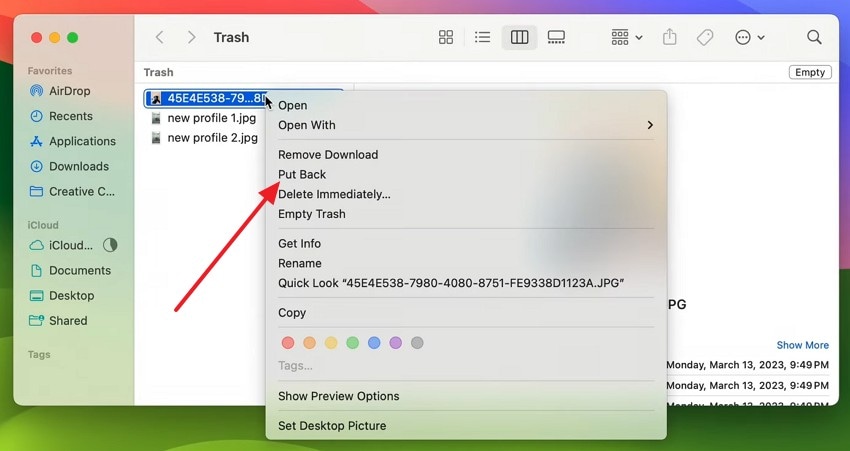
The trash folder can save your deleted files for as long as possible unless you haven’t activated the “Remove items from the Trash after 30 days” option. Instead of dealing with hours of recovery, this method allows you to pick the “Put Back” option simply. Hence, this makes recovering data seamless and hassle-free once appropriately done through the steps mentioned ahead:
Instructions. Open the Trash folder, locate the QuickTime recording, and once you find it, press the “Put Back” option after right clicking on it.
Way 2. iCloud Backup
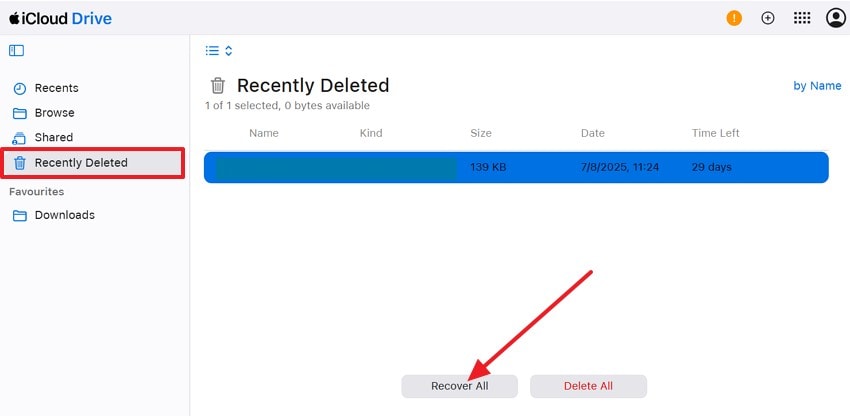
One can also consider the iCloud Backup method to recover QuickTime screen recording because it automatically sync and stores files in folders like Desktop and Documents. Hence, if your recording was stored in any of these locations and iCloud was enabled, you can seamlessly log in to iCloud Drive and access it through these steps:
Instructions. Sign in to iCloud.com and head to the iCloud Drive to choose the “Recently Deleted” folder from the left tab. After that, search for the QuickTime recording named under .mov files and press the “Recover All” button.
Way 3. Time Machine
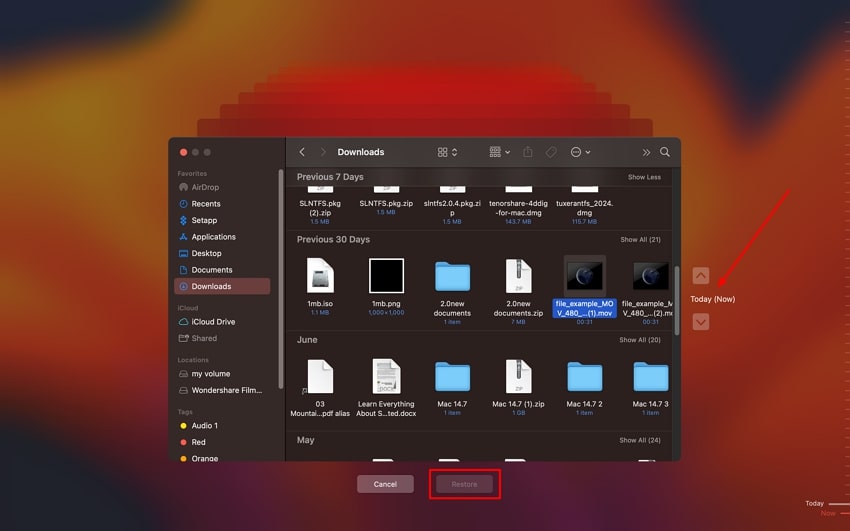
Time Machine also allows you to recover deleted QuickTime recording, as this built-in backup tool automatically saves versions of your files over time. If your recording was deleted but previously backed up, you can go back to the exact date and restore it easily. Overall, this solution is ideal for users who regularly back up their Mac through Time Machine, allowing them to recover recordings via the given steps:
Step 1. On your Mac, press the “Time Machine” icon and choose the “Browse Time Machine Backups” option from the list.

Step 2. Find the QuickTime recording by navigating through the days on the right-side. As you locate the file across a particular timestamp, tap on it and choose the “Restore” option.
Conclusion
Summing up, many users look for simple and effective ways to recover QuickTime recording when they accidentally delete them. Therefore, to deal with this issue, we’ve offered you 6 simple ways that you can consider to restore lost or deleted files. Among all these fixes, we recommend using Wondershare Recoverit since this tool supports quick scanning while allowing you to preview the restored files.
FAQ
-
1. What are the most effective ways to recover a lost or unsaved QuickTime recording on a Mac in 2025?
As of 2025, the most practical solution to recover deleted QuickTime recording is to consider using secure tools like Wondershare Recoverit. The tool supports numerous video and audio formats while offering you the facility to batch recover files lost in any type of scenario. -
2. How can I prevent losing QuickTime recordings in the future?
To ensure that you do not lose valuable information in future, ensure that you observe the following measures:- Verify the file name and saving location before pressing the “Save” button in QuickTime.
- Backup your Mac with Time Machine or any other solution to ensure recordings are safe, even after accidental deletion.
- Always keep your Mac’s storage optimized to prevent failed saves.
- Avoid force-quitting QuickTime when you are about to save your recorded files.
- Regularly check AutoSave and Temporary folders after any app crash.
-
3. What should I do if my QuickTime file is corrupted and won’t play?
When you feel that your QuickTime file is corrupted, try to use QuickTime’s repair features, like re-exporting or opening it on another media player. In case that doesn’t work, it is suggested to consider using any video repair tool to fix the file and restore playback.


 ChatGPT
 Perplexity
 Google AI Mode
 Grok
Grok


