How to Resize a Mac Volume with Mac Disk Utility
You can enlarge a Mac Volume without data loss using Mac Disk Utility by selecting your drive, clicking Partition, and deleting the immediately adjacent volume to reallocate its freed space to your target volume.
● Drives must be formatted with a GUID Partition Map to avoid data loss, and resizing Fusion Drives requires the exact or a newer version of Mac Disk Utility used to create them.
● You cannot expand the last volume on a particular drive; to enlarge any other volume, you must permanently destroy the partition immediately behind it to make room.
● When a partition is deleted, its space is automatically added to the preceding volume by default, though you can manually specify custom sizes instead of using the pie chart to turn leftover space into a new volume.
Ask AI for a summary
To resize a Mac Volume in its Drive is very important for users as it creates more space in a specific Volume and decreases it in another in which there is lesser data. Managing Mac Drives and their Volumes is necessary to keep the data, files, and contents secure and properly arranged.
In this article, we shall learn how to resize a Mac Volume with Mac Disk Utility without disturbing the data in the other partitions. When there are multiple partitions, and you need one slightly bigger than the other on a particular Mac Drive to store more data in it, you can use Mac Disk Utility to increase Volumes, delete partitions, expand or resize Volumes as you like.
Let's move ahead to explore how to resize a Mac Volume with Mac Disk Utility, rules of resizing, and much more.
Try Wondershare Recoverit to Perform Data Recovery
 Security Verified. Over 7,302,189 people have downloaded it.
Part 1: Rule of resizing a Mac volume
Want to resize a Mac Volume with Mac Disk Utility? There are some rules you'll have to follow. Pay attention to these rules for the most accurate results.
- Fusion Drives can be resized with a version of Mac Disk Utility used to create it or its update, but not with an older version.
- If you want to enlarge a Volume, then the partition or Volume immediately next to the affected Volume must be destroyed to make more space.
- The Volume which is the last of a particular Drive cannot be expanded but can be deleted altogether.
- Using pie charts to adjust Volume size is tedious. We recommend you to use optional sizes rather than pie Chart dividers.
- Please note that only the Mac Drives which were formatted with GUID Partition Map can be resized if you do not want data loss.
- Always remember to take a backup of the Drive and its data before you resize a Mac Volume with Mac Disk Utility as resizing may need you to delete partitions.
- When you resize a Mac Volume with Mac Disk Utility by decreasing its size, a new Volume will be created next to it or right behind it to fill up the leftover space.
- When a partition is deleted, the space from it is added to the preceding partition.
Part 2: How to enlarge a Mac volume with Disk Utility?
Mac Disk Utility is a built-in application in Mac OS but has undergone a series of changes with every OS update. Since the newest and latest version of it is extremely feature-laden, it can be used to enlarge/resize a Mac Volume easily without causing a loss in data.
Just a reminder, the last Volume on the Drive cannot be enlarged. Also, you must be willing to destroy the Volume behind the said Volume.
Many users express their opinions stating that using Mac Disk Utility to Resize a Mac Volume is no longer a cakewalk. However, we feel that its interface is very intuitive and easy to use. Apple has come up with the most organized Mac Disk Utility interface ever which will guide you all along as you proceed to enlarge/resize a Mac Volume.
Imagine a situation where a Drive is partitioned into equal Volumes, but one of those is running out of space since its contents are more than that in the other partitions. What will you do? Simply use Mac Disk Utility and make room in one Volume by decreasing some in the other.
That people prefer using Mac Disk Utility is because it is a one-stop solution for managing storage devices working with Mac. Also, Mac Disk Utility is fully equipped to resize, enlarge, decrease, create and delete Volumes/Partitions, without disturbing the data in the Drive and destructively affecting other Volumes and partitions.
Curious to resize a Mac Volume with Mac Disk Utility? Move on to the next segment and you'll be able to do just that without any data loss.
Given below are detailed steps to resize a Mac Volume with Mac Disk Utility. Follow the instructions carefully to enlarge a Mac Volume without losing any data:
- Open Mac Disk Utility toolkit from applications or utilities.
- Now when the Mac Disk Utility interface is open before you, select the Drive whose Volume has to be enlarged.
- Hit "Partition" on the toolbar to resize a Mac Volume with Mac Disk utility.

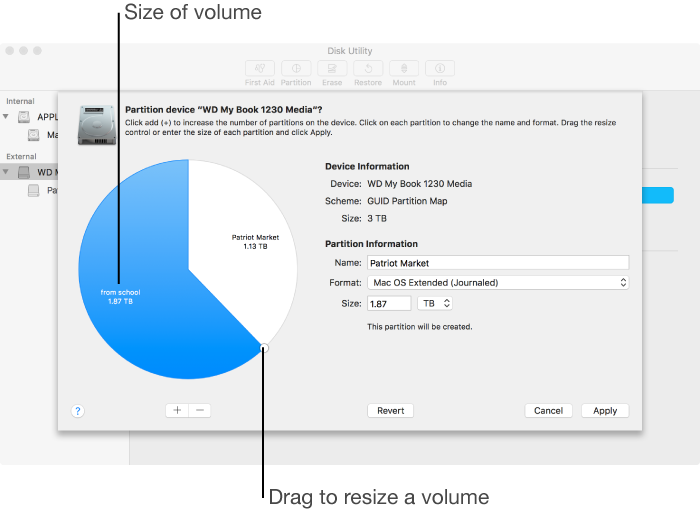
- Now a pie chart will open up showing you the space occupied by each Volume as shown below.
- To move on, let us delete a Volume to enlarge another. Carefully choose and click on the Volume you want to wipe off on the Pie Chart. The selected Volume turns its cooler to Blue and its details are displayed on the right.
- Now delete this Volume which is Blue and hit the minus icon below the pie chart.
- The pie chart will now be altered and warn you about the consequences.
- If you're satisfied, hit "Apply" or hit "Cancel" to choose another Volume to delete it.
- By default, Mac Disk Utility will automatically add up the freed space to the Volume preceding the deleted Volume, but if you want to customize the Volume sizes, select the said Volume, specify its size and hit "Return/Revert". The leftover space will be used to create a new Volume.
- The size of each volume can also be adjusted directly from the Pie Chart as shown below.
- Finally, when the desired Volume is enlarged to a size suitable for you, hit "Apply" and it's done.
Conclusion
Who would have imagined that a Mac Drive Volume could be enlarged so easily? Well, with Mac Disk Utility, resizing a Volume is easy, effective and does not harm the data saved on the drive. The process is very intuitive and steps to use Disk Utility in Mac are extremely simple as stated above.
Do not hesitate to smartly arrange and organize your data in the Mac Drive as it will not disturb the other Drives or the data contained in Volumes of the same Drive.
What's Wrong with Mac
- Recover Your Mac
- Fix Your Mac
- Delete Your Mac
- Learn Mac Hacks


 ChatGPT
 Perplexity
 Gemini
 Claude
 Grok
Grok


Sue Wayne
staff Editor