How to Fix Error Code 43 on Mac [4 Proven Methods]
Mac Error Code 43 occurs when Finder cannot move or delete a file due to illegal filename characters, locked items, or drive corruption, and is resolved by repairing the storage drive, resetting system memory, or forcing Finder to restart.
● To fix temporary Finder initialization issues, press Option + Command + Esc simultaneously to forcefully quit and relaunch the Finder application.
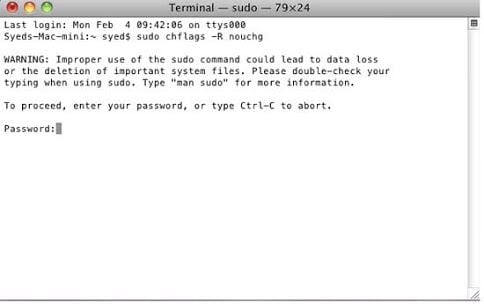
● If locked files inside the Trash are causing the prompt, launch Terminal as an administrator, execute the command chflags -R touching to unlock the data, and drag the files into the Terminal to remove them.
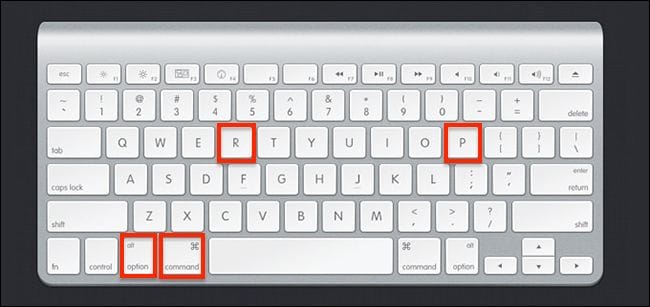
● To clear underlying firmware corruption, reset the PRAM and NVRAM by holding the Command + Option + P + R keys for 20 seconds immediately after restarting the Mac until the second system chime sounds.
Ask AI for a summary
"I'm getting the error code 43 on Mac whenever I try to move my documents. Can someone tell what is error code 43 and how to fix it?"
If you are a Mac user, then you might already know how smooth and secure the macOS is. Nevertheless, there are times when users encounter issues like error 43 on Mac. The error usually occurs when we try to delete some files or move them from one location to another. Since there can be different reasons for the macOS error code 43, it is important to diagnose the problem and troubleshoot it accordingly. In this post, I'm going to tell you what is error code 43 and how we can fix it.
Part 1: What is Error Code 43 on Mac?
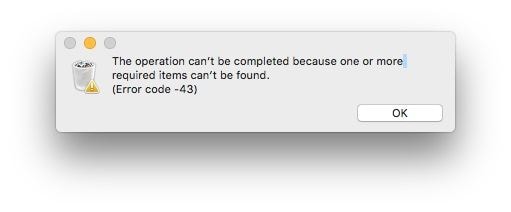
In order to fix the error code 43 on Mac, it is important to know what could have caused it in the first place. Ideally, when we try to move some files from one location to another or delete them from the storage or Trash, we get the error 43 Mac screen. It states that "The operation can't be completed because one or more required items can't be found. (Error code -43)" which stops the transfer or deletion of files on Mac.
While the macOS error code 43 can take place at any time, it is mostly observed while moving files from a USB drive. For instance, you can get the error code 43 USB on Mac while deleting some files from a pen drive or transferring them from the USB drive to your Mac storage.
You could be getting the error code 43 prompt on your Mac due to the following reasons:
- It can happen when there are no shared points in the disk where your files are stored.
- Chances are that the files you are trying to access might not be available anymore.
- The disk or partition where your data is stored can be corrupted or unavailable.
- It can happen if you are trying to access a file with illegal characters in the name (like special symbols that are not allowed in Mac).
- The file could not be downloaded or copied entirely from its source and now it is unavailable or corrupt.
- The content you are trying to access could be locked or might be in use by some other application presently.
- You might not have the authority to access the respective content (it can be locked by the admin).
Apart from this, any other issue related to the hard disk partitions or the macOS firmware can also cause the error 43 on Mac.
Part 2: How to Fix Error Code 43 on Mac?
As you can see, there could be all kinds of reasons for getting the error code 43 on Mac. Therefore, you can try some of these suggestions to fix error 43 on Mac, depending on its major cause.
Method 1: Fix the Mac Drive with Disk Utility
The easiest way to fix the Finder error code 43 is by using the Disk Utility application in Mac. It is an inbuilt application that can be used to scan your hard disk and repair it automatically. In case if a hard disk corruption has caused the MacBook error code 43, then this would be able to fix it.
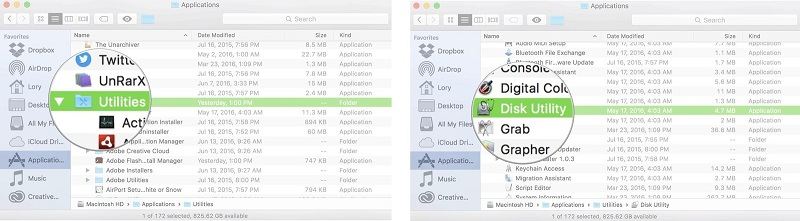
Step 1. Firstly, you need to launch the Disk Utility application on your Mac. For this, you can just look up "Disk Utility" in the Spotlight search or go to Finder > Applications > Utilities > Disk Utility.
Step 2. Once the Disk Utility application would be launched, you can view various partitions and external drives on the sidebar. From here, select your Macintosh HD (the main storage of your Mac).
Step 3. This will enable various operations on the right that you can perform on your hard disk. From the toolbar, click on the "First Aid" button and choose to run the first aid scan on your hard disk.
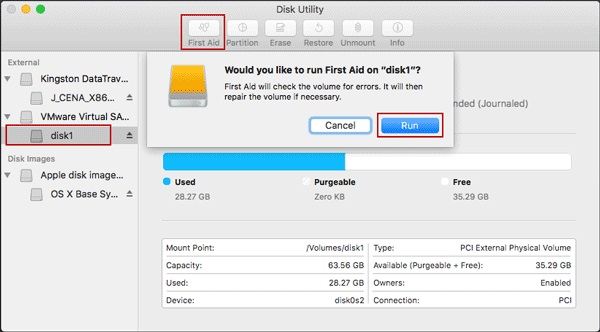
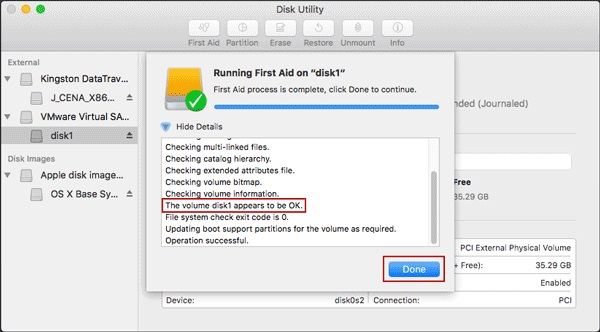
Step 4. Agree to the prompt and wait for a while as your Mac would run the scan and tries to fix the error code 43 on Mac. In the end, you can view the results and restart your Mac to resolve it.
Method 2: Reset PRAM and NVRAM on Mac
Chances are that a firmware issue related to your Mac's PRAM or NVRAM can also cause the error 43 in Mac. PRAM, which stands for Parameter Random Access Memory, stores details related to your system configuration, display settings, hard disk configuration, and so on. Similarly, NVRAM (Non-Volatile Random Access Memory) has details about the device, display, and other permanent system components.
If either PRAM or NVRAM has been corrupted in your Mac, then it can cause numerous issues – including the error code 43 USB on Mac. You can fix it by resetting the PRAM and NVRAM on your Mac by following these steps:
Step 1. Firstly, go to your Mac's Finder and click on the "Shut Down" option to turn your Mac off.

Step 2. Wait for a while for Mac to get turned off and press the Power key to restart it. Immediately, press and hold the Command + Option + P + R keys simultaneously for around 20 seconds while your Mac restarts.
Step 3. Now, you will hear the system chime for the second time that will depict the PRAM has been restored on Mac. Let go of the keys now and wait as your Mac would be restarted with no issues.
Method 3: Get Rid of Locked Files from Trash
A while back, when I got the error 43 on Mac, I discovered it is because of the presence of some locked files in the Trash. If the files are locked or not accessible, then you can't delete them, leading to the Finder error code 43 prompt. In this case, you can run the following code on Terminal and fix the macOS error code 43.
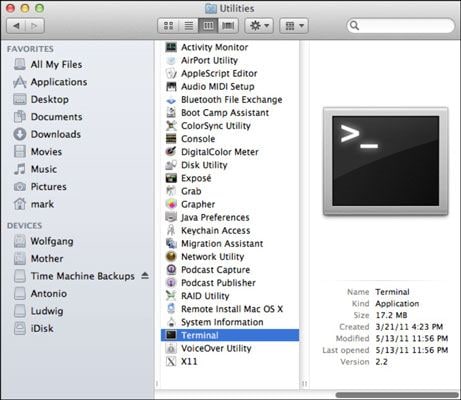
Step 1. Firstly, you need to launch a Terminal (as an administrator) on your Mac. For this, just go to its Finder > Applications > Utilities and launch Terminal.
Step 2. After launching Terminal as an administrator, just run the command "chflags -R touching" to unlock the files on your Mac. To proceed, you would have to enter the password of your account.
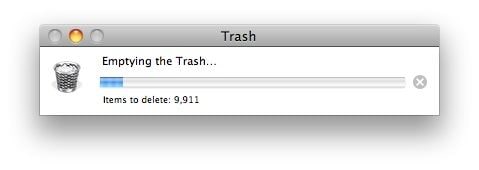
Step 3. Once you have successfully processed the command, launch the Trash application on your Mac, and select all the files present in it by pressing the Command + A keys.
Step 4. This will just select all the files in the Trash folder. Now, just drag all files from Trash and drop them to the Terminal to get rid of them. You can also double click the Trash icon to wipe it as well.
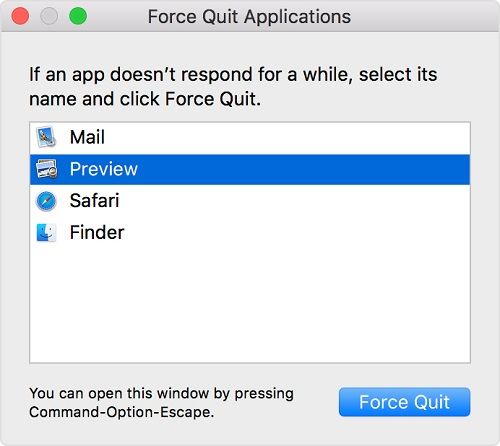
Method 4: Forcefully Quit Finder
Finder is one of the most important components in Mac which is responsible for the way we interact with the system. Nevertheless, sometimes it might not get initialized correctly, leading to the Finder error code 43 in Mac. The good thing is that you can easily fix this issue by forcefully quitting the Finder.
Step 1. Just go to the upper-left corner of your screen, click on the Apple logo, and choose to Force Quit the Finder. Alternatively, you can also press the Option + Command + Esc keys at the same time.

Step 2. This will open the Force Quit application window on the screen. From here, you can just select Finder and click on the "Force Quit" button to close it forcefully.
Part 3: How to Recover Lost Data After Fixing Error Code 43?
Sometimes, while fixing the error code 43 in Mac, users end up losing their important files. For instance, the files that are locked could be deleted or you would have formatted the USB drive having some corrupt content. Well, if you have also lost your important files in the process, then you can take the assistance of Recoverit Data Recovery. The application can scan the internal hard disk of your Mac or any other external device for unforeseen data loss.
Video tutorial: How to Recover Deleted Files on Mac Even Emptied Trash
By following a simple click-through process, you can easily get back all kinds of lost content from the selected location. The tool supports every major kind of data like photos, videos, documents, music, compressed files, and so on. Besides that, it also lets us filter the results and even preview our files beforehand. To learn how to use Recoverit to get back your lost files in Mac, just follow this basic drill.
Step 1: Select a location to scan
Firstly, just launch the Recoverit application on your Mac by visiting Finder > Applications and simply select a location to scan from its home. You can pick the entire drive, a partition, or browse to select folders to scan. If you want, you can connect an external device to your Mac and select it from here.

Step 2: Sit back and hold on for a while
After selecting the target location, simply start the data recovery process and wait for the scan to be over. You can view the progress of the operation on the screen and even halt it in between.

If you want, you can also use the filter option of the tool to pinpoint the type of data you are looking for. There are different options to filter the results on the basis of file type, size, and more.
Step 3: Preview and save your data
After completing the process, you can also preview your files like photos, audios, documents, etc. on the interface. Presently, the application supports the preview of files of a maximum of 15 MB size. In the end, you can preview and select the files that you have lost and click on the "Recover" button to get them back.

While the first scan would be able to meet your requirements, you can also run an advanced video recovery process if you want to from here.
Part 4: How to Avoid Error Code 43 from Appearing on Mac?
Now when you know how to fix the error 43 on Mac, you would easily be able to use your Mac without any hassle. Though, if you don't want to encounter the error code 43 on Mac again, then consider following these suggestions.
- Whenever you are transferring your data from one place to another, make sure the process is complete and don't stop it in between.
- Similarly, while removing files from your Mac or Trash, let the process be completed.
- Keep all the applications up to date and consider upgrading your Mac regularly to avoid security threats.
- Scan your Mac's storage every now and then and avoid any malpractice that can corrupt it.
- Only use reliable third-party applications while accessing your data and make sure that you save your files in a secure manner.
- Try to make different user accounts on your Mac and lock your important data via the admin account.
- Avoid the overwriting of your content by saving files under the same names or folders.
- Try not to abruptly restart or shut down your Mac that can corrupt your files or applications.
This brings us to the end of this extensive guide on what is error code 43 and how to fix it. As you can see, the error code 43 on Mac can happen due to numerous reasons that I have discussed here. Also, I have come up with different ways to fix the macOS error code 43 that you can implement without any technical hassle. Lastly, if you have lost your data while fixing the error 43 on Mac, then consider using a reliable application like Recoverit Data Recovery. Trusted by professionals, it will let you get back your lost data under different scenarios without any trouble.
Frequently Asked Questions (FAQ)
- What is Error Code 43 on a Mac?
A: Error Code 43 represents is a generic Finder message. It means an operation, like moving or deleting a file, cannot be completed. The core issue is that Finder cannot locate the necessary file data or has an issue with special characters in the filename.
- Why does Error Code 43 happen when I move files?
A: Error Code 43 occurs is often simple: the file's name contains illegal characters (like / or :), the file is locked, or the drive itself has minor corruption. It can also happen with incomplete downloads where the file is essentially a placeholder.
- How do I fix Error Code 43 on my Mac?
A: check the filename for odd characters and try force-relaunching Finder. If that fails, resetting your Mac's PRAM/NVRAM is a very effective solution that can clear the underlying system glitch causing the error.
What's Wrong with Mac
- Recover Your Mac
- Fix Your Mac
- Delete Your Mac
- Learn Mac Hacks


 ChatGPT
 Perplexity
 Gemini
 Claude
 Grok
Grok


Sue Wayne
staff Editor