External Hard Drive Keeps Disconnecting on Mac? All Fixes
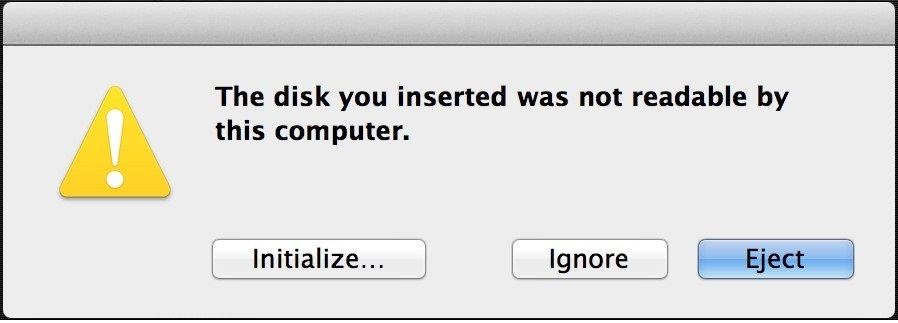
Nowadays, some people are having trouble while connecting the external hard drive with Mac. It's not an uncommon problem. Even a few days ago, I myself got the same issue while attaching an external hard drive with my mac book pro, with the warning "the disk you inserted was not readable by this computer" kept popping up on my screen.
Before discussing the solutions, I would like to put some light on why is this problem occurring?
Why does my external hard drive keep disconnecting?
If you connected your external hard drive with your Mac, and it's not responding like discussed above, definitely there is a kind of particular problem behind the scene, that you didn't recognize yet. I evaluated some possible cusses that are going to mention below.
- The hard drive didn't plug-in properly
- Data cable is damaged or exposed( try different cable)
- USB cable connector got damage.
- Hardware or software issue.
- A USB port( Thunderbolt port) is damaged, it might be a hardware problem of your Mac, so try a different port.
- Your Mac might be working slow.
- If your external drive connected through a wall outlet, use a different wall outlet
- This problem might because of your mac or USB port( thunder-bolt), so try a different Mac to assurance.
- Test your external hard drive on a different Mac or pc; sometimes, this problem occurs due to the hard drive damaged.
Whenever these kinds of problems occur, your external hard drive doesn't show on your Mac. It is incredibly annoying when you are transferring data between two devices. Furthermore, the risk of data corruption can be increase while transferring data from the external drive to Mac.
For preventing this kind of risk and problems, There is numerous website which are providing not-effective methods. Still, I have some experimented solutions that work for such type of problem.
Solution 1: Check if your Mac can recognize the external hard drive
This kind of approach makes you able to check whether your mac port or hard drive is physically damaged. If your mac book/ pc port or external drive is damaged, your Mac will not identify the external hard drive. And you will get the same dialogue on-screen as I showed above. You must have to check the Mac to recognize the external hard drive through the following steps:
Step 1: Click on the apple icon on the upper-left corner of your screen.
Step 2: Click on about this Mac.

Step 3: Click on the Overview button, and after that, select the system Report option. Through this action, a screen will appear, system information window.
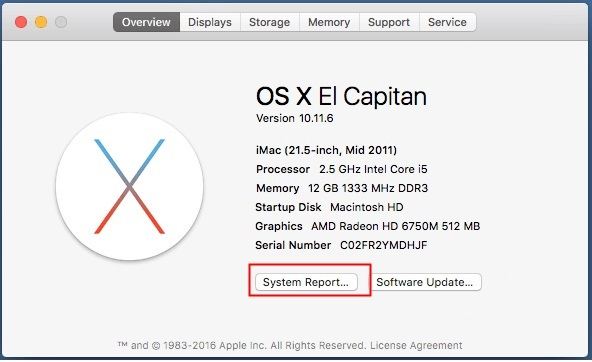
Step 4: After displaying the system information window, double-click on the hardware option to expand the system information category.
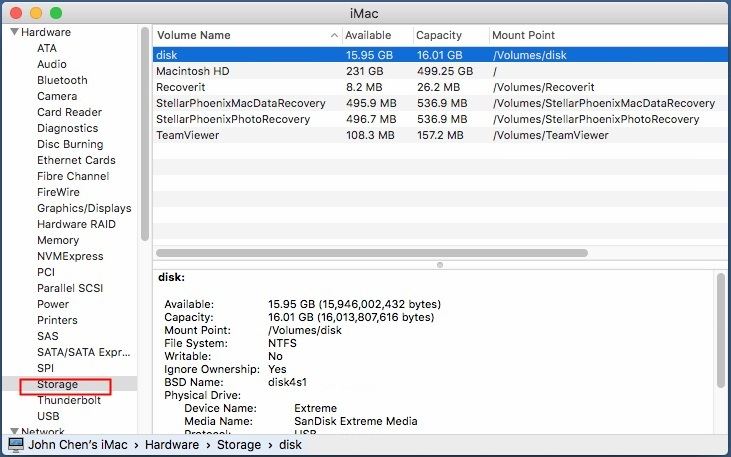
Step 5: Select the storage if the hard drive you inserted is displaying in the right of the panel, which means there is no issue with your Mac's port or connected hard drive, so you just need to move on the following method. If it didn't display in the right panel, that means there is a problem with your Mac's port or drive for considering this issue; you can do the following things:
Attach the external hard drive to a different computer to check whether it is working or not. If it is not working or displaying on another computer, then your external hard drive has a software or hardware problem. The only option to resolve this problem is to replace your external hard drive with a new one.
Use a new hard drive on your Mac's USB port to check whether the device is working on it or not. If it does not work, there is a severe problem with your Mac hardware. Try another available port of your Mac, or take it to a repair workshop for further inspection.
Solution 2. Resolve this issue by using Disk Utility
Sometimes, this kind of problem can be because of missing the disk partition table. You can even utilize the Disk utility function, which is a built-in Mac to repair your external hard drive. It is advantageous to fix numerous hard drive problems such as external hard drives to keep disconnecting issues on your computer or laptop.
Here is instruction, how you can repair your external hard drive by using Disk Utility.
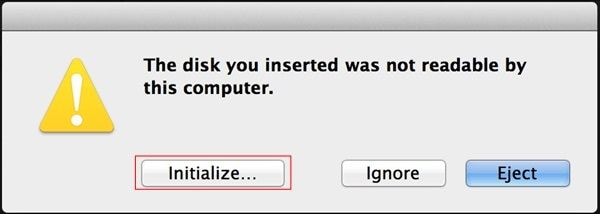
Step 1: Click on the initialize button when the error message dialogue appears. After that Disk utility window will open.
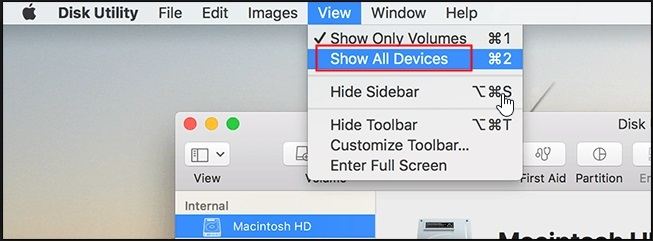
Step 2: Click on the view option in the menu bar, and choose Show all devices.
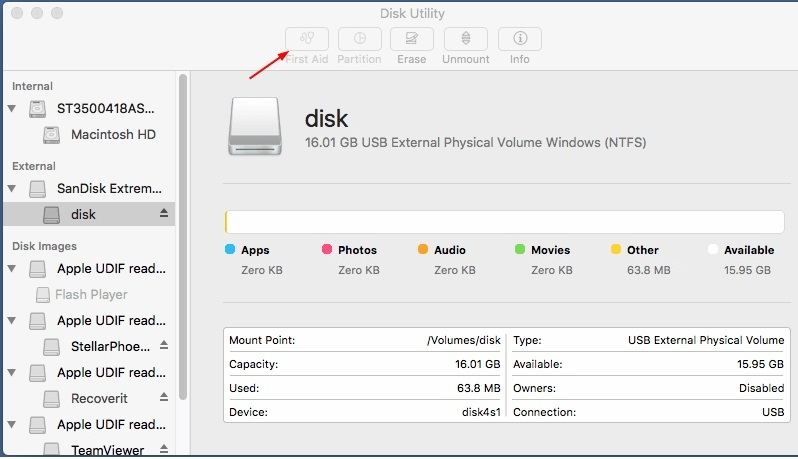
Step 3: On the left pane of the display screen, click on the external device. After that, click on the First Aid tab option.
Step 4: Click on the "Repair Disk" in the bottom window for a start repairing process.
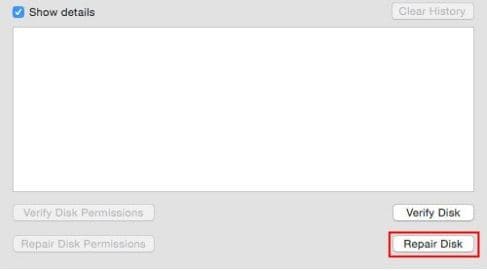
Step 5: This step will take several minutes for processing. After done repairing. Check back your external hard drive by connecting it again.
Solution 3.Change finder settings in your Mac
There is one of the most common methods that people usually use to resolve external drive issues. Change the finder settings to make your external drive recognize on your Mac. It is also a well-knowing cause that makes your mac system unable to understand the external devices. For fixing this issue, you need to follow some instructions to resolve it by changing the finder settings.
Step 1: First, open your Finder window in your Mac. Go to the finder preference.
Step 2: When finder preference got open, now click on the general settings option.
Step 3: In the last phase, you must have to assure that the external disk option is enabled or not. If it is allowed, then the process got to end here, but if it does not, then make it let instantly and save all the changes.
Solution 4. Recover or backup your drive data before format
Sometimes, corrupted files can be a significant cause of such type of error on your Mac. File corruption can cause by a malicious virus, improper shut down of your Mac, or forceful restart. To resolve such kind of issue, you need to recover your data first and, after that, perform the hard drive format. But the question is rising on this point that how can we repair and recover our corrupted, lost data.
For dealing with this problem, you will need to contact third-party software because Mac does not have such features to make it recover your drive data. If you are still sticking with; what kind of software you need to recover your data, I will recommend you Recoverit software.
Recoverit data recovery software makes you able to recover more than 1000 formats of files from a variety of modern storage devices and operating systems such as Mac OS, MS Windows( all version), digital cam, USB drive, Drone cam, SSD drive, CF or SD card, etc.
Furthermore, you can repair and recover various type of files like video, audio, photos, documents, emails, and many others.
Recoverit will take several seconds to initiate on your Mac to start itself when it got launched. Now you are three steps far from your lost data.
Step 1: Select your device
First, make it launch Recoverit data recovery software on your Mac.
To recover your specific data from your external hard drive, you need to select the partition or hard drive by clicking on your external hard drive. And then click on the "Start" button to initiate the recovery process.

Step 2: Scan the location
In this step, Recoverit software will start scanning your files all around the drive. Using an advancing search algorithm will find out all your lost, corrupted, encrypted, deleted, or formatted data.
During the scan, if you get your specific data, then you can pause scanning at the spot.

Step 3: Preview and Recover Files
Recoverit software allows you to preview all the recoverable data or files before recovering them. You can simply select all targeted files such as video, audio, documents, etc. manually by clicking on the "Select" option to recover all those files chosen by click on the Recover button. After click on it, you will retrieve all your recoverable selected data will back.

Furthermore, it will recommend you to save it on another location rather than the original location to prevent overwriting data.
Solution 5. Change the format of your external hard drive
This type of issue usually occurs due to the external hard drive's format, especially if it is NTFS. Mac does not support the NTFS format officially. If your external hard drive is NTFS formatted, it might be readable for you but not writeable. And it might be possible that you get such type of external drive disability error usually occurs when you insert your external hard drive in Mac. You can fix this problem by, change the format of your external hard drive from NTFS to exFAT, that supported by both Windows and OS X.
Note: Keep in mind that changing the format of your external hard drive can erase all the data permanently. You must have to make a backup of all data of your external drive. For doing this, you will need a windows computer that can easily support NTFS format to save you all data in it.
For ensuring the drive format, follow some steps:
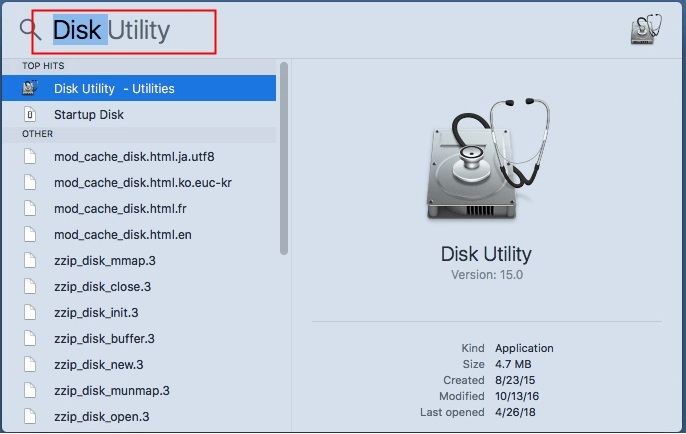
Step 1: Click on the search option in the upper right corner of your mac screen. After then, a spotlight search window will appear

Step 2: Type the Disk utility in your keyboards and press enter. Disk Utility window will open.
Step 3: Select your external disk drive and then select on the info tab of Disk Utility function.
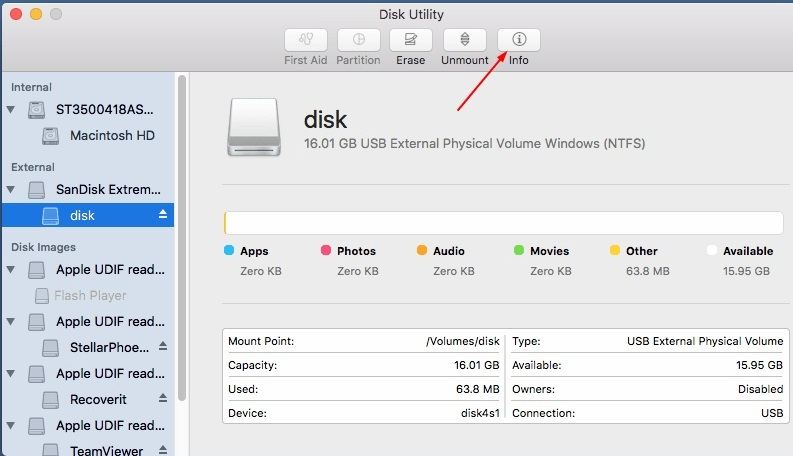
Step 4: Check whether the file system is exFAT or NTFS. If NTFS, then follow some steps below to change its format.
There are four steps you will follow to change the format of your external drive from NTFS to exFAT.
Step 1: Open Disk Utility.
Step 2: Again, select the disk drive from the sidebar and click on the erase option.
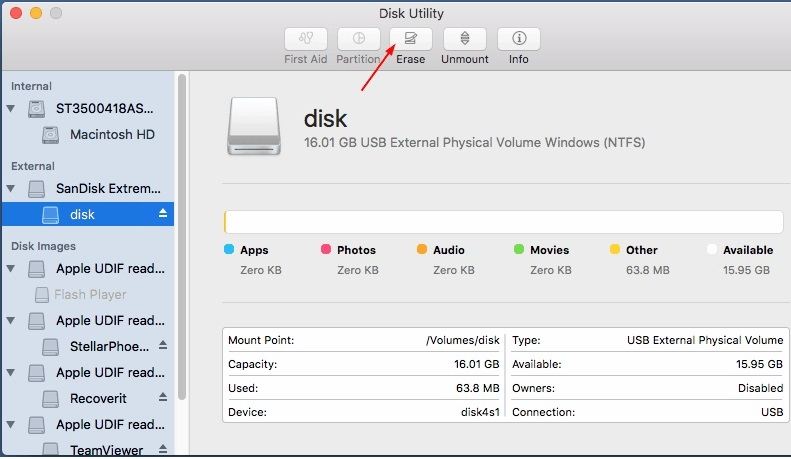
Step 3: Choose the format EXFAT and click on the Erase button. This process will take several seconds to format all your drive data. You need to be patient for this procedure to complete.
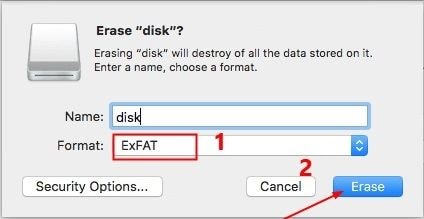
Step 4: Now, you can check if your Mac can read an external hard disk drive.
If the concerning problem persists, then try the next following method.
Solution 6. Fix error with terminal
if your external hard drive is disconnecting you on Mac, you can even check and resolve this error through USB and with the terminal. For solving this issue, you need a few steps to follow that discuss below:
Step 1: The very first, you need to open Terminal application in utilities, then type:
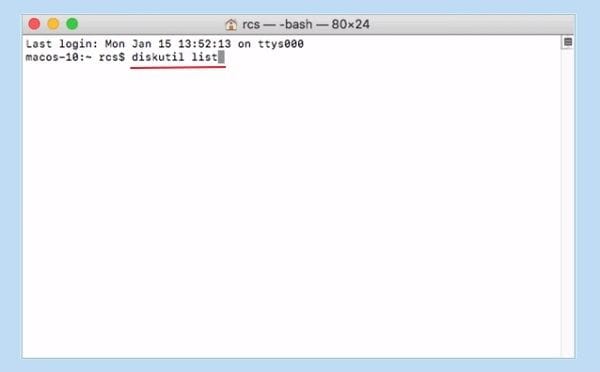
Step 2: And then you will find the number of your external hard drive or USB by type: diskutil info disk2 and press return.
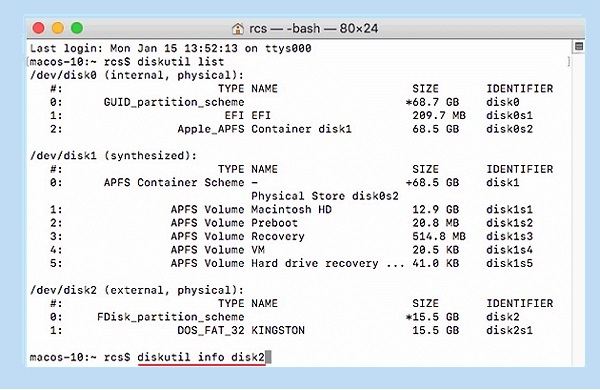
Important: Here, you need to replace 2 with your external disk number.
Step 3: And now you will type: diskutil eject disk2 and press return.
Step 4: Type the diskutil list on the keyboard and press return. When the USB drive gets disappear in the Terminal list, you will close the window instantly.
Step 5: You will simply shut down your mac Terminal application and then open the console to evaluate the drive errors.
Step 6: At last just, click on "Faults and Error" to make sure whether there is still any problem or not.
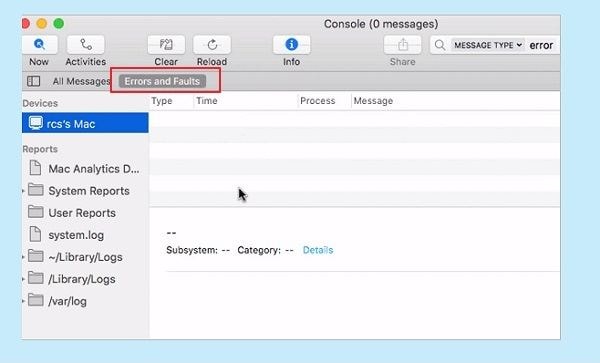
Performs all the steps we discussed above; you will plug in your external drive in Mac again. If the error shows again after reconnecting the external hard drive, then it is pretty sure that your external drive is entirely secure. So, now you can connect it with another mac to ensure its visibility.
Essential Suggestions to Reconnect External Hard Drive
1. The right way to connect External Hard Drive on Mac
Usually, when you connect external hard drive on mac port quickly, it ruins the external hard drive cable and sometimes ports also and make it disabled on your Mac. That is why whenever you connect your external hard drive on Mac, you should do it in a very decent way so that the usability age of cable and port might extend, and also your Mac will be able to recognize it frequently.
2. Right Way to Prevent External Hard Drive Disconnecting Randomly
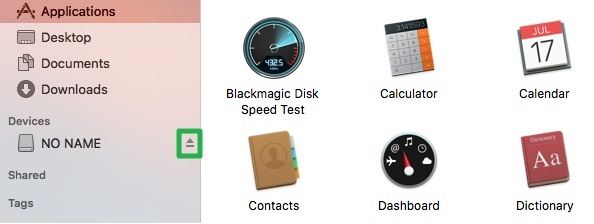
Simply just click on the finder, at the left bottom of the screen. Click on the eject external icon by selecting your external hard drive name.
3. Right Ways to Prevent External Hard Drive Lost on Mac
- Keep you mac ports clean and dust-free
- If your Mac is getting heat up during connecting or disabling, you must take it to repair shop to assure about motherboard problem issues.
- Keep making your files backup on a regular base on multiple locations.
- Install antivirus application on Mac and update it monthly.
Conclusion
In final words, I hope you got to fix your mac error "the disk you inserted was not readable by a computer." There are several other ways to resolves this issue, but recommend methods are highly workable. If you are still having this issue, you can feel free to comment below. We will love to help you to resolve this issue with multiple solutions.
Frequently Asked Questions
1. Why does my external drive disconnect when my Mac sleeps or is idle?
This is often caused by a power-saving setting. To fix this, go to System Settings > Energy Saver and uncheck "Put hard disks to sleep when possible." This prevents macOS from cutting power to the drive, stopping the external drive connection drop when idle.
2. Could a bad cable cause my external hard drive to keep disconnecting?
Absolutely. A faulty cable or a loose USB port is a primary reason for an external drive disconnecting. Before trying software fixes, always use a different, high-quality cable and connect the drive to another port on your Mac to rule out a simple hardware issue.
3. Is it dangerous if my Mac external drive disconnects randomly? I'm worried about data loss.
Yes, sudden disconnections can be risky and may lead to Mac external drive disconnect data loss or file system corruption, as the drive might not have finished a write operation. It is critical to resolve the disconnection issue and back up important data immediately.
4. Why does my external drive disconnect when my Mac sleeps or is idle?
This could indicate a file system error. Open Disk Utility, select your external drive from the sidebar, and run "First Aid." This built-in tool will scan for and attempt to repair any errors on the disk, which can often resolve random disconnection problems.
What's Wrong with Mac
- Recover Your Mac
- Fix Your Mac
- Delete Your Mac
- Learn Mac Hacks


 ChatGPT
 Perplexity
 Google AI Mode
 Grok
Grok


Sue Wayne
staff Editor