
Quick Answer: Converting NTFS to exFAT Safely
The Data Loss Reality:
It is mathematically impossible to convert an NTFS file system architecture directly into an exFAT structure inline without erasing data. Changing the master file tables requires a complete partition wipe (Formatting). You must back up your files first or use an application like Wondershare Recoverit to restore data blocks immediately after a quick format.
When to switch to exFAT: Choose exFAT if your storage drive (USB flash drive, SD card, or external SSD) needs to read and write seamlessly across both Windows and macOS environments without native OS size caps.
Fastest Native Fix (Disk Management): Right-click the Start Menu > open Disk Management > right-click your target volume > click Format > change the File System drop-down menu to exFAT > check Quick Format.
Advanced Fix (Command Prompt): Run CMD as administrator and use the command sequence: diskpart $\rightarrow$ list disk $\rightarrow$ select disk n $\rightarrow$ clean $\rightarrow$ format fs=exfat quick.
Is it possible to convert NTFS to exFAT without losing data?
No, it's important to back up your files before converting. Whether it's an HDD or an SSD, whether you want to convert NTFS to exFAT on the local drive or convert NTFS to FAT32 on an external hard/USB drive, this operation involves formatting the hard drives and will erase all the data on the disks.
So, what should you do when you want to change the NTFS hard drive to exFAT to solve more potential problems and improve the performance of your computer?
In this situation, there are two options to prevent any data loss resulting from formatting: one is to back up the hard drive beforehand, and the other is to recover the data later. You can use the method in the bonus tip to recover the data after formatting.
Solution |
Application |
| Method 1. Convert NTFS Drive to exFAT Using Disk Management | All users can do it, but if you attempt to format a USB flash drive or SD card using Disk Management, you can be informed that the device is write-protected. |
| Method 2. Convert NTFS Drive to exFAT Using CMD | Professional users can do it, but you risk making errors when using it to format an internal NTFS disk to exFAT. |
| Method 3. Effective NTFS to exFAT Converter - AOMEI Partition Assistant | All levels of users can do it. Windows Vista/XP/7/8/10/11 are supported. It has a simple, powerful UI. Upgrade to Professional to convert dynamic disk to basic without data loss and restore lost partition. |
Part 1: Things to Keep in Mind Before Converting NTFS to exFAT
- As formatting will wipe your data from the storage device, make a backup of your crucial files. Copy them and store them somewhere secure, or utilize data backup software.
- Compared to NTFS file system, exFAT has its benefits and Check the video below to learn why you may not choose the exFAT file system for your storage devices.
For Windows XP/Vista/7/8/10/11
For macOS X 10.10 or later
Structural Properties: NTFS vs. exFAT File Systems
Understanding why you are altering your storage framework helps ensure device compatibility across modern hardware standards:
Feature Specification |
NTFS (New Technology File System) |
exFAT (Extended File Allocation Table) |
| Primary Platform Optimize | Windows Native System Drives (C:) | External Storage Media / Flash Storage / SD Cards |
| Cross-Platform Read/Write | Read-Only on macOS (Requires third-party drivers) | Full Read/Write natively on Windows, macOS, & Linux |
| Maximum File Size Limit | 16 TB (Architectural Limit up to 8 PB) | 128 PB (Virtually Unlimited for Consumer Use) |
| Journaling & Fault Tolerance | Yes (Highly resilient against unexpected power loss) | No (Prone to corruption if pulled out without safely ejecting) |
| Ideal Hardware Use Case | Internal HDDs, Enterprise NVMe SSDs | USB Sticks, Camera SDXC cards, Steam Deck/ROG Ally MicroSDs |
Also read: Difference between NTFS and exFAT
Part 2: How To Convert NTFS to exFAT
Format Safetynet: Selecting the Right Tooling Suite
To ensure you do not brick or damage the data tracking lines on large multi-terabyte external enclosures, match your device configuration to the proper utility pathway:
Device Architecture Group |
Risk Level |
Optimal Interface Choice |
Reason for Selection |
| Under 32 GB Flash Drives | Low | Disk Management | Fast, simple execution for basic small consumer flash chips. |
| Removable Media with Partition Errors | Medium | Windows Diskpart Terminal (CMD) | Bypasses system process locks to clear stubborn master boot sectors. |
| Dynamic Disks / Large External HDDs | High | AOMEI Partition Assistant | Protects partition alignments and handles advanced volume configurations. |
| Accidental Formatted Drives | Critical | Wondershare Recoverit Deployment | Scans the unallocated raw sector data layers before files get overwritten. |
Method 1: Convert NTFS Drive to exFAT Using Disk Management
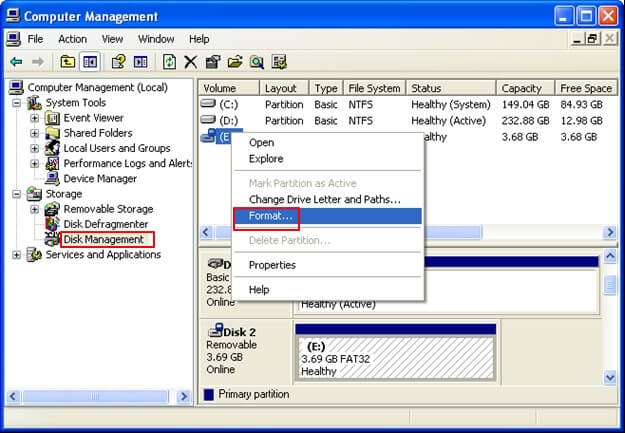
Step 1. Click "Manage" from the context menu of This PC or My Computer.
Step 2. Then choose "Disk Management" in Device Manager.
Step 3. Right-click the desired device in Disk Management and choose "Format."
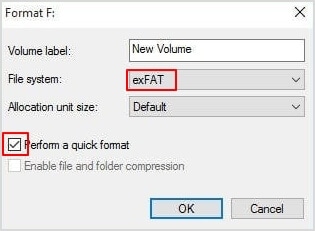
Step 4. Pick "exFAT" as the target file system for the chosen device. Then, check "Quick Format" and click "OK" to confirm the NTFS to exFAT process.
Method 2: Convert NTFS Drive to exFAT Using CMD
Step 1. First, connect your USB memory stick to your computer and wait for it to recognize it.
Step 2. Go through Start > Accessories > Command Prompt or Start > Run > type "cmd" > Enter to launch Command Prompt.
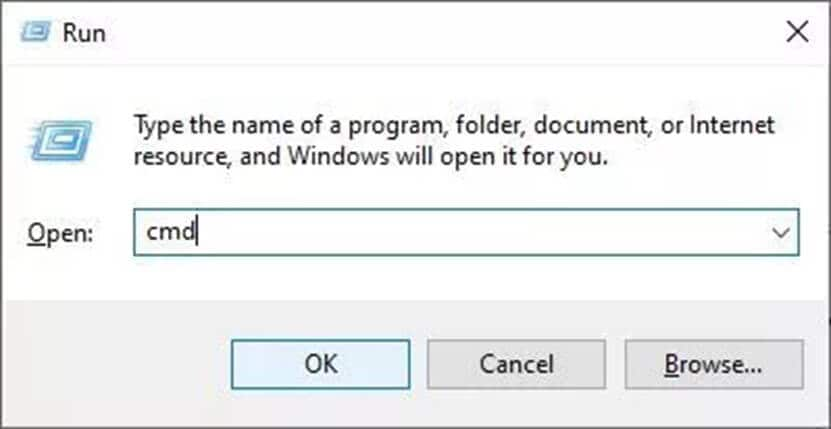
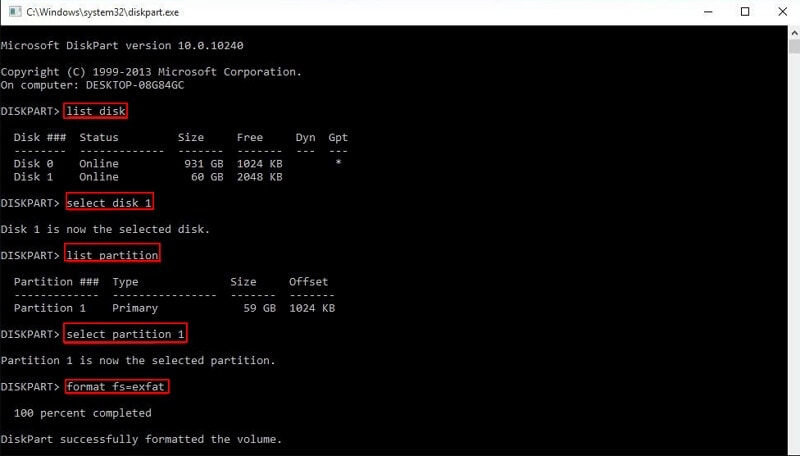
Step 3. Type the commands one by one in the Command Prompt:
list disk
select disk n ("n" is the number of your targeted drive)
list partition
select partition x ("x" is the number of your targeted drive partition)
format fs=exfat
exit
Pro Tip 2026: Stripping the "Disk is Write-Protected" Attribute Flag
When trying to format a high-capacity flash drive from NTFS to exFAT using Windows native utilities, users frequently run into a wall with a "The disk is write-protected" warning block. This usually occurs because the legacy NTFS permission descriptors are locked down by the host OS security layer. You can clear this attribute entirely using Command Prompt before running your formatting pass. While active inside the diskpart tool interface, select your target drive and execute this line:attributes disk clear readonly
This forces the storage hardware flash controller to drop its hardware lock, enabling the format fs=exfat quick engine to overwrite the partition tables smoothly.
Method 3: Effective NTFS to exFAT Converter - AOMEI Partition Assistant
When you convert NTFS to exFAT using the Diskpart command line, errors are inevitable if you are unfamiliar with it. When you try to format a USB flash drive or SD card to exFAT using Disk Management, you can get a warning that the disk is write-protected.
Your best option at this stage may be an efficient NTFS to exFAT converter like AOMEI Partition Assistant Standard. The Windows system-specific partitioning tool AOMEI Partition Assistant Standard is compatible with Windows 11/10/8.1/8/7, XP, and Vista. It has a straightforward user interface and robust features. In addition, you can upgrade to Professional to access additional capabilities like recovering lost partitions and downgrading dynamic disk to basic without losing data.
Step 1. You must connect the external drive to a Windows computer and free download AOMEI Partition Assistant Standard to format NTFS to exFAT.
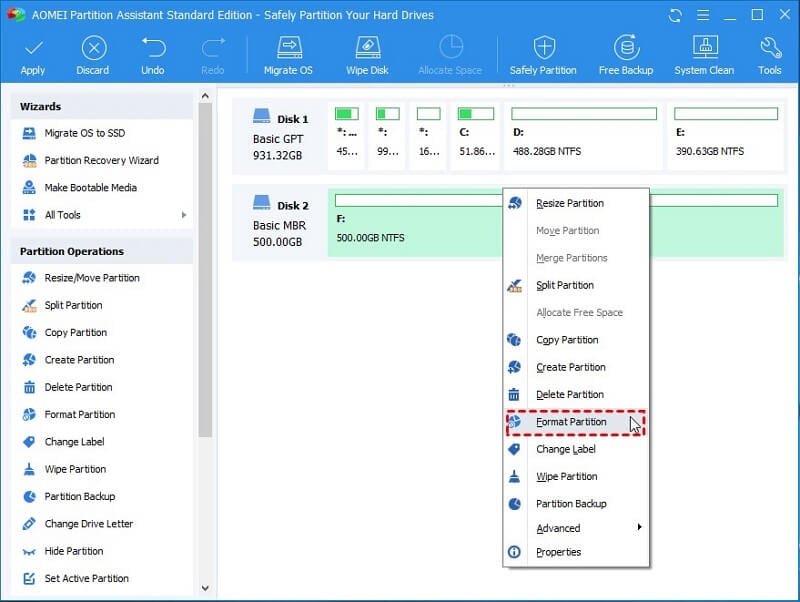
Step 2. Open AOMEI Partition Assistant Standard. Right-click the external disk and choose "Format Partition" (Take converting NTFS to exFAT on Windows 11, for example).
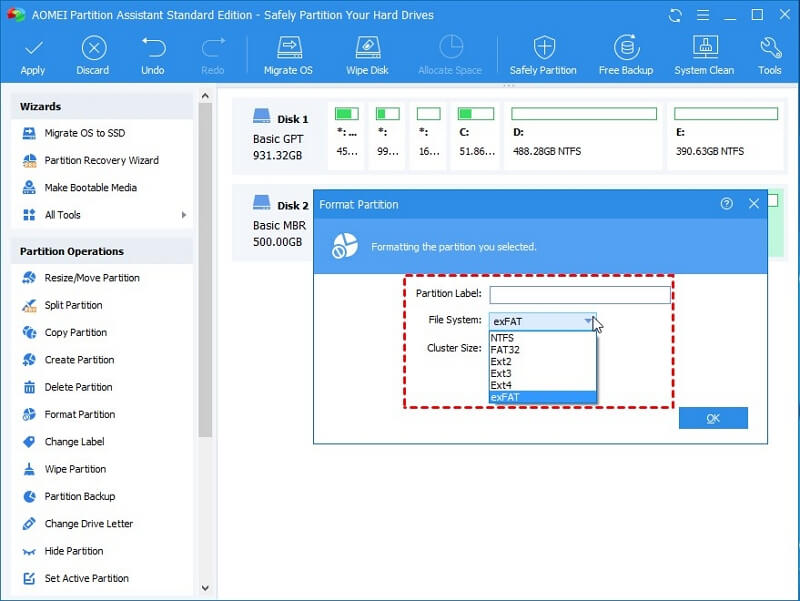
Step 3. In the File System drop-down menu, choose exFAT. You can customize your own "Partition Label" and "Cluster Size" in this box. Then select the "OK" button.
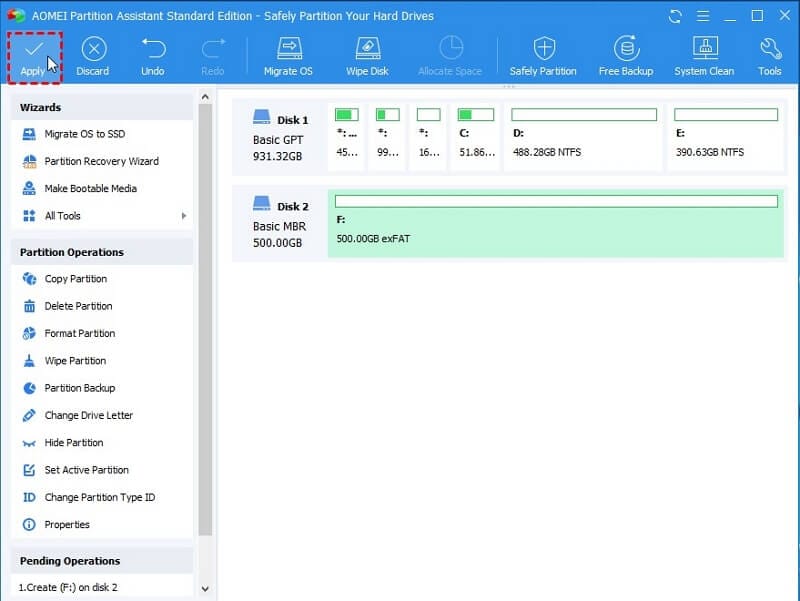
Step 4. Check the "Pending Operations" box in the main interface, and click "Apply" to commit the change from NTFS to exFAT.
If you don't want to lose the data stored on the disk, copying the partition for backup is a good option since formatting will wipe all data on the sector.
Flash memory, such as a USB flash drive, is the best device to use exFAT. When converting an internal or external HDD to exFAT, use caution.
Video Tutorial on How to Convert NTFS to Exfat Without Losing Data
For Windows XP/Vista/7/8/10/11
For macOS X 10.10 or later
Part 3: How To Recover Data After Formatting NTFS to exFAT
Sometimes the hard disk is accidentally formatted, resulting in the loss of data files. Is it possible to retrieve the data from a formatted hard drive? Please refrain from saving any new data to the hard disk that has been formatted, as this will result in file overwriting. But don't worry; you can use the top data recovery software - Wondershare Recoverit, to recover lost data from formatted hard drives safely and successfully.
Wondershare Recoverit - Best Data Recover Software
5,481,435 people have downloaded it.
Supports data recovery from all file systems, including exFAT, FAT32, NTFS, APFS, HFS+, Raid, RAW, and ext4 under the Linux OS.
Supports 500+ data loss situations, such as hard drive formatting, emptied recycle bin, partition loss, computer crashes, etc.
Restore data from 2000+ storage devices like USB drives, SD cards, SSDs, HDDs, Floppy Disks, Pen Drive, etc.
Data Recovery Freeto try, and Professional version to enjoy more.
How To Recover Data From Formatted NTFS/exFAT Hard Drives:
Step 1. Choose the formatted drive.
Launch the Recoverit Data Recovery application after installation and choose your formatted hard drive under the Hards Drives and Locations tab.

Step 2. Scan for lost data.
The formatted hard drive recovery program will begin looking for and scanning the lost files and data on the disk.

Step 3. Preview and recover.
You may then review all of the recoverable files to check if they are the desired ones. Then click "Recover" to save all recovered files to a safe location.
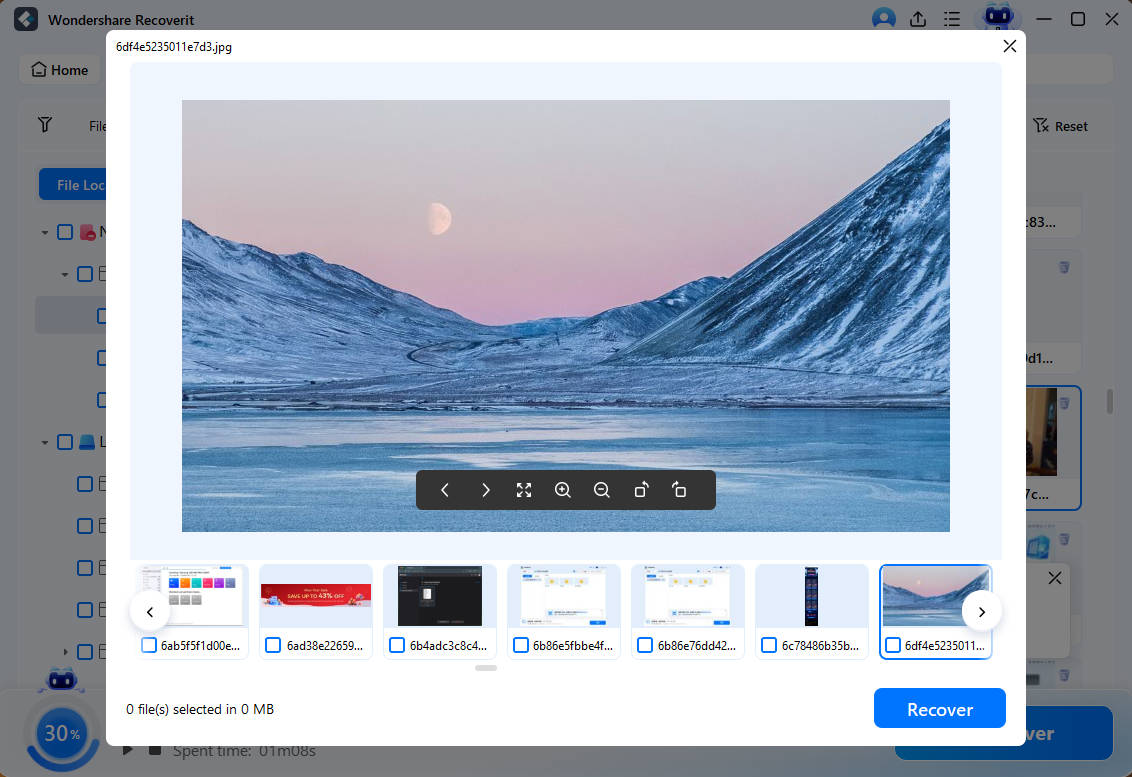
For Windows XP/Vista/7/8/10/11
For macOS X 10.10 or later
Final Thoughts
This article talked about different ways to convert NTFS to exFAT. The final one, AOMEI Partition Assistant, is strongly recommended since it can do various additional complex tasks that Windows native tools cannot handle.
Final Checklist: Verifying Your Transformed exFAT System Volume
- Unlink Safely via File Explorer: Before using your new exFAT drive across multiple computer operating systems, verify the transformation by right-clicking the drive in File Explorer and selecting Properties.
- Execute "Safely Remove Hardware": Because exFAT drops the extensive internal file-journaling engine used by NTFS, always click the taskbar icon to eject the storage drive safely before physically disconnecting it from the USB hub layout.
- Check Allocation Unit Size (Cluster Size): For modern high-speed storage media over $128 GB, make sure the tool formatted the unit utilizing an optimal cluster structure layout (typically $128 KB or $256 KB) to preserve swift read/write file execution parameters.
- Pre-Stage Recovery Assets: If you ran a quick format without a localized secure system backup file, do not paste new files onto the fresh exFAT block partition. Immediately run Wondershare Recoverit over the raw drive layer to preserve your original documents from sector overwrite degradation.


