
 TL;DR:
You can natively create a Windows partition on an Intel-based Mac without wiping your current macOS installation by using the Boot Camp Assistant utility to allocate hard drive space and install the new operating system.
● The installation process strictly requires a 64-bit Microsoft Windows 8 disk image, an inserted USB device for downloading Windows support software, and a minimum of 55 GB of free hard drive space.
● You can switch between environments by clicking the Bootcamp icon in the Windows taskbar to restart into Mac, or by selecting the Windows drive under the Startup Disk menu in macOS System Preferences.
● Mac hard drives permit a maximum of four primary partitions, and a deleted Boot Camp partition cannot be restored if it is overlapped by another partition or exceeds this four-partition limit.
Ask AI for a summary
 ChatGPT
 Perplexity
 Gemini
 Claude
 Grok
Grok
Facing trouble with your Mac's disk space when trying to run specific software? Creating a Windows partition on Mac is the most reliable solution. This process, often managed by Boot Camp Assistant, might seem daunting if you're dealing with a computer disk partition for the first time. However, our guide simplifies every step, ensuring you can successfully create a stable Windows partition on Mac without any prior tech expertise, solving your disk partition troubles efficiently.
Part 1. What Is Windows Partition on Mac?
Before creating a Windows partition on a Mac, it is important to know about Windows partitions. An internal or external hard disc is divided into multiple storage systems in window partitioning. Moreover, it is also known as Bootcamp partition.
Boot Camp is a technology that Apple created that enables Mac users to install and launch their computers natively in Microsoft Windows. When your computer boots up, you may quickly switch between Windows and Mac.
Furthermore, your previous macOS partition will be resized by Boot Camp, and a brand-new Windows partition will be created and formatted. If your Mac has numerous hard drives, Boot Camp might also aid in partitioning a different drive.
There are different system requirements to make windows partitions on mac in a good way. Some of them are the following:
- Intel-based Mac
- A disk image of a 64-bit version of Microsoft Windows 8
- An empty 16GB free disk space on your startup drive.
- You'll require a minimum of 55 GB of free space on your Mac's hard drive. 5. It is advised to back up your key files and have the most recent software update installed before starting Boot Camp.
- If you have older mac windows, then you are required to install an updated window.
More related: Run Windows on Mac – Complete Guide with Proven Methods
Part 2. How to Create a Windows Partition on Mac Using Boot Camp?
Window partitions on Mac can be overwhelming, however, Boot Camp has made the process easy to create window partitions on Mac by using the following steps:
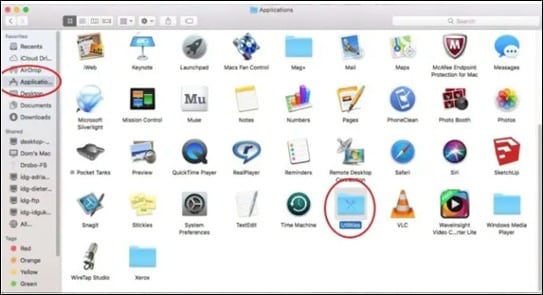
Step 1: Open Applications – Go to Utilities.
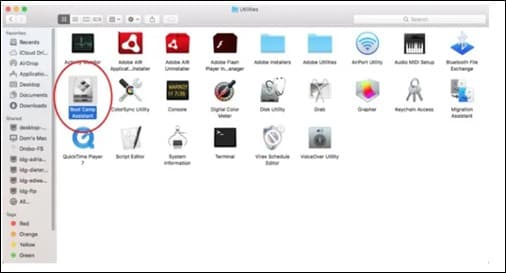
Step 2: Run Boot Camp Assistant.
Step 3: Click Continue.
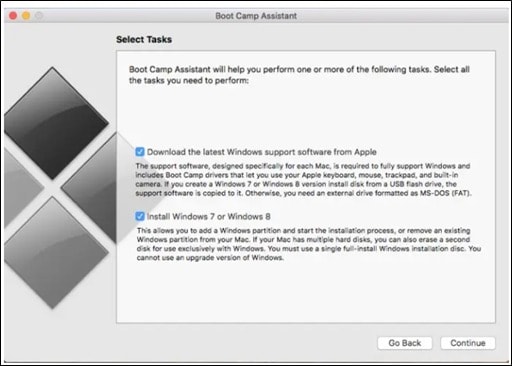
Step 4: Give your administrative credentials if prompted. Enter to begin the program download. The Windows support software must be installed on a USB device that has been inserted into the Mac.
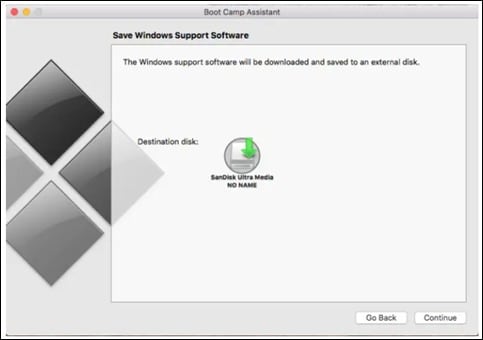
Step 5: The assistant will ask you to build a Windows partition on the hard disk after the download is complete. Without affecting or wiping your current macOS installation, this step partitions your drive to set aside free space only for Windows.
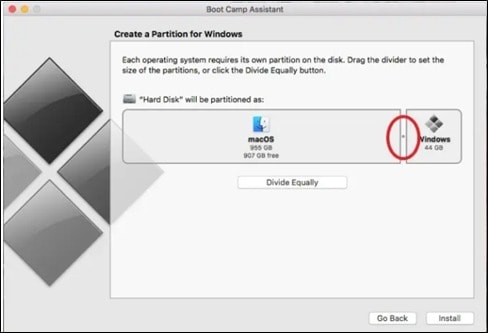
Step 6: You will now see a slider that represents your hard disc. You can select the amount of hard drive space to give your Windows partition here.
Step 7: Click Partition after you're content with your partitioning plan. Your hard drive's data will start being partitioned and reorganized by OS X, which could take some time.
Step 8: A partition will be created by Boot Camp, you can name it accordingly. After restarting, the installation process will start.
More Related: How To Resize Bootcamp Partition
Part 3. How to Switch Between Windows And macOS?
You can easily switch between Windows and Mac in a variety of ways. You can boot camp to switch easily without any interruptions. In this way, restarting your computer will allow you to switch between Windows and Mac, or vice versa.
Let’s see step by step how it works:
From Windows to MAC
Follow these easy steps if you're running Windows and want to use Boot Camp to move to a Mac:
Step 1: Locate the bottom right corner of your screen by scrolling down. The taskbar ought to be visible. To reveal the concealed icons, click the upward-pointing arrow icon.
Step 2: Select the Bootcamp button, which must resemble the following:
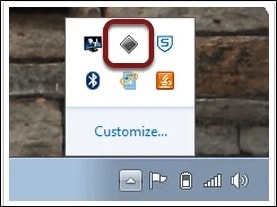
Step 3: To transition from Windows to Mac, use the "restart" option.

From MAC to Windows
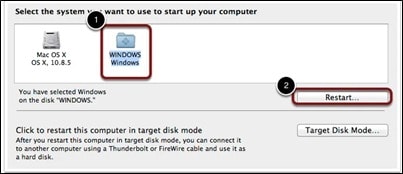
Step 1: Click the System Preferences icon located in the bottom right corner of your macOS screen.

Step 2: An icon in the form of a hard disc should appear. The Startup Disk symbol is shown here. To see Windows and macOS installed on your machine, click on it.

Step 3: Your system should have both Windows and macOS installed. Restart Windows by clicking it.
A Boot Camp partition can be easily deleted using the same program, Boot Camp Assistant, that you used to set it up in the first place. If you still require any files or other data, you should first back up the Windows partition.
Check more in the following articles:
This article has provided fantastic solutions to solve some common and complicated system problems. If you want a problem to be solved right away, you must keep in mind a few key commands.
Part 4. Bonus Tip: How to Recover Lost or Deleted Partitions?
In most cases, you must do the following actions to restore a deleted partition:
Find any deleted partitions by scanning the hard drive; if any are discovered, choose the partition you want to recover and launch the Restore Partition dialogue. You can perform a content check on this partition by scanning it first. If a partition has overlapped another one on a drive, it cannot be restored. On the same hard drive, only four primary partitions are permitted; if this limit is exceeded, partitions cannot be restored. Similarly, Wondershare Recoverit demonstrates the quickest method for recovering lost partitions. If CMD is new to you, be sure to experiment with raw data or keep a backup of your PC. Something could happen that would be impossible to fix. We are confident that their articles will help you recover any lost data or partitions.
Step 1: Scan Hard Disk for deleted partitions.
When a partition is erased, the disc space is labeled "Unallocated." To recover data from a destroyed disc or even to restore it, you can search this space for it.
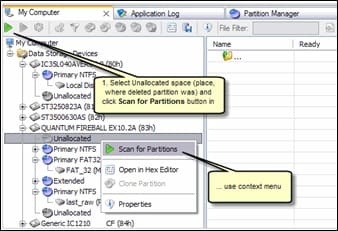
Even if a deleted disc has been replaced by another partition, you can still attempt to locate it and have a reasonable chance of recovering your data from it. You must choose a Hard Disk to scan in this scenario.
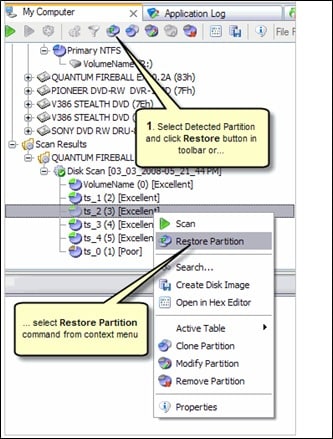
Step 2: Select partition and open the "Restore Partition" dialog.
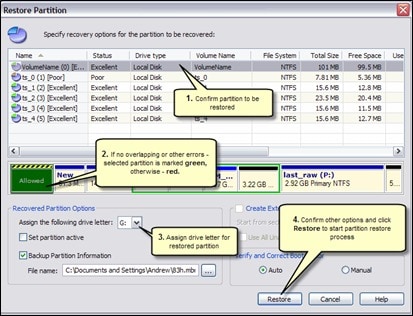
Step 3: Set restore options in the "Restore Partition" dialog and run restore.
More Related: How to Run EXE Files on Mac
Conclusion
Creating a window partition on a mac can be a difficult process however there are several tools to perform this task. One of them is Bootcamp which is easy and friendly to use. There is a list of requirements and compatibility to create a window partition by using Bootcamp. Furthermore, switching between Windows & macOS can have also been highlighted. Lastly, it is also explained in this article how to recover lost partitions by using simple methods. Hopefully, this article has helped to resolve all your queries regarding the above-mentioned topics. However, you can write in the comment section about any part that confuses you.


