


 TL;DR:
To safely force empty Trash on macOS, identify and fix the specific error blocking the deletion—such as restarting the Mac for files marked as in use or correcting access rights via Get Info—before escalating to Safe Mode or Terminal commands.
● Control-click a specific stubborn file and select Delete Immediately to remove it without emptying the entire Trash, keeping in mind that holding the Option key only suppresses warning messages rather than forcing deletion.
● Limit the use of the Terminal command sudo rm -rf "$HOME/.Trash/"* to an absolute last resort, and do not use it or disable System Integrity Protection to remove protected system items or files on failing external drives.
● If critical data is accidentally force-deleted, immediately stop writing new files to the drive to prevent overwriting, check Time Machine backups first, and only scan with Recoverit for Mac if no backup exists.
Ask AI for a summary
 ChatGPT
 Perplexity
 Gemini
 Claude
 Grok
Grok
If Trash will not empty on your Mac, do not jump straight to a destructive Terminal command. Start by checking the error message, reviewing what is in Trash, and fixing the specific blocker. On current macOS, the safest order is to retry Finder, close apps that are using a file, unlock or correct permissions if needed, try Safe Mode for persistent software conflicts, and use Terminal only as a last resort.
Quick Answer
● Start safely: open Trash, review the files, and put back anything you may still need before permanently deleting it.
● Fix the blocker: if macOS says an item is in use, quit the related app or restart the Mac; if permissions are wrong, correct them in Get Info.
● Force only when needed: use Safe Mode or a narrowly targeted Terminal command only after normal deletion still fails.
● Deleted the wrong file: stop writing new data to the original drive, check backups first, then consider recovery software if no backup contains the file.
Terminology: macOS calls this location Trash, not Recycle Bin. Searches such as “force empty recycle bin Mac” refer to the same task.
In This Article
Part 1. What Force Empty Trash Actually Means on Mac
“Force empty Trash” can mean several different things: permanently deleting one item, emptying the entire Trash after Finder refuses, bypassing a warning, or removing an item that is still in use. These are not the same operation, so the safest method depends on what macOS is actually telling you.
What Apple Supports in Finder
Apple's current Mac User Guide for deleting files and folders provides two built-in options from Trash:
- Empty all Trash: open Trash and click Empty, or choose “Finder > Empty Trash.”
- Delete one item immediately: Control-click the item in Trash and choose Delete Immediately.
Before using either option, inspect the Trash contents. Apple warns that items emptied from Trash are permanently deleted and no longer available through Finder's normal Put Back workflow.
What the Option Key Does and Does Not Do
Older tutorials often describe the Option key as a universal “force empty” trick. Apple's current documentation is more specific: holding Option while clicking Empty or choosing Empty Trash suppresses the warning message. It does not mean Finder will automatically override a file that is still held open by another process or solve every permission problem.
That distinction matters because the old page treated Option as a force-delete mechanism. On a current Mac, read the error first and fix its cause instead of assuming Option bypasses it.
Part 2. Why Trash Will Not Empty on Mac
Most failed Trash deletions are not random. Finder usually points to a specific file or condition. Use that message to choose the least destructive fix rather than trying several force-delete methods in no particular order.
| What You See | Likely Cause | Safest First Action |
| “Item is in use” | An app or background process still has the file open. | Quit the related app, then restart the Mac if the lock persists. |
| Permission or access error | Your account does not have the required access to modify the item. | Check Sharing & Permissions in Get Info. |
| A locked-file warning | The file has its Locked attribute enabled. | Review the item and unlock it in Get Info if you need to remove the restriction. |
| Item came from an external drive | The Trash entry is tied to another mounted storage device. | Reconnect the drive and retry from Finder before using Terminal. |
| Repeated file-system or drive errors | The storage device may have directory or file-system issues. | Protect important data first, then consider Disk Utility First Aid. |
If your main problem is not “how to force empty Trash” but a repeated error such as an item being in use, a dedicated troubleshooting guide can go deeper. See why Mac Trash will not empty and how to fix it.
Part 3. Fix the Blocker Before You Force Delete Trash
Start with the methods that change the least. They preserve the normal Finder workflow and reduce the chance of deleting something you did not mean to remove.
Close Apps and Restart the Mac
If Finder says an item is in use, close the app that created or opened it. If you are not sure which app is holding the file, save your work and restart the Mac. A restart can release temporary file locks created by background processes.
Step 1. Quit open apps that may be using the file.
Step 2. Choose “Apple menu > Restart.”
Step 3. After signing back in, open Trash and try Empty again.
If the same item remains blocked after a restart, move to the specific lock or permission checks below.
Check Locked Files
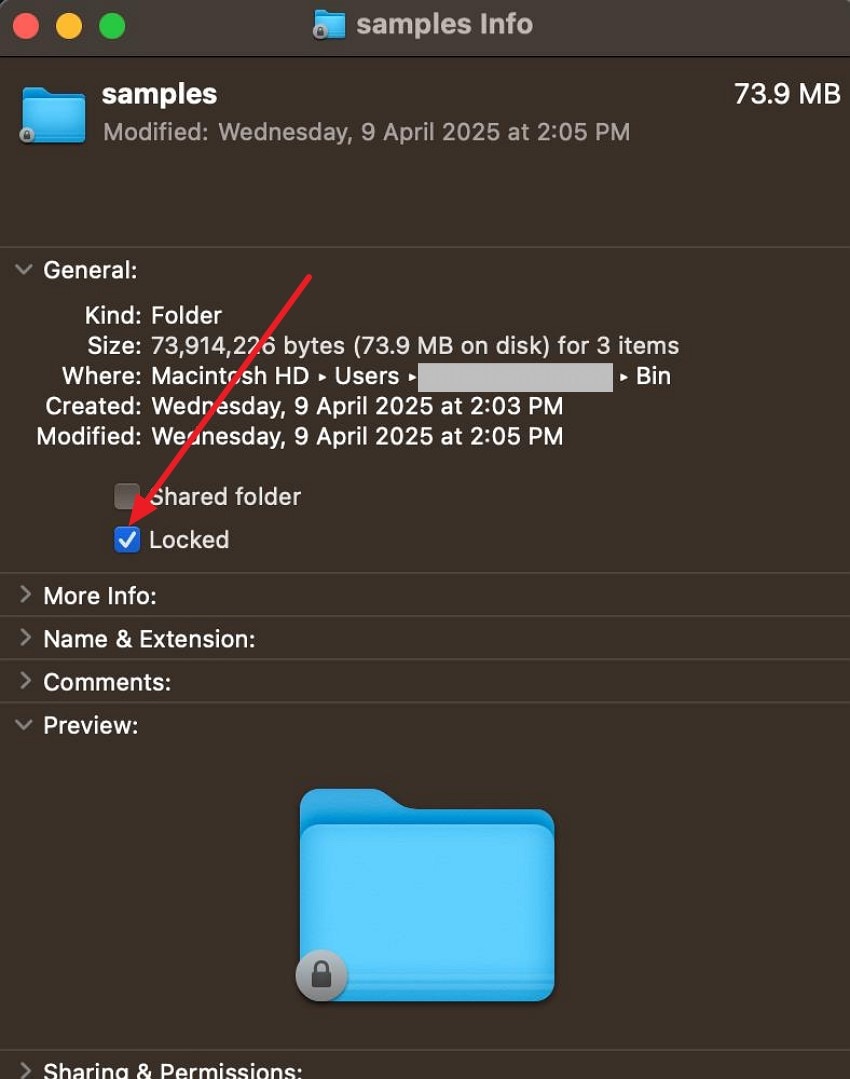
A locked item is meant to resist accidental changes. Apple notes that a locked document can still be deleted from Trash after confirmation, but if the lock is creating confusion or repeated prompts, you can remove it in Get Info before trying again.
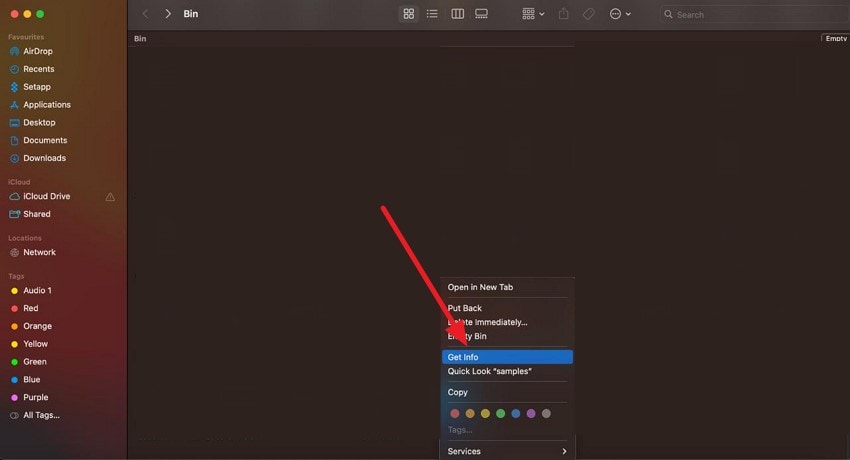
Step 1. Open Trash, Control-click the item, and choose Get Info.
Step 2. In the General section, clear the Locked checkbox when it is available.
Step 3. Close Get Info and retry Empty Trash.
Check File Permissions
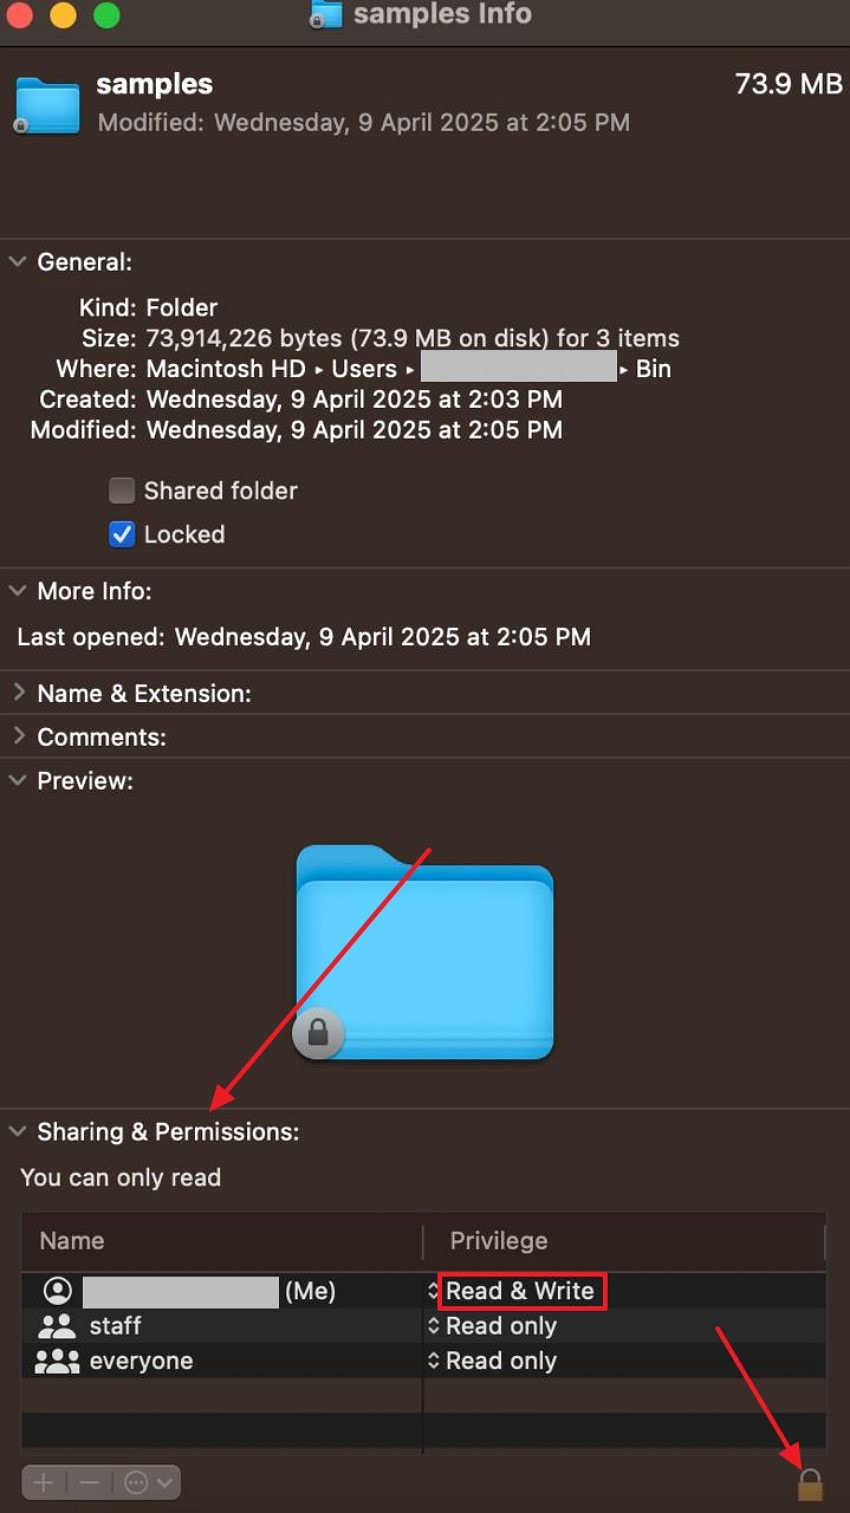
If macOS reports that you do not have permission to change or delete the item, check access rights rather than escalating straight to a root-level command. Apple's current permissions guide uses the Sharing & Permissions section in Get Info.
Step 1. Control-click the item and choose Get Info.
Step 2. Expand Sharing & Permissions.
Step 3. If your user does not have the required access and you are authorized to change it, unlock the settings and choose Read & Write.
Note: Do not change ownership or permissions on system files simply to make them deletable. If the item belongs to macOS or another managed account, confirm why it is protected first.
Delete One Stubborn Item Immediately
If the whole Trash contains files you still want to review but one known item needs to go, delete only that item instead of force-emptying everything.
Step 1. Open Trash and Control-click the specific item.
Step 2. Choose Delete Immediately.
Step 3. Confirm the permanent deletion.
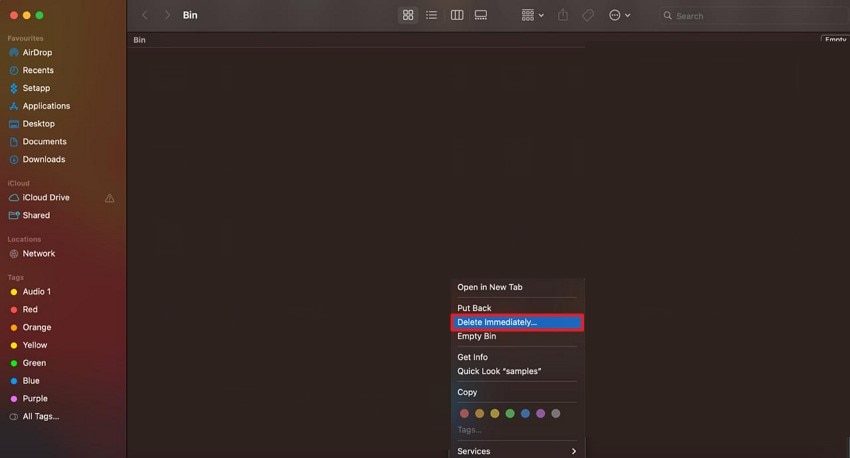
This is an Apple-documented Finder action and is safer than deleting the entire Trash when only one item is causing trouble.
Part 4. Force Empty Trash in Safe Mode
If a restart does not release a file that appears to be held by login software or another startup process, Safe Mode is a reasonable next diagnostic step. Apple describes Safe Mode as a way to determine whether software that loads as the Mac starts is contributing to a problem. Once in Safe Mode, retry the normal Finder Empty Trash command.
Apple Silicon Mac
Step 1. Choose “Apple menu > Shut Down” and wait until the Mac is fully off.
Step 2. Press and hold the power button until Loading startup options appears.
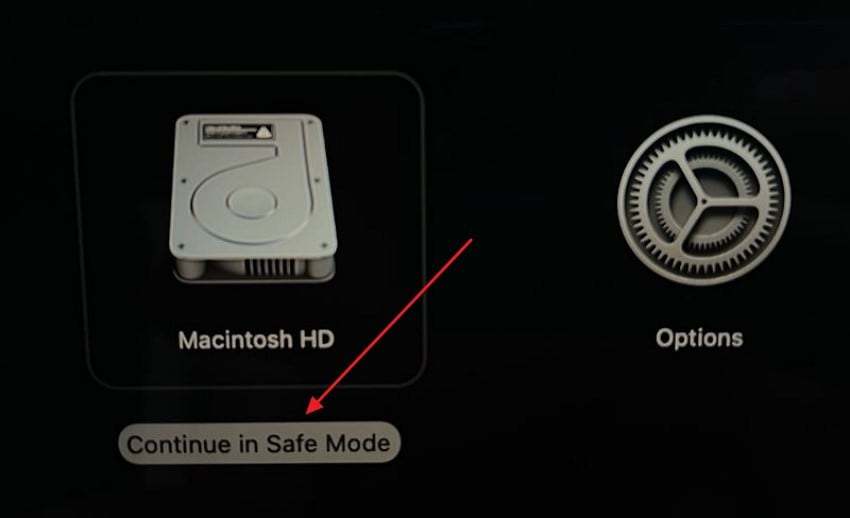
Step 3. Select your startup volume, hold Shift, then click Continue in Safe Mode.
Step 4. After login, open Trash and try Empty again.
Intel-Based Mac
Step 1. Restart or turn on the Mac.
Step 2. Immediately hold Shift until the login window appears.
Step 3. Sign in, confirm that Safe Boot is active, then retry Empty Trash.
Step 4. Restart normally when finished.
For the current startup steps for both Mac types, use Apple's Safe Mode instructions.
Part 5. Force Empty Trash With Terminal as a Last Resort
Terminal is powerful because it can permanently remove files without Finder's normal safeguards. That makes it useful when the Trash mechanism itself is stuck, but it also makes typing or pasting the wrong path much more dangerous than clicking Empty in Finder.
Use a Trash-Only Command
Use this only after you have reviewed the Trash contents, confirmed that you no longer need them, and tried the safer methods above.
Step 1. Open Terminal from “Applications > Utilities > Terminal.”
Step 2. Enter the following command exactly:
sudo rm -rf "$HOME/.Trash/"*
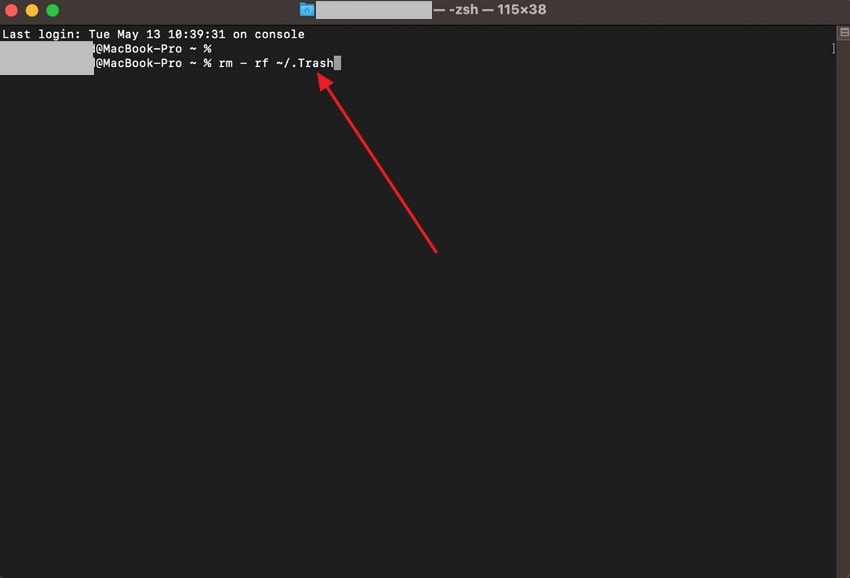
Step 3. Press Return. If macOS requests your administrator password, type it and press Return. The password may not appear while you type.
Important: This is an advanced Unix deletion method, not Apple's recommended everyday Trash workflow. It does not provide Finder's normal review or Put Back path. Do not broaden the path, remove the $HOME/.Trash/ target, or paste an unfamiliar rm -rf command from a forum.
When Not to Use Terminal
- You are not sure what is in Trash: review it in Finder first.
- You are trying to delete a protected system item: find out why it is protected instead of escalating privileges.
- The storage device is failing or disconnecting: protect data before running more write operations.
- You are preparing a Mac for resale: use Apple's supported erase-and-reset workflow instead of trying to “securely” delete files one by one.
Part 6. Special Cases: External Drives, Disk Errors, and Privacy
Some Trash problems are not really about the Trash folder itself. The item may belong to another mounted drive, the file system may be damaged, or the real goal may be privacy before selling the Mac. These cases need different actions.
Trash From an External Drive
If the stubborn item originally came from an external hard drive, USB drive, or other mounted storage, reconnect that device before trying to empty Trash. macOS tracks deleted items from mounted storage separately from the internal startup volume, so disconnecting the source can leave the Trash state confusing.
If the external drive is physically unstable, repeatedly disconnects, makes unusual noises, smells burnt, or shows water damage, stop trying to force-delete files from it. Copy or recover important data first and use a professional recovery service for serious hardware damage.
When Disk Utility First Aid Makes Sense
Disk Utility First Aid is not a routine “force empty Trash” button. Apple says First Aid checks and repairs certain errors in a storage device's formatting and directory structure. Use it only when there are signs of a broader disk problem, and protect important files before repairs when possible.
If you need deeper disk troubleshooting, the separate Mac Trash won't empty guide covers error-specific branches without turning First Aid into the default first step.
Do Not Disable SIP or Look for Secure Empty Trash
The old version of this page recommended disabling System Integrity Protection (SIP) so third-party tools could force Trash deletion. That is not an appropriate default fix for a normal Trash problem and has been removed from this workflow.
“Secure Empty Trash” is also a legacy feature. Apple removed the option in OS X El Capitan because secure deletion could not be guaranteed on some systems, including flash storage. If your goal is to sell, give away, trade in, or recycle the Mac, follow Apple's supported erase and reset process for transferring ownership rather than relying on old secure-empty instructions.
Part 7. Recover a File After Force Emptying Trash by Mistake
Forced deletion becomes a data-recovery problem the moment you realize an important file was removed. At that point, stop cleaning the Mac and switch priorities: reduce new writes, check existing backups first, and only then consider scanning the original storage.
Check Backups Before Scanning
Start with Time Machine, iCloud recovery options, or the original cloud/app location if the file was synchronized there. A backup copy is preferable to scanning the startup disk because continuing to install software or create files can overwrite deleted data.
For a full recovery decision tree, use the dedicated Mac Trash recovery guide rather than repeating every recovery method on this page.
Use Recoverit Only When No Backup Contains the File
If Trash has already been emptied, no backup contains the file, and the original storage is still detectable, Recoverit for Mac can scan the affected Mac volume or mounted storage for recoverable deleted files. No software can guarantee recovery after overwrite, and direct recovery from modern internal SSDs may be limited by TRIM and ongoing system writes.

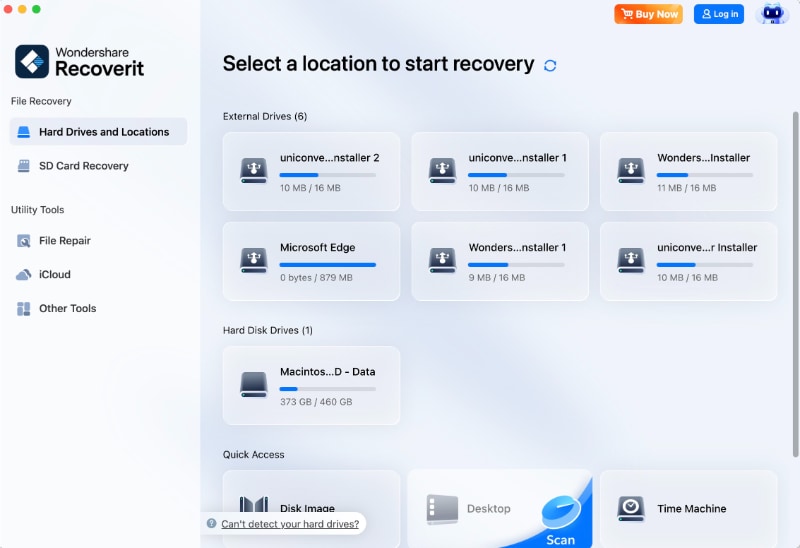
Step 1. Select the original location
Choose the Mac volume, folder, or mounted storage device where the file existed before it was deleted.
Step 2. Scan and narrow the results
Start the scan and use file type, path, name, or date filters when available to narrow the results.

Step 3. Preview before recovery
Preview the target file when preview is available so you can confirm that it is the item you need.

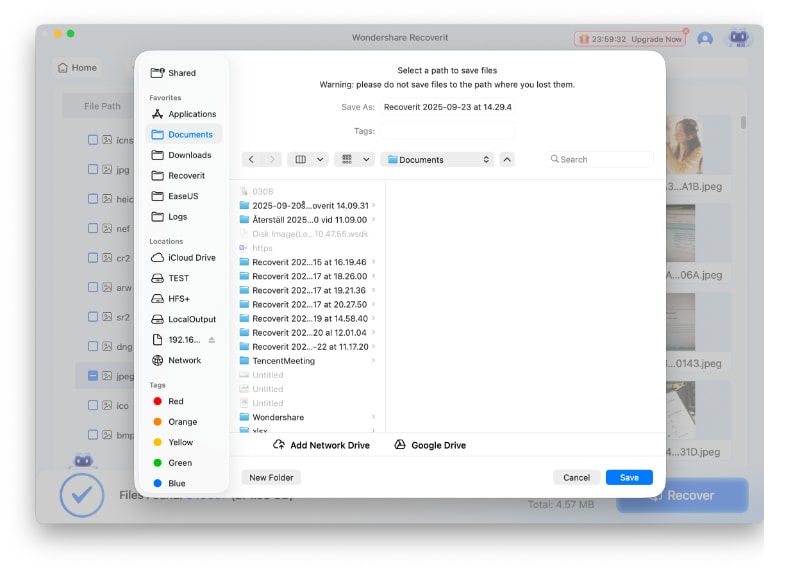
Step 4. Save to a different healthy location
Recover the file to another drive or safe location, not back to the same source where it was deleted, to reduce overwrite risk.
For the complete current product workflow, see the Recoverit for Mac user guide.
Conclusion
To force empty Trash on a Mac safely, first identify why Finder is refusing the deletion. Close apps that still use a file, correct permissions only when necessary, use Delete Immediately for a single known item, and try Safe Mode if startup software appears to be involved. Keep Terminal as the last resort, and do not disable SIP simply to empty Trash. If forced deletion removes something important, stop writing to the original storage and check backups before attempting recovery.
FAQ
-
How do I force empty Trash on a Mac?
Start by reviewing Trash and retrying Finder. If an item is in use, quit the related app or restart the Mac. If the issue persists because of startup software, try Safe Mode. Use a narrowly targeted Terminal deletion only as a last resort after confirming that everything in Trash can be permanently removed. -
Does holding Option force empty Trash on Mac?
Not in the way many older guides claim. Apple's current documentation says holding Option while clicking Empty suppresses the warning message. It does not automatically solve every in-use, permissions, or storage-device error. -
How do I force delete one file from Mac Trash?
Open Trash, Control-click the specific item, choose Delete Immediately, then confirm. This removes only that item instead of emptying the entire Trash. -
Why does my Mac say a Trash item is in use?
An app or background process may still have the file open. Quit the related app and retry. If you cannot identify the process, save your work and restart the Mac, then try Empty Trash again. -
Should I disable System Integrity Protection to empty Trash?
No. Disabling SIP is not an appropriate default fix for a normal Trash problem. Use Finder, permissions checks, Safe Mode, or a carefully targeted advanced method instead. -
Is Secure Empty Trash still available on modern macOS?
No. Apple removed Secure Empty Trash in OS X El Capitan because secure deletion could not be guaranteed on some storage, including flash-based devices. -
Can I recover a file after force emptying Trash on Mac?
Sometimes, depending on the storage type, overwrite activity, TRIM, and whether a backup exists. Stop writing new data to the original storage, check Time Machine or cloud backups first, and use recovery software only when the file is not available from a backup.


