
If your Mac is unstable or won't start up, having a rescue tool is essential. One of the most reliable solutions is to create a bootable Mac USB drive, which allows you to reinstall macOS or run diagnostic tools. While there are several ways to do this, DiskMaker X (formerly Lion DiskMaker) is a popular free app designed to simplify this process, making it accessible even for non-technical users.
DiskMaker X automates the technical steps, turning a complex task into just a few clicks. Whether you need to fix a system crash, perform a clean installation of macOS, or set up multiple Macs without redownloading the installer, this guide will walk you through using DiskMaker X. We will provide clear, step-by-step instructions and troubleshoot common errors you might face.
In this article
Part 1. DiskMaker Versions and Their Compatibility
Fristly, let’s have a look at the basic information of DiskMaker. Below is the list of DiskMaker versions with their compatible macOS X:
DiskMaker Version |
Compatible macOS |
| DiskMaker X 3 | OS X Mountain Lion (10.8), OS X Mavericks (10.9) |
| DiskMaker X 5 | OS X Mavericks (10.9) |
| DiskMaker X 6 | macOS Sierra (10.12), OS X El Capitan (10.11), OS X Yosemite (10.10) |
| DiskMaker X 7 | macOS High Sierra (10.13) |
| DiskMaker X 8 | macOS Mojave (10.14) |
| DiskMaker X 9 | macOS Catalina (10.15) |
Mac Processor Type |
Compatible OS |
Recommended Tool |
| Intel-Based Macs | Catalina & Older | DiskMaker X |
| Apple Silicon (M1/M2/M3) | Big Sur, Monterey, Ventura, Sonoma | Native Terminal / InstallAssistant |
| PowerPC (Vintage) | Leopard / Tiger | DiskMaker X (Legacy) |
Note: Diskmaker X is not compatible with macOS Big Sur, and the developers are not planning to update the software compatibility.
Part 2. Pre-requisite to use DiskMaker
To use the DiskMaker for macOS bootable USB, you will need the following:
- USB: For most versions of macOS, you'll need around 8 GB. However, macOS Catalina requires a minimum of 10 GB. And if you want to create a multi-boot disk with every version of macOS, you'll require a 6 x 8 GB + 10 GB = 58 GB USB.
2026 Technical Note: USB-C and Drive Speed
While DiskMaker X works with older USB 2.0 drives, using a USB 3.2 Gen 1 (or higher) flash drive will reduce the creation time from 45 minutes to under 10 minutes. If you are using a modern MacBook with only USB-C ports, ensure your USB-C to USB-A adapter supports data transfer and is not just a charging cable. High-quality adapters prevent "Disk Not Found" errors during the verification phase of the bootable media creation.
- A Downloaded Installer: You will need a downloaded installer for macOS Catalina, High Sierra, or El Capitan.
- Mac OS X Installer App: Besides the DiskMaker X installers, you'll need to download the macOS or OS X installer app from the Apple Official Website or Mac App Store. If you cannot get the macOS installer apps from the Apple website, you can download them from the DiskMaker X download page.
- Data Backup: Make sure to backup your data on the USB drive and your Mac system.
Pro Tip: How to Force a Full Installer Download
In 2026, the Mac App Store often downloads a "stub" installer (around 20MB) which will cause DiskMaker X to fail. To ensure you have the full 5GB+ installer:
- Delete any existing "Install macOS" files from your Applications folder.
- Open Terminal and type: softwareupdate --fetch-full-installer --full-installer-version 10.15 (replace 10.15 with your target version).
- Wait for the download to complete in your Applications folder. DiskMaker X requires this full file to successfully create the bootable structure.
Part 3. Backup or Recover Lost Data from Unbootable Mac before using DiskMaker
After knowing what DiskMaker is and what you need to prepare to apply it, there is an important thing to do before you start with the guidance in Part 4 – backup your data. While we have provided the scheme to use DisMaker to boot your Mac in the later part, if it failed, you may risk losing your important data. Hence, it is recommended to backup your data on Mac before you start. You can backup and rescue your data with a reliable and secure tool – Recoverit. This application can run smoothly on Mac and extract the data under various difficult situations, including an unbootable Mac.
Please follow the steps below to use Recoverit and give you a strong backup.
To begin with, let’s check the prerequisites to use it:
- A blank USB flash drive with 16-32 GB of empty space
- A working computer with Recoverit installed on it
Here are the steps to apply Recoverit to recover your data from an unbootable Mac.
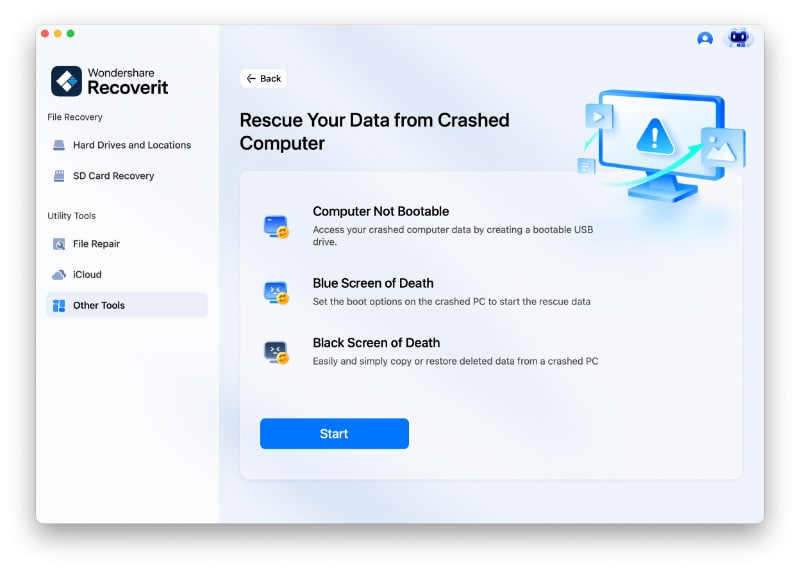
Step 1: Launch Recoverit on your working computer, then insert the USB. On the left side of the main interface showing in the screen, choose "System Crashed Computer". And then click “start” to go on.
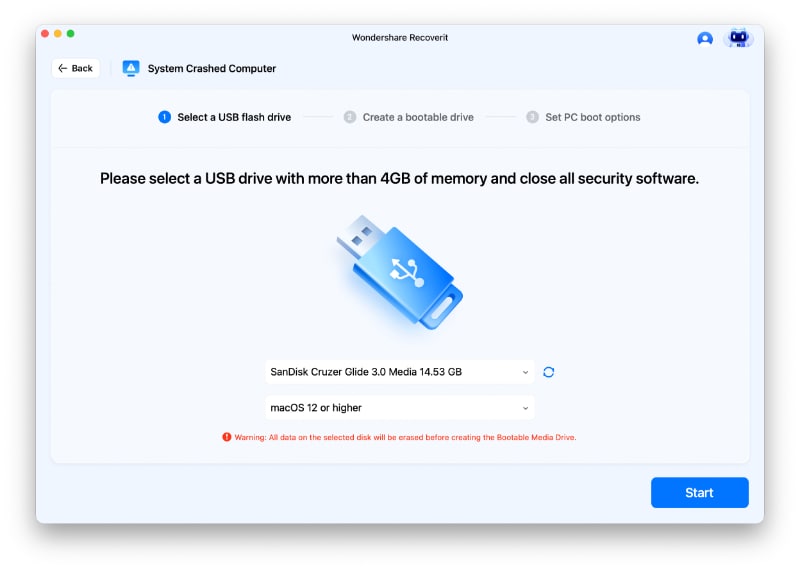
Step 2: When selecting a bootable device, there are two options of modes available. Select your USB flash drive and click the "Start" button.
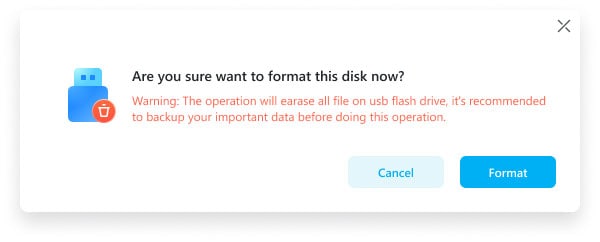
Step 3: To ensure enough space on the USB drive, it will be formatted, and thus, all the data present on it will be wiped. So back up important files in advance. Click "Format" and the next interface will show you the procedure for formatting the USB drive.
After the drive formatting, Recoverit starts creating the bootable media drive on Mac. During the process, do not remove the USB flash drive out of your Mac computer. Usually a few minutes later, the bootable USB flash drive will be created. Then there will be a guide for you to boot your crashed Mac.
Step 4: Now, Recover data from crashed Mac. Connect a good hard drive to the crashed Mac, choose the hard drive you connect, and click “Start Copy” button. Then the screen shows the process of copying data from the crashed Mac to the hard drive. When the copying process is finished, it will show “Copy files completed!”.
Part 4. How to Use DiskMaker to Create a Bootable USB on macOS?
Here's how to use DiskMaker X to create a bootable USB on different macOS:
Use DiskMaker to Create Bootable USB on macOS 10.14 Mojave
Follow the below steps to use DiskMaker on macOS Mojave:
Step 1: Download DiskMaker X 8 on your Mac system and install it. Next, launch the Mac App Store and find the macOS Mojave Installer. Click Get and download it on your system.
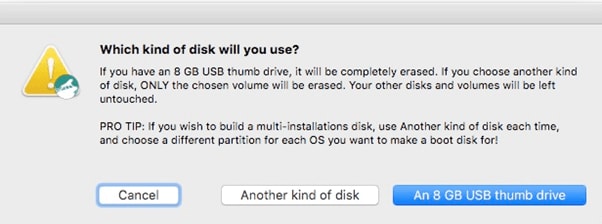
Step 2: Plug a 16-32 USB drive into the USB port on your Mac. Make sure to backup your data on the drive, as DiskMaker will erase everything on it while creating a bootable macOS drive.
Step 3: If you are already running the macOS 10.14 Mojave on your system, make sure to give Accessibility authorization before using DiskMaker. This is because the Mojave OS has a built-in Privacy Control mechanism that will cause multiple alerts to appear on your screen while creating a bootable USB. To avoid the alerts, do the following steps:
- From the dock, launch "System Preferences" and click "Security & Privacy."
- Head to the "Privacy" tab and click "Accessibility."
- In the System Preferences window, click the lock icon in the left corner to unlock the preference.
- Next, use your Touch ID or enter your password to continue. From the Finder, drag the DiskMaker X icon to the right side of the window to add it to the list of apps you allow to control your Mac.
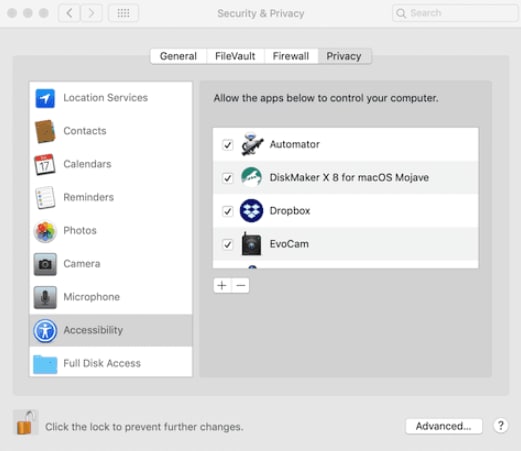
Note: Make sure to remove this authorization once you create a bootable USB drive using the DiskMaker X software. Moreover, some alerts will still appear when using the software. Click "OK" to remove the alerts.
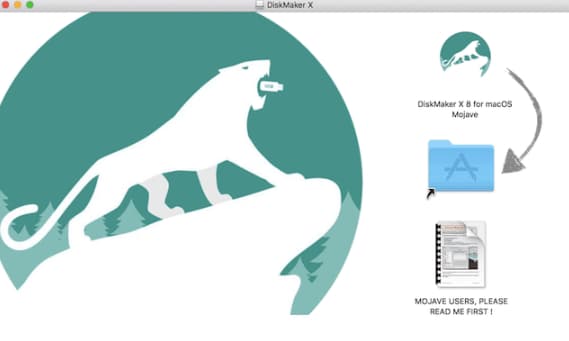
Step 4: Launch the DiskMaker software, select the macOS version 10.14 Mojave, and click "Use this Copy."
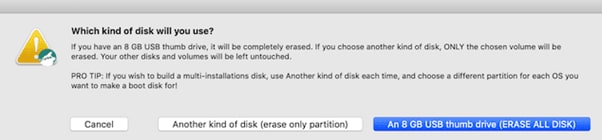
Step 5: Select the type of drive you are using to create your bootable drive (USB Drive in this case). The drive will be erased, type the admin password if asked, and wait for the booting process to complete.
Once done, a dialog box will appear. Click quit or System Preferences, depending on your requirements. Alternatively, install the OS by rebooting your Mac.
Use DiskMaker to Create a Bootable USB on Sierra and Other Mac OS X
To create a bootable USB on macOS Sierra using DiskMaker, do the following steps in sequence:
Step 1: Download the macOS Sierra from Mac App Store.
Step 2: Next, download DiskMaker X for macOS Sierra and install it. Plug a 16-32GB USB into your Mac and launch the DiskMaker X software.
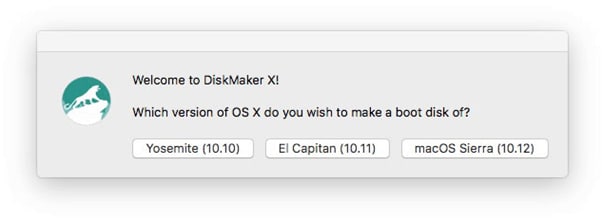
Step 3: Select your macOS version, i.e., macOS Sierra in this case, and the app will start searching for a copy of the OS. Once it finds the copy, a dialog box will appear. Click Use this Copy to continue. If you don't want to use the copy, you can click "Use another copy" and select it from your system.
Step 4: Select your thumb drive; the app will format everything on the USB drive. Enter your admin password, and the booting process will begin.
Step 5: Wait for the process to complete and restart your Mac to install the macOS on your system.

In case you want to create macOS Bootable usb drive on Windows in another way, you can watch this video:
Part 5. Troubleshooting
When using DiskMaker, you may discounter some common problems on different macOS systems. We have listed the three main problems and provided relevant solutions to help you out.
When creating the Install disk with DiskMaker X, I encounter this error message: "The disk could not be created because of an error: An error occurred: -10006."
This error occurs when you try to create an install disk, and a false mount is created, which is a folder with the same name as your install drive. This results in the Install drive having the same name but with 1 at the end. To avoid this, do the following steps:
Step 1: Head to Finder > GO > Go to Folder menu and type /Volumes/.
Step 2: If a folder is named as your macOS Install disk, delete it. Enter your admin name and password.
Step 3: Reboot your Mac and try again.
When using DiskMaker X 7 for High Sierra / When using DiskMaker X 8 for Mojave, I encounter this error message: "The disk could not be created because of an error: An error occurred: -10006. Finder got an error: Can't set alias \" Install macOS High Sierra: Install macOS High Sierra.app\" to {425, 76}."
Follow the tips below to resolve this DiskMaker error message:
- Update your DiskMaker X software to 7.0.1 or 8.0.1.
- Check the size of the macOS Install app; if it is 20MB, it means it is not completely downloaded. Download the full Installer and try again.
"This copy of the Install OS X [OS X Name] application can't be verified. It may have been corrupted or tampered with during downloading."
After February 14th of, 2016, Apple's OS X App Store certificates expired, which means that anyone trying to re-install OS X using an installer downloaded before that date will encounter an error. This has nothing to do with DiskMaker X but is an issue with the Apple installers.
Part 6. A Quick Verdict: Well-Known MacPE Tools - UNetbootin and DiskMaker, Which to Choose?
Both UNetbootin and DiskMaker X are popular tools for creating bootable USB flash drives. But which one to choose?
The first thing to know about is that they work on different systems. DiskMaker X is a macOS-only tool that allows you to create bootable disk images for macOS installer disks. However, UNetbootin is a free cross-platform tool that enables you to create bootable live USB drives for various Linux distributions and is available for Windows, Linux, and macOS. To learn more about UNetbootin, you can read How to use UNetbootin on Mac.
Below we have provided a quick comparison table to help you decide which software is best for you.
Features |
UNetbootin |
DiskMaker X |
| Price | Free and Donation-based | Free and Donation-based |
| Compatibility | Linux, Windows, and macOS | macOS |
| Success Rate | 90% | 95% |
| Utilities Rating | 77% | 21% |
| Portable | Yes | No |
| Multiboot | Yes | Yes |
As you can see in the table, UNetBootin is better software than DiskMaker X in many aspects. However, the latter is specifically designed for macOS. Therefore, we recommend to choose the one which best suits your needs.
More Related: How to Boot Mac from USB Drive
User Goal |
Primary Tool |
Best Feature |
| Recover Files from Dead Mac | Wondershare Recoverit | Extracts data without OS reinstall. |
| Clean OS Installation | DiskMaker X | Automated bootable USB creation. |
| Multi-Mac Deployment | DiskMaker X | Avoids repeated 12GB downloads. |
| Cross-Platform Booting | UNetbootin | Supports Linux & Windows ISOs. |
Conclusion
In this article, we've discussed how to use DiskMaker X to create a bootable macOS USB for different Mac OS X. We've provided step-by-step methods for using the software on macOS Mojave and Sierra. In the end, we've explored how to resolve some common errors that users encounter while using DiskMaker X on Mac.
Hopefully, this article helped resolve your queries, and you can now create a bootable macOS USB without any hassle.
People Also Ask
1. Can a bootable USB fix a Mac that experiences fault reboots?
Yes, it can be a crucial step. If your Mac suffers from a computer restart loop due to software corruption, using a bootable USB allows you to run Disk Utility to repair the drive or reinstall a fresh copy of macOS. This often resolves the underlying issue causing the Mac computer fault restart.
2. What if DiskMaker can't find the macOS installer on my computer?
This is a common issue. First, ensure you have downloaded the complete macOS installer from the App Store and it is located in your main "/Applications" folder. If DiskMaker still fails, it may be due to a partial download; delete the installer, restart your Mac, and download it again.
3. Why does my Mac restart to a black screen after booting from the USB?
A Mac computer fault restart that leads to a black screen can indicate an issue with the USB drive itself or incorrect bootable drive creation. Try re-creating the installer with a different, high-quality USB drive. Also, ensure the macOS installer you downloaded is not corrupted.
4. Is it safe to use DiskMaker to create a bootable Mac USB?
Absolutely. DiskMaker is a well-regarded tool that uses AppleScript to automate the official process recommended by Apple. It does not modify the macOS installer itself. However, remember that the process will completely erase the USB drive, so back up any data beforehand.


