

 TL;DR:
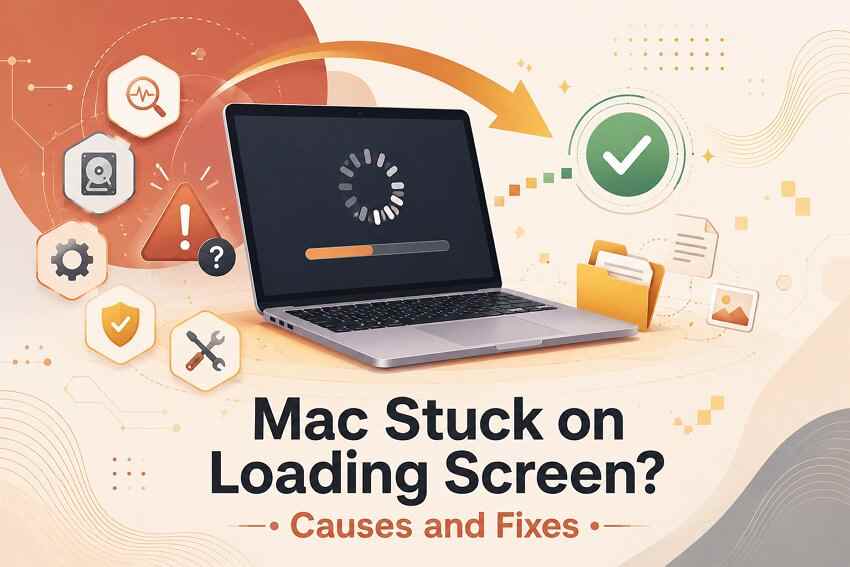
A Mac stuck on the loading screen indicates macOS found the startup disk but cannot finish booting, which can usually be resolved by disconnecting external devices, booting into Safe Mode, or running Disk Utility First Aid from macOS Recovery before resorting to an OS reinstall.
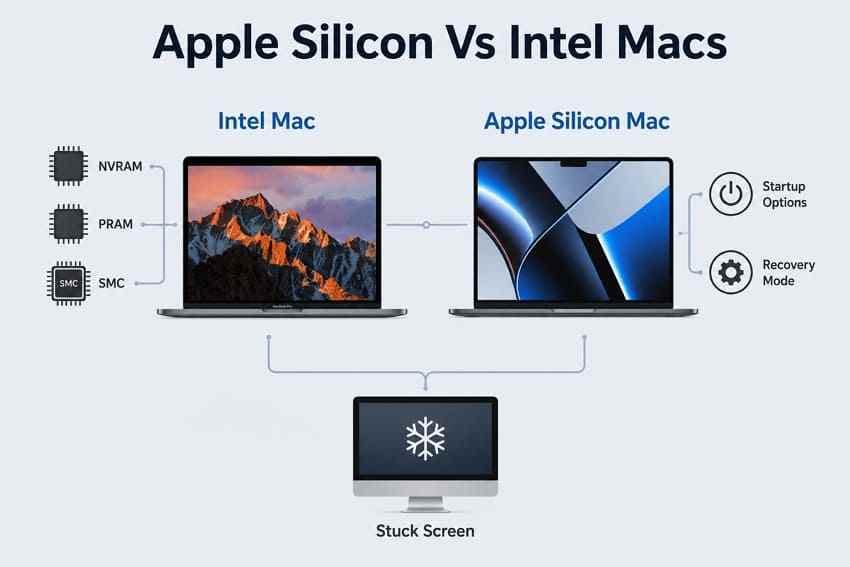
● Apple silicon Macs require holding the power button to access Safe Mode or macOS Recovery and handle low-level resets automatically, whereas Intel Macs rely on startup keyboard shortcuts and allow manual NVRAM and SMC resets.
● If the freeze occurs specifically after entering a password, the issue is typically tied to corrupted user settings, low disk space, or background apps, which can be isolated and removed via the system settings by booting into Safe Mode.
● Before executing a clean install or disk erasure, recover inaccessible data using a bootable USB created on a secondary Mac, noting that recovery tools cannot bypass FileVault encryption, repair damaged logic boards, or restore overwritten files.
Ask AI for a summary
 ChatGPT
 Perplexity
 Gemini
 Claude
 Grok
Grok
A Mac stuck on loading screen usually means macOS found the startup disk but could not finish loading. The freeze may happen at the Apple logo, progress bar, spinning wheel, or after you enter the login password. It can affect a MacBook Air, MacBook Pro, iMac, Mac mini, or Mac Studio, including both Apple silicon and Intel models.
The fix depends on where the startup process stops. A MacBook stuck on Apple logo with loading bar often points to disk, update, or system file trouble. A MacBook Pro stuck on login screen may involve login items, user account settings, or a profile issue. An iMac stuck on loading screen may also be affected by external devices, storage errors, or display-related confusion.
This guide explains how to diagnose the symptom, apply safe fixes in the right order, and protect important files before you erase, reinstall, or send the Mac for repair. If your Mac will not boot normally, Recoverit Mac Data Recovery can help recover local files from accessible Mac drives before deeper repair. It cannot repair macOS, fix hardware, bypass FileVault, or recover overwritten data.
In this article
-
- Fix 1. Force Restart the Mac Safely
- Fix 2. Boot Into Safe Mode on Apple Silicon or Intel Macs
- Fix 3. Remove Login Items and Recently Installed Apps in Safe Mode
- Fix 4. Reset NVRAM or PRAM on Intel Macs
- Fix 5. Reset the SMC on Intel Macs
- Fix 6. Start Up From macOS Recovery
- Fix 7. Run Disk Utility First Aid on the Startup Disk
- Fix 8. Choose the Correct Startup Disk
- Fix 9. Reinstall macOS Without Erasing Important Data
- Fix 10. Erase the Startup Disk and Clean Install macOS as a Last Resort
Part 1. What Does "Mac Stuck on Loading Screen" Mean?
A loading screen freeze means the Mac starts the boot process but cannot reach the desktop. Apple notes that the Apple logo and progress bar appear while macOS is starting from the startup disk. If that process stops and does not continue, the Mac needs startup troubleshooting.
Apple Logo With Loading Bar
If your MacBook is stuck on Apple logo with loading bar, macOS may be loading system files, finishing an update, checking the startup disk, or failing on a damaged system file. This is one of the most common forms of a Mac stuck at loading screen.
Progress Bar Stops Near the End
A progress bar that stops near completion often points to login services, system extensions, disk errors, or a failed update. If the bar still moves slowly, wait. If it has not moved for a long time and the Mac is unresponsive, treat it as frozen.
MacBook Pro Stuck on Login Screen
If you can enter the password but the Mac never loads the desktop, the problem may involve login items, launch agents, corrupted user settings, insufficient free disk space, or an app that starts immediately after login.
Mac Repeatedly Restarts or Shows a Spinning Indicator
A boot loop, spinning indicator, or restart during startup may involve a kernel panic, incompatible software, storage failure, or hardware problem. Avoid repeated forced restarts if the Mac becomes hot or the drive makes unusual sounds.
Apple Silicon vs Intel Mac: Why the Fixes Differ
Apple silicon Macs use M-series chips and different startup controls. Intel Macs can use manual NVRAM and SMC resets, while Apple silicon handles many low-level resets automatically during restart. Safe Mode and macOS Recovery also use different startup keys on Apple silicon and Intel Macs.
Part 2. Quick Diagnosis: Where Is Your Mac Getting Stuck?
Match what you see on screen before choosing a fix.
If the Progress Bar Is Still Moving
If the progress bar continues moving, especially after a macOS update, keep the Mac connected to power and wait. A large system update can take longer than expected. Do not force shutdown while the bar is still making progress.
If the Progress Bar Has Not Moved for a Long Time
If the progress bar does not move for a long time and the Mac does not respond, start with a safe force restart. If the freeze returns, move to Safe Mode, Recovery, and Disk Utility First Aid.
If the Freeze Happens After Login
If the Mac reaches the login screen but freezes after entering the password, focus on Safe Mode, login items, recently installed apps, low disk space, and user account issues.
If External Devices Are Connected
External drives, hubs, docks, monitors, printers, and security keys can interrupt startup. Disconnect nonessential devices and restart the Mac with only power, keyboard, mouse, and display connected if needed.
Symptom Table for Mac Loading Screen Problems
| Symptom | Likely Startup Stage | Possible Cause | Best First Fix |
| Apple logo and progress bar stop | System loading from startup disk | Disk error, failed update, system file issue | Safe Mode, then Disk Utility First Aid |
| MacBook stuck on loading screen progress bar near the end | Late startup or login preparation | Login items, extensions, low disk space | Safe Mode and remove login items |
| MacBook Pro stuck on login screen after password | User account loading | Corrupted user settings or login items | Safe Mode, test another user if available |
| Mac restarts repeatedly during startup | Kernel or hardware check | Kernel panic, hardware, driver conflict | Disconnect devices and enter Safe Mode |
| iMac stuck on loading screen with external drives attached | Startup disk selection or device check | Peripheral conflict or wrong startup disk | Disconnect devices and choose startup disk |
Part 3. What to Do Before Trying Advanced Fixes
These checks reduce the chance of making the problem worse.
Keep the Mac Plugged In During Updates
If the Mac is updating, keep it plugged in and wait while the progress bar moves. Portable Macs should not be allowed to run out of battery during a system update.
Disconnect External Devices and Accessories
Unplug external drives, USB hubs, docks, printers, card readers, audio devices, and unnecessary displays. Restart with the simplest setup possible. For an iMac, keep only the power cable, keyboard, mouse, and main display connection if applicable.
Avoid Erasing or Reinstalling Before Protecting Files
Reinstalling macOS over the existing system is usually intended to keep user data, but mistakes, disk failure, or choosing Erase can remove files. Protect important data before any erase, clean install, or repair.
Check Whether You Have a Recent Backup
If you use Time Machine, iCloud Drive, or another backup system, confirm that important files are already backed up. If no recent backup exists and the files matter, recover or copy the data before taking destructive actions.
Part 4. How to Fix a Mac Stuck on the Loading Screen
Work through these fixes in order. Start with simple, reversible steps before erasing or reinstalling macOS.
Fix 1. Force Restart the Mac Safely
Use this only when the Mac is frozen and the progress bar is not moving.
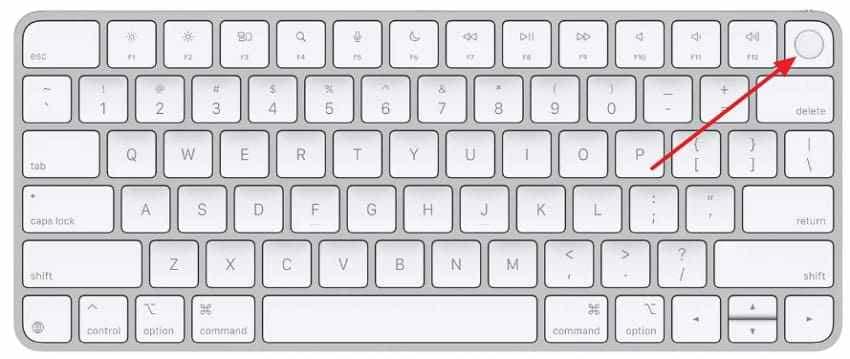
Step 1. Press and hold the Power or Touch ID button until the Mac turns off.
Step 2. Wait 10 seconds. Disconnect external accessories that are not required.
Step 3. Press the power button again and watch whether startup completes.
Fix 2. Boot Into Safe Mode on Apple Silicon or Intel Macs
Safe Mode starts macOS with only essential components, checks the startup disk, and prevents some software from loading automatically. If the Mac starts in Safe Mode, the issue is likely software-related.
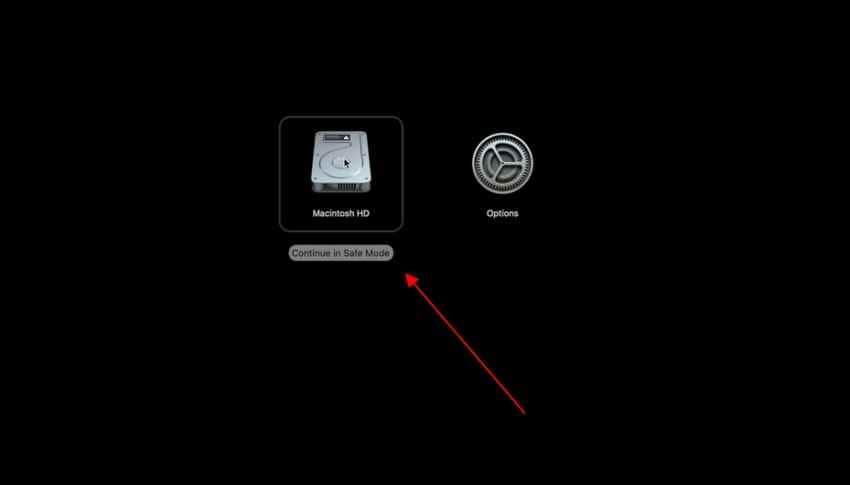
On Apple silicon Macs: Shut down the Mac. Press and hold the power button until startup options appear. Select your startup disk, hold Shift, then click Continue in Safe Mode.
On Intel Macs: Turn on or restart the Mac, then immediately hold Shift until the login window appears. You may see Safe Boot in the menu bar.

Fix 3. Remove Login Items and Recently Installed Apps in Safe Mode
If the Mac reaches Safe Mode, remove suspicious login items and apps installed shortly before the loading screen problem began.
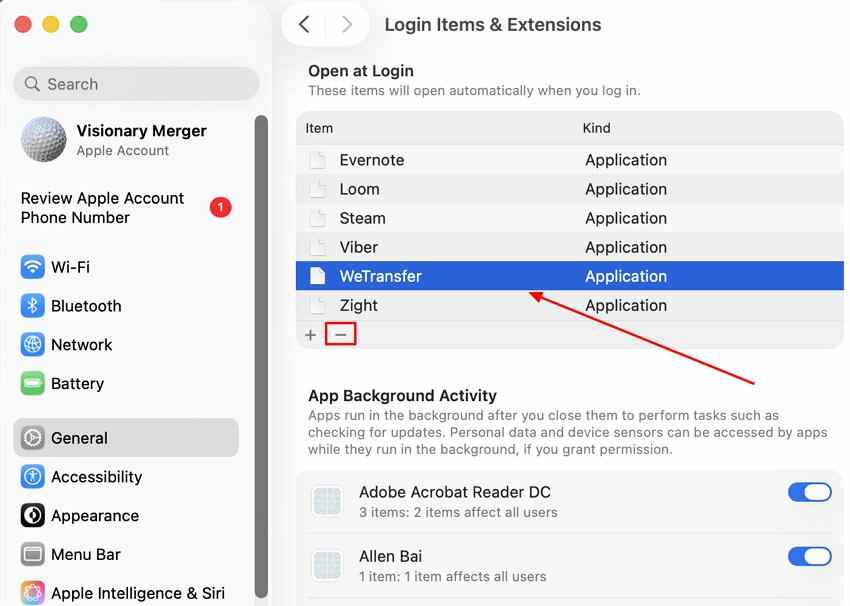
Step 1. Open System Settings, choose General, then open Login Items & Extensions.
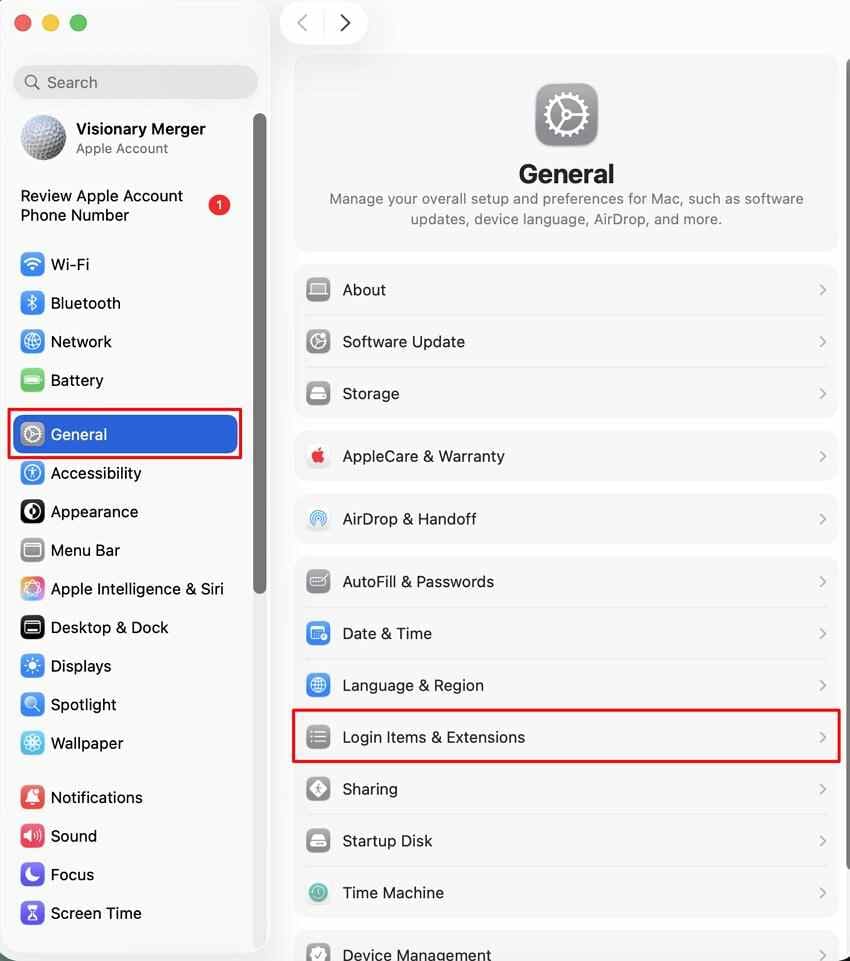
Step 2. Remove suspicious or recently added items from Open at Login. Restart normally and test. Re-enable items one at a time after the Mac starts normally.
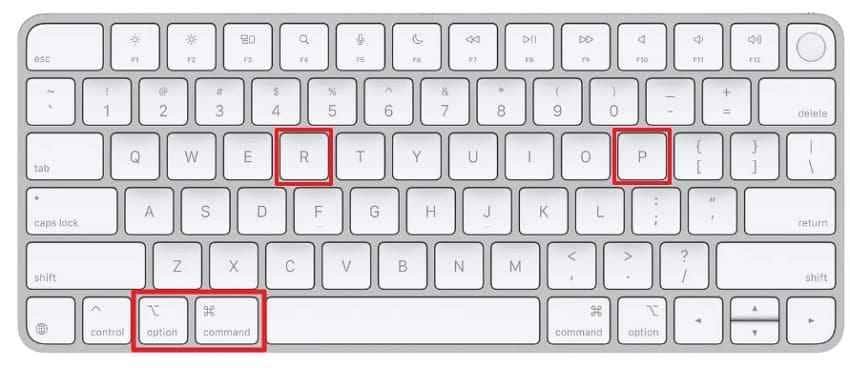
Fix 4. Reset NVRAM or PRAM on Intel Macs
NVRAM stores certain startup disk, display, sound, and system settings. Resetting it can help on Intel Macs if startup disk selection or display settings are involved. Apple silicon Macs do not use this manual NVRAM reset process.
Shut down the Intel Mac. Turn it on and immediately hold Option + Command + P + R for about 20 seconds, then release the keys and let the Mac start.
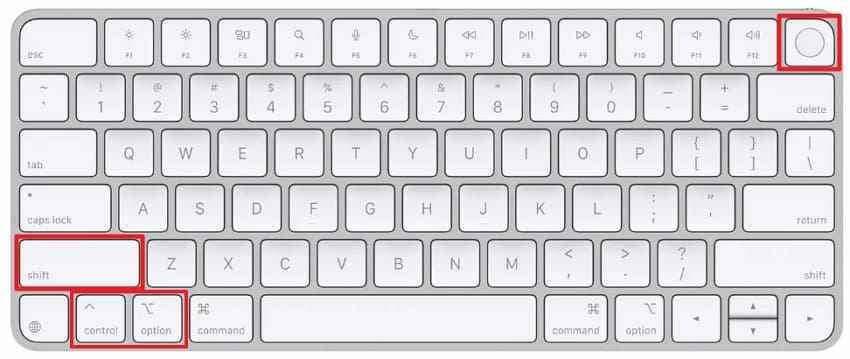
Fix 5. Reset the SMC on Intel Macs
The SMC controls power-related behavior on Intel Macs. Reset it only if the issue involves power, charging, fans, sleep, or startup behavior. Apple silicon Macs do not require a manual SMC reset; shut down, wait, and restart instead.
For many Intel Mac notebooks with a T2 chip, shut down the Mac, hold Control + Option + Shift for 7 seconds, keep holding those keys and press the power button for another 7 seconds, then release all keys and restart. For older Intel models, follow Apple's model-specific SMC reset steps.
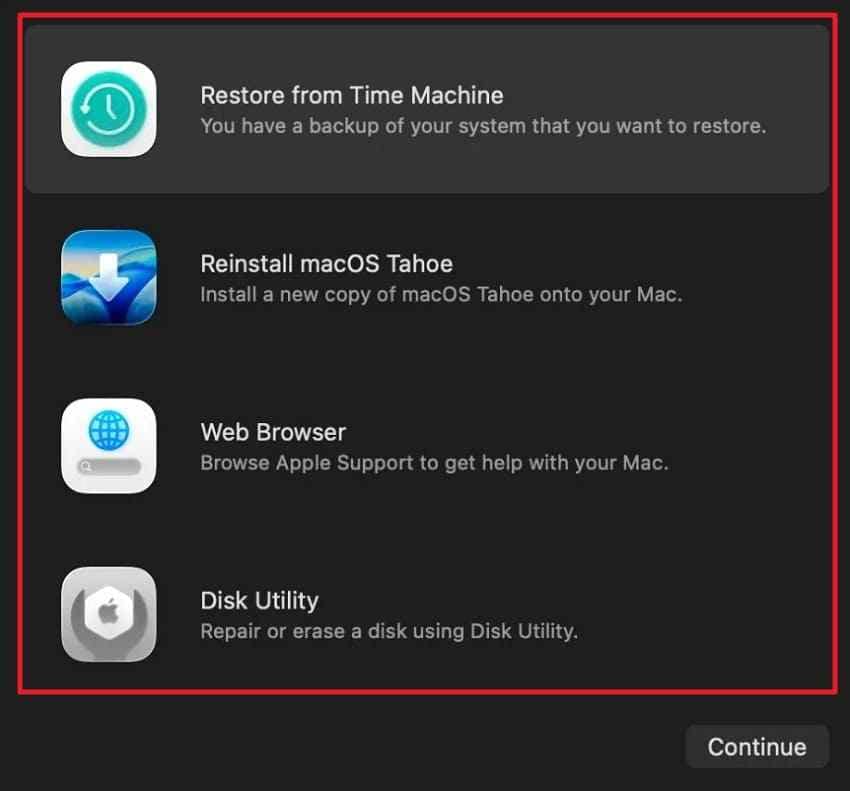
Fix 6. Start Up From macOS Recovery
macOS Recovery lets you repair the startup disk, choose a startup disk, reinstall macOS, restore from backup, or erase the disk if absolutely necessary.
On Apple silicon Macs: Shut down the Mac. Press and hold the power button until startup options appear. Click Options, then click Continue.
On Intel Macs: Turn on or restart the Mac and immediately hold Command + R until the Apple logo or spinning globe appears.
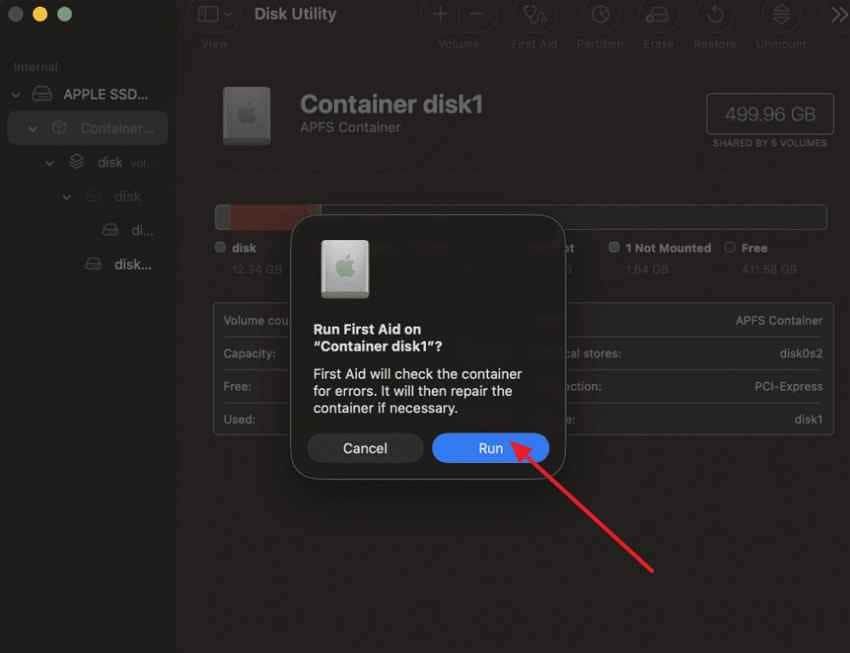
Fix 7. Run Disk Utility First Aid on the Startup Disk
Disk Utility First Aid can find and repair file-system errors that stop macOS from loading.
Step 1. In macOS Recovery, open Disk Utility. Choose View > Show All Devices if available.
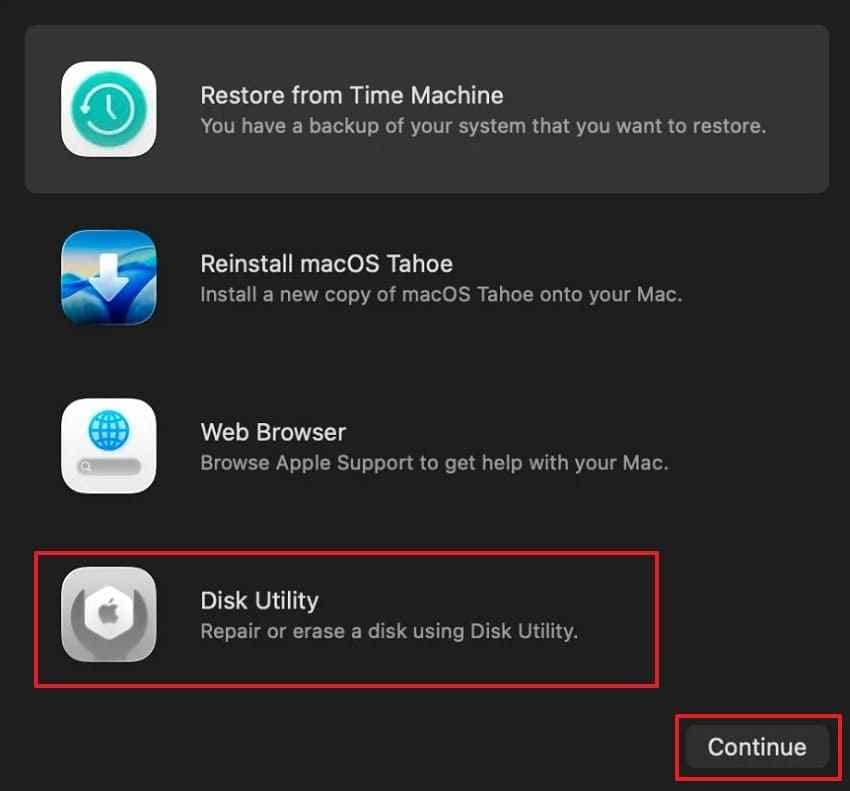
Step 2. Select the startup volume, then click First Aid and Run. If Disk Utility shows containers or the physical disk, run First Aid from volumes up through the container and disk. Restart after the repair finishes.
Fix 8. Choose the Correct Startup Disk
If the Mac tries to start from the wrong disk, it may freeze or fail to finish startup. In macOS Recovery, open Startup Disk, select the correct macOS system disk, and restart.
This is especially relevant for users with external boot drives, multiple volumes, or an iMac that was recently connected to other storage devices.
Fix 9. Reinstall macOS Without Erasing Important Data
If Disk Utility does not solve the issue, reinstall macOS from Recovery. Choose Reinstall macOS and follow the onscreen instructions without erasing the disk. This refreshes system files while normally keeping users, apps, and data in place.
Back up or recover important files first whenever possible, because reinstall can fail if the disk is damaged or if the wrong option is selected.
Fix 10. Erase the Startup Disk and Clean Install macOS as a Last Resort
Erase is the last resort because it deletes the startup disk. Use it only after data is backed up or recovered and lighter fixes have failed.
Step 1. Start in macOS Recovery and open Disk Utility. Select the startup disk or volume and click Erase. For modern macOS versions, use APFS unless Apple or your macOS installer instructs otherwise.
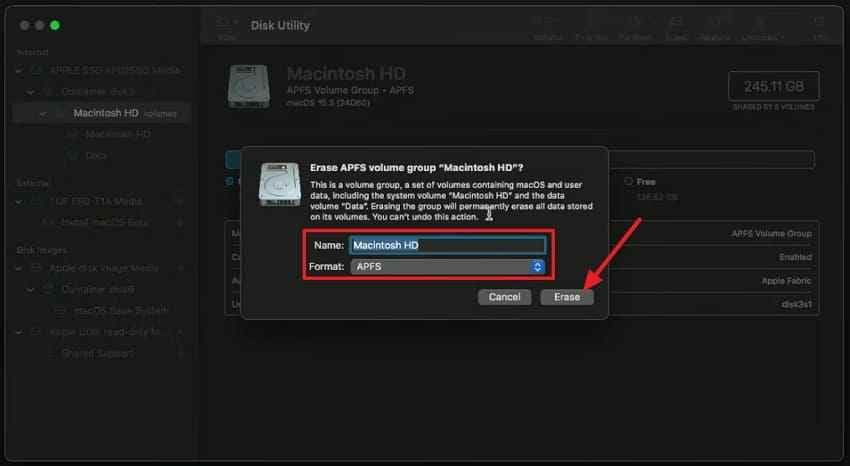
Step 2. Return to macOS Recovery and choose Reinstall macOS. Follow the onscreen instructions to install a fresh system.
Part 5. Recover Files Before Erasing or Reinstalling macOS
If your Mac is stuck on loading screen and no recent backup exists, file protection should come before erase, clean install, or repair.
Why Data Recovery Should Come Before Erase or Repair
| Action | Data Risk |
| Disk Utility repair | Usually safe, but a failing disk can worsen during repeated repairs |
| Reinstall macOS | Normally keeps files, but mistakes or disk failure can still cause loss |
| Erase and clean install | Deletes the startup disk |
| Hardware service | Storage may be erased, replaced, or inaccessible during repair |
When Recoverit Can Help
Recoverit Mac Data Recovery can help recover local files from accessible Mac internal drives, external drives, USB drives, memory cards, and other supported storage devices. It is useful before erasing a Mac, reinstalling macOS, or sending the device for repair.
Recoverit can help with documents, photos, videos, audio files, archives, project files, and other recoverable local data when the drive is still readable and the files have not been overwritten.
When Recoverit Cannot Help
Recoverit cannot repair macOS, fix a damaged logic board, bypass FileVault encryption, recover data without the required password or recovery key, restore overwritten files, or guarantee recovery from a physically failing SSD. If the drive is not detected or is severely damaged, contact a professional data recovery service.
How to Recover Files From a Mac That Will Not Boot Normally
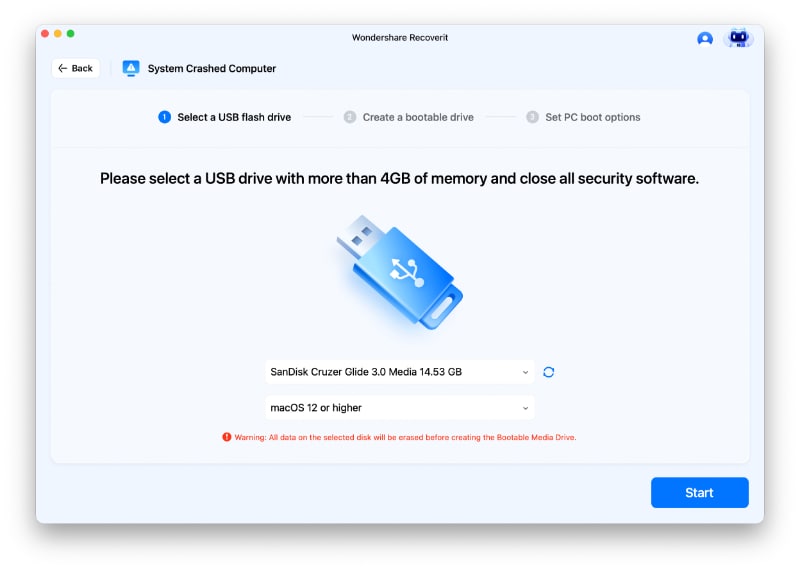
Use another working Mac and a spare USB drive. The USB drive may be formatted while creating bootable recovery media, so do not use one that contains important files.
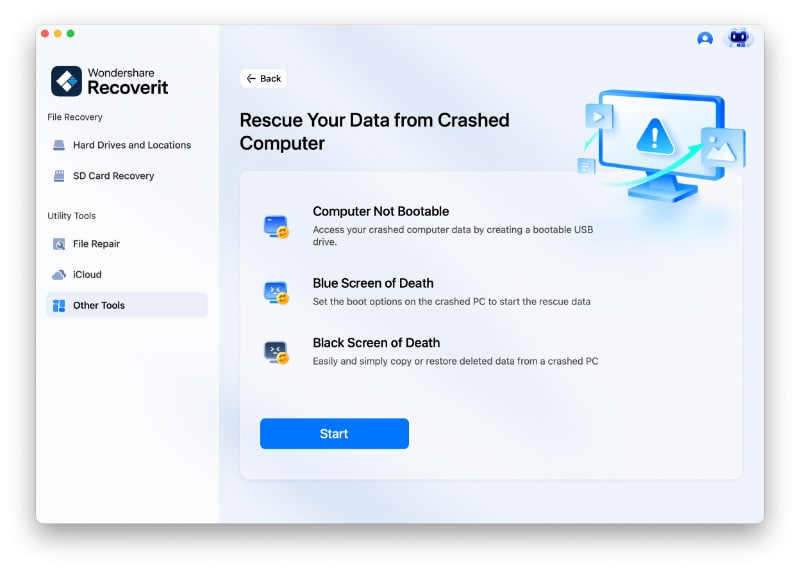
Step 1. Choose Computer Not Bootable
Install and open Recoverit on a working Mac. Go to Other Tools, choose Computer Not Bootable, and click Start.
Step 2. Create a Bootable USB Drive
Connect a USB drive, select it in Recoverit, confirm the macOS version when prompted, and click Start to create bootable recovery media.
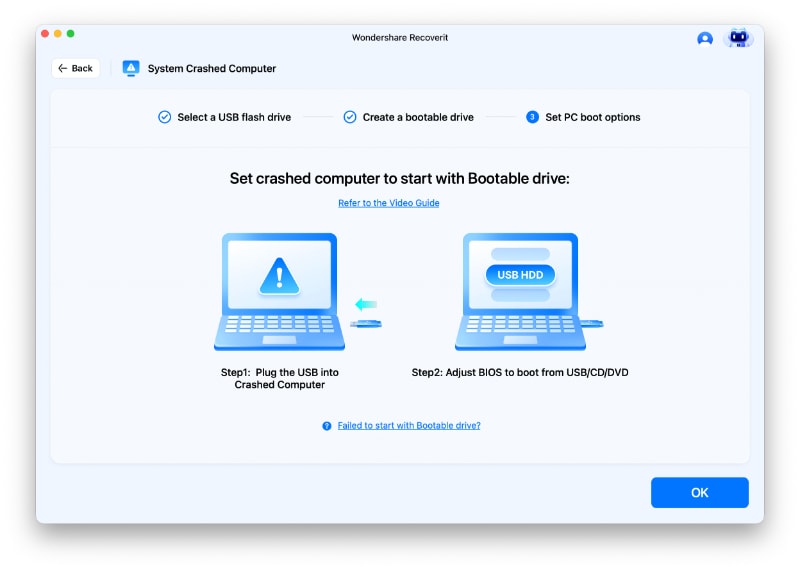
Step 3. Boot the Affected Mac and Recover Files
Connect the bootable USB to the affected Mac, start from the USB, scan the internal storage, preview recoverable files when available, and save recovered files to another external drive.
What to Do If the Mac Drive Is Failing or FileVault Is Locked
If the Mac reports disk errors, the drive is not detected, or scans repeatedly freeze, stop trying to repair or scan the disk. For important files, a professional recovery service is safer. If FileVault is enabled, you need the correct account password or recovery key to access encrypted data.
Part 6. How to Prevent Future Mac Loading Screen Freezes
These habits reduce the chance of another startup freeze and lower data-loss risk.
Let macOS Updates Finish Completely
Keep the Mac plugged in during updates and do not force shutdown while the progress bar is moving. Interrupted updates are a common cause of startup problems.
Maintain Enough Free Startup Disk Space
Keep enough free space for macOS updates, caches, and temporary files. A nearly full startup disk can slow or block login and startup processes.
Review Login Items Regularly
Remove old or unnecessary login items, VPN agents, storage sync tools, and background apps you no longer use. Too many startup items can slow login and cause conflicts.
Disconnect Unnecessary Peripherals Before Restarting
Before a major macOS update or troubleshooting restart, unplug drives, hubs, docks, and other accessories that are not required for startup.
Keep Time Machine or Another Backup Current
Use Time Machine, cloud backup, or another backup method for important files. A recent backup makes it safer to repair, reinstall, or erase macOS if startup fails again.
Conclusion
A Mac stuck on the loading screen needs a structured approach. First check whether the progress bar is still moving, disconnect external devices, then try Safe Mode, login item cleanup, NVRAM or SMC reset on Intel Macs, macOS Recovery, Disk Utility First Aid, startup disk selection, and reinstalling macOS. Erasing the disk should be the last resort.
If your Mac contains important files and you do not have a recent backup, recover or protect the data before erase, clean install, or hardware repair. Recoverit Mac Data Recovery can help recover local files from accessible Mac storage, but it cannot repair macOS, bypass encryption, or recover data from an unreadable physical drive.
FAQ
-
Why is my MacBook stuck on the Apple logo with a loading bar?
It usually means macOS found the startup disk but could not finish loading. Common causes include disk errors, failed updates, incompatible extensions, login item conflicts, or hardware trouble. -
How long should I wait if my Mac is stuck during an update?
If the progress bar is still moving, keep the Mac plugged in and wait. If it has not moved for a long time and the Mac is unresponsive, treat it as frozen and begin safe troubleshooting. -
Will reinstalling macOS delete my files?
Reinstalling macOS over the existing system is designed to keep user data, but you should still back up or recover important files first. Erasing the disk or clean installing macOS deletes data. -
What should I do if Safe Mode does not work?
Disconnect accessories, enter macOS Recovery, run Disk Utility First Aid, choose the correct startup disk, and consider reinstalling macOS. If important files are not backed up, recover data before erase or repair. -
Can Recoverit fix a Mac stuck on loading screen?
No. Recoverit does not repair macOS or hardware. It can help recover local files from accessible Mac storage before you erase, reinstall, or send the Mac for repair.


