


 TL;DR:
To safely recover an unallocated partition without losing your files, you must first extract the trapped data using recovery software like Recoverit or TestDisk before using Windows Disk Management to assign a new drive letter, because creating a new partition will permanently overwrite the existing data.
● TestDisk serves as a free command-line utility capable of directly analyzing and rebuilding the missing partition table, whereas Recoverit provides a graphical interface to scan and retrieve specific files from the unallocated space without altering the drive structure.
● Once your data is secured or restored via Windows File History, you can reclaim the unallocated storage by right-clicking it in Disk Management to select New Simple Volume or Extend Volume, or by running the create partition primary command via the Diskpart utility.
● If the unallocated partition is located on a Solid State Drive with the TRIM command enabled, the system will permanently erase the lost data over time, requiring immediate file extraction before attempting any partition formatting or structural repairs.
Ask AI for a summary
 ChatGPT
 Perplexity
 Gemini
 Claude
 Grok
Grok
To recover unallocated partition, it is necessary to restore your hard drive memory when all of it inexplicably vanishes or becomes inaccessible due to system errors, partition deletion, or formatting. Recovery tools, modernized Windows utilities in 2025, will enable one to restore lost partitions without data loss more easily than ever.
This guide elaborates on the reasons for unallocated partitions and their frequent recovery reasons. It also goes through solutions through inbuilt system programs and professional recovery software to easily reclaim missing disk space and essential files safely.
Try Recoverit to Perform Partition Data Recovery
 Security Verified. 3,591,664 people have downloaded it.
In this article

Part 1. What is an “Unallocated Partition?”
An Unallocated Partition is referred to as the section of the hard drive or SSD that is not assigned to any file system or drive letter. While this makes it invisible to the File Explorer, it does not store any particular data, even if it physically exists.
There are several reasons why an unallocated partition happens within a computer. From accidental deletion to formatting errors and system crashes, these are some of the prominent reasons why you have to recover unallocated partition. Until the space gets reallocated through the disk management utility or partition recovery tools, the space remains unallocated.
Part 2. Common Causes of Unallocated Partitions on Windows or Mac
After learning what is an unallocated partition, users can go through the following reasons to understand why it happens:
- Accidental Partition Deletion: This counts among the most frequent causes of unallocated partitions when performing disk management or OS installations. Upon erasure, the space is counted as unallocated, which is inaccessible through file managers until assigned.
- Interruption in OS Installation: If there are interruptions during OS installation or upgrades, there is a chance that a disk may be left unallocated. This usually occurs if there are power losses or failed writes to create new partitions properly.
- Drive Corruption or Hardware Failure: Disk corruption can be directly associated with file system errors or hardware malfunction. While this can lead to the loss of partition tables, it can influence previously assigned areas to become unallocated.
- Disk Format Limitations: Disks operating under MBR format have stricter size limits, which prevent users from fully utilizing them. If boundaries are exceeded, some space is automatically left unallocated in such disk formats.
- External Hardware Issue: When connecting peripheral devices like USB drives, they can create unallocated partitions if appropriately disconnected. This can effectively lead to confusion with unallocated space when dealing with disk management.
Part 3. How to Recover an Unallocated Partition Without Losing Data
With that, let us go through some of the top ways to explain how to recover unallocated partition without putting the data at risk:
Way 1. Use Data Recovery Software - Recoverit
As discussed above, accidental deletion, failed updates, or power failure can be a direct influence on an unallocated partition. This particular problem can put your data at risk, which might include your precious photos and videos. That is where you can rely on Recoverit, a powerful data recovery tool offering advanced data scanning technology with a 99.5% recovery rate.
The tool holds stature in scanning the unallocated spaces within the SSD, reconstructing partition tables, and restoring files without overwriting data. Under 10,000 unique data loss scenarios, Recoverit works perfectly in restoring your data with crisp quality.
Key Features
- Scanning Options: Performs Quick or Deep Scans on your computer and its drives to seamlessly retrieve lost data.
- Preview Mode: Comes with a preview setting where you can go through the recovered data before saving it to your device.
- Filter System: Allows users to narrow their scanning process by applying filters for file type, size, date of creation, and more.
Instructional Guide on How to Recover Lost Data Files Using Recoverit
Let's go through the detailed steps to figure out how to recover an unallocated partition using the top recovery software:
- Select Location and Begin Scanning
Head to the “Hard Drives and Locations” tab and select the visible unallocated drive from the list to begin scanning.

- Access Lost Files and Choose Desired Ones
Once the scanning starts, all the lost documents and media will appear under the left side “File Location” tab. As it is completed, choose the desired files and open them in a “Preview” window.

- Go through Files and Recover
From here, thoroughly check every bit of the content in your files or videos, and hit “Recover.”

Way 2. Restore from a Backup
File History turns out to be an official backup system for Windows devices, if enabled appropriately. For users who face issues of unallocated partitions they can easily recover their important files, including documents, pictures, and music, through it. File History regularly backs up data to a new location to preserve multiple versions of files, ensuring easy restoration if the data is lost.
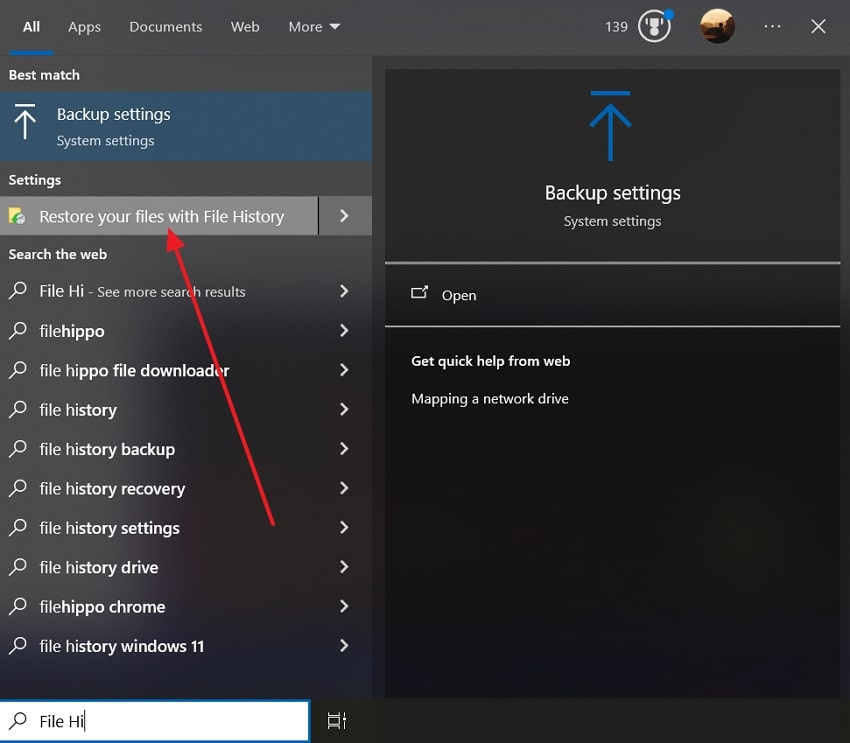
- Search for “File History” and press the “Restore Your Files with File History” option from the search results
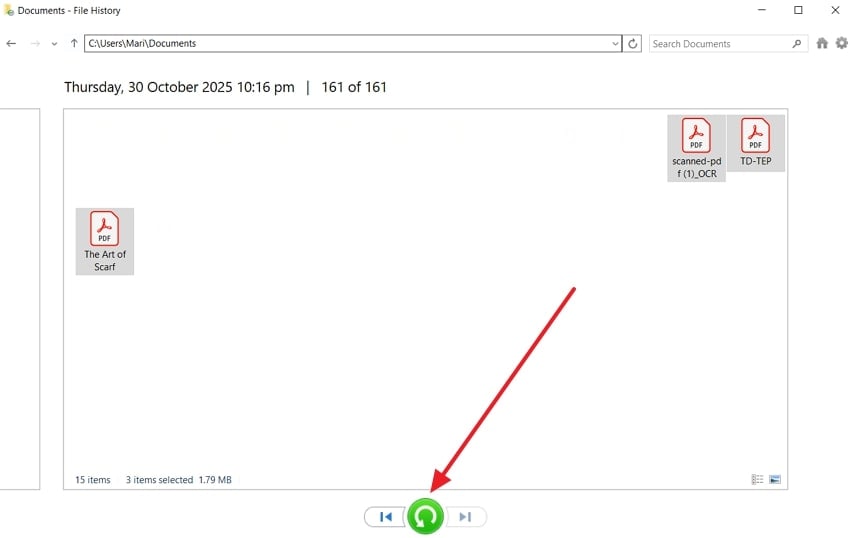
- Next, open the folder effectively present in the “unallocated drive” where you lost your files, select them, and click the green "Restore to Original Location” button.
Way 3. Contact a Data Recovery Service
In case you’re trying to figure out how to recover an unallocated partition, contacting a data recovery service is considered a reliable solution. When standard recovery solutions fail to provide a way, professional services utilize advanced techniques to safely access lost partitions. Their expertise is prominent when compared with home-based options, helping users extract important data without losing it to the problem.
Part 4. How to Fix an Unallocated Partition: Other Fixes to Try
This part will provide users with various efficient ways on how to recover an unallocated partition. All provided solutions can serve as quick troubleshooters if the problem of unallocated partitions accidentally happens across the device:
1. Create a New Partition
Using the Disk Management tool in Windows, available space can be converted into a new usable storage space. It gives you a chance to designate your new partition with an appropriate letter, volume size, and various formatting choices. This means that if the partition has been deleted, then this method can be helpful to turn the unused space into usable storage data.
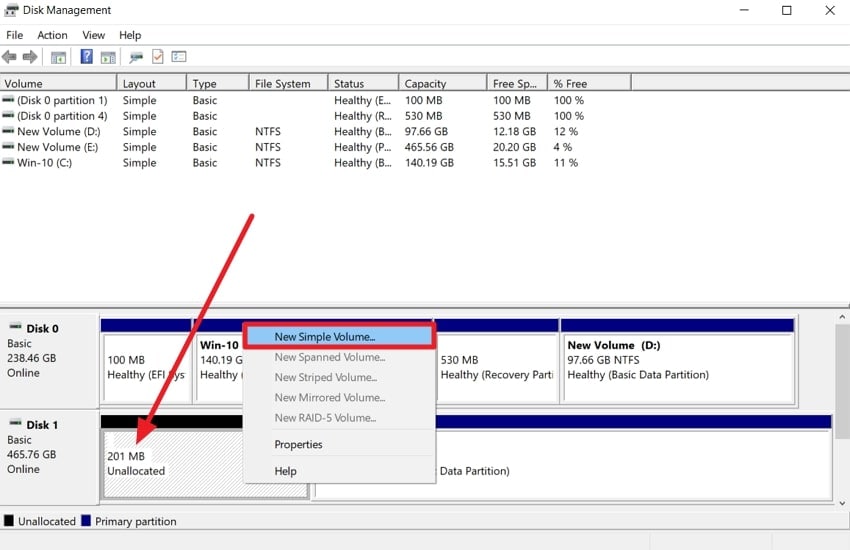
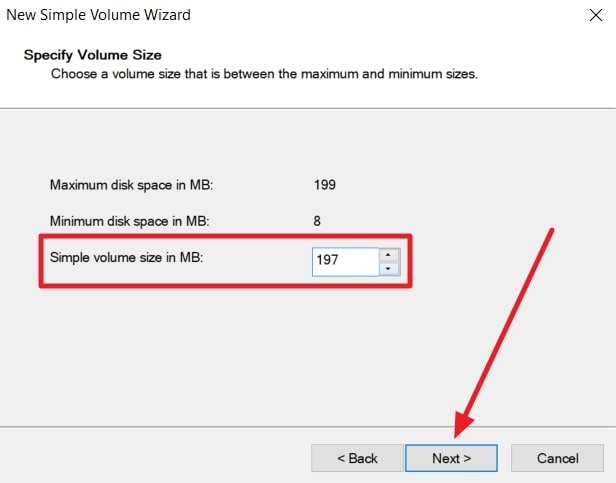
- Access the “Disk Management” window by searching for it from the bottom taskbar. Right-click on the unallocated disk and choose the “New Simple Volume” option.
- Moving forward, press “Next” on the “Simple Volume Wizard” screen. From here, set a “Simple Volume Size in MB,” and hit “Next.”
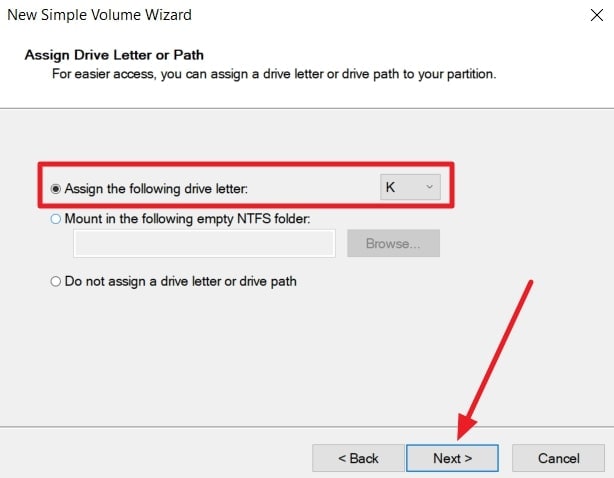
- After that, choose the “Assign the Following Drive Letter,” pick a letter, and press “Next” to proceed.
- On the "Format Partition" section, select the "Format this Volume with the Following Settings" option. Define a file system, unit size, and label before pressing "Next" and finishing the partition creation.

2. Add Space to an Existing Partition
Another method that explains how to recover unallocated partition involves adding unallocated space to an existing partition. While it does increase the size of the current drive, it turns out to be a handy solution if the drive is running out of space. This also makes your storage organized and helps you utilize the available space in a proper manner.
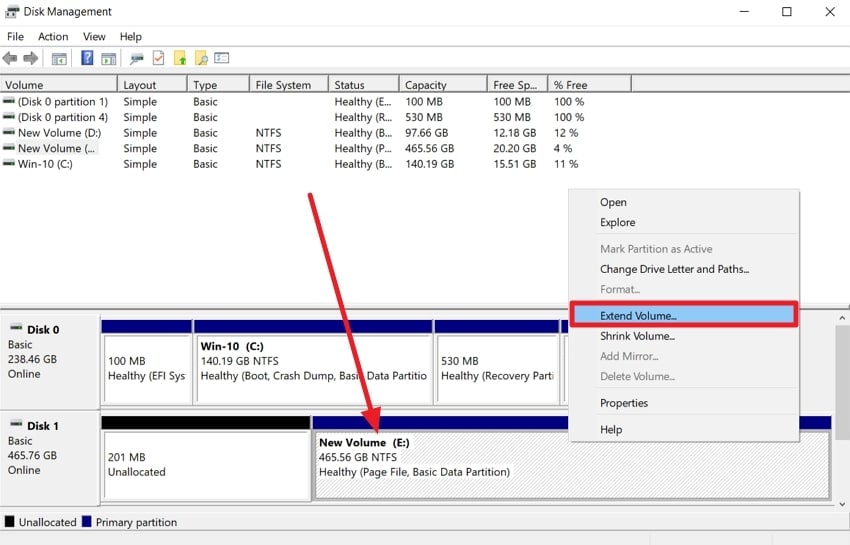
- Within the “Disk Management” window, right-click on an existing disk drive to choose “Extend Volume.”
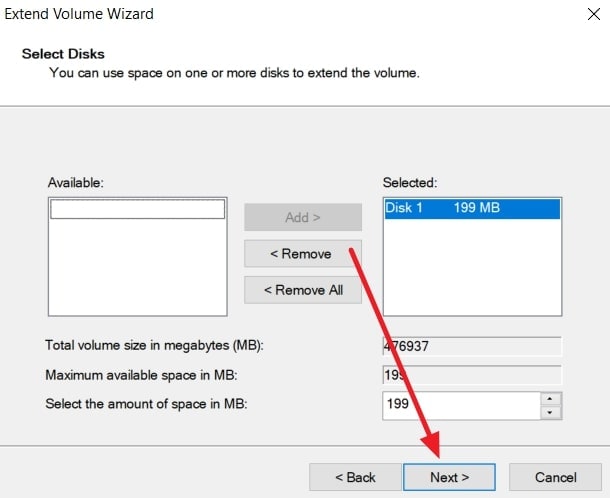
- Select the space under the "Available" box, hit "Add" to move the disk across the box, and continue by clicking "Next."
3. Use CMD (Diskpart)
Diskpart acts as a command-line tool that helps in managing hard drives and partitions within Windows. It can be used for creating, deleting, and recover unallocated partition without any hassle. While this requires some expertise, it gives you control over your partitions and lets you fix the issue a normal tool might not handle.
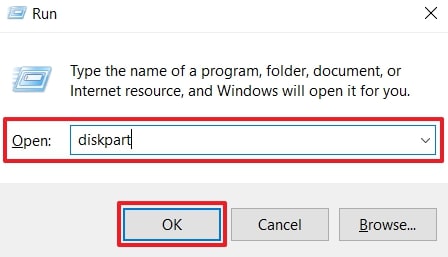
- Using the “Windows + R” shortcut keys, access the “Run” dialogue box, and type “diskpart.”
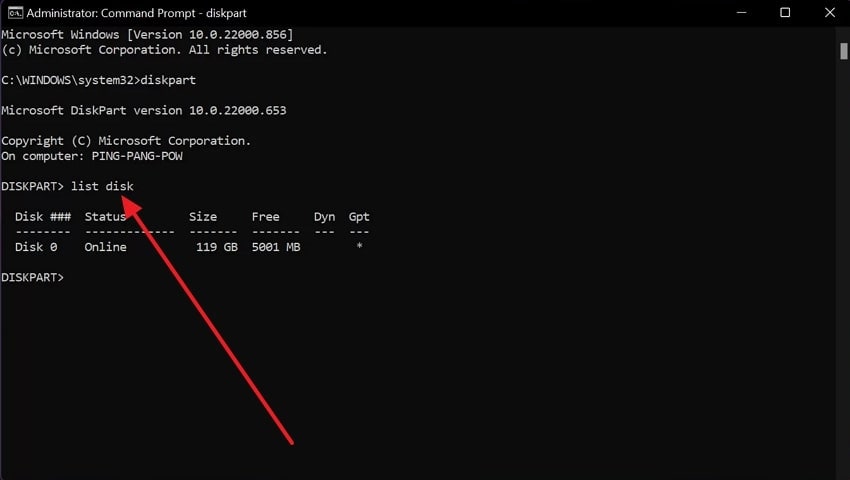
- As the CMD window opens, use the “list disk” command next to “Diskpart” and hit “Enter.” This will help you get hold of the “Free” section, showing the amount of unallocated space within the device.
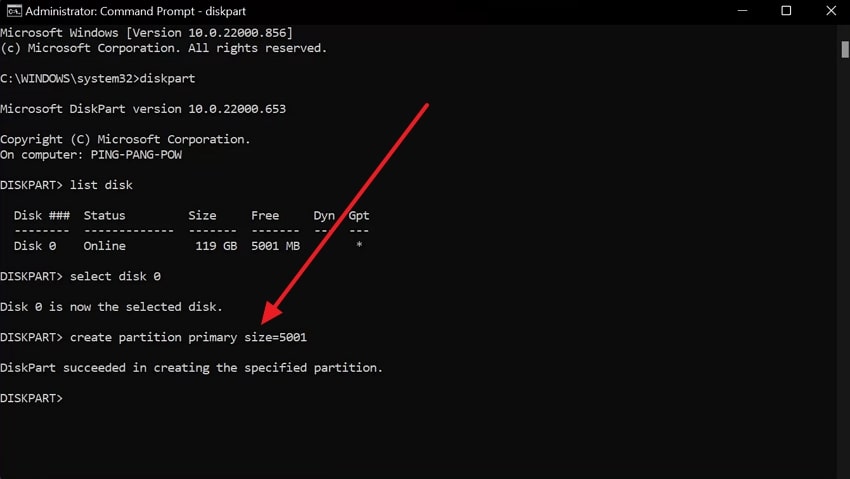
- Use the command “select disk x” (x represents the number of disks with unallocated space) and use “Enter” to proceed further.

- Next, write the “create partition primary size=x” command (replace the x with the size of the new partition) next to “Diskpart,” and press “Enter.”
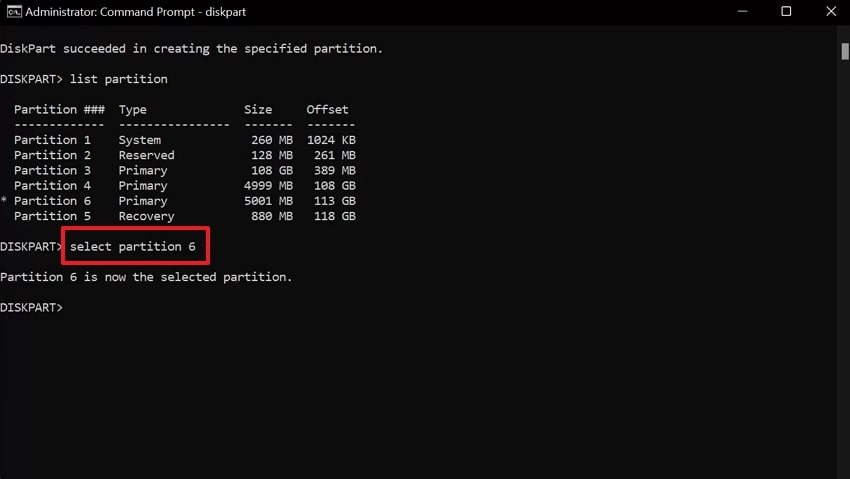
- Once that's done, type “list partition” and hit the “Enter” key on your keyboard.

- When the various partitions appear, type the “select partition x” command, replace the x with the newly created partition, and click “Enter.”
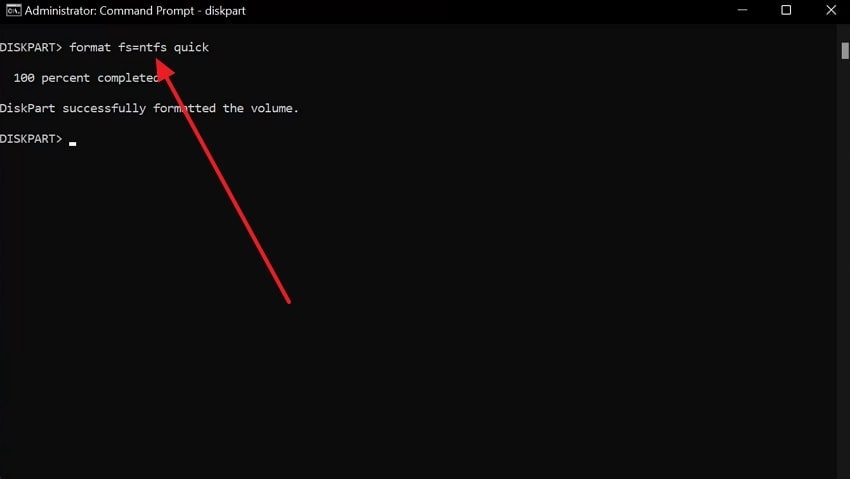
- On the next commands, format the partition by entering the "format fs=ntfs quick" command and pressing "Enter."
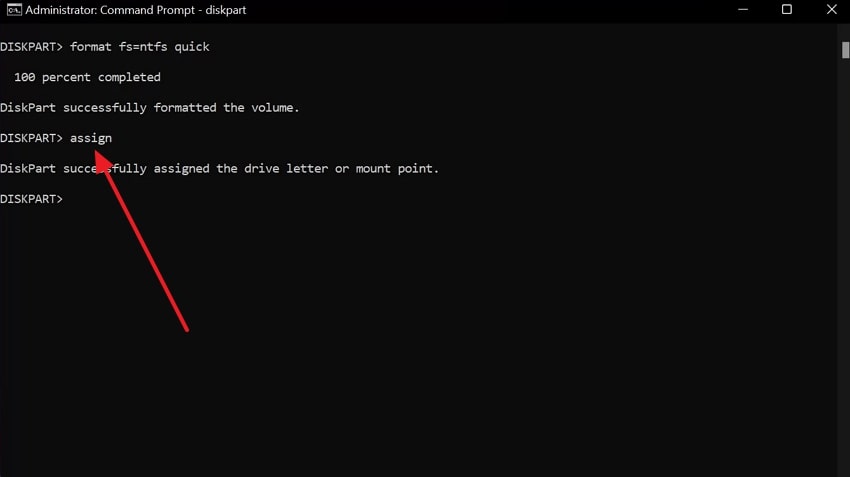
- Finally, after waiting for the Diskpart to format the partition, type “assign letter x” (choose any letter in place of x), and finish this process by exiting the command prompt window.
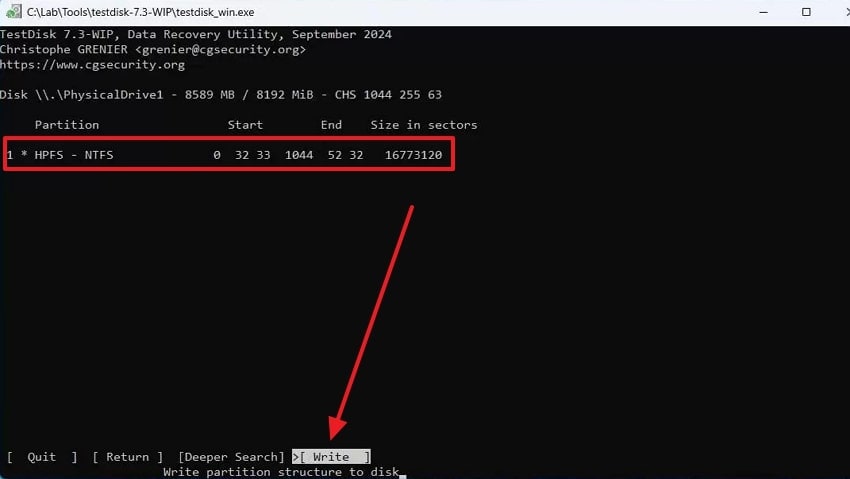
4. Use TestDisk
If you use TestDisk free recovery program, you can find and easily restore your lost or accidentally deleted partitions. This program thoroughly scans the drive and detects any type of corruption or any missing partition table. Unlike other tools, it retrieves old partition data and structure using a bunch of analysis. You can follow the given steps on how to recover unallocated partition using this tool:
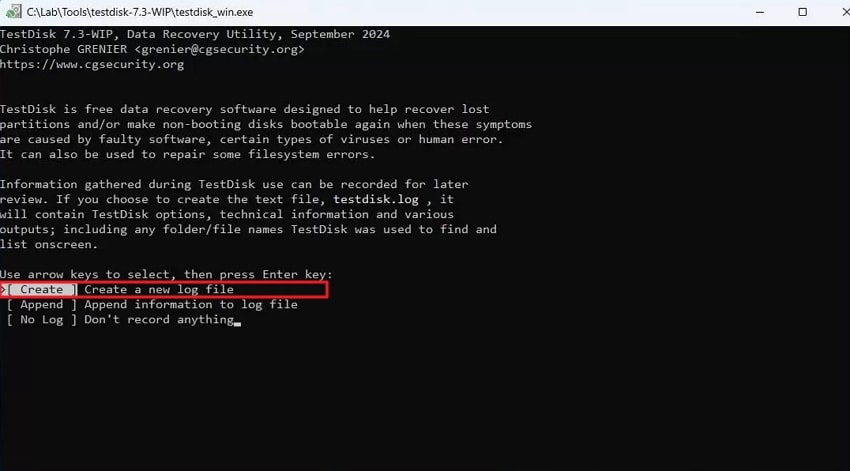
- After downloading TestDisk on your operating system, extract its content and right-click on "testdisk_win.exe" to select "Run as administrator." As it opens on a CMD window, select the "create" option to begin.
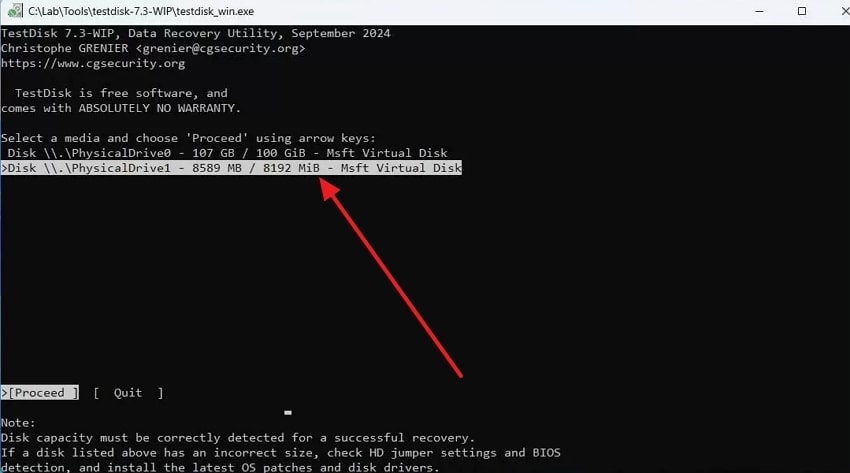
- Now, scroll through the available disks, choose one, and hit the “Enter” key to proceed.
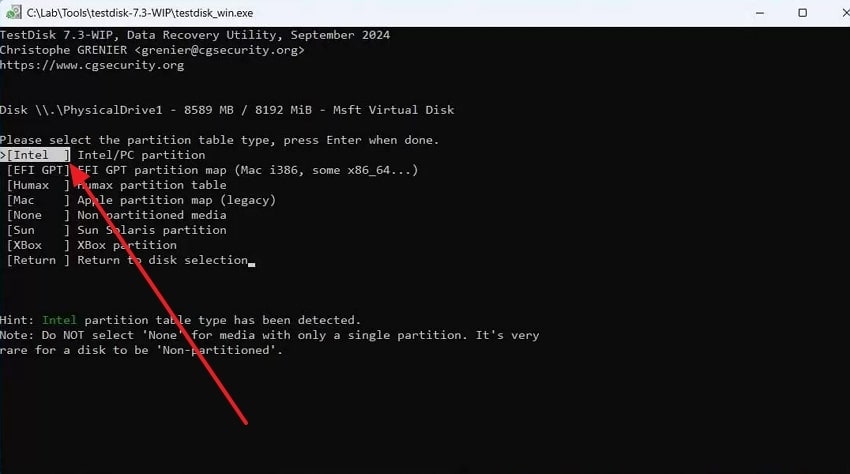
- On the next options, pick the “Intel (Intel/PC partition)” choice from under the “Please Select the Partition Table Type” command, and hit “Enter.”
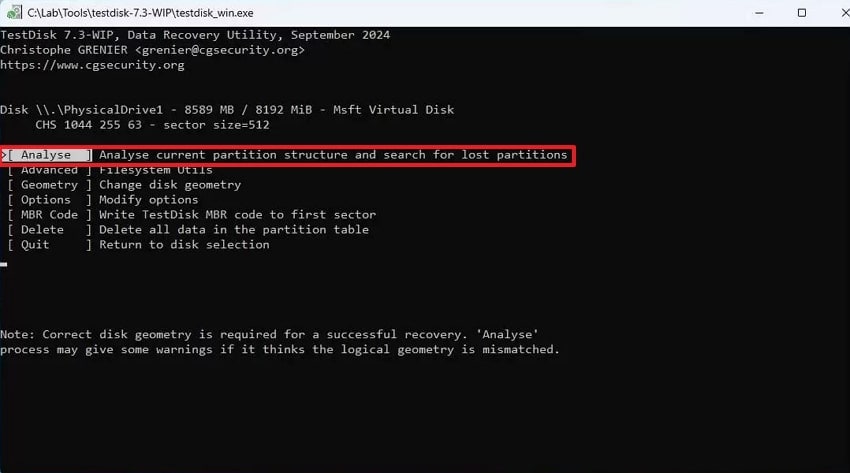
- You need to select the "Analyse" option and let the tool go through the partition structure and look for any lost partitions.
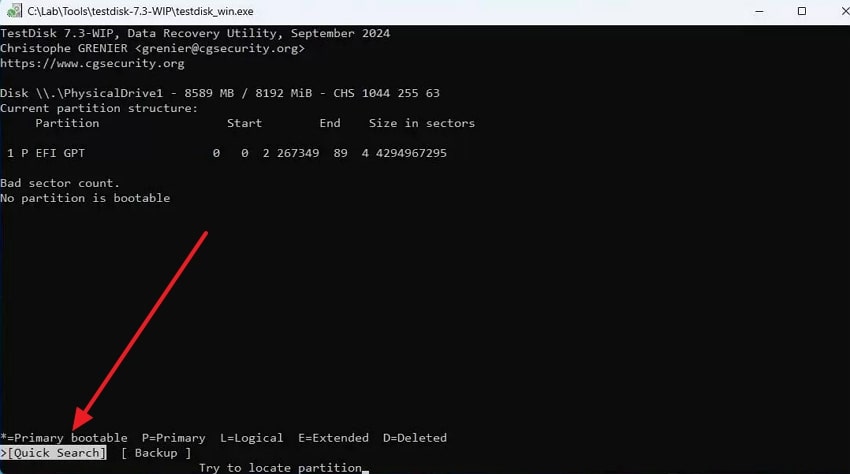
- Afterward, at the bottom of the command prompt window, select the “Quick Search” option to enhance the searching process.
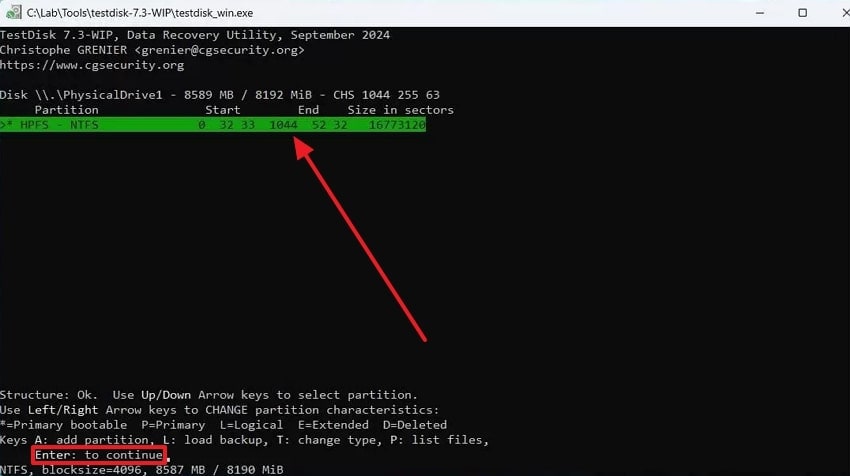
- Next, with the help of TestDisk, the lost partition will appear under the “Partition” section, which you need to select, and hit the “Enter” key.
- When the information of the lost partition appears clear, press the "Write" option, and hit "Enter" to write the partition back to the table. To proceed to this step, press "Y" to restart the computer, then check your partition once the device restarts.
Part 5. Tips to Prevent Partitions from Becoming Unallocated Again
After learning about recover unallocated partition, you might want some tips on how to avoid data loss. The following points provide users with some of the best tips that can help them understand what needs to be done to prevent deletion:
- Regular Backups: You should maintain backups of all your important files within an external drive or cloud storage system. It helps ensure that even if the partition becomes unallocated, your data is kept safe or accessible.
- Check Disk Health: Both Windows and Mac users should monitor their disks by using the disk health tool. The CHKDSK and Disk Utility tools scan for and detect bad sectors, helping you fix them before partition corruption.
- Compatible Partition Styles: To prevent an unallocated partition, use modern partition styles such as MBR, GPT, and others. If you mix any incompatible partition styles, it can cause recognition errors within the system.
- Update Disk Drives: Users should keep their disk drives updated, as it can help avoid corruption and communication errors. With these problems, you can easily lose your device's partition.
- Monitor SSD TRIM Effects: Be aware that the TRIM command can permanently erase data. That's why, act accordingly and recover the essential files before they're overwritten.
Conclusion
As we conclude our discussion, users learned that their computers may have unallocated space, which can lead to data loss. That is why this article provides some of the best ways to recover essential files and data from your device. Moreover, you learned about how to recover unallocated partition with simple step-by-step guides. However, if you're looking for the best data recovery, use the Recoverit data recovery solution for foolproof results.
FAQ
-
1. Can I recover data without formatting the drive?
Yes, you can still recover lost data from unallocated partitions by using the best data recovery software, such as Recoverit or TestDisk. Besides, these tools help scan drives and restore files without erasing any existing data. -
2. Is it safe to create a new partition on unallocated space?
If users do not have to recover any lost files from a partition, they can safely create a new partition. However, if there are important files in your unallocated space, creating a new partition will lose them. -
3. What features should I look for in partition recovery software?
Deep scanning, file preview, and partition table recovery tools are the must-have features of an effective recovery tool. Also, your software should be capable of supporting various file systems such as NTFS, HFS+, and so on, with a fluid recovery rate. -
4. Are there specialized tools for Mac partition recovery?
You can use tools like Recoverit to recover unallocated partition. Such tools support Mac file systems, such as APFS and exFAT, making them ideal for recovering lost partitions.


