

 TL;DR:
Diskpart is a built-in Windows command-line utility that allows users to manage, format, shrink, and convert local and external disk partitions directly through an Administrator-level Command Prompt.
● Executing actions requires a strict command sequence where users must identify and isolate the target drive using the list disk and select disk commands before applying modifications to prevent data loss on the wrong volume.
● Converting a drive between MBR and GPT partition styles requires first executing the clean command on the selected disk, which entirely wipes all existing partitions and data.
● The utility lacks warning prompts for destructive commands like format or clean all, requiring users to rely on external recovery software like Recoverit if a partition table is unintentionally deleted.
Ask AI for a summary
 ChatGPT
 Perplexity
 Gemini
 Claude
 Grok
Grok
DiskPart is a Microsoft command-line utility for managing disks, partitions, volumes, and virtual hard disks in Windows. It is powerful because it can create, format, extend, shrink, assign drive letters, convert partition styles, and erase disks from a command prompt.
That power also makes DiskPart risky. It works on the object currently in focus, such as the selected disk, selected partition, or selected volume. If you select the wrong target before running clean, format, or delete partition, you can lose data immediately.
This guide should separate read-only commands from commands that change or erase storage, then show safer Windows 11/10 command sequences for common partition tasks.

Before You Run DiskPart Commands: Safety Checklist
| Safety Check | Why It Matters | Command or Action |
| Run as administrator | DiskPart needs elevated permission for most storage changes | Open Terminal or Command Prompt as administrator |
| List disks and volumes first | Prevents selecting the wrong drive | list disk and list volume |
| Confirm the focused object | DiskPart commands act on the selected disk, volume, or partition | detail disk, detail volume, or detail partition |
| Back up important files | Format, clean, delete, and convert commands can remove data | Copy files to another drive before making changes |
| Check the disk number by size | USB, SD cards, external drives, and internal disks can look similar | Compare size, status, and drive letter before selecting |
| Avoid destructive commands on system disk | Wrong commands can make Windows unbootable | Do not run clean, delete, or format on the OS disk unless reinstalling intentionally |
Part 1. What Is DiskPart?
DiskPart is a built-in Microsoft command interpreter for disk, partition, volume, and virtual disk management. It replaced older tools such as Fdisk for many command-line disk management tasks.
| Item | DiskPart Details |
| Developer | Microsoft |
| Tool type | Command-line disk partitioning and volume management utility |
| Best for | Advanced disk operations, scripting, recovery environments, USB preparation, drive letter fixes, and partition repair tasks |
| Works with | Disks, partitions, volumes, virtual hard disks, removable storage, and external drives recognized by Windows |
| Requires | Administrator permission for most changes |
| Key rule | Most commands require selecting a disk, partition, or volume before making changes |
Disk Management is easier for visual tasks. DiskPart is better when the graphical tool is unavailable, Windows cannot assign a drive letter correctly, a script is required, or the user is working in Windows Recovery Environment.
Part 2. Common DiskPart Commands in Windows 11/10
The most important DiskPart concept is focus. You normally run a list command, select the correct disk, volume, or partition, confirm it with a detail command, and only then run the action command.
| Command | Purpose | Data Risk |
list disk |
Displays disks detected by Windows | Read-only |
list volume |
Displays volumes and drive letters | Read-only |
list partition |
Displays partitions on the selected disk | Read-only |
list vdisk |
Displays virtual disks | Read-only |
select disk n |
Sets the target disk focus | Safe by itself, risky before destructive commands |
select volume n |
Sets the target volume focus | Safe by itself, risky before destructive commands |
select partition n |
Sets the target partition focus | Safe by itself, risky before destructive commands |
detail disk, detail volume, detail partition |
Shows detailed information about the selected object | Read-only |
assign letter=E |
Assigns a drive letter to the selected volume | Low |
remove letter=E |
Removes a drive letter from the selected volume | Medium if apps depend on the letter |
create partition primary size=102400 |
Creates a primary partition of a specified size in MB | Medium if the wrong disk is selected |
format fs=ntfs quick |
Formats the selected volume with a file system | High, removes existing file references |
extend size=10240 |
Extends the selected volume into available contiguous free space | Medium |
shrink desired=10240 |
Shrinks the selected volume by the specified size in MB | Medium |
delete partition |
Deletes the selected partition | High, removes partition access |
clean |
Removes partition and volume information from the selected disk | Very high |
clean all |
Writes zeros to every sector of the selected disk | Extreme and slow, destroys recoverability |
convert gpt or convert mbr |
Converts the selected empty disk partition style | High if cleanup is required first |
active |
Marks the selected MBR partition as active | High on boot disks if used incorrectly |
DiskPart Command Risk Levels
| Risk Level | Commands | Rule Before Running |
| Read-only | list, detail, help |
Safe for diagnosis |
| Low | assign, attributes volume clear readonly |
Confirm the selected volume first |
| Medium | shrink, extend, remove letter, create partition |
Back up important data and check available space |
| High | format, delete partition, active, convert mbr, convert gpt |
Back up or recover data first and confirm target with detail |
| Extreme | clean, clean all |
Use only when intentionally erasing or resetting the selected disk |
Part 3. DiskPart Command Examples to Manage Partitions in Windows
DiskPart commands are entered one line at a time. Press Enter after each command and read the output before continuing. For every task, identify the target first, select it, confirm it, then run the action command.
Example 1: Mark an MBR Partition as Active
The active command should be used only on an MBR disk partition that must be used for BIOS-style booting. Do not use it casually on GPT disks or random data partitions.
- Run
diskpart. - Run
list disk. - Run
select disk nand replacenwith the correct disk number. - Run
detail diskto confirm the selected disk. - Run
list partition. - Run
select partition nand replacenwith the target MBR partition. - Run
detail partitionto confirm the selected partition. - Run
activeonly if you are certain this partition should be active.

active as a general boot repair command.Example 2: Assign a Drive Letter to a Volume
Use assign when a partition or removable drive appears in Disk Management but has no drive letter in File Explorer.
- Run
diskpartas administrator. - Run
list volume.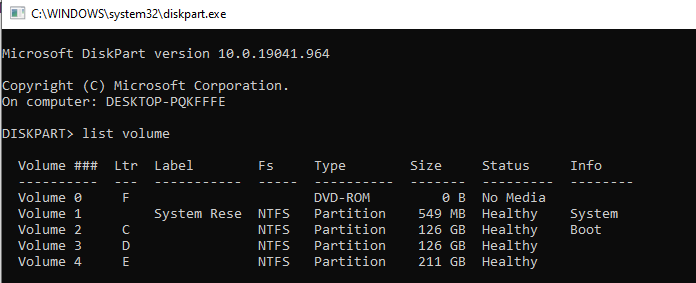
- Find the target volume by size, label, and file system.
- Run
select volume n.
- Run
detail volumeto confirm it is the correct volume. - Run
assign letter=Eand replaceEwith an unused drive letter.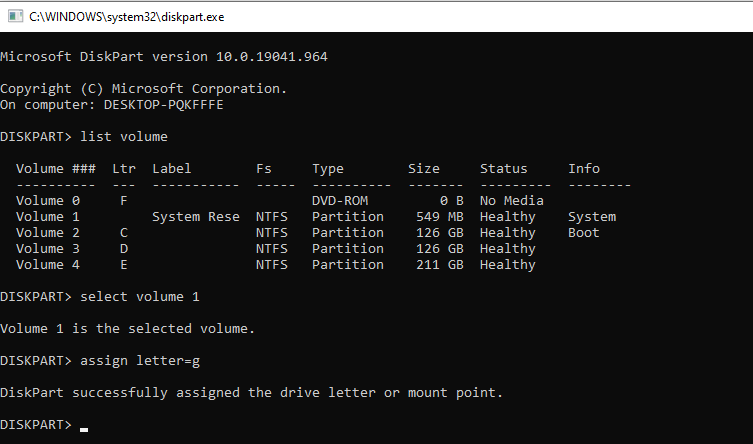
- Open File Explorer and check whether the volume appears.
Example 3: Create, Assign, and Format a New Primary Partition
Use this sequence only on unallocated space or on a disk that you intentionally prepared for a new partition. Creating and formatting the wrong partition can remove access to existing data.
- Run
diskpart. - Run
list disk. - Run
select disk n. - Run
detail diskand confirm the selected disk. - Run
create partition primary size=102400to create a 100GB partition, or omitsizeto use all available space. - Run
format fs=ntfs quick label=Data, or choosefs=exfatfor cross-device removable storage. - Run
assign letter=E. - Run
exit.

Example 4: Delete a Partition
The delete partition command removes the selected partition. If you delete the wrong partition, stop immediately and do not create a new partition, format the disk, or write new data before recovery.
- Back up or recover data from the partition first.
- Run
diskpart. - Run
list disk. - Run
select disk n. - Run
list partition. - Run
select partition n. - Run
detail partition. - Run
delete partitiononly after confirming the target.

Example 5: Format a Volume
The format command prepares a selected volume with a file system. It removes existing file references from that volume, so recover or back up important files first.
- Run
diskpart. - Run
list volume. - Run
select volume n. - Run
detail volumeto confirm the drive letter, size, and label. - Run
format fs=ntfs quick label=Datafor a quick NTFS format. - Use
format fs=exfat quickwhen the target device requires exFAT.
- Run
assign letter=Eif the volume needs a drive letter.
Example 6: Shrink a Volume
Use shrink to reduce a selected volume and create unallocated space. The size is entered in MB, and Windows may limit shrink size because of unmovable files.
- Back up important files from the volume.
- Run
diskpart. - Run
list volume. - Run
select volume n. - Run
detail volume. - Run
shrink querymaxto check the maximum reclaimable size. - Run
shrink desired=10240to shrink by 10GB.

Example 7: Extend a Volume
Use extend to add available unallocated space to the selected volume. In many cases, the unallocated space must be immediately after the target volume.
- Back up important data.
- Run
diskpart. - Run
list volume. - Run
select volume n. - Run
detail volume. - Run
extend size=10240to extend by 10GB, or runextendto use all available compatible space. - Run
list volumeagain to confirm the new size.
Example 8: Clean or Erase a Disk
clean and clean all are high-risk commands. Use them only when you intentionally want to reset or erase the selected disk.
| Command | What It Does | Recovery Impact |
clean |
Removes partition and volume information from the selected disk | Data may still be recoverable if no new data is written |
clean all |
Writes zeros to every sector of the selected disk | Recovery is usually not practical because data is overwritten |
- Back up or recover all needed data first.
- Run
diskpart. - Run
list disk. - Run
select disk n. - Run
detail diskand confirm size, model, and volumes. - Run
cleanonly if you want to remove partition information. - Run
clean allonly if you intentionally want to overwrite the whole disk.

clean, stop using the disk immediately. Do not create a new partition or format it before attempting partition recovery.Example 9: Convert Between MBR and GPT
DiskPart convert gpt and convert mbr are intended for selected empty disks. Many guides use clean before conversion, but that removes partition information and can cause data loss.
- Back up the entire disk.
- Use this sequence only on a disk you are willing to erase.
- Run
diskpart. - Run
list disk. - Run
select disk n. - Run
detail disk. - Run
cleanonly after confirming data is backed up. - Run
convert gptorconvert mbr.

MBR2GPT.EXE instead of using DiskPart clean.Part 4. How To Open DiskPart in Windows 11/10
Open DiskPart with administrator permission. If Windows cannot boot, you can also open Command Prompt from Windows Recovery Environment and run DiskPart there.
| Method | Steps | Best For |
| Windows Terminal | Right-click Start, choose Terminal Admin, type diskpart, and press Enter |
Windows 11 and newer Windows 10 builds |
| Command Prompt | Search cmd, choose Run as administrator, type diskpart, and press Enter |
Classic Windows command workflow |
| Run dialog | Press Windows + R, type diskpart, and approve administrator prompt |
Fast launch when Windows is working |
| Windows Recovery Environment | Open Troubleshoot > Advanced options > Command Prompt, then run diskpart |
Boot repair, offline disk checks, and recovery tasks |
list disk, list volume, and detail again.Part 5. Recover Data After Wrong DiskPart Commands
If a wrong DiskPart command deleted a partition, formatted a volume, or ran clean on the wrong disk, stop using that disk immediately. Do not create a new partition, format the disk again, or copy new files to it.
Wondershare Recoverit can scan disks, partitions, external drives, USB drives, memory cards, and other storage devices for recoverable files after accidental deletion, formatting, partition loss, or a DiskPart mistake. Recovery is much harder after clean all because that command overwrites sectors with zeros.
| DiskPart Mistake | What To Do Immediately | Recovery Chance |
Ran delete partition |
Stop using the disk and scan the original drive | Often possible if no new partition or format was created |
Ran format quick |
Stop writing data and scan the formatted volume | Possible if data was not overwritten |
Ran clean |
Do not initialize, partition, or format the disk | Possible in some cases before overwrite |
Ran clean all |
Stop immediately and evaluate whether any backup exists | Very low because data is overwritten |
Converted the wrong disk after clean |
Stop using the disk and scan before creating volumes | Depends on overwrite and new partition creation |
- Stop using the affected disk.
- Install Wondershare Recoverit on another drive or another computer if possible.

- Open Recoverit and select the affected disk, lost partition, or formatted volume.
- Start the scan.

- Preview recoverable files.
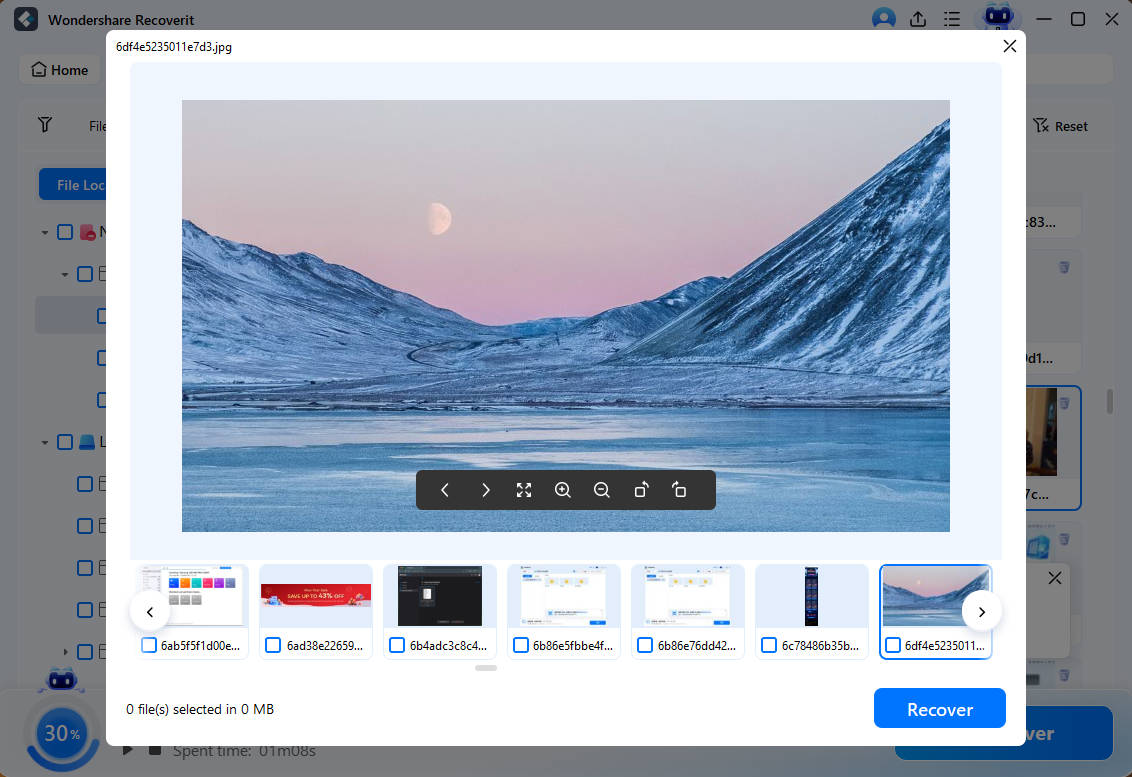
- Click Recover.
- Save recovered files to a different disk.
Conclusion
DiskPart is a powerful Windows 11/10 tool for managing disks, partitions, volumes, and virtual disks. Use read-only commands such as list disk, list volume, list partition, and detail to understand the storage layout before making changes.
For routine tasks, DiskPart can assign drive letters, create partitions, format volumes, shrink or extend volumes, and prepare USB or external drives. For high-risk tasks, treat delete partition, format, clean, clean all, and convert mbr or convert gpt with caution because they can remove data or make a disk unbootable.
If a wrong DiskPart command causes partition loss or data loss, stop using the affected disk immediately and scan it with Wondershare Recoverit before creating new partitions or saving new data.
FAQ
-
Do I need to install Diskpart from any external source?
No! Diskpart is a Windows utility already installed and incorporated into your operating system. You don't need to install it from any external source, nor does it cost you. -
Does the Diskpart Clean command delete all the hard drive data?
The Clean command enables you to delete any or all drive partitions. However, all the data won't be deleted; if you have cleaned only one drive, the data associated with that drive will be deleted. -
Does older Windows versions include Diskpart?
No! Earlier Windows OS versions had the Fdisk tool instead of Diskpart to manage hard drives and partitions. -
I accidentally lost a partition by entering the wrong command in Diskpart; what to do next?
The lost partition is only removed from the record of the partition table and is not entirely gone. Therefore, if you have accidentally lost your partition, you can recover it using dependable recovery software. -
Can I format my disk using Diskpart?
Yes! Diskpart allows you to format any or all of your disks; you can accomplish this by applying the "format" command to the specified drive. Note that formatting deletes all the drive content, so back up your data into another drive before formatting.


