


 TL;DR:
Converting your drive to a dynamic disk is recommended only if you require advanced flexible volume management like RAID setups, mirroring, or spanning across multiple disks on Windows 2000 and later.
● The conversion process requires available unallocated space and administrative privileges, and it strictly cannot be performed on clustered, unusual, or removable storage drives.
● Dynamic disks are completely inaccessible on older operating systems, unsupported in multi-boot environments, and not recommended for Windows boot disks due to complicated recovery procedures.
● Reverting a dynamic disk back to a basic configuration requires completely deleting all existing volumes first, which permanently erases all data on the drive.
Ask AI for a summary
 ChatGPT
 Perplexity
 Gemini
 Claude
 Grok
Grok
When managing storage on a Windows computer, you'll often encounter the terms "Basic disk" and "Dynamic disk." While most systems operate on basic disks by default, dynamic disks offer greater flexibility. These are used for advanced configurations such as spanning features, which are ideal for users who want complete control.
However, deciding whether to convert from a basic disk to a dynamic one isn't always straightforward. In this guide, we will provide efficient steps to convert to dynamic disk, along with the necessary information. So, if you are also confused about whether to convert or not, then read the following article to the end.
Try Recoverit to Perform Data Recovery
 Security Verified. 3,591,664 people have downloaded it.
In this article

Part 1. Should I Convert to a Dynamic Disk? Benefits of Converting to a Dynamic Disk
Converting to a dynamic disk in Windows is ideal if you need advanced features like fault tolerance and flexible volume management. Dynamic disks enable you to create, extend, or delete volumes without restarting your system. You can also span volumes across multiple disks, which is valuable if you want to increase storage capacity. So if you're confused between these 2 formats, explore the following comparison of basic disks and dynamic disks:
Basic Disk vs. Dynamic Disk
| Features | Basic Disks | Dynamic Disks |
|---|---|---|
| Partition/Volume Types | Primary and extended partitions | Simple, spanned, striped, mirrored, RAID-5 volumes |
| Maximum Partitions | Up to 4 primary (MBR) or 128 (GPT) | No fixed limit; relies on volume types and space |
| Compatibility | All Windows versions | Windows 2000 and later |
| Volume Expansion | Limited; repartitioning required | Dynamic expansion is possible without reformatting |
| Advanced Features | Basic partitioning only | RAID, spanning, mirroring, flexible volume management |
| Data Redundancy | No built-in redundancy: external backup needed | Built-in redundancy via mirroring and RAID |
| Flexibility | Less flexible; simple partitions | Highly flexible; complex setups supported |
| Management Complexity | Simple and straightforward | Complex management |
| Conversion | Can convert to a dynamic disk (backups recommended) | Converting to a basic disk requires a backup and reformat |
Part 2. Risks and Considerations Before Converting to Dynamic Disk
Before proceeding with what does convert to dynamic disk do, it's important to understand the potential risks and key considerations involved:

- Data Loss Risk: While conversion is typically safe, there is a risk of data loss, especially if hardware issues or a process interruption occur in between.
- Compatibility Limitations: Dynamic disks are not recognized by older Windows operating systems and may be inaccessible within a multi-boot system.
- Volume Structure Changes: The disk will convert from using partitions to using volumes, which might affect how data is organized.
- Limited Recovery Options: Recovery tools and utilities for dynamic disks are fewer and may require more involved processes.
- Not Supported on Removable Drives: Most removable disks can't be converted, although only the computer will recognize changes if it works.
Part 3. How to Check If Your Disk Can Be Converted to a Dynamic Disk
To know should I convert to dynamic disk, it's essential to verify whether your disk is compatible with dynamic disk features, so explore the following methods:
1. Check Disk Type and Compatibility
Using Disk Management to check disk type and compatibility before conversion is recommended, as it provides accurate, real-time information directly from the OS. This approach will help you avoid mistakes and ensure that only the targeted disk is converted. Furthermore, this tool is integrated into Windows, making it a safer option. Upon knowing its features, let's explore its detailed stepwise guide below:
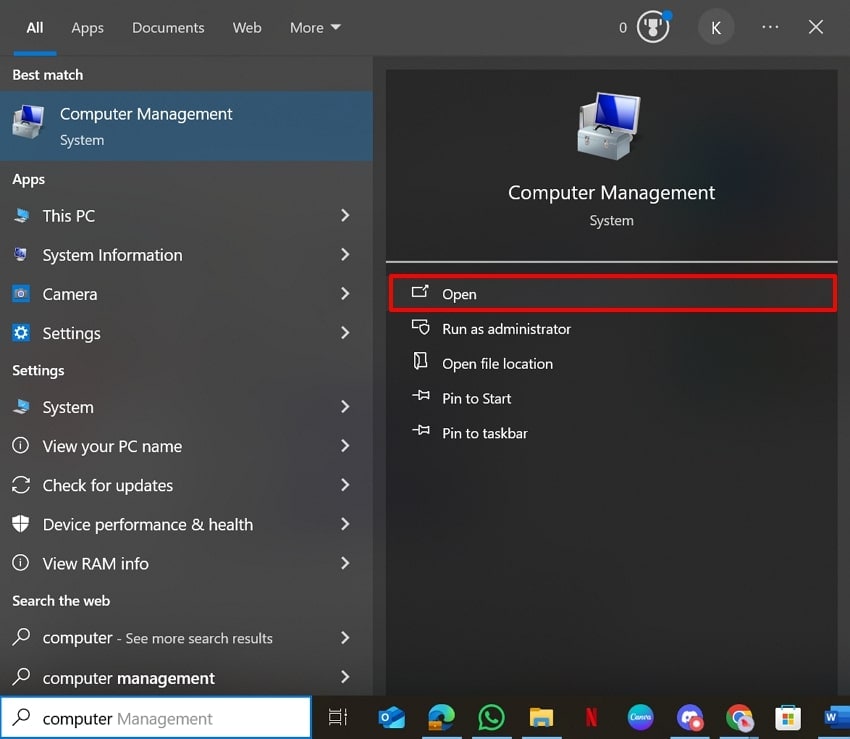
- Initiate by clicking the Windows icon and searching for the "Computer Management" app. Following this, click on the "Open" button to enter its interface.
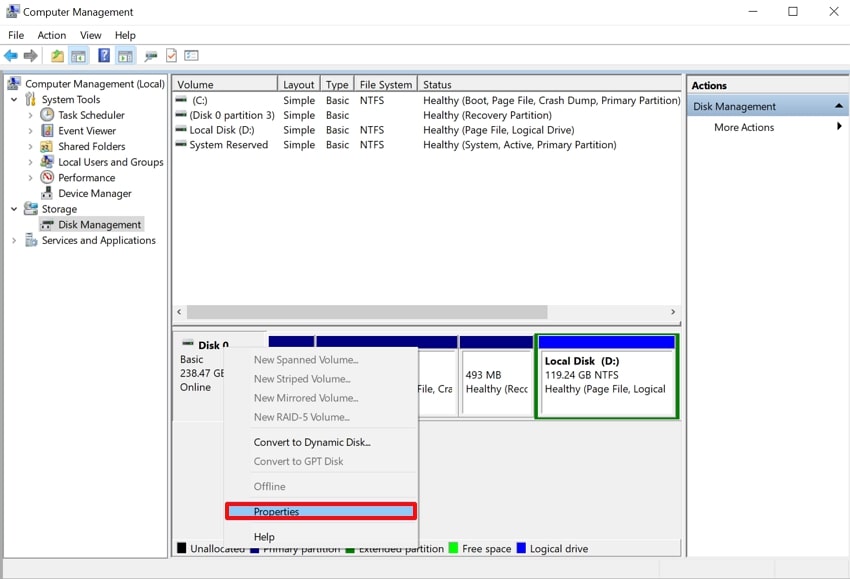
- Expand the "Storage" menu from the left tab and choose the "Disk Management" option. Here, right-click the desired disk and select Properties from the pop-up menu.
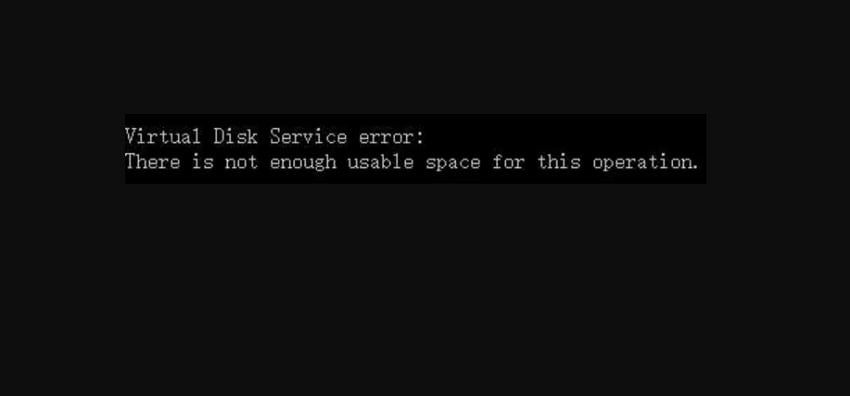
2. Required Unallocated Space
Before you explore what does convert to dynamic disk mean, make sure to check the unallocated space for this process. It ensures the disk meets system requirements and prevents failed conversions during the process. This method is recommended as it reduces the risk of corruption by ensuring necessary structures can be added safely. Moreover, it avoids troubleshooting, saving time and effort during conversion.
3. No Clustered/Removable/Unusual Disks
Within this method, users check for clustered, removable, or unusual disks that are not eligible for conversion to dynamic disks. It ensures that only eligible disks are converted, preserving system reliability and preventing operating system failures. Furthermore, it protects data by avoiding disk conversions, ensuring all data remains available and secure on your PC.
4. Use Disk Management Tool
Users can use this method to check whether their disk can be converted to a dynamic disk, as it performs automatic checks and provides instant feedback. Unlike third-party checking tools, it quickly shows which disks are eligible for conversion, saving time and effort. Disk management won't let you proceed if the requirements aren't met, protecting against data loss, so let's explore its detailed stepwise guide:
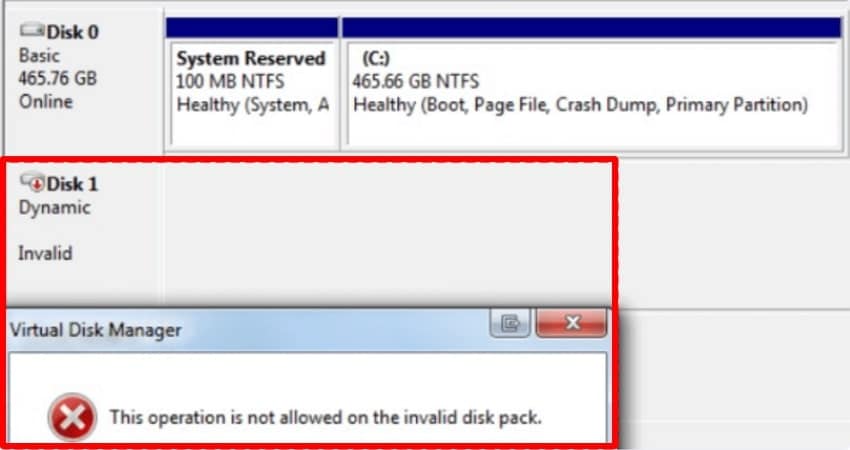
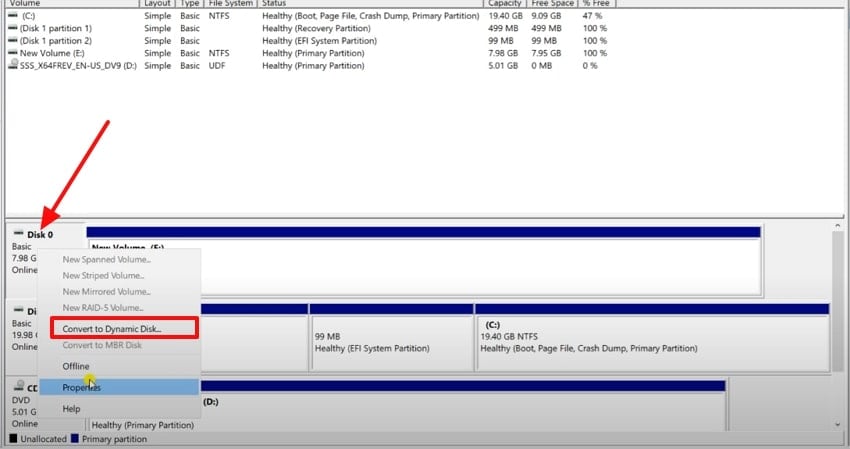
Instructions. Upon entering the Disk Management tool, right-click the disk and select "Convert to Dynamic Disk. If it shows a pop-up that says, "This operation is not allowed on the invalid disk pack," you are ineligible to convert the disk.
5. Command Line
Using the Diskpart command-line utility to check whether your disk can be converted to a dynamic disk offers several advantages. In this method, you simply select the desired disk in the CMD interface, and it will display an error message if the disk is ineligible. It displays exact disk attributes, such as removable status, partition style, and sector size.
Part 4. Step-by-Step Guide: How to Do Dynamic Disk Convert in Windows
Once you've confirmed your disk is compatible, you can proceed with the conversion. Here's a detailed step-by-step guide to explore what does convert to dynamic disk means in Windows:
A. Disk Management
Converting a primary disk to a dynamic disk is one of the easiest yet safest methods; it uses the built-in disk management tool. It provides a clutter-free interface for setting the disk to online and choosing the conversion option. This tool examines compatibility, removable status, and unallocated space, making sure to avoid further errors. Furthermore, it does not require a system reboot, so have a look at its stepwise guide:
- Access the "Computer Management" tool and choose the "Disk Management" option within the "Storage" menu. Afterwards, right-click on the desired drive to further select the "Online" option to make the drive easily accessible for settings.

- Now, right-click the drive again and choose "Convert to Dynamic Disk" to let it start the conversion process.
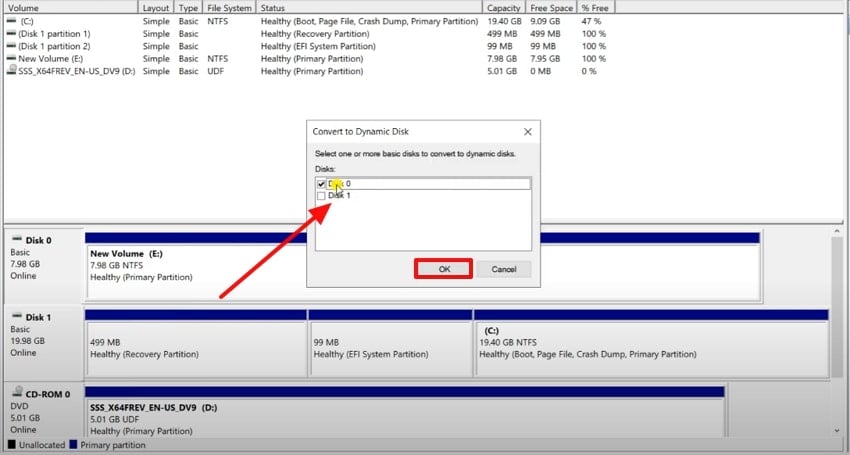
- Here, choose the desired disk and hit the "OK" button to permit it.
B. Convert to Dynamic Disk Using Diskpart
Diskpart is a powerful command-line interface that can be easily accessed on any Windows operating system. This method is ideal for users who prefer automation and don't have access to any graphical interface. Furthermore, Diskpart gives you direct control over disk selection and conversion, enabling scripted management for multiple devices. While doing it provides real-time error messages, which is a plus point.
Prerequisites Before Using the Command-line Interface
Before you dive into the procedure to convert to a dynamic disk, have a look at the following prerequisites of using the command-line interface:
- Administrative privileges: Users must ensure to run the command-line interface directly as Administrator for a smoother workflow.
- Backup: Normally, it is recommended that users back up their essential data, as sometimes converting may require deleting partitions, resulting in data loss.
- Disk Eligibility: Always check your PC's disk eligibility, as non-removable, non-clustered disks are not supported and require unallocated space.
Expert Stepwise Guide to Use Diskpart Using Dynamic Disk
After hearing this method's key features and prerequisites, let's explore its detailed stepwise guide below:
- Go to the "Windows" menu and search for the "cmd" app. Following this, right-click the Command Prompt and hit the "Run as Administrator" option to enter its interface.
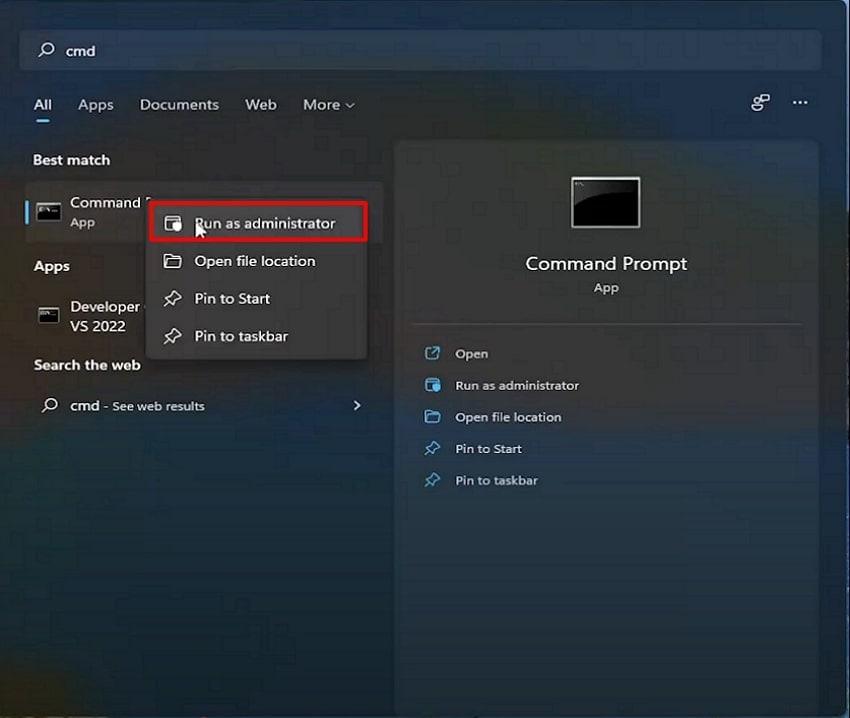
- Here, a pop-up will appear to access the changes that will occur, so click on the "Yes" button to grant permissions.

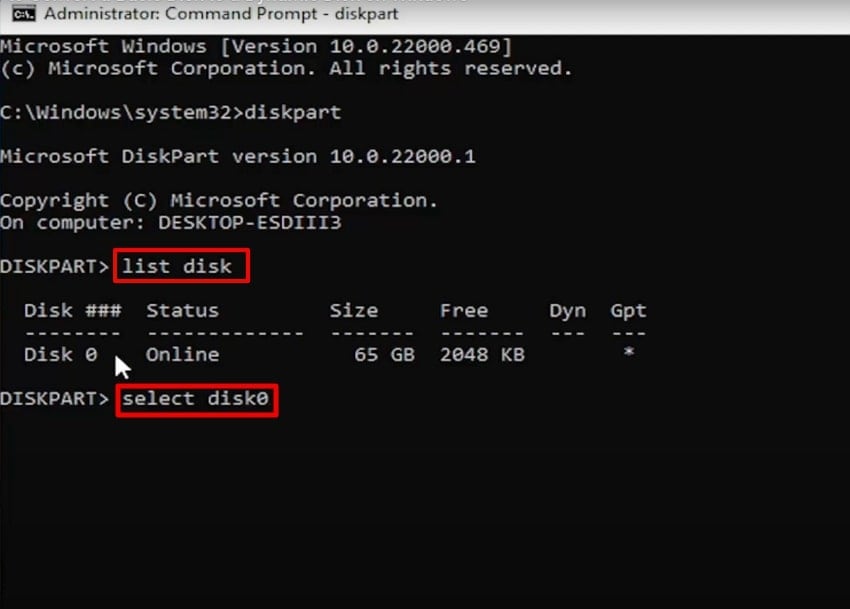
- Upon entering the command-line interface, type the "Diskpart" command and hit the Enter button.
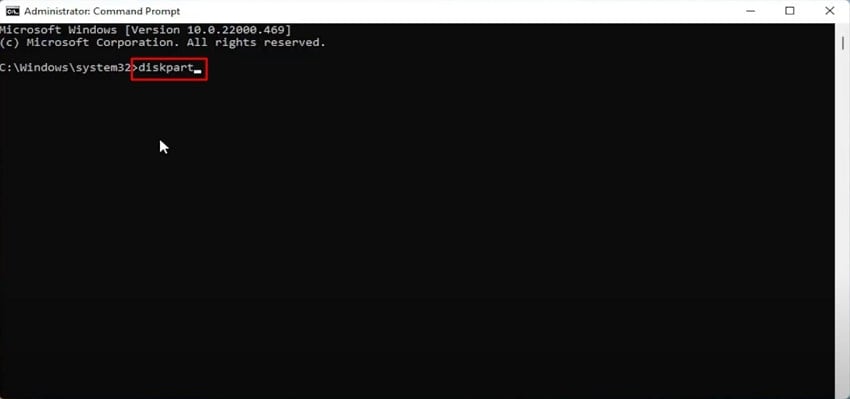
- Here, write down the "List Disk" command and hit the network button to get the disk lists of your computer. Now, type "select disk", type the desired disk number from the list, and hit the "Enter" button. Following this, a pop-up will appear which shows your progress if your PC is eligible for it.
Part 5. How to Revert or Undo Dynamic Disk Conversion if Needed
Mostly, people mistakenly convert their primary disks into Dynamic drives, but no worries, now you can even reverse it. Without downloading any third-party tool, users can use the built-in disk management tool to reverse this process. This method works reliably for all Windows desktop and server systems, ensuring you can restore a basic disk configuration. Furthermore, you can format the disk for new use without rebooting, so let's explore:
- Access the "Disk Management" option within the "Computer Management" app. Following this, right-click the Drive and select the "Delete Volume" option within the pop-up menu that appears.

- Now, click on the "Convert to Basic Disk" option to undo the dynamic disk conversion procedure. After choosing it, it will automatically convert the Dynamic Disk into a Basic Disk.

Pro Tip. Lost Data from Dynamic Disk Conversion? Use Recoverit to Restore It Safely
Imagine you are an IT specialist and have tried to convert your basic disk to a dynamic disk using the above-discussed methods. However, after the conversation, you realize that your essential data has been deleted during this procedure, and you panic. In this situation, we recommend using Recoverit, which lets you restore your lost data with 99.5% accuracy.
This tool lets you download any file type, covering almost every major file type, including documents, photos, videos, and audio. Furthermore, it provides a wider support to almost 1 million storage devices such as USB drives, memory cards, and internal hard disks. The foremost is that users can easily access it from both Windows and Mac operating systems to cater to a wider audience.
Key Features
- Scanning Options: Being an efficient tool, it lets you choose between the Quick Scanning option, designed for easier scenarios, and the Deep Scanning option to cater to complex issues.
- Lost Scenarios: Recoverit is capable of retrieving data lost to any scenario, including virus attack, damaged hard drive, and partition recovery.
- Batch Processing and Preview: One can access the batch processing system to restore all the files simultaneously and preview the recovered outcome before downloading.
Expert Stepwise Guide To Use Recoverit
While exploring what does convert to dynamic disk do, if you want to restore your lost file with Recoverit, then follow the given guide:
- Select Hard Drives and Location to Choose the Desired Location
After accessing the tool, click on the "Hard Drives and Location" option from the left tab. Following this, choose the desired location of the lost file from the "Quick Access" tab.
- Start the Scanning Procedure Instantly
Once you choose the location, it will automatically start the "Quick Scanning" process to find your lost file. However, if it cannot find the file, you can access Deep scanning mode or search by file name or type for quicker data recovery.
- Preview and Render the Recovered Outcome
Finally, your data has been retrieved, and now you can preview the recovered outcome by clicking the "Preview" button. After previewing the recovered file, hit the "Recover All" button, which rendered it to the designated folder of the device.
Conclusion
Summing up, in this article, we have provided all the necessary information for you to convert to a dynamic disk. We have listed some efficient methods along with their step-by-step guides that you can consider using while doing this. Furthermore, if you lost your data during this conversation, then we recommend using Recoverit, which provides 99.9% accuracy while retrieving your data.
FAQ
1. What are the main advantages of converting to a dynamic disk?
Dynamic disks allow for more flexible storage management, including creating spanned, striped, and mirrored volumes. Furthermore, it also supports resizing and extending volumes without rebooting, making disk management easier.2. Are there risks or drawbacks to using dynamic disks?
Yes, dynamic disks may cause compatibility issues, especially if you replace hardware or run older operating systems. However, you have to delete all volumes to revert to basic disks, which erases data, so we recommend using Recoverit for retrieving files.3. Can I convert the Windows boot disk to dynamic?
Yes, it is possible for boot setups to convert to a dynamic disk, but it is not recommended for non-expert users specifically. As it complicates recovery and operating system reinstallation procedures, it can’t be handled by a beginner, leading to corruption and data loss.4. Will other operating systems recognize my dynamic disk?
No, only the Windows 2000 operating system and its newer versions can recognize dynamic disks. Other operating systems and older Windows versions won't access data on dynamic volumes.


