You can merge iPhone photos in two ways. To put separate pictures side by side, stack screenshots, or make a collage, use Shortcuts or a collage app. To remove repeated copies of the same photo, use the Duplicates feature in Apple Photos. These tools do different jobs, so choosing the right one helps you avoid deleting an original by mistake.
Shortcuts, Google Photos, and PicCollage create a new combined image while normally leaving your source pictures alone. The Photos app, however, keeps one version when you merge duplicates and moves the extras to Recently Deleted. Start with the comparison, then follow the steps for your goal. If you remove an image accidentally, check Recently Deleted before trying anything else.
In this article
Part 1. Can You Merge Photos Directly in the iPhone Photos App?
The built-in Photos app can merge duplicate photos and videos, but it does not offer a general collage tool for joining unrelated pictures into one new image. For a side-by-side comparison, use Shortcuts; for frames and templates, use a collage app. Both normally keep the originals. Photos Duplicates works differently: it keeps a best-quality copy with relevant information from the duplicates and moves the other copies to Recently Deleted.
| Your goal | Best tool | What you get | What happens to originals |
| Combine two receipts or screenshots | Apple Shortcuts | One horizontal or vertical image | Original images remain |
| Make a multi-photo collage | Google Photos or PicCollage | One new collage image | Original images normally remain |
| Remove copies of the same photo | Apple Photos > Duplicates | One kept photo with relevant metadata | Extra duplicate files move to Recently Deleted |
If you use iCloud Photos, remember that a Photos-library deletion also syncs to other devices on the same Apple Account. Creating a collage is not the same operation as merging duplicates. For Apple's current controls, see Merge duplicate photos and videos on iPhone.
Part 2. How to Merge Two or More Photos on iPhone
Choose the arrangement before you begin. Use Horizontal for two pictures side by side, Vertical for a long receipt or a pair of screenshots, and Grid for a compact set of three or more photos. If text needs to remain readable, keep its original resolution and inspect the exported image at full size. A decorative template may crop the edges of receipts and documents.
Method 1. Combine Photos Using Apple Shortcuts
Shortcuts is the simplest no-extra-app option for basic layouts. Build a shortcut with three actions in this order: Select Photos > Combine Images > Save to Photo Album. Some newer versions also show an optional description-based shortcut creator, but you do not need it for this method.
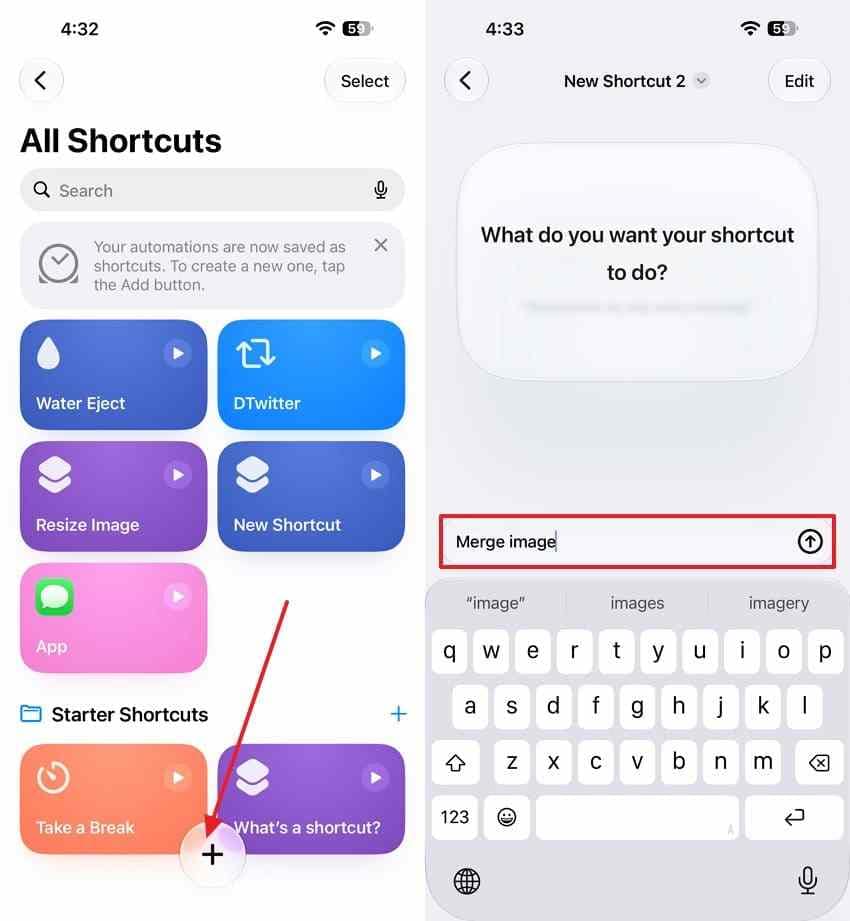
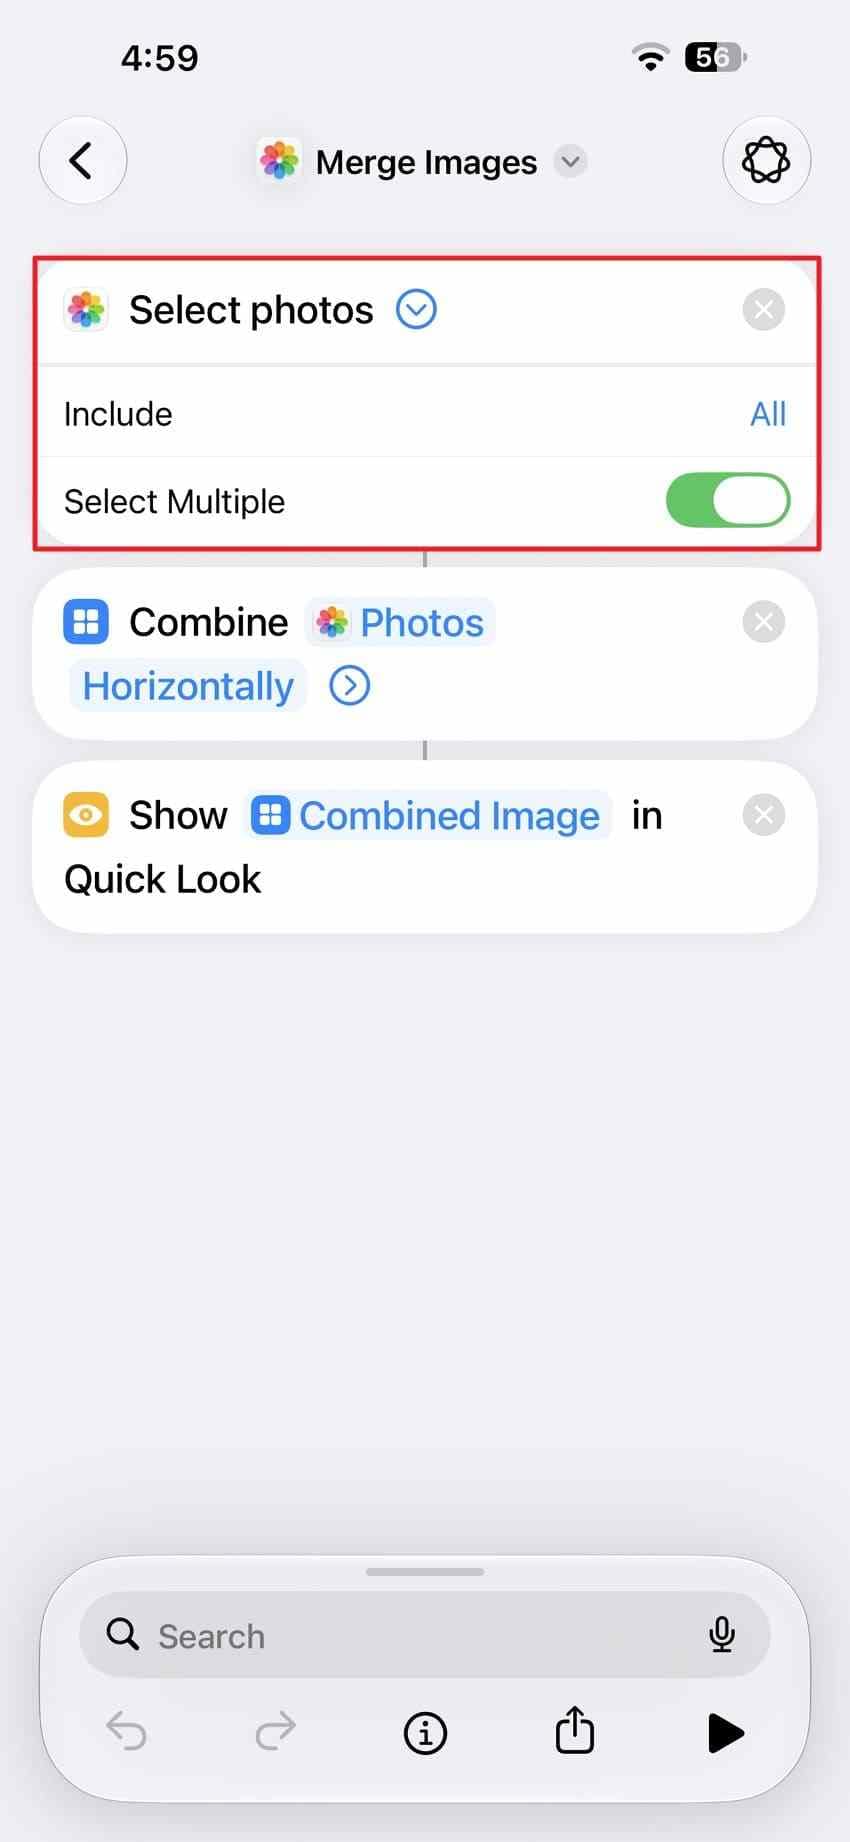
Step 1. Open Shortcuts, tap +, choose Add Action, and search for Select Photos. Add it to your shortcut and enable Select Multiple.
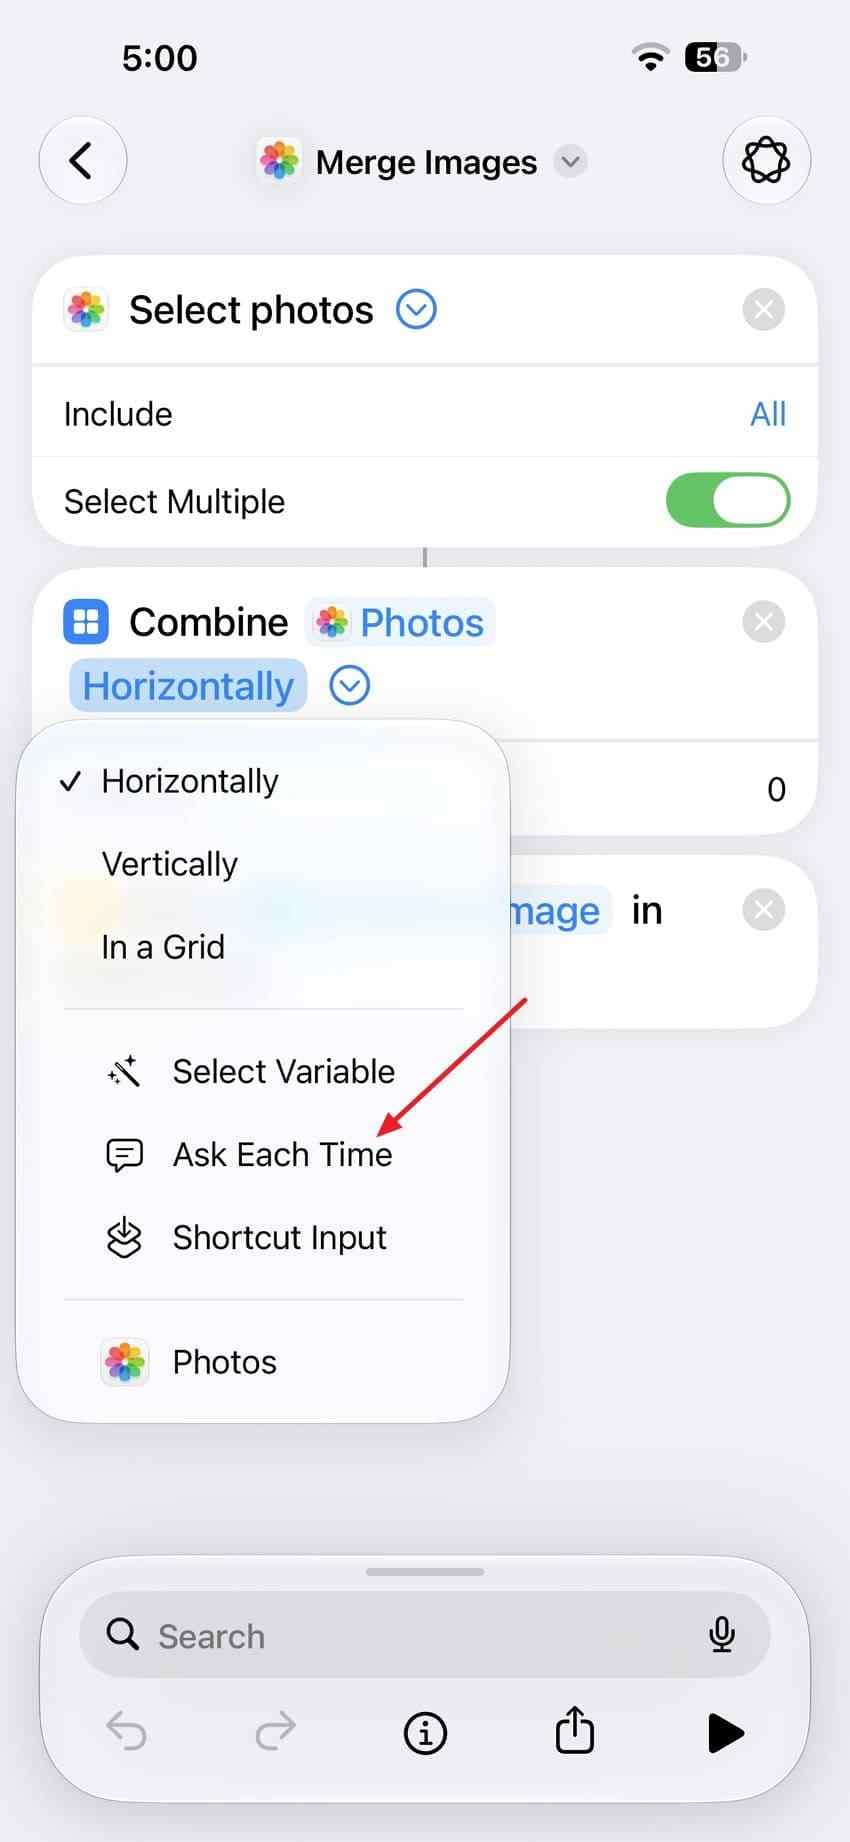
Step 2. Add Combine Images below it. Tap the layout setting and choose Horizontally, Vertically, or In a Grid if available. Adjust spacing where the action provides that option.
Step 3. Add Save to Photo Album as the last action. Choose the destination album if needed, rename your shortcut, and tap Done. The screen below shows another way to save images; labels can vary across Shortcuts versions.
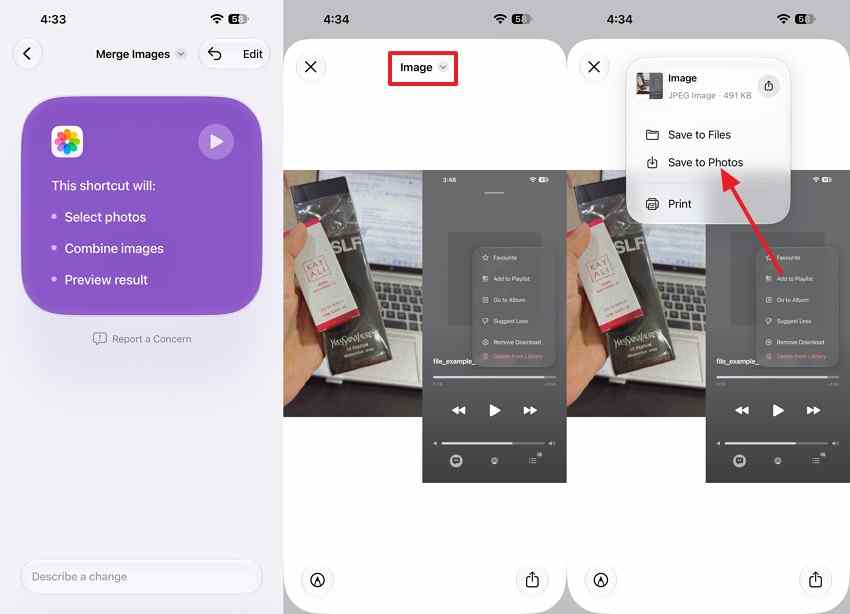
Step 4. Run the shortcut, pick your pictures, and confirm. Open Photos and inspect the newly saved image. If the order or spacing is wrong, adjust the shortcut and run it again instead of deleting the source images.
For documents or receipts, avoid unnecessary Resize Image steps that shrink text. For a clearer output, use full-resolution sources and check the final image before sharing it. Apple explains the action order in its Shortcuts documentation.
You can also open this video reference while following the Shortcuts steps. If its menus differ from yours, use the action sequence above.
Method 2. Create a Collage in Google Photos
Google Photos offers ready-made collage designs. Google states that the updated iPhone collage editor requires iOS 18 or later and Google Photos 7.64 or later; some options vary by device. You can start by selecting up to six photos, while the available layout determines how many slots you can use.
Step 1. Open Google Photos, select the pictures you want, and tap Create > Collage. Alternatively, open the Create tab and choose a collage template first.
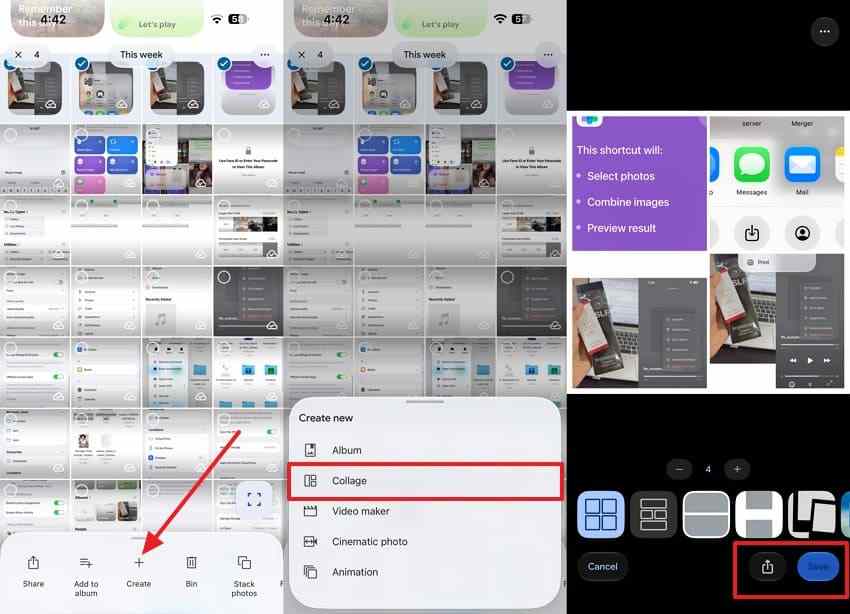
Step 2. Choose a template. Drag pictures between slots, pinch to adjust framing, and add or remove slots where the design allows it. For screenshots containing text, favor a simple layout without tight crops.
Step 3. Tap Save or Share after checking the final arrangement. Keep the source pictures until you have verified the saved collage. You can compare the current options in Google Photos Help.
Method 3. Combine iPhone Pictures Using PicCollage
PicCollage is useful when you want editable grids, borders, captions, or more control over where each image sits. The iPhone app requires iOS 18 or later, and some designs or watermark-free exports may require a paid option. You do not need a paid plan simply to try a basic collage.
Step 1. Open PicCollage and select photos and videos from its home screen, or start with a grid design. Import the pictures you want to use.
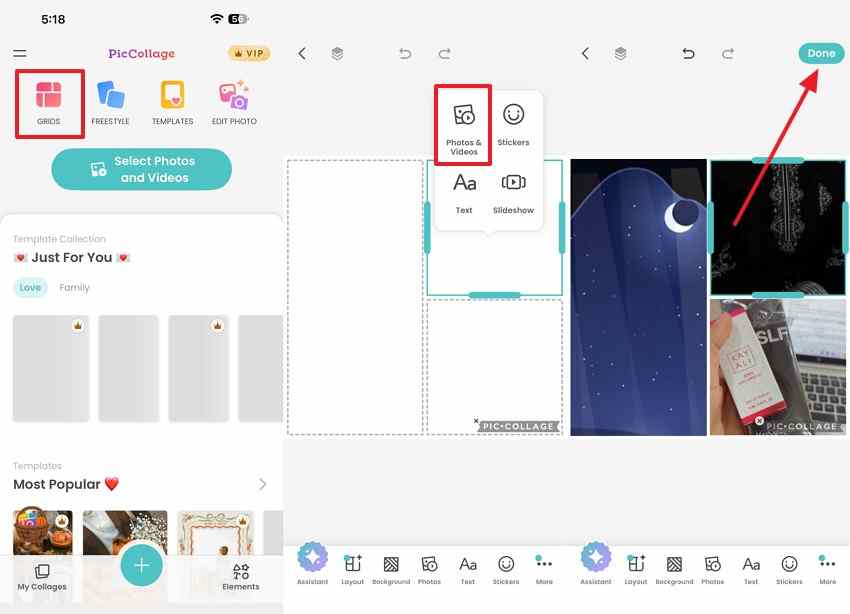
Step 2. Choose a grid or freestyle layout, reposition the pictures, and adjust borders or spacing. Before you finalize, check for unintended cropping.
Step 3. Tap Done, then Save to Library/Gallery to keep the combined image in Photos. The exact controls may move between releases. See PicCollage's saving instructions.
Part 3. How to Merge Duplicate Photos on iPhone Using the Photos App
If your library contains repeated copies, you can merge them without building a collage. Apple Photos identifies duplicates automatically on iOS 16 and later. Review each group before you merge: two similar shots from the same scene are not necessarily duplicates, and you may want to keep both.
Step 1. Open Photos, tap Collections, then locate Utilities > Duplicates. On older iOS versions, the collection may appear under Albums.
Step 2. Review the photos or videos in a set. Tap Merge, then confirm Merge [number] Items. If you want to process multiple sets, use Select and choose the groups first.
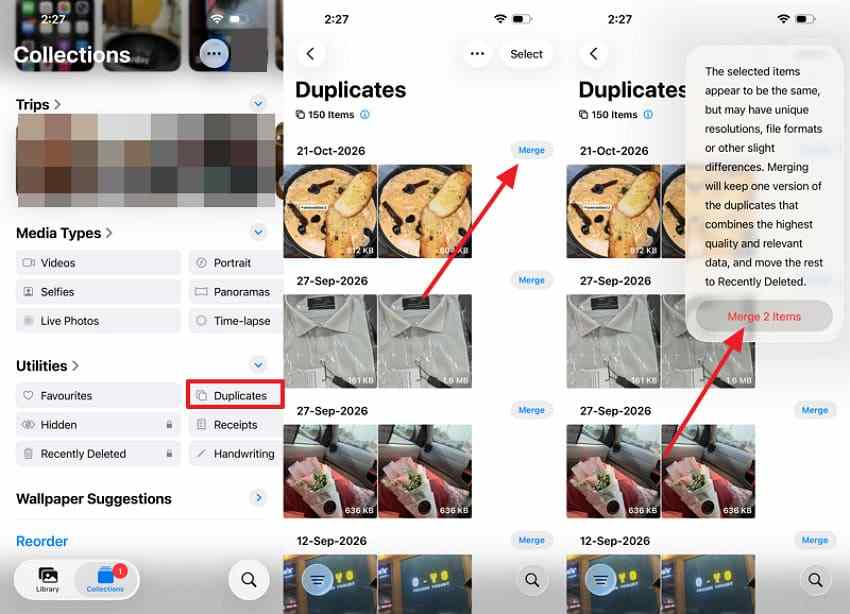
Step 3. Check your library. Photos keeps the highest-quality version and combines relevant information such as favorites and captions; the extra copies move to Recently Deleted, normally for 30 days. A duplicate merge does not create a side-by-side picture. With iCloud Photos enabled, the changes sync across your devices.
Important: Do not permanently empty Recently Deleted simply to test a merge. Keeping the recoverable copies gives you a short window to restore extras if you change your mind.
Part 4. Why Can't I Merge Photos on My iPhone?
When something does not work, first check whether you are using the correct feature. A missing Duplicates collection is usually different from a broken collage shortcut; a blurry collage can also be an export or layout problem rather than a problem with the original photos.
Fix 1. The Duplicates Collection Is Missing
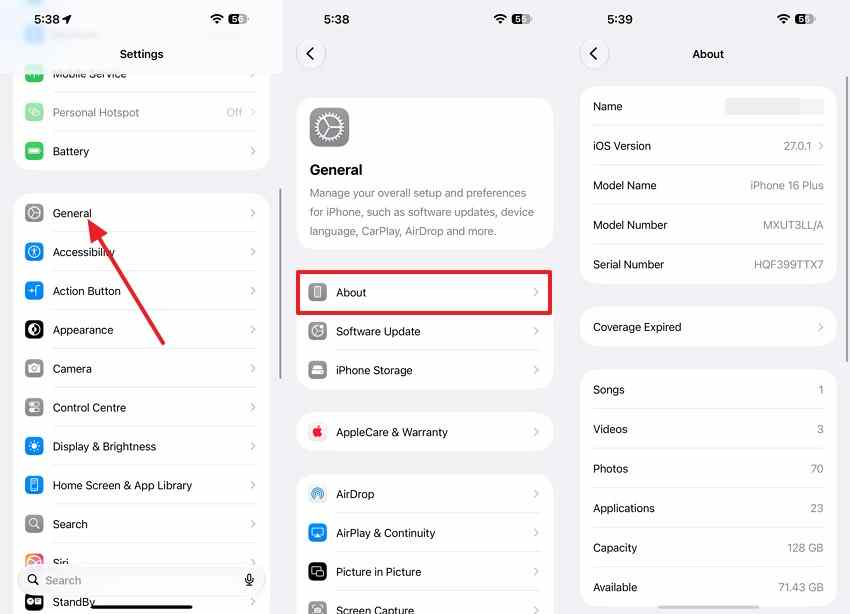
Step 1. Check your iOS version under Settings > General > About. The built-in Duplicates collection requires iOS 16 or later.
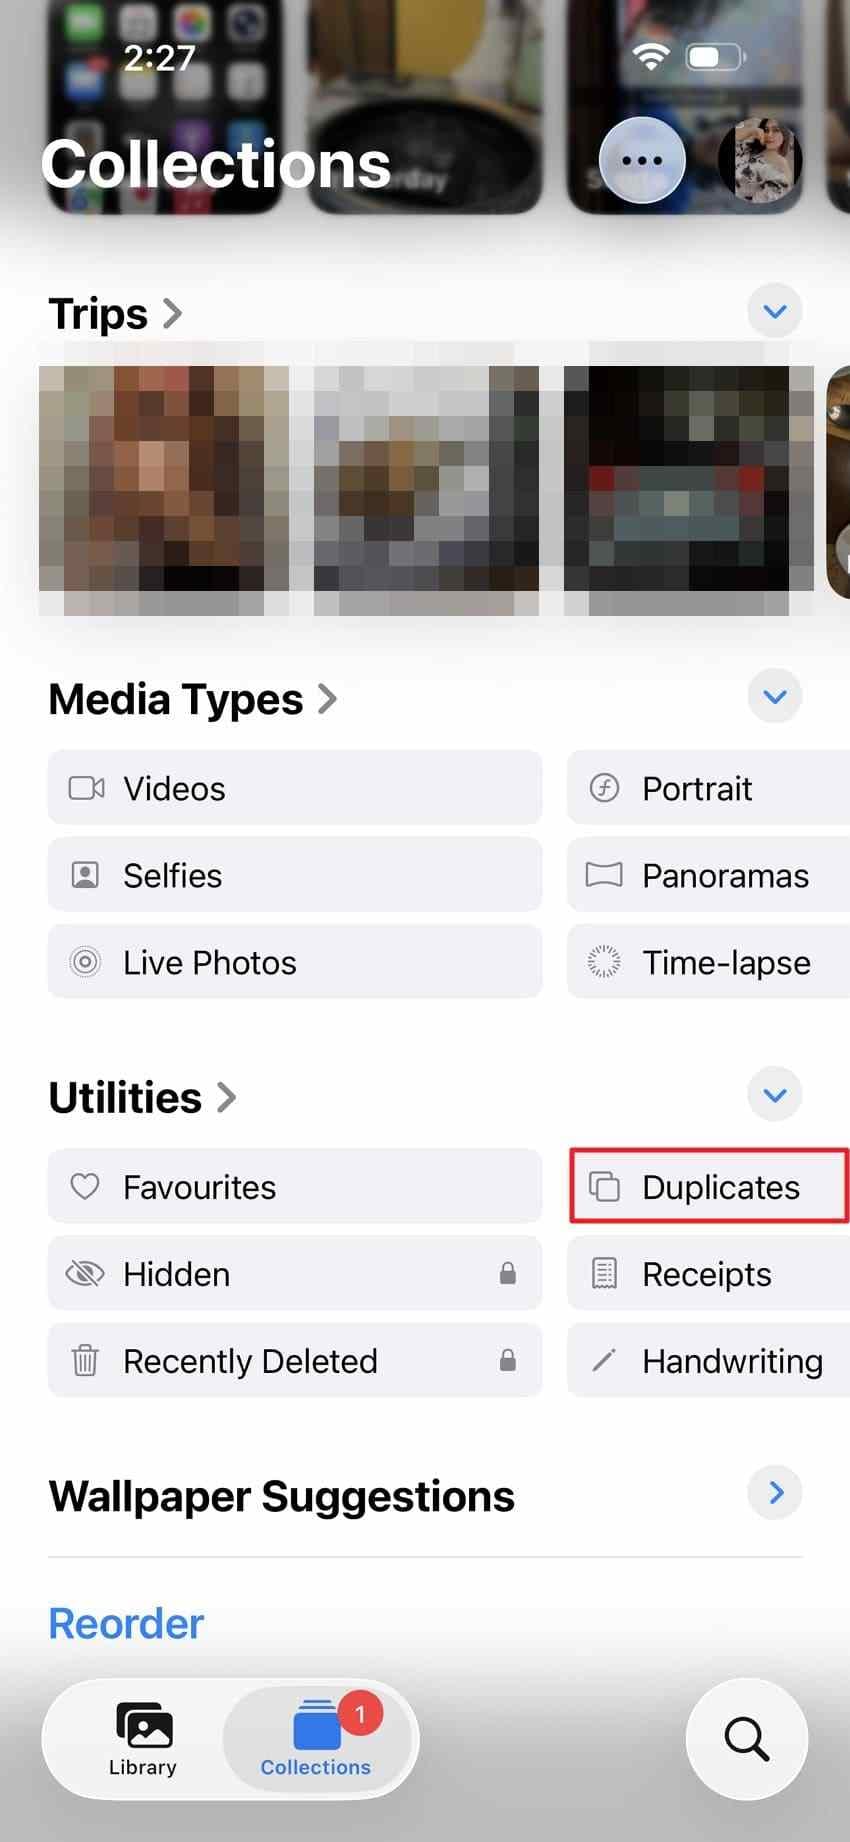
Step 2. Open Photos, go to Collections > Utilities, and look for Duplicates. Apple hides this collection if no duplicates have been detected.
Step 3. If you recently imported many photos, give the library time to analyze them. Connect the phone to power, lock it, and allow background processing. Photos may find nothing if the pictures are merely similar rather than copies.
Fix 2. Shortcuts Will Not Select, Combine, or Save Photos
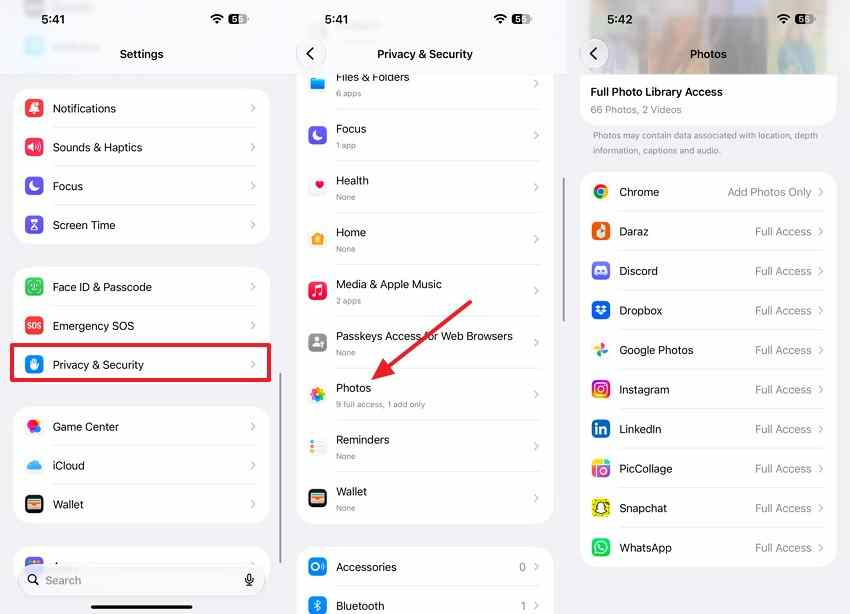
Step 1. If Shortcuts requests permission to access Photos, allow the needed access. You can review available permissions under Settings > Privacy & Security > Photos; permission options depend on your iOS version.
Step 2. Check that Select Photos is first and Select Multiple is on, followed by Combine Images. A shortcut receiving just one photo cannot create the intended multi-image layout.
Step 3. Confirm that Combine Images has the arrangement you want, then put Save to Photo Album last. Where supported, choose Ask Each Time to change the layout when running it.
Step 4. Test the shortcut with two ordinary photos and look in the destination album. If it still fails, recreate the three actions manually rather than depending on optional AI-generated actions.
Fix 3. The Combined Photo Is Blurry, Cropped, or in the Wrong Order
- Small or blurry text: Use the original screenshot or photo, not a compressed copy from a chat app. Avoid shrinking receipts to fit a dense collage.
- Cropped edges: Choose a less restrictive Google Photos or PicCollage frame, or use Shortcuts in a horizontal or vertical layout.
- Uneven sizes: Compare image proportions before combining. Resize only when necessary, and save the source files separately.
- Wrong order: Reselect pictures in the intended sequence, or drag images into different collage slots before saving.
A new collage can have different dimensions or compression than the originals. Zoom in on small labels and text before deleting or sharing anything.
Part 5. How to Restore Photos Accidentally Deleted While Merging
If a picture disappears during duplicate cleanup, check Recently Deleted first. Photos generally keeps deleted items for up to 30 days, unless they are permanently deleted sooner or special account conditions apply. Do not erase or reset your iPhone as your first recovery step.
Step 1. Open Photos > Collections > Utilities > Recently Deleted, and unlock the collection with Face ID, Touch ID, or your passcode.
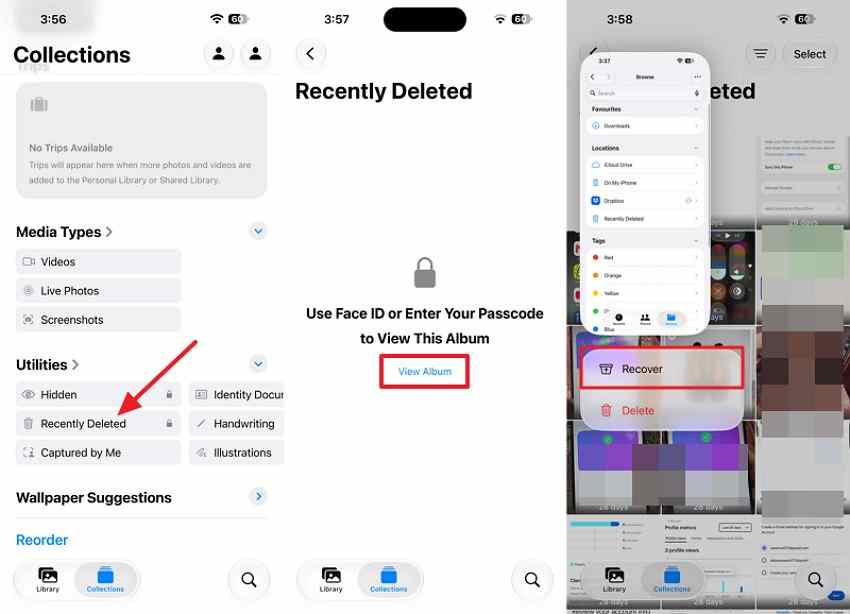
Step 2. Tap Select, choose the image you need, then use Recover and confirm. Check your library after the photo returns. You may be able to retrieve extra copies moved there after a duplicate merge.
Step 3. If the file is not there, check iCloud.com > Photos > Recently Deleted (when using iCloud Photos), independent cloud photo backups, messages, or a copy you previously exported to a computer. Deletions can sync across iCloud Photos devices, so a second signed-in device is not automatically an independent backup.
Apple states that photos in iCloud Photos are not duplicated inside an iCloud device backup. Restoring an old device backup can also replace newer information, so check what that backup actually contains before considering it. See Apple's deletion and recovery guidance and its explanation of iCloud Photos.
Pro Tip. Recover Deleted Copies of iPhone Photos From a Computer With Recoverit
If you previously copied iPhone pictures to a Windows PC, Mac, external drive, or readable memory card and later deleted those exported copies, Wondershare Recoverit may help recover files that remain accessible on that storage. It does not directly scan modern iPhone internal storage or restore missing photos from iCloud servers. If you only lost a photo from the iPhone itself, start with the Apple recovery checks above.
How to Recover Previously Exported iPhone Photos
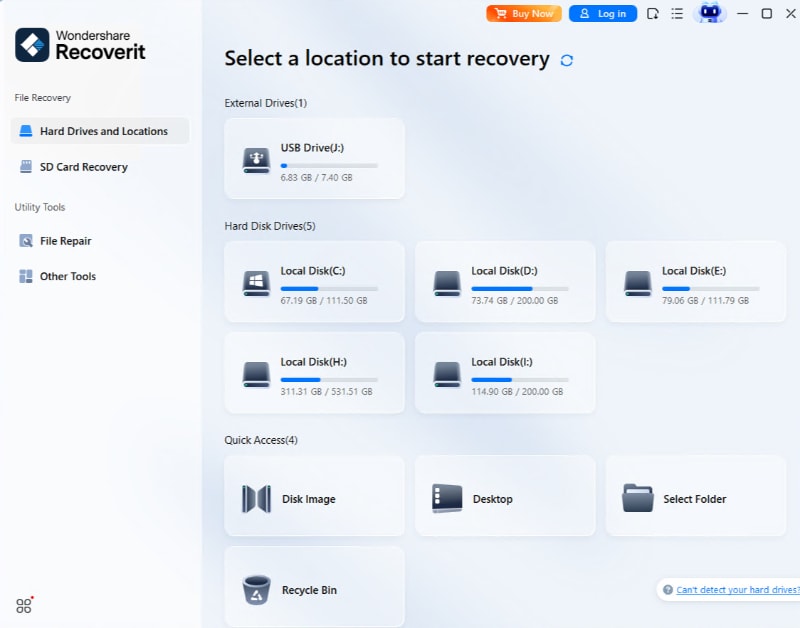
Step 1. Stop saving new files to the affected computer drive or removable storage. Open Recoverit on a suitable separate drive and select the actual location where your exported iPhone photos were stored. These product screenshots illustrate the Windows interface; Mac labels may differ.
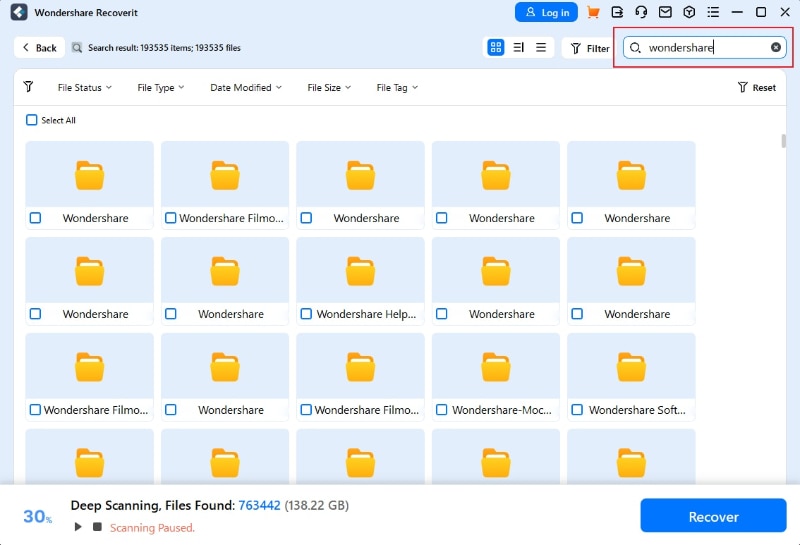
Step 2. Scan the selected storage and use available file type or folder filters to look for HEIC, JPG, or other photo formats. Preview the results if supported. A scan finding a filename does not establish that every file is intact.
Step 3. Select the recoverable photos and choose Recover. Save them to another healthy drive, not back to the location where they were lost, and open the restored files to verify they work.
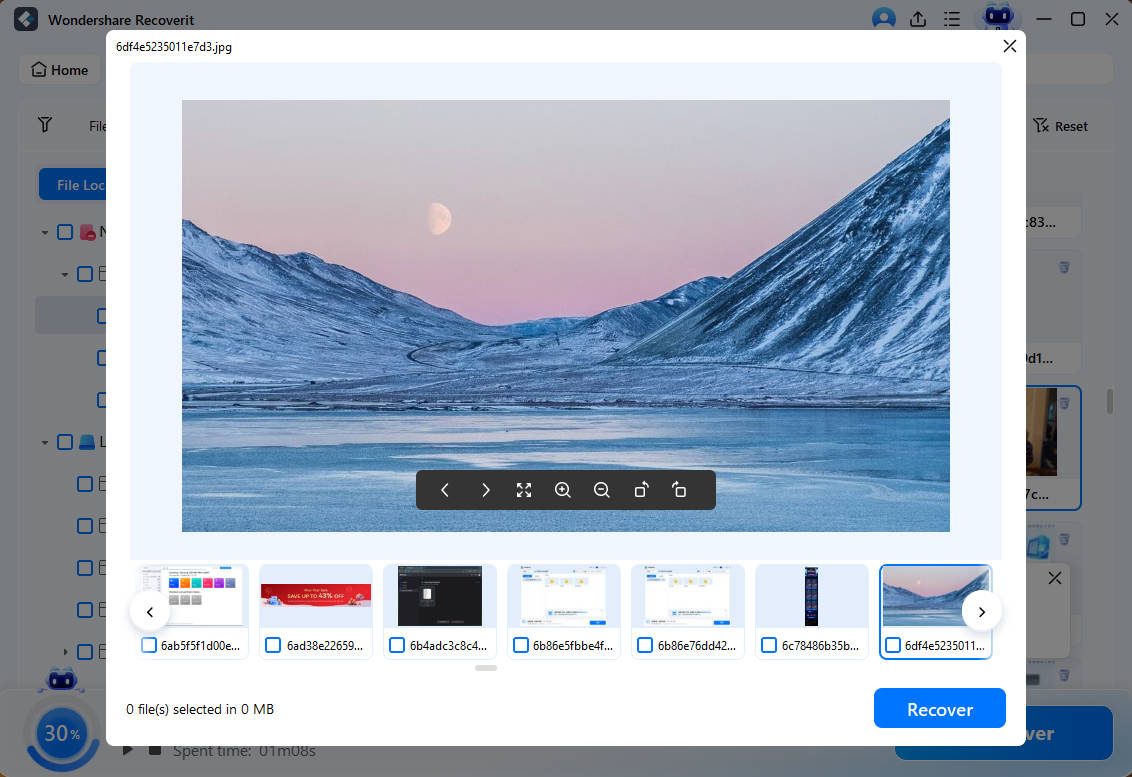
Recovery depends on the condition of the drive, encryption, overwriting, and available photo data. For more detail about these limits and supported sources, see Recoverit Photo Recovery and the separate guide for permanently deleted iPhone photos.
Conclusion
To combine several iPhone photos, use Shortcuts for simple strips and grids, Google Photos for collage templates, or PicCollage for more design options. To remove repeated copies instead, use the Duplicates feature in Photos and review each group before confirming Merge. Check the saved image at full size, especially when it contains text, and keep your originals until you are satisfied. If you delete photos accidentally, check Recently Deleted and independent backups first. Recoverit is relevant only for eligible copies lost from readable computer or external storage.
FAQ
-
Can I merge Live Photos and regular pictures on iPhone?
You can use a collage tool to combine a still frame from a Live Photo with an ordinary picture. The exported collage is typically a still image, not a new Live Photo. The original Live Photo remains in your library unless you delete it separately. -
Does merging duplicate photos on iPhone free up iCloud storage?
It can reduce the space used by repeated photos when iCloud Photos is enabled and the library finishes syncing. Apple states that items in Recently Deleted do not count toward iCloud storage, but the exact displayed savings depend on file size and sync status. Check iCloud storage after the merge instead of assuming a particular amount. -
Can I undo a duplicate photo merge on iPhone?
There is no general one-tap undo for a completed merge. The discarded copies are usually placed in Recently Deleted, where you can restore them within 30 days if they are still available. Restoring those copies does not necessarily reverse every metadata change made by the merge. -
Can I combine multiple iPhone pictures into a single PDF?
Yes. Save the images to the Files app, open the folder, select the pictures, and look for Create PDF in the available More actions. The precise menu placement can vary by iOS version. Check the PDF page order and readability before sharing it.


