How to Repair External Hard Drive Using Command Prompt(CMD)?

Jun 03, 2026 • Filed to: Answer Hard Drive Problems • Proven solutions
Admit it! You all have been through a corrupted or damaged external hard drive at some point. No doubt external hard drives are a pretty useful tool for people who often find it challenging to organize their data. But facing data corruption or errors with the hard drive can lead to great disappointment.
Nevertheless, every problem comes with a solution, and a corrupted hard drive is no exception. You can use Windows build-in Command Prompt to repair a hard disk in different types of scenarios. For example, suppose you are a Windows 7 user and are not inclined towards downloading extra third-party software to get the hard drive repaired, then using the command prompt will the best option to go for.
So, if that’s the case with you too, continue reading further to discover how to repair an external hard drive using CMD in a Windows system.
| Solution | Best For... | Key Action |
| 01. Fix Logical Errors | Quickly scanning and fixing basic file system errors. | CMD (Admin) > chkdsk f: /f |
| 02. Repair Bad Sectors | Drives with physical/logical bad sectors and missing files. | CMD (Admin) > chkdsk f: /f/r/x |
| 03. Use DiskPart | Severe corruption where formatting is required to reset the drive. | CMD > diskpart > select disk X > format fs=ntfs quick |
| 04. Run SFC Tool | Hard drive issues caused by damaged Windows system files. | CMD (Admin) > sfc /scannow |
05. Recoverit Data Recovery |
Professional recovery with a 98% success rate for all errors. | Run Recoverit > Select Drive > Scan & Recover |
Basics about Command (CMD)
If you’ve never used or heard of Command Prompt before, you’re not alone. Many people are not familiar with this pretty amazing tool even after using a Windows OS for several years. Basically, Command Prompt or CMD is a command-line interface that’s used to execute shell commands. All the command prompt commands are pre-defined and you’ll have to use them in the same way to perform the desired task.
It has been a crucial part of Windows OS since the beginning and can help you tackle many Windows errors by executing different commands. Even if your external hard drive has gone corrupt, you can use CMD to fix it. You may be even curious about what are the hard drive problems that can be solved by Command prompt. Here I list a few.
What Kinds of Hard Drive Problems Can Be Solved by Command Prompt?
- Logical Errors: At times, you may have encountered unexpected behavior with a particular software on your PC. These can be the result of the bugs and come under logical error. We know it’s no less than a headache but yes, you can definitely fix the external hard drive using CMD.
- Bad Sector: A bad sector in a hard drive basically refers to a little cluster of storage space that can’t be read and is defective. Natural wear and tear (hardcore or overtime usage) or physical damage can lead to bad sectors. So, if your hard drive has any bad sector that is due to hardcore or overtime usage (but not physical damage), using CMD to repair the hard drive will be a suitable option.
- Data Loss: To some extent, data loss from the hard drive can also be fixed using the command prompt.
How to Repair Hard Drive Using Command (CMD)?
To repair any corrupt hard drive, you’ll have to use CHKDSK, also known as CheckDisk, an official Windows utility that’s designed to check the integrity of a hard drive and repair it in case of damage. CHKDSK is executed within CMD and can be used to repair both internal and external hard drives, irrespective of their storage space.
So, let’s quickly check out how to repair a damaged external hard drive using CHKDSK in Command Prompt. For this tutorial, we’re using Windows 7, but you can follow the same approach on any Windows version to execute the CHKDSK utility.
1 Fix Logical Errors
First of all, let’s see how to use CHKDSK to repair a hard drive with logical errors.
- Launch the “Start” menu and search for “CMD”. Right-click the first search result and tap “Open as Administrator” to run CMD as the Admin.

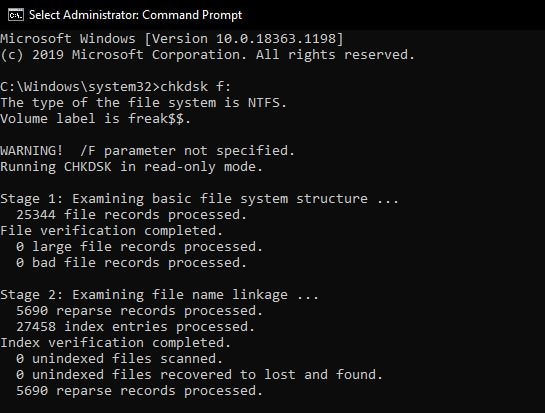
- Now, execute the following command to check your external hard drive to find any logical errors.
chkdsk f: (Make sure to replace “f” with the letter that’s representing the external hard drive on your PC).
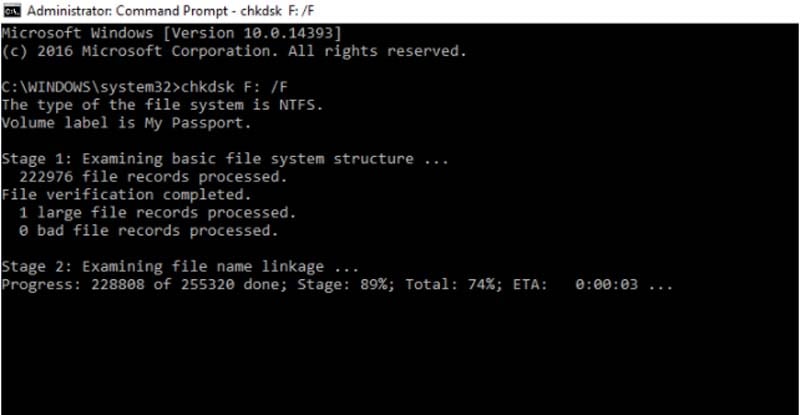
- The previous command will only scan the hard drive for potential errors, but it won’t fix them. So, if you want to fix the errors, you’ll have to execute the following command.
chkdsk f: /f (“/f” is a CHKDSK parameter that’ll look for logical errors on the hard drive and try to fix them as well).
2 Repair Hard Drive With Bad Sectors and Recover Lost Data
If the above command doesn’t repair your hard drive, there’s a huge probability that it contains bad sectors, which also means that you might have already lost valuable data from the hard drive as well. Fortunately, you can also use the CHKDSK utility to look for bad sectors and recover deleted files.
Here’s how to repair bad sectors on a hard drive using CMD.
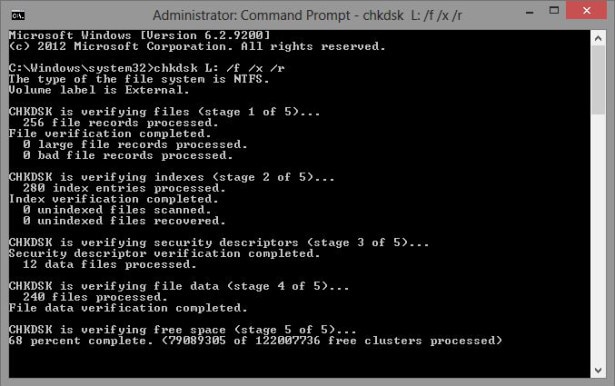
- Launch CMD as administrator by following the same steps as earlier. Then, execute the following command:
chkdsk f: /f/r/x (“/r” will look for bad sectors and recover any readable information. “/x” will dismount the hard drive before scanning so that the process doesn’t get interrupted by any external factor).
- Wait for the above command to execute successfully. Now, type the drive letter of your external hard drive and press enter. This will change the current drive to your external hard drive.
- Finally, type “attrib -h -r -s /s /d *.*” and press enter.

This command will automatically try to recover the lost data. As soon as the process completes, a new folder will be created inside the hard drive, that’ll contain all the recovered files.
3 Repair Hard Drive Using DiskPart
If the above command doesn’t fix the problem, you can try the DiskPart command to repair the external hard drive by formatting it.
(All the data stored on the drive will be erased after formatting. Don’t forget to back up or recover the files to another storage device before processing the following method.)
Here are the steps:
- Type in Command Prompt in the search box next to the Start menu, and launch it as administrator.
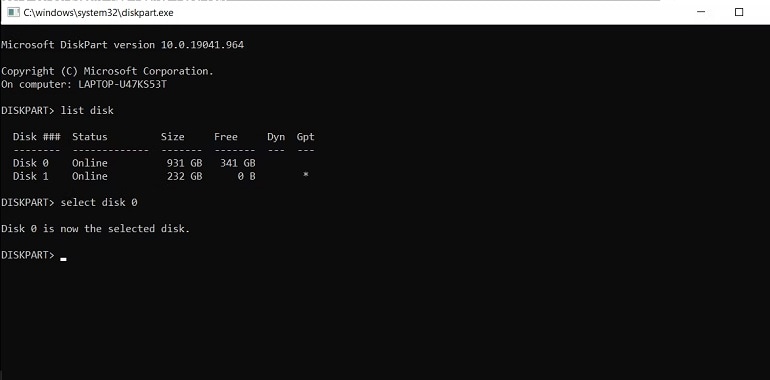
- Type list disk or list volume in the window and press Enter to find all the storage devices connected to your computer.
- Select the corrupted external hard drive by typing "select disk X" or "select volume X". (Replace X with the number of the corrupted external hard drive.)
- After that, type the following command to start formatting:
format fs=ntfs quick - Wait for the process to complete. Then, close the command prompt window.
4 Repair Hard Drive by Running SFC
A corrupted hard drive can be caused by its damaged file system. You can repair the corrupted hard drive using the System File Checker tool(SFC). Follow this way:
- Launch Command Prompt as administrator.
- For Windows 10 and above users, copy the following command prompt in the windows and press Enter: DISM.exe /Online /Cleanup-image /Restorehealth
The users using the earlier Windows don’t need to execute it.

- When the scanning process is complete, type the command "sfc /scannow" and press Enter. If you’re repairing the external hard drive, run the following command:
sfc /scannow /offbootdir=X:\ /offwindir=C:\Windows
Replace X with the letter of the external hard drive, and change C:\Windows accordingly if the Windows system is not installed in the C drive.
One-Stop Solution | How to Recover Data from Hard Drive?
While using a command prompt to recover data is a cool way to get back deleted files, it doesn’t work all the time. In fact, the recovery rate for Command Prompt is so low that you might never be able to retrieve all the files from a damaged external hard drive.
If you’re facing the same situation, we recommend using a professional data recovery tool, i.e., Wondershare Recoverit to retrieve the lost data. Since Recoverit is dedicated recovery software, it has a 99.5% success rate. So, irrespective of the type of hard drive error, Wondershare Recoverit will help you recover the deleted files all the time. It works with different types of storage devices such as hard drives, pen drives, SD cards, etc. The tool also supports 1000+ file types, which means you’ll be able to recover everything using Recoverit.
To put it in simple words, Wondershare Recoverit is your one-stop solution to recover lost data from a damaged external hard drive. Let’s take a look at the step-by-step process to recover files using Wondershare Recoverit.
Step 1 Install Recoverit on your PC and make sure to connect your hard drive as well. Now, launch the software and choose the hard drive as the target location. It’ll be listed under the “External Devices” tab.

Step 2 Click the “Next” button and Recoverit will start scanning the hard drive for all the deleted files. This process may vary for every user, depending on the overall storage space of the hard drive.

Step 3 Once the scanning process completes, Recoverit will list out all the deleted files on your screen. At this point, choose the files that you want to retrieve, and click “Recover” in the bottom-right corner to get them back on your hard drive. You can also tap the “Preview” button to check the preview of a file before recovering it.

Conclusion
Encountering software errors on an external hard drive is a common problem experienced by many users. However, instead of panicking about the situation, simply fire up your laptop and execute the above-mentioned commands to repair the external hard drive using CMD. And, in case you’ve lost your valuable data during the repairing process, install Wondershare Recoverit, and get it back without any efforts.
People Also Ask
-
What are some common CMD commands used to repair an external hard drive?
Some common CMD commands used for repairing external hard drives include chkdsk, diskpart, and sfc/scannow. -
How do I run chkdsk on my external hard drive using CMD?
To run chkdsk on your external hard drive, open CMD as administrator and type "chkdsk /f X:" (replace X with the drive letter of your external hard drive) and press Enter. -
Are there any risks involved in repairing an external hard drive using CMD?
There is a risk of data loss when repairing an external hard drive using CMD, so it's important to back up your important files before attempting any repairs. Additionally, running certain commands incorrectly can cause further damage to the drive.
What's Wrong with Drive
- Recover Your Drive
- Restore formatted drive
- Recover undetected drive
- Retrieve WD drive data
- Get files from external drive
- Wiped data can be recovered
- Recover data from dropped hard drive
- Fix Your Drive
- What if drive not showing up?
- Hard drive won't boot? Fix it
- What if a disk unallocated?
- Deal with hard drive crash
- Repair disk & recover data
- Fix Toshiba external drive not working
- Fix a broken hard drive
- Format/Wipe Drive
- Know Your Drive


Theo Lucia
chief Editor