

 TL;DR:
You can safely unmount a USB drive on a Mac by dragging its desktop icon to the Trash, clicking the Eject icon in the Finder sidebar, right-clicking the device to select Eject, or highlighting the drive and pressing Command + E.
● Wait for all active file transfers to complete and close any applications accessing the drive before ejecting to prevent data corruption and structural damage.
● If an improper removal causes file loss, Wondershare Recoverit can be used to scan the USB drive and selectively restore over 1,000 file types, including DOC and EMLX.
Ask AI for a summary
 ChatGPT
 Perplexity
 Gemini
 Claude
 Grok
Grok
Multiple Mac users often worry about safely removing a USB drive without corrupting files. Yet, some people still feel unsure about the correct steps to follow. Moreover, pulling them out wrong can lose your important photos and documents. Users may also rush and forget simple actions that keep their data protected. In this guide, you will learn how to eject a USB on Mac safely and quickly.
Try Recoverit to Perform USB Data Recovery
 Security Verified. 3,591,664 people have downloaded it.
In this article

Part 1. Common Mistakes Users Make with External USB Devices
Avoiding common mistakes protects your files and device health during daily USB use. Every day habits cause data loss; learn below how to safely remove USB from Mac:
- Yanking Drive: Pulling a USB without ejecting risks interrupting writes and corrupting files. Thus, hidden system activity may break mid-process and damage the entire drive structure.
- Wrong Port: Using a high-speed drive in an old port lowers speed and confuses you. Also, slow communication between devices can create delays that mimic serious drive faults.
- No Backup: Keeping only one copy on a USB risks losing everything if it fails. Plus, unexpected errors or disconnects can instantly remove data with no recovery options available.
- Rough Handling: Bending or forcing drives into tight ports can damage connectors and harm circuits. Dropping external drives harms internal parts and creates permanently unreadable disk areas.
- Malware Risk: Plugging unknown sticks into public computers can install malware without signs. Infected files later spread across devices and compromise stored personal or work data.
Part 2. Signs Your USB Drive Might Be at Risk
Many minor warnings can indicate that a USB device is at risk and may stop working soon. Following early signs helps you protect your data, even when learning how to eject USB from MacBook:
- Slow Transfer: Transfer slows down, and simple files take a long time to move. This slowdown warns that internal memory blocks are weakening and approaching possible failure.
- Missing Files: Files disappear, and some folders refuse to open without warning signs. Its behaviour shows file structure damage that threatens the remaining data stored inside.
- No Detection: The device appears without size or fails to load on different Mac ports. Such a detection failure indicates severe recognition problems and reveals advanced internal memory faults.
- Format Alerts: This system asks to format the drive and shows repeated file error messages. These alerts signal deep storage issues that raise significant risk for stored data.
- Random Disconnect: A drive disconnects without touch and vanishes from Finder during use. Its unstable link signals weakening connectors, increasing the risk of sudden data loss.
What to Do Before Ejecting Any USB or External Drive
- Activity Check: Active file movement shows ongoing data work that increases risk if removed early.
- Copy Completion: Unfinished copy bars show pending data actions that create a risk.
- Drive Unmount: Disappearing drive icons indicate a successful release, reducing hidden damage risks.
- App Closure: Opening apps using drive files signals hidden tasks that increase corruption risk.
- Final Wait: Waiting for confirmation messages indicates safe conditions and reduces remaining risks.
Part 3. 4 Gentle Ways to Escort Your USB Out of Your Mac’s System
Users want to know how to eject a flash drive from a Mac because skipping proper steps can lead to file loss. Below are the 4 ways to help prevent warning signs to eject your USB from your Mac:
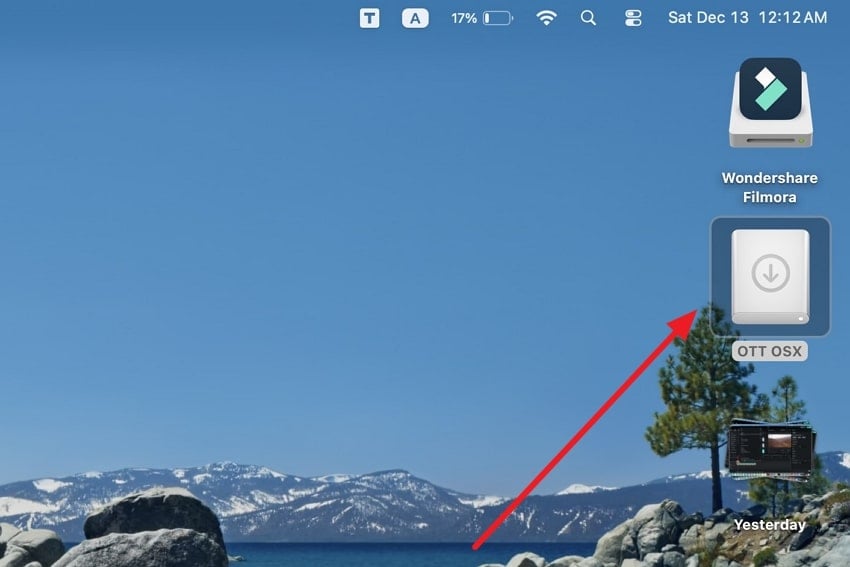
1. From the Mac Desktop
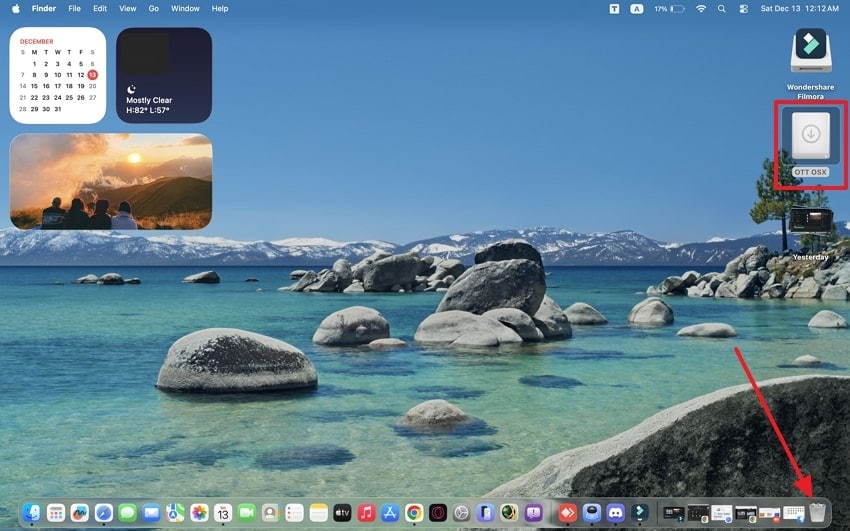
Although USB mishaps cause data loss, the desktop method explains how to eject USB on Mac. It tells macOS to finish all writes before unplugging. Plus, this approach gives a clear visual cue that prevents hidden tasks from damage. It also highlights macOS's safeguards that prevent removal while background processes remain active. So, follow the steps to eject a USB from a Mac desktop:
Instructions. To initiate, drag the USB icon to the “Trash” icon and press the “Eject” button.
2. Using Finder (Sidebar)
Finder’s sidebar often shows your connected drives, helping you safely remove them. It explains how to eject USB from MacBook using a visible indicator. This action flushes cached data, so no file remains half-saved or broken. The view signals macOS is preparing your drive, ensuring stored data remains intact. Take guidance below to remove the USB via Finder:
- After accessing the “Finder” app, locate your connected USB device under “Locations.”
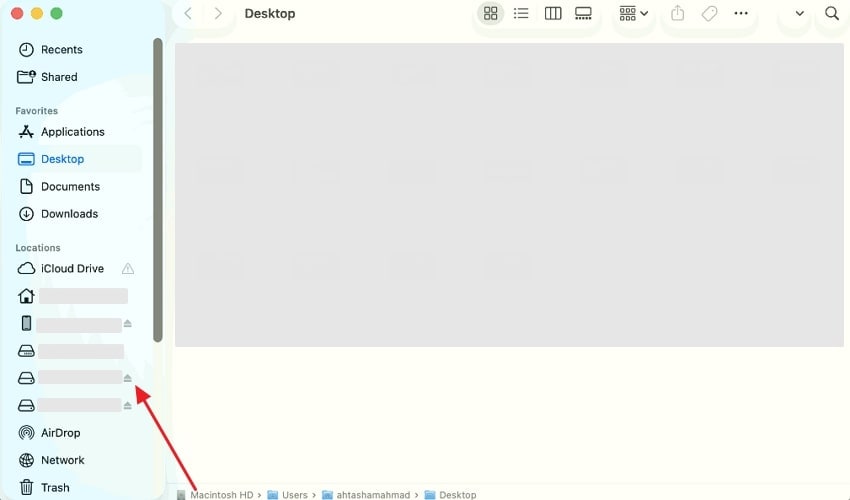
- Next, click the “Eject” icon beside the USB drive name to unmount it.
3. Using Right-Click (Control-Click)
Apart from the methods above, this is another simple way to unmount an external drive. It tells macOS to complete all active read and write processes before removal, keeping your data safe. Using this option lowers the risk of file corruption and disk errors. It also merges safety checks with unmounting in one action. Learn how to safely remove USB from Mac using a right click to protect drive integrity.
- Locate your connected USB drive on the desktop or in the Finder sidebar. Next, you need to right-click on the USB drive name.
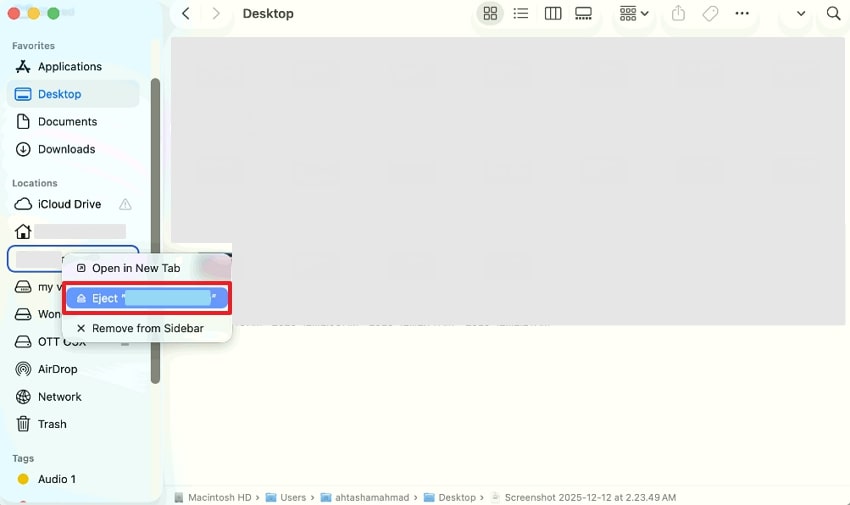
- Finally, a small menu will appear; select “Eject” to unmount the drive safely.
4. Using a Keyboard Shortcut
You can also use a keyboard shortcut to quickly remove external drives. On a Mac, this command safely unmounts the device by finishing all active data writing before removal. It helps prevent file corruption and protects stored information. This method also ensures background processes are not interrupted, keeping the system stable. Follow the instructions below to learn how to eject a flash drive from Mac using shortcut keys.
- To initiate, click the USB drive icon on your desktop or select it in Finder.
- Next, press “Command + E” on your keyboard. Afterward, the USB icon will disappear from the desktop.
Pro Tip. Recoverit to the Rescue: Fix USB Data Lost After a Bad Eject
Apart from learning how to eject USB on Mac, many people lose their important data when ejecting a USB badly from a Mac. To solve this issue, you should try Recoverit to restore your essential data. This advanced tool can even retrieve data after USB drive formatting or format error issues. Moreover, it supports the easy recovery of more than 1,000 file types, including DOC and EMLX.
While recovering, you can scan your USB Drivers thoroughly to locate lost or deleted files. Plus, it allows selective recovery of individual files or entire folders as needed. Users can even restore files lost from sudden power surges affecting flash drives. Additionally, the tool is compatible with all popular USB flash drive brands and types.
Key Features
- Virus Protection: Securely recover files compromised by viruses or malware while maintaining data integrity.
- Filter Feature: Quickly filter search results to locate and recover specific file types efficiently.
- Save Destination: Save recovered files to a safe location to prevent overwriting existing data.
Detailed Step-by-Step Guide to Recover Your Lost Data
This section covers the detailed guide to restoring your data from a USB if lost via Recoverit:
- Select the External Drive
After opening the program, choose the USB storage drive that contains your lost files.
- Scan the Drive Across Recoverit
The software conducts a full scan of the chosen storage. Afterward, select the desired file and press the “Recover” button.
- Preview and Recover Data
Once the scan completes, view all detected files and select “Recover” to save your items to your MacBook.
Part 4. Keep Your Mac at Its Best: Easy Maintenance Tips
Maintaining your Mac’s performance ensures it runs smoothly and lasts longer. Thus, this part explains simple habits like how to eject USB from MacBook to prevent file corruption and hardware issues:
- System Update: Keep macOS updated and apps for better security and smoother operations daily. Also, automatic updates install performance fixes without requiring manual checks each time.
- Storage Management: Maintain ample free space by regularly deleting junk files and unused apps. Therefore, moving large files to external drives prevents your Mac from running slowly constantly.
- Startup Control: Review login items and disable unnecessary apps that start automatically at boot. Thus, fewer startup apps reduce resource usage and speed up the Mac effectively.
- Hardware Care: Clean vents, keyboard, and ports to avoid dust buildup and overheating risks. Proper battery use and checking preserve longevity and prevent unexpected failures.
- Disk Health: Use built-in tools like Disk Utility to check and repair minor disk errors. Apart from that, early detection of file or disk issues prevents serious problems later.
Conclusion
To summarize, a well-maintained Mac will have better performance and increased stability. Safe habits will save you from data corruption, hardware damage, and other unforeseen slowness. In addition, keeping track of storage and disk health makes your Mac run smoothly. Nonetheless, even being aware of how to eject USB on Mac, accidents may still occur. Thus, Recoverit stands out as the best solution for users who experience accidental data loss.
FAQ
1. Can I remove a USB during file transfer?
It can corrupt data and damage stored data if you remove a USB while transferring files. You should wait for the transfer to finish before removing the USB. This ensures all files are safely written without risking permanent loss.2. Why does my USB show a “Cannot be ejected” error?
This happens when background apps are still using the drive or files. Close all apps and check the Activity Monitor to identify the process preventing ejection. Also, waiting a few moments often resolves hidden file access issues automatically.3. How do I recover files after a failed USB eject?
Recoverit can retrieve lost files caused by improper USB ejection or formatting errors. It scans the drive deeply to efficiently locate deleted or corrupted data. Moreover, selective recovery allows restoring only the needed files without affecting the rest.4. Can large files affect my USB drive eject process?
Yes, moving huge files may delay the system from finishing write operations. It is important to know that the file transfer is complete before removing a USB drive. An external storage of heavy files is useful in maintaining the speed and performance of the Mac.


