


 TL;DR:
To safely remove a USB drive on Windows and prevent RAW format errors or file corruption, always close active applications and eject the device using the System Tray or File Explorer before unplugging.
● If the System Tray icon is missing or unresponsive, open File Explorer, right-click the targeted USB drive, and select "Eject" to safely dismount the hardware.
● Modern Windows uses a default "Quick Removal" policy that disables write caching, meaning you can technically unplug the drive without ejecting only if you are certain no background syncs or file transfers are active.
● If Windows blocks the ejection with an "In Use" prompt after closing all visible programs, restarting the PC will successfully clear the hidden file locks so the drive can be removed.
Ask AI for a summary
 ChatGPT
 Perplexity
 Gemini
 Claude
 Grok
Grok
Removing a USB drive without properly ejecting it can lead to corrupted files, data loss, or frustrating "access denied" errors. These issues are normally caused by various reasons, including open file handles, background syncs. Sometimes it may look like no data is lost at first, but it can lead to USB corruption, leading to inaccessible files.
To address this issue, this guide covers everything from key indicators to professional fixes to explore how to remove USB files safely. By following the guide, you will ensure your USB data stays intact while resolving glitches quickly and efficiently.
Try Recoverit to Perform USB Data Recovery
 Security Verified. 3,591,664 people have downloaded it.
In this article

Part 1. What Happens If You Remove a USB Drive Without Ejecting Safely?
Removing a USB drive without safely ejecting it usually does not physically damage the drive or the computer, but it can corrupt files, which is alarming. Thus, let's explore the following symptoms to know when this error occurs before you jump into its fixes:
Symptoms Of a Corrupted USB Flash Drive
- Format Disk Prompt Appears: When you plug in the USB drive, it is asked to be formatted, which often indicates file system corruption.
- Drive Shows Wrong Size: The USB appears as RAW, 0 bytes, or shows an obviously incorrect capacity in File Explorer or Disk Management.
- Missing or Unreadable Files: Files or folders disappear, refuse to open, show “file is corrupted/unreadable,” or display strange names and sizes.
- Disk Structure Error Messages: When you try to access a USB device, Windows displays errors such as "The disk structure is corrupted and unreadable."
- USB Not Recognized or Empty: The system does not recognize the USB device at all, or it displays messages such as "Please insert a disk into the USB drive."
Part 2. How To Safely Remove A USB (Windows)
With the symptoms of a corrupted USB drive in mind, let's explore the safest methods to learn how to remove a USB drive safely:
Method 1. Using the System Tray To Remove USB (Quickest)
As the quickest method, you can instantly access the USB icon in the system tray. With this, Windows easily dismounts the USB drive and clears unnecessary cache to reduce the risk of file-system or file corruption. Furthermore, you will receive a “Safe to eject” notification to know when to eject the drive safely. So, let's explore a detailed stepwise guide below to use this method:
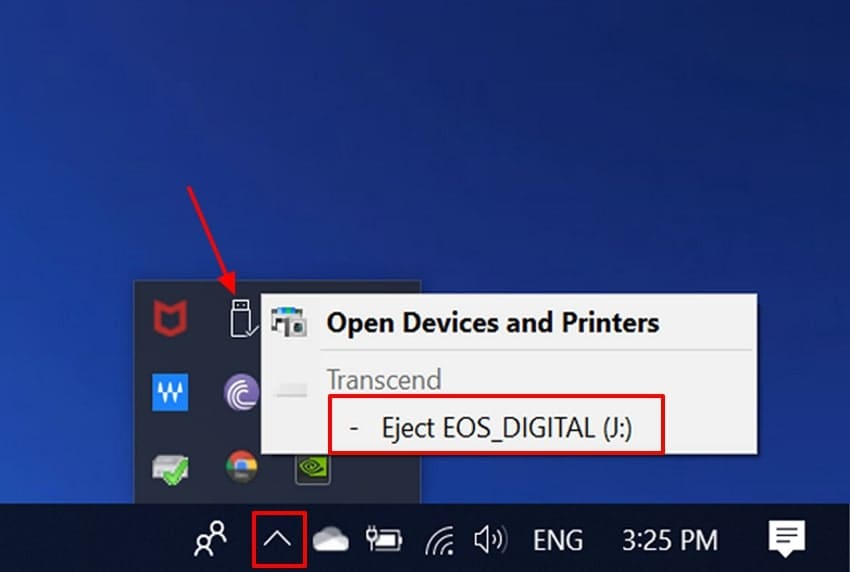
- Initiate by ensuring that all the files and folders of that specific drive are closed completely. Click the “Small Arrow” in the right corner, then tap the USB drive icon. Following this, select the “Eject *USB NAME* (X:)” option.
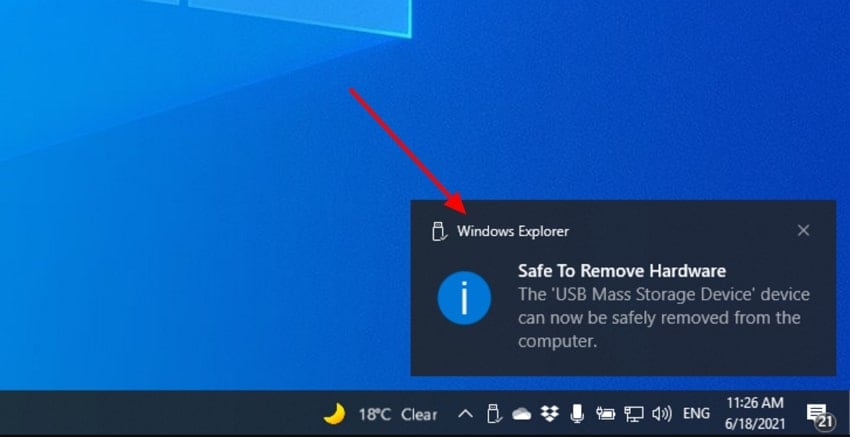
- Wait until you receive a pop-up saying, “Safe to Remove Hardware,” and then remove your hard drive/USB.
Method 2. Using File Explorer To Remove a USB (When the Icon is Missing/Stuck)
To explore “how do I eject a flash drive” when the USB drive icon is unavailable, you can opt for this method. As File Explorer is a built-in tool in Windows, it functions smoothly even if the icon is disabled or becomes unresponsive. Moreover, you simply eject the drive by right-clicking the targeted USB drive. In this method, Windows automatically closes file handles, as shown in the following guide:
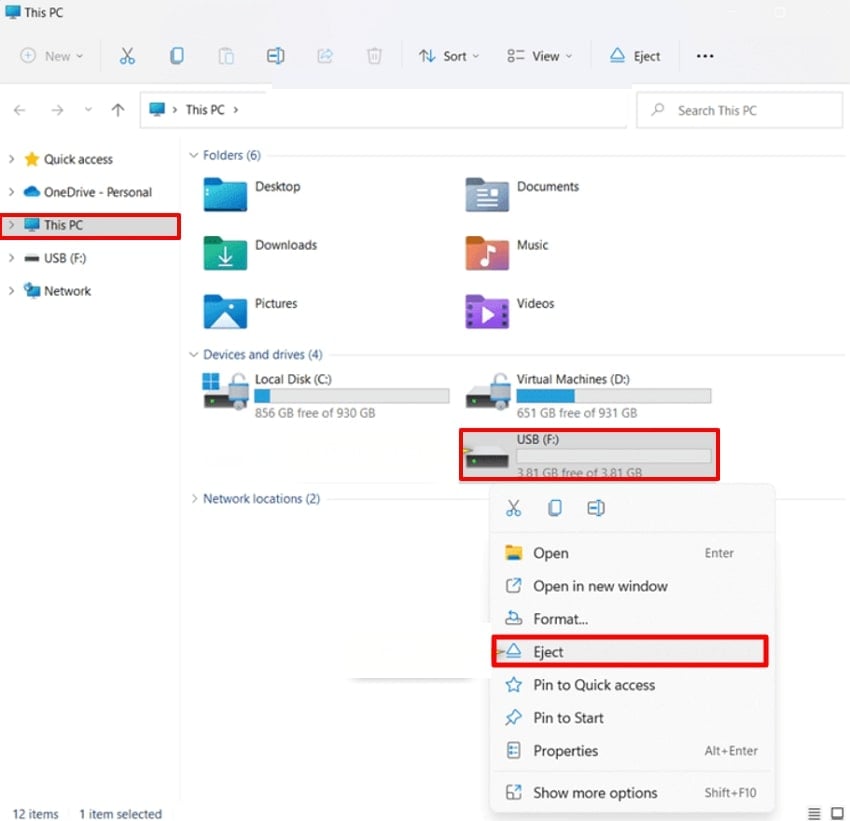
- Start by clicking the "This PC" in the "File Explorer" app. Next, select the desired USB drive, right-click it, and choose the "Eject" option.
- Now, it will automatically display a pop-up labeled “Safe to Remove Hardware,” allowing you to remove the drive instantly.

Method 3. When Windows Says "In Use" When Removing USB
Sometimes, when you unplug the USB drive, you see a “In Use” pop-up. It means that some files, including images and music players, are working. After turning it off, wait for a second and try ejecting the USB drive using File Explorer. Following this, if it still shows the “In Use” pop-up, then try restarting the PC, and it will clear all file locks.

Part 3. Quick Removal Policy, And When You Can Just Unplug
Quick Removal is a default policy on all modern Windows for external USB drives. It disables the writing cache on the device, so Windows writes data to the USB as quickly as possible. Thus, if no cached data is waiting to be written, the drive can be instantly kept “ready to remove” at any time.
Furthermore, if the drive is set to "Quick Removal" (default) and no files are being copied from the USB, you can generally unplug it. This is beneficial for everyday use, like moving small files, where transfers finish quickly, and there are no lengthy background tasks.
Part 4. Best Practices to Prevent USB Issues and Data Loss
After exploring how to eject a flash drive, it’s equally important to follow best practices that prevent future issues:
- Eject USB Before Unplugging: Always eject the USB before unplugging, especially during or right after file transfers, to avoid file system corruption.
- Keep At Least One Backup: Always keep at least 1 backup of important files on another drive or in cloud storage to keep them safe.
- Avoid Unplugging When Copying: Always make sure you don’t unplug the USB drive when you are copying a file, as it will lead to file corruption.
- Regularly Scan USB Drives: Ensure you periodically scan the USB drives and host computers with updated antivirus software to avoid the risk of spreading it.
- Physically Protect USBs: Users should use drive covers and save them from extreme heat or moisture so information remains protected.
Pro Tip: Recover Critical USB Files with Recoverit Before Future Errors
A photographer had just finished an important wedding shoot and wanted to share a few highlights with the host. After the function ended, he quickly plugged his USB drive into the host’s laptop to display some preview images. He removed the USB drive without safely ejecting it because the moment felt rushed and busy. The next morning, he discovered that several important files had disappeared due to the interrupted workflow.
In situations like this, a reliable recovery tool such as Recoverit can help restore lost USB data with impressive accuracy. This tool uses advanced AI algorithms to retrieve a wide range of file formats, including images, PDFs, and videos. Users can also choose between Quick Scanning and Deep Scanning modes based on their needs. Moreover, you can restore multiple files simultaneously to save your extra time and manual effort.
Key Features
- Preview Feature: This tool lets you preview the recovered results to ensure accuracy and completeness.
- Device Compatibility: Users can access this tool on all major operating systems, including Windows, macOS, and Linux.
- Supported Media Devices: This tool provides efficient support for a wide range of media devices, including Cameras, Drones, GoPro, and Action data recovery.
An Extensive Guide to Using Recoverit to Retrieve Lost Data
While learning how to remove a USB drive safely, let's explore a detailed stepwise guide to recover lost data:
- Choose the Desired Location for Data Recovery
After accessing the tool, click “Hard Drives and Location” and select the desired lost location of the lost data within the “Quick Access” tab.
- Initiate the Scanning Procedure to Recover Data
After selecting the location, the procedure automatically starts in “Quick Scanning” mode. However, if it cannot locate the desired file, you can also enable “Deep Scanning” mode for better results.
- Preview and Render the Recovered Files to the Device
Finally, the desired file is recovered, and hit the “Preview” button to examine it. After previewing it, click on the “Recover” button to save the files to the designated folder.
Video Tutorial: How to Fix a Corrupted USB Flash Drive and Recover Data?
Conclusion
Summing up, this article has covered all the efficient methods to know how to remove a USB safely. The guide walked through practical methods, common warning signs, and best practices to help you avoid data loss. Furthermore, if you lost your data, then we recommend using Recoverit, which ensures maximum accuracy while retrieving data. We have also provided you with some tips to prevent the USB from further corruption.
FAQ
1. Why does my computer say “This device is currently in use” when I try to eject?
Windows displays this message when a program or other service is still open on the USB drive. In this case, the system will block ejecting, which could corrupt files or the file system on the drive.2. How can I safely eject a USB drive on Windows?
Users can easily eject a USB drive on Windows by using the system tray method. However, sometimes the USB icon is hidden, so you can try ejecting it through File Explorer.3. I accidentally pulled out my USB drive without ejecting it so what should I do?
In this scenario, ensure you don’t copy new files to the USB drive instantly. After a while, try plugging the USB again and check if the files are accessible or not.4. Does the “Quick Removal” policy on Windows mean I can always unplug without ejecting?
Quick Removal reduces write caching so that drives are more often safe to unplug. However, always use the ejection option, which is the safest option, especially for larger files.


