How to Fix Disable USB Selective Suspend on Windows 10/11
Do you find your USB flash drive not recognized by the computer after plugged in for a while, but everything is functioning again when you unplug it and plug in again? If you are one of the numerous users who have had to deal with this problem, it will interest you to know that it is a problem caused by the USB Selective Suspend feature.
In this article, you will learn the basic information of this issue, what to do when facing this issue on Windows 10/11, and how to disable USB Stick Selective Suspend setting on Windows 10/11.
What is USB Selective Suspend?
First of all, let's take a look at how Microsoft defines the USB flash drive selective suspend feature:
"The USB selective suspend feature allows the hub driver to suspend an individual port without affecting the operation of the other ports on the hub. Selective suspension of USB devices is especially useful in portable computers since it helps conserve battery power."
-- From Microsoft official website
To make it easier for you to understand, USB drive selective suspend is a feature that only works on USB devices that are connected to a computer.
Since devices are not active round the clock, Windows will place a port that is not in use on low power and prevents data loss and driver corruption to make more power available for other tasks and a much longer period.
Flash drive selective suspend features are activated by enabling Keyboard/Mouse Wake option in the BIOS setting so to correct an error related to flash drive Selective Suspend on Windows 10/11 you will have to tweak a few options under this category.
Should I Enable USB Selective Suspend or Disable It?
Many USB drive users often argue as to the importance of enabling a Selective Suspend feature. When faced with this error, you will be tempted to disable it entirely, but is it the right thing to do? Check the Pros and Cons of enabling USB drive selective suspend feature:
Pros
- Enabling the feature helps you save a lot of battery power.
- If you have had issues with external drives in the past, it is advisable to leave the feature on.
Cons
- Disabling the feature increases risk such as a quick drain of your laptop's battery life.
- Always keep the USB drive plugged in cause the flash drive overheat and lead to physical damage.
- A sudden and brutal unplug after a long use may cause the USB flash drive corruption.
On a personal note, the Selective Suspend has little to offer for desktop PC users because they are always plugged into a power source when in use.
Therefore, if you are using a desktop PC, you can just turn it off to avoid the USB stick selective suspend issue in the future. However, if you are using a laptop, it is better to consider the battery consumption before turning it off.
How to Disable USB Stick Selective Suspend Setting on Windows 10/11?
By now, you should have made up your mind whether to disable it or not. Next, let's take a step forward and learn how to disable USB drive selective suspend setting step by step. Follow these simple steps below:
- Press the Windows key + S at once then type "power plan" in the search box. Click on the "Edit power plan".

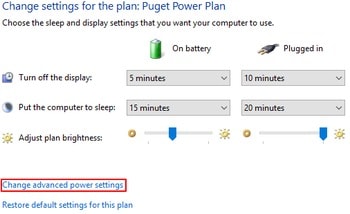
- Click on Change advanced power setting.

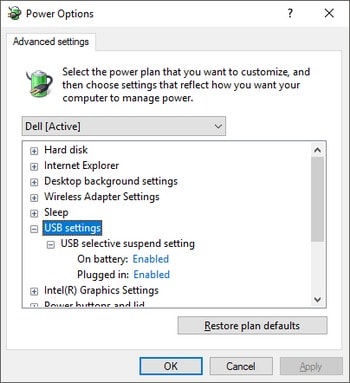
- Expand USB settings and USB sitck selective suspend settings, pick "Disabled" and click OK.

Other Scenarios
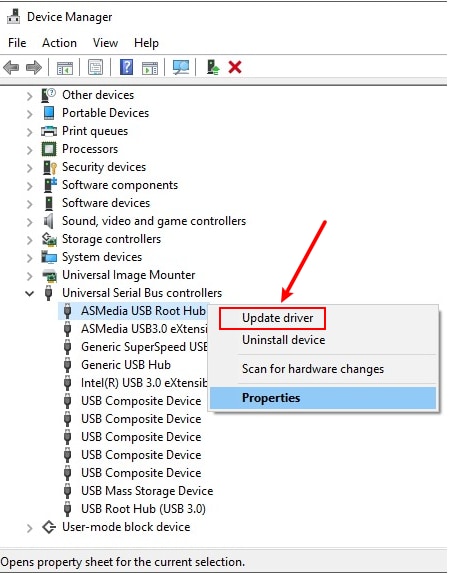
If disabling the feature doesn't help you resolve your unrecognizable USB device, consider updating your driver either manually or automatically.

-
For an automatic update, download a driver update program online and launch it. The program will scan for faulty, missing, or outdated drivers on your system then install an updated one in its place. These actions can make your USB drive recognizable again.
Conclusion
Hopefully, your USB flash drive is now functioning again. However, if you have tried all the solutions above but nothing happens, you need to consider the data security on your USB device. Take a look at this video that lists more proven solutions for USB device not recognized issue, and how to recover data from your flash drive.
Video Tutorial on How to Fix USB Device Not Recognized
USB Solution
- Recover USB Drive
- Format USB Drive
- Fix/Repair USB Drive
- Know USB Drive


 ChatGPT
 Perplexity
 Google AI Mode
 Grok
Grok


Sue Wayne
staff Editor