

 TL;DR:
To fix Windows 10 Explorer.exe crashes caused by corrupted files, driver conflicts, or memory limitations, execute built-in command-line repairs, increase your virtual memory allocation, or update your display drivers.
● Run the `sfc /scannow` command in Command Prompt to repair corrupted system components, and if the problem persists, execute `DISM.exe /Online /Cleanup-Image /Restorehealth` to perform an advanced system image restoration.
● Resolve memory-related application freezes by opening `sysdm.cpl`, navigating to the Advanced Performance settings, disabling automatic paging file management, and manually inputting a larger custom Virtual Memory size.
● If the Explorer.exe malfunction results in deleted documents before you can perform a System Restore, utilize Wondershare Recoverit to scan your hard drives and retrieve over 1000 supported file types.
Ask AI for a summary
 ChatGPT
 Perplexity
 Gemini
 Claude
 Grok
Grok
The “file explorer.exe” application is an important component of the Windows OS, which helps you to access all folders or files. If an Explorer.exe error strikes, it can turn a smooth workflow into a mess while causing performance issues. These errors often stem from corrupted files or conflicts with other programs. Ignoring them can lead to even bigger problems like data loss or constant system restart.
Therefore, addressing or fixing these errors not only restores system stability but ensures you can work without any interruptions. So, to get yourself sorted with this issue, read the following article packed with effective fixes. Plus, it hides an additional quick recovery tool, which deals with accidentally deleted important documents.
Try Recoverit to Perform Data Recovery
 Security Verified. 3,591,664 people have downloaded it.
In this article
-
- Restart Explorer.exe Using Task Manager
- Increase Virtual Memory from System Properties
- Run SFC Scan
- Use DISM.exe For System Repair
- Disable Auto-Hide of Taskbar
- Use Windows Memory Diagnostics for Fixing Explorer Application
- Run CHKDSK For Repairs
- Consider Updating Your Graphics Driver
- Try System Restore as the Last Resort

Part 1. Why is File Explorer.exe Application Showing Errors?
The Explorer.exe problem is a common issue that many users face, which turns their simple tasks into nightmares. However, understanding the root cause of why these errors happen is the first step towards fixing them:
- Corrupted System Files: Windows relies on a set of essential system files to keep everything running, which also includes Explorer.exe. If these files get corrupted due to unexpected shutdowns or software conflicts, File Explorer may become unresponsive.
- Outdated Drivers: The drivers act as a bridge between your hardware and software while allowing Windows to communicate with your components. In case your graphic card or drivers are outdated, it can cause instability in the Explorer application.
- Overloaded File Explorer Cache: File Explorer keeps a cache of accessed files, but if corrupted, it can lead to performance issues. A cluttered or damaged cache might be causing the File Explorer to open late.
- Third-Party Software Conflicts: There are certain third-party applications, like file managers or antivirus programs, that can interfere with Explorer.exe. These programs may alter system settings and lead to unexpected freezes, which can directly affect the File Explorer.
- System Malware: Another important reason could be malware that is manipulating system files. For instance, if your system is infected, you might detect random crashes or excessive CPU usage.
Identifying causes and applying fixes for the 0xc000007b application error.
Part 2. Fixing The Explorer.exe Problems: Bringing the Best Solutions
This part will provide you with some of the best solutions on how to fix Explorer.exe file errors. Moreover, if you have no idea about these methods, then don't worry, as we will look at these methods with a comprehensive guide:
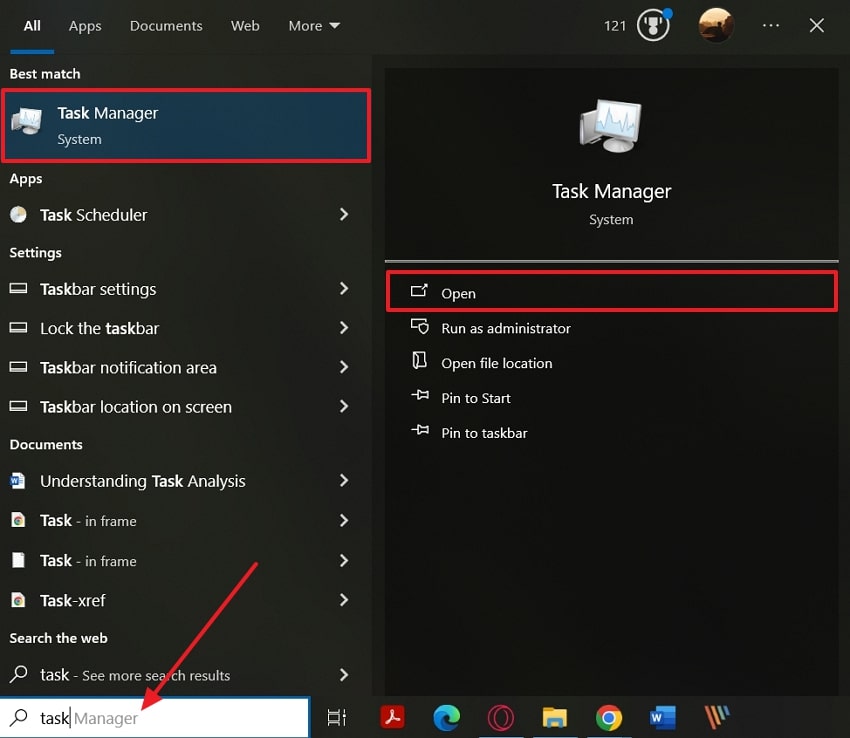
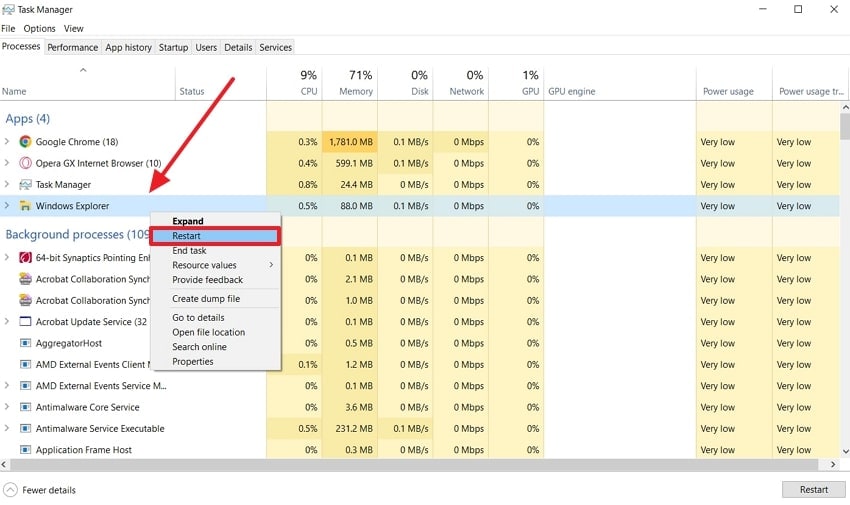
1.Restart Explorer.exe Using Task Manager
One of the simplest methods to resolve the EXE application errors is to restart Windows Explorer from the task manager. This process will restart the application and remove any underlying cause or glitch it might be experiencing. Follow the given steps and learn how to restart the Explorer using Task Manager:
Step 1. Click the “Search” bar at the bottom taskbar, and type “Task Manager” in the bar. When the results appear, click the “Open” option to reveal the main interface of the Task Manager.
Step 2. After that, right-click the “Windows Explorer” option, and from the drop-down menu, press the “Restart” option.
2.Increase Virtual Memory from System Properties
Sometimes, the reason Explorer.exe errors occur is because there is no free space to run the system. It is recommended to increase the virtual memory as it acts as an extension of your computer's RAM. So, learn how to increase the virtual memory by following the given guide:
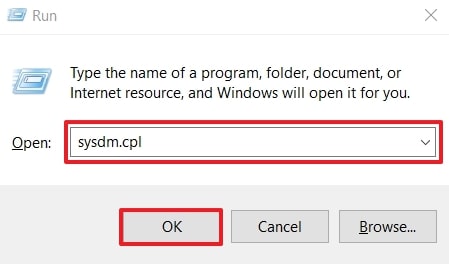
Step 1. Press the “Win + R” keys from the keyboard to open a small pop-up window. Next, type “sysdm.cpl” in the “Open” section and hit the “OK” button.
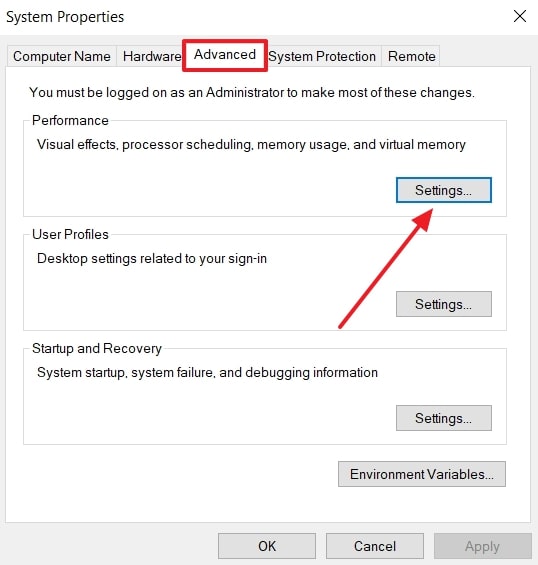
Step 2. Afterward, from the “System Properties” dialogue box, head to the “Advanced” tab. Now, under the “Performance” section, hit the “Settings…” button to proceed to another setting box.
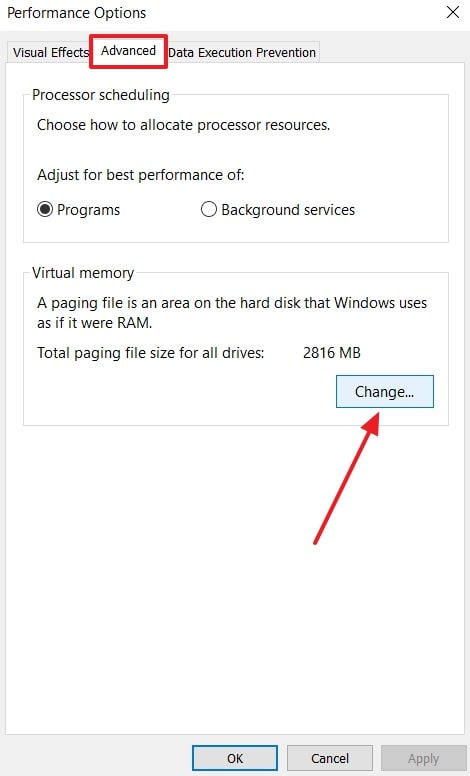
Step 3. When the “Performance Options” window opens, go to the “Virtual Memory” section and click the “Change” button.
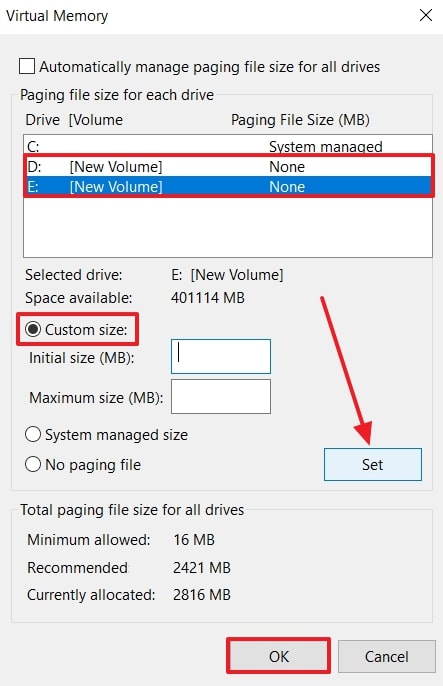
Step 4. Upon doing so, the “Virtual Memory” small window will open, where you need to uncheck the “Automatically Manage Paging File Size for all Drivers” option. After that, choose a desired drive under the “Paging File Size for Each Drive” section and tick the “Custom Size” option. Add the desired MBs in the “Initial Size” and “Maximum Size” boxes, and hit “Set” before clicking “OK.”
3.Run SFC Scan
An SFC scan helps identify and repair any corrupted files in your Explorer application while ensuring their integrity. This scan benefits users as it can automatically fix the “the memory could not be read” problem. Also, it enhances the system’s performance and stability without damaging Windows components. We have given you the following steps on how to perform a SFC scan using commands:
Step 1. Start by clicking the “Win + R” keys from your keyboard to access a small “Run” dialogue box. Now, type “cmd” in the “Open” section, and hit the “OK” button to open a command window.
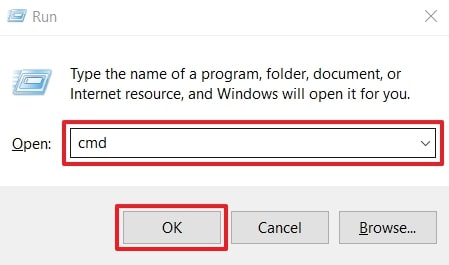
Step 2. On the “Command Prompt” window, write “sfc /scannow” and click the “Enter” key to let the system process this demand. After it's done scanning, restart your computer and check if the Explorer.exe problem is fixed or not.

4.Use DISM.exe For System Repair
If, for some reason, the SFC scan does not resolve the Explorer.exe error, you can turn to DISM. It is an advanced repair solution that checks and fixes any major issues with the Window system. To perform this procedure, go through the given steps and fix the Explorer error:
Step 1. Head to the left side “Search” bar on the taskbar and write “Command Prompt.” When the top result opens, press the “Command Prompt” option to open the window.
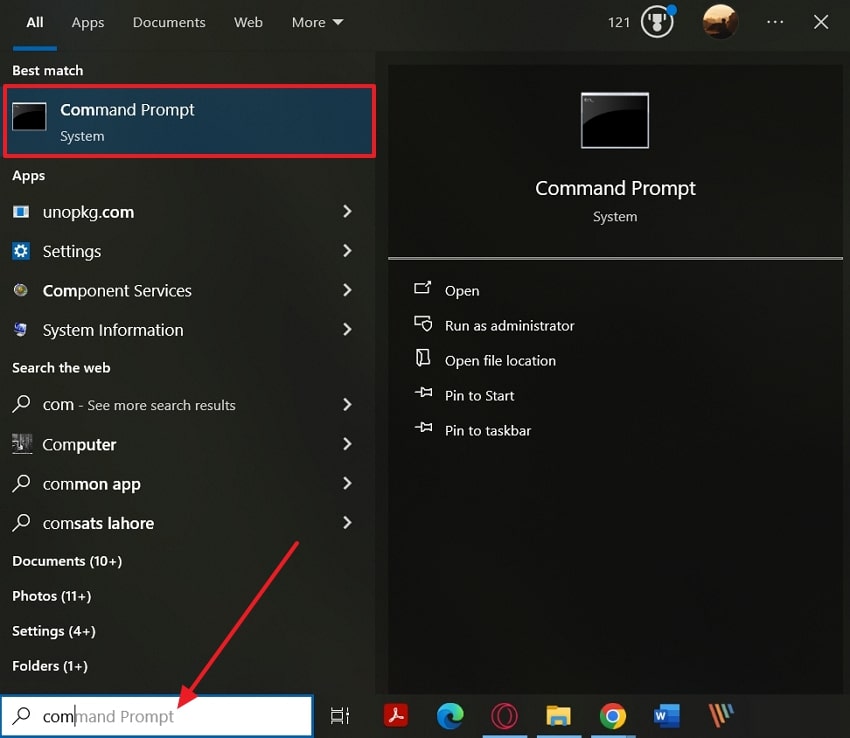
Step 2. Next, type “DISM.exe /Online /Cleanup-Image /Restorehealth” and press “Enter” to let the system scan for the Explorer error. The scanning will resolve the Explorer.exe file issue that you can check after restarting your device.

5.Disable Auto-Hide of Taskbar
Disabling the auto-hide feature of the taskbar from the settings can help run the system more smoothly. This fix is ideal for resolving the EXE application errors and for those who want quick accessibility to the programs. Thus, read this step-by-step guide and learn to disable the option with ease:
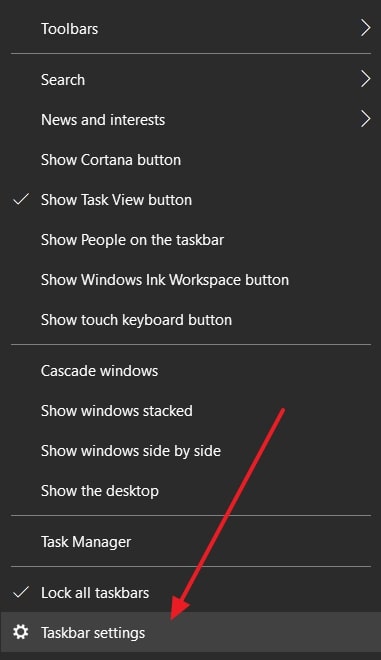
Step 1. First, right-click on the Windows taskbar and choose the “Taskbar Settings” from the opened bottom-up menu.
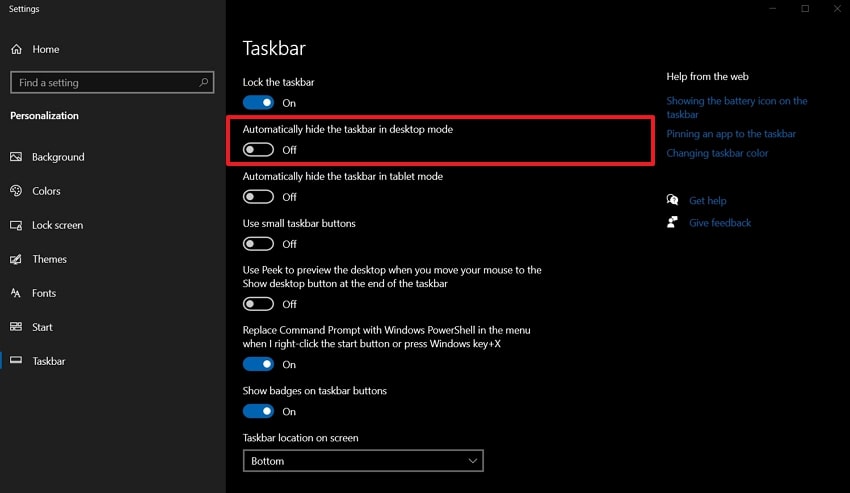
Step 2. When the “Taskbar” settings page opens on your device, toggle the “Automatically hide the taskbar in desktop mode” option.
6.Use Windows Memory Diagnostics for Fixing Explorer Application
Windows Memory Diagnostics is mostly used when there is something wrong with the RAM or if there are unexpected Windows crashes. This tool can quickly identify and resolve memory-related problems that might be interfering with your system. Read through these easy-to-follow steps and learn how to utilize the WMD for fixing the Explorer.exe file application:
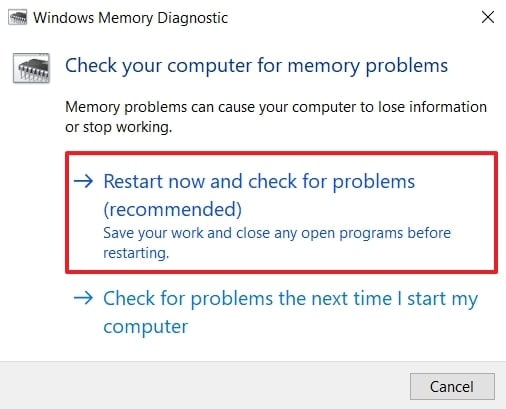
Step 1. To access the Windows Memory Diagnostics window, search for it on the “Search” bar.
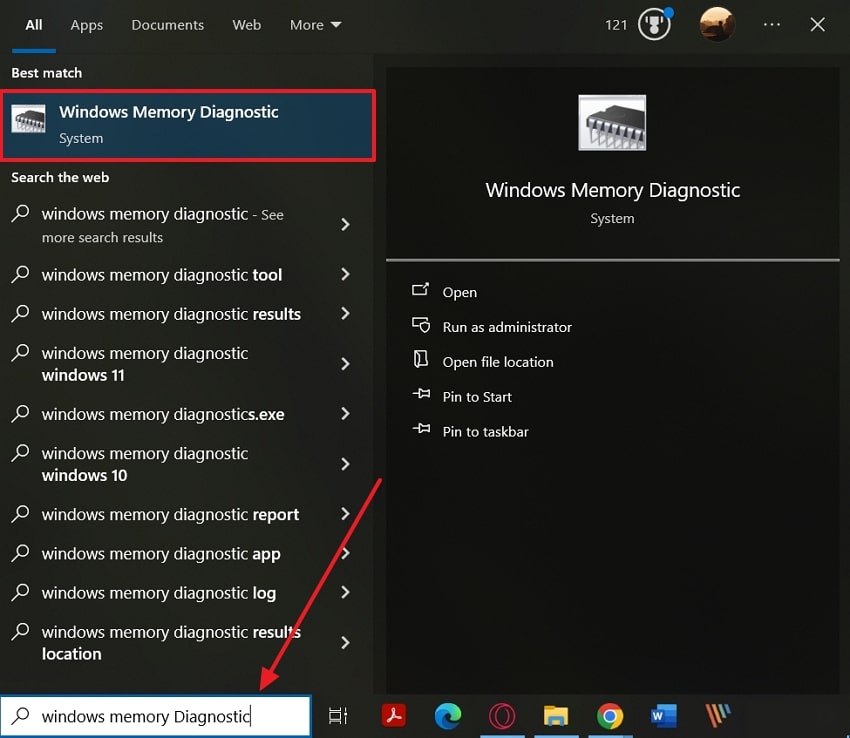
Step 2. Upon opening the WMD dialogue box, click the “Restart Now and Check for Problems (Recommended)” option. This will immediately fix the Explorer.exe error, and you can access the necessary files on your Explorer.
7.Run CHKDSK For Repairs
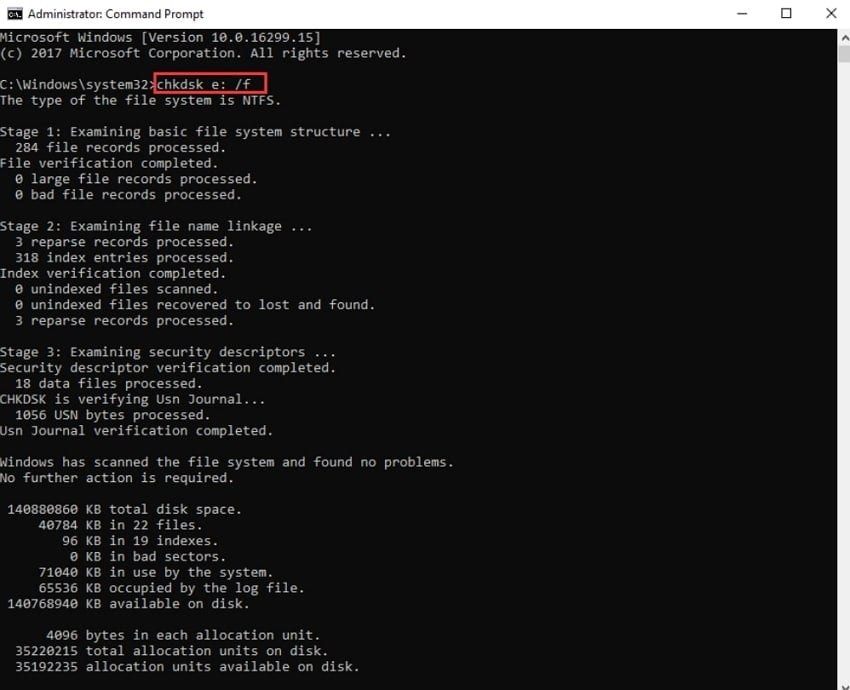
When your system is experiencing hard drive errors that are causing file corruption, it is another reason that leads to the Explorer.exe file error. To cater to this issue, running the CHKDSK utility can help you repair such disk-related problems. It significantly improves disk performance and ensures a smoother flow of Windows, which is offered as follows:
Instructions. Upon opening CMD, type in the “chkdsk e: /f” command right next to the “C: \Windows \system32>” and hit “Enter.” A line of stages will appear that will find the potential reason why the Explorer isn't working on your device.
8.Consider Updating Your Graphics Driver
Old graphic drivers can lead to problems with Explorer.exe and make Windows malfunction. Your computer may experience a random freeze, screen flashing, and crash, all of which are frustrating. It is easy to update the graphic drivers through the device manager to resolve this issue using the steps below:
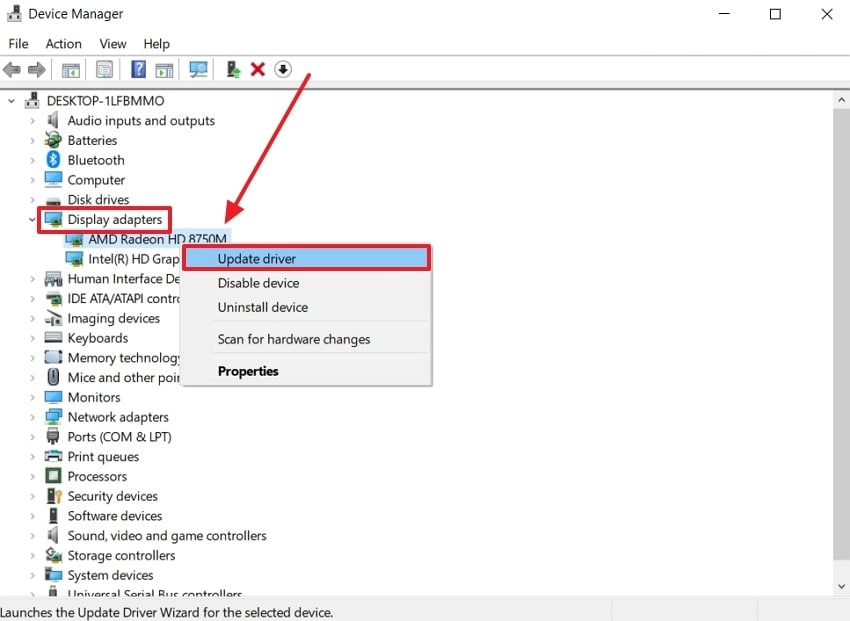
Step 1. Open the “Device Manager” by searching for it in the “Search” bar, located at the bottom taskbar.
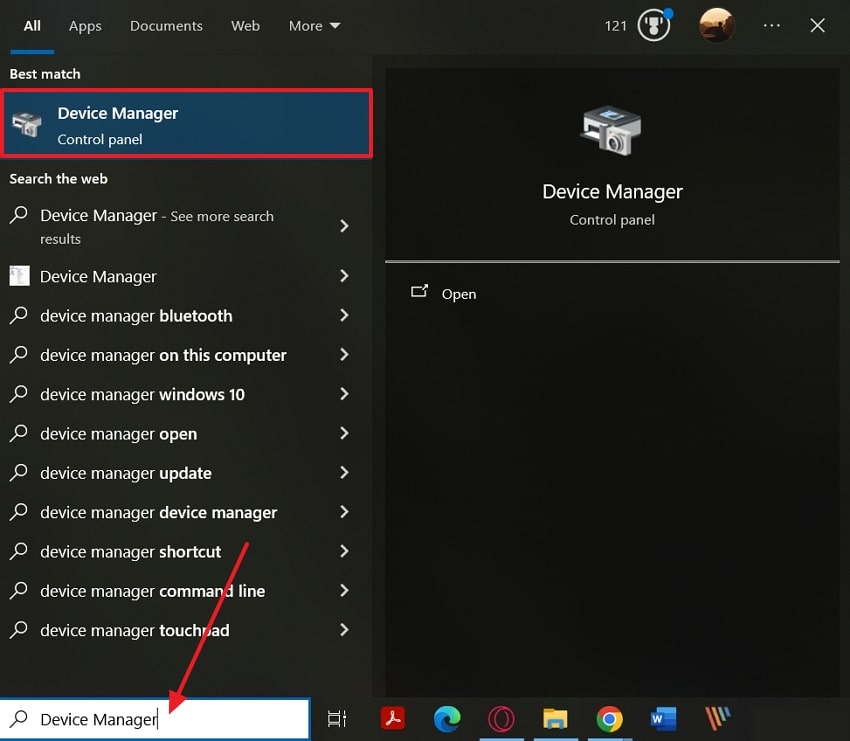
Step 2. In the opened Device Manager window, extend the “Display Adapters” option and right-click on the desired one. From the drop-down menu, select the “Update Driver” option and check if your Explorer is working or not.
9.Try System Restore as the Last Resort
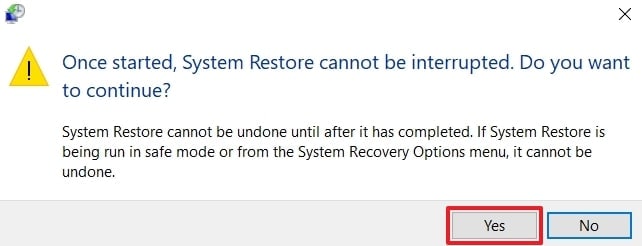
Lastly, if everything else fails, users can try the system restore method to fix the “the memory could not be read” issue. Sometimes, the Explorer application issue is caused by a new Windows installation, update, or another action. To fix this problem, turn to the following steps and undo all the problematic changes without losing any personal files and data:
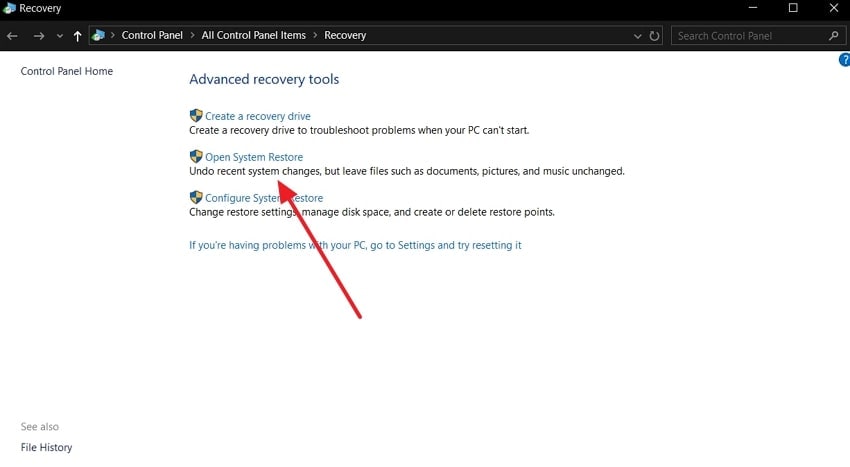
Step 1. Start by accessing the “Recovery” window through the “Control Panel Home” section. Now, click the “Open System Restore” under the “Advanced Recovery Tools” section to begin the restoring process.
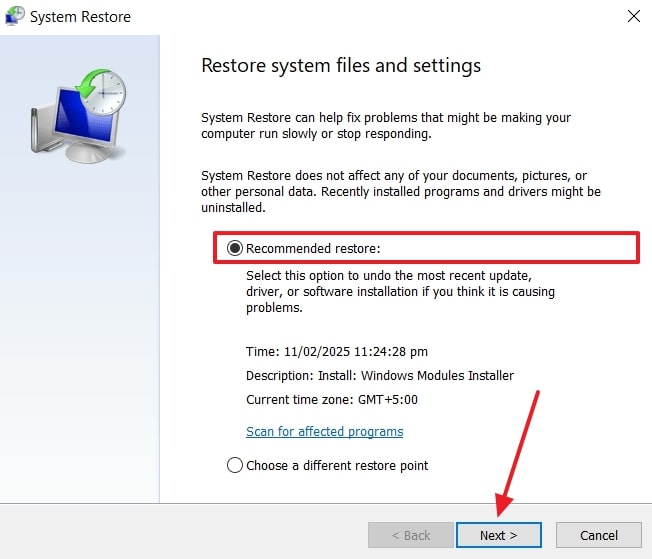
Step 2. Once the “System Restore” window opens, check the “Recommended Restore” option instead of the other one, and hit the “Next” button at the bottom.
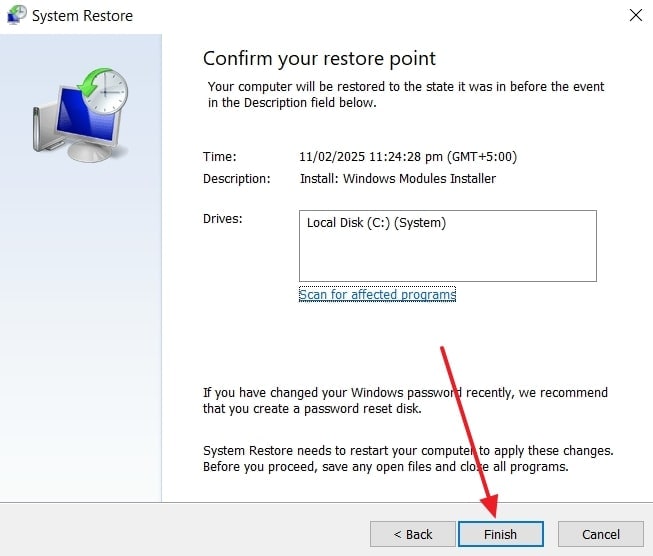
Step 3. Moving to the next “Confirm your restore point” window, hit the “Finish” button at the bottom right to reconfirm your Windows restoration point.
Step 4. On the final “Once started, System Restore cannot be interrupted. Do you want to continue” window, press the “Yes” button to proceed.
Part 3. Accidentally Deleted Important Files? Make Quick Recovery!
Sometimes, the Explorer.exe file error can cause your system to crash and result in important data loss. However, having Wondershare Recoverit in hand, you will be able to restore any accidently deleted files. Whether you've emptied the recycle bin or suffered a system crash, it can scan your system and retrieve files in a few clicks. Apart from this, the platform restores 1000+ types of files for users of every kind.
The recovery tool also helps restore files from over 2000+ storage devices, including lost data from Windows or deleted files from Mac. Besides this, you can restore videos, photos, and even documents from multiple devices. Its high recovery success rate ensures recovering deleted files with minimal hassle, regardless of their size. With this tool, you can also restore game data completely using its advanced scanning algorithms.
Key Features
- Recover Files NAS: Using this platform, individuals can retrieve lost files in NAS servers with a real-time recovery process without interrupting the work in its server.
- USB Data Recovery: While supporting all USB flash drive brands and types, the tool recovers 1000 plus file types within seconds.
- Excel Recovery: With the platform, you can recover deleted Excel files from all storage devices like file folders, hard drives, or SD cards.
Comprehensive Guide to Recover Deleted Important Files
After dealing with exe application errors, if you have faced an accidental deletion of files. In this situation, follow the steps provided below to retrieve them through a trustworthy tool like Recoverit:
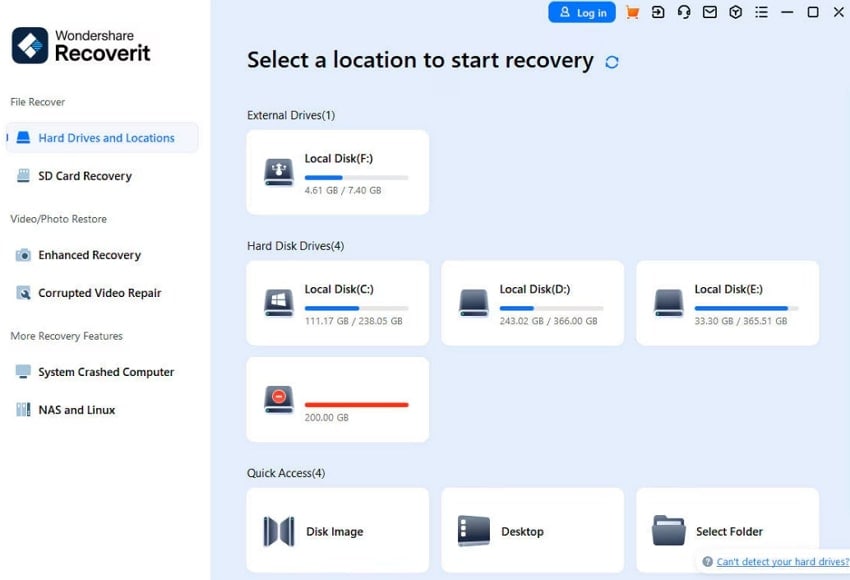
Step 1. Choose the Location for Scanning Data
Launch the program and reveal the default interface where “Hard Drives and Locations” are displayed on the left. From the current interface, select a hard disk under the Hard Disk Drive tab or desktop under the “Quick Access” tab. Finally, press the “Start” button to initiate the scanning process on the selected location.
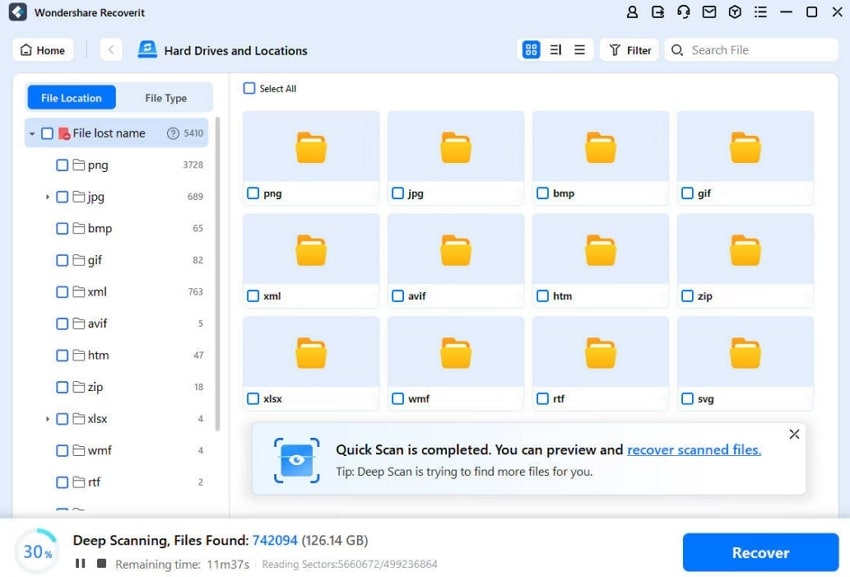
Step 2. Identify the Deleted Files for Recovery
During the scan, all deleted files will be listed under the "File Location" tab in the "File Lost Name" folder. Simply select the files you wish to recover and click the "Recover" button located at the bottom right.
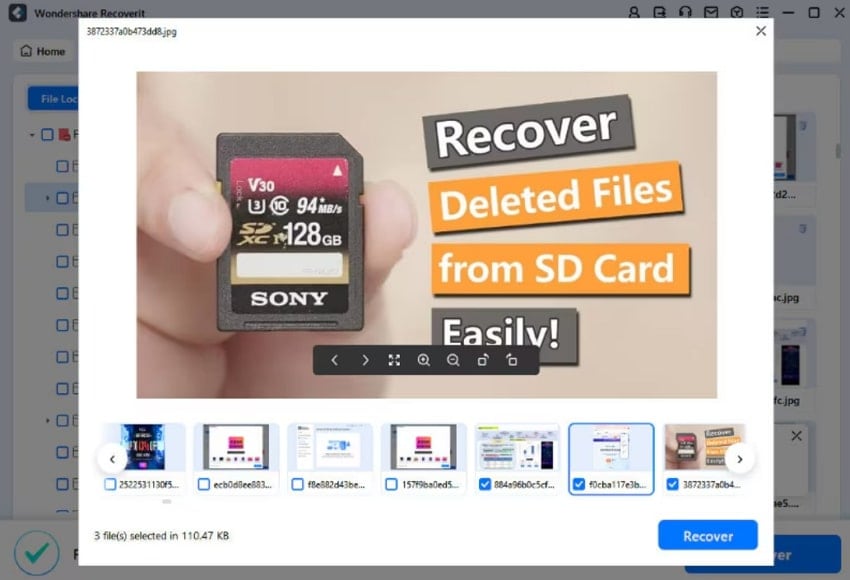
Step 3. Preview the Process and Recover the Files
With Recoverit, you can preview the recoverable files before heading towards the recovery step. After previewing, select your target files and press the “Recover” button to retrieve your files with accuracy.
Conclusion
Dealing with Explorer.exe errors on Windows 10 can be overwhelming, but with the right approach, you can restore smooth functionality. By following the 9 fixes mentioned earlier, users can prevent frequent Explorer crashes or slow performance. However, if you have accidentally deleted any file, using Recoverit is the only reliable solution.
FAQ
-
1. Can outdated drivers cause Explorer.exe errors?
Yes, outdated or incompatible drivers like graphic chipsets or storage drivers can cause Explorer.exe file crashes and errors in Windows 10. For example, an outdated graphic driver can lead to visual glitches in File Explorer, causing interruptions while opening images. -
2. What should I do if clearing File Explorer history doesn’t fix the issue?
If clearing the File Explorer history doesn't resolve the issue, it's possible that corrupted system files are causing Explorer.exe to crash. In this case, run the (SFC) and (DISM) scans to repair system files. -
3. What is the best recovery method for accidentally deleted files?
An accidental click on the delete button can cause sudden stress, but Wondershare Recoverit is the ultimate solution for this. With this platform, users can restore 1000+ file types from 2000+ storage devices with a few steps.


