
Jun 11, 2026 • Filed to: Windows Computer Solutions • Proven solutions
 TL;DR:
Resolve the WDF_violation BSOD error by isolating faulty drivers or hardware, specifically by renaming the HpqKbFiltr.sys file on HP systems, disconnecting USB peripherals, or utilizing Windows 10 recovery tools like SFC scans and Startup Repair.
● HP users can bypass driver conflicts by booting into Recovery Mode, opening the Command Prompt, and renaming the HpqKbFiltr.sys driver file to HpqKbFiltr.sys.bak.
● If removing USB peripherals does not work, boot into Windows Safe Mode to uninstall the Bluetooth driver via Device Manager or execute the sfc /scannow command to repair corrupted system files.
● When standard repairs fail, use WinRE to run a System Restore or perform a Windows 10 factory reset, and utilize Recoverit Data Recovery to retrieve any files lost during the troubleshooting process.
Ask AI for a summary
 ChatGPT
 Perplexity
 Gemini
 Claude
 Grok
Grok

BSOD errors have been the most frustrating errors for all of us. And resolving it the moment we find it is what we always have wanted. This article talks about stop code WDF_violation error. There have been lots of questions flowing all over the internet to fix stop code WDF_violation. That is why we felt like sharing the reasons for the errors and troubleshooting steps will be of great assistance to you. As we always believe in helping our readers if they are in a super dilemma. So here is the post that will help you fix the error of WDF violation on your own. Have a look.
Part 1: What Cause Stop Code DF_VIOLATION?
Here is a list of reason why get to see stop code WDF_violation error.
🔍 Technical Analysis: Core Triggers Behind WDF_VIOLATION Crashes
The Windows Driver Framework handles communication between your operating system and connected components. When a driver passes an invalid command structure directly into the system kernel, Windows stops execution to protect your hardware components. Review the primary trigger points below:
| Culprit Component | Root System Error Vector | Associated System Code / File |
| HP Keyboard Filter | Conflicting legacy keyboard driver configuration maps on HP hardware. | HpqKbFiltr.sys |
| Peripheral USB Links | Power-state mismatches or broken endpoint allocations in USB ports. | USBXHCI.sys / Wdf01000.sys |
| Bluetooth Transceivers | Outdated wireless stack profiles or memory leakage during initialization. | BthPort.sys |
| Corrupted Core Files | Interrupted updates or disk errors that damage critical system binaries. | Wdf01000.sys (Framework Root) |
Part 2: How to Fix Stop Code WDF Violation
Solution 1: Rename the Conflicting HpqKbFiltr.sys Driver (HP Devices)
A common cause of the WDF_VIOLATION crash on HP laptops and desktops is an outdated keyboard filter driver file. Renaming this file prevents the Windows kernel from calling up the broken driver code during startup.
- Boot Into the Windows Recovery Environment (WinRE)
If your PC cannot boot to the desktop, turn it on and off three times consecutively using the physical power button to trigger WinRE. Alternatively, insert a bootable Windows installation USB drive, select your language, and click Repair your computer.

- Launch the Native Command Prompt Console
From the main recovery screen, click on Troubleshoot, select Advanced options, and click directly on Command Prompt to open an elevated administrative console space. - Navigate and Execute the Driver Rename Commands
Type the following commands into the console window one by one, pressing Enter after each line to move into your system drive directory and rename the broken driver extension safely:c:
cd Windows\System32\drivers
ren HpqKbFiltr.sys HpqKbFiltr.sys.bak - Exit the Console Environment and Reboot
Typeexitand press Enter to close the Command Prompt interface. Click on Continue to exit the recovery menu and boot back into Windows normally to confirm the crash loop has stopped.
Solution 2: Disconnect All USB Peripherals
Many times, stop code WDF_violation is caused because of some USB peripherals. So, to fix this problem you can try disconnecting all the USB peripherals from your computer. Mouse, camera for instance!
If the above tactic did not work you may disable the USB ports from the BIOS section. Follow the below steps to do the same.
Tip: In this below tutorial some of the keys that are used to enter the BIOS while disabling the USB ports could be different as it depends upon the version of BIOS you are having. So, you need to follow the instructions shown on your screen, the below tutorial is just for reference.
Step 1: To Enter into the BIOS section you need to restart your computer and keep pressing the "F2" key or "Del" key to enter BIOS.
Step 2: Once you've reached to the BIOS, navigate to "Advanced Tab" followed by "Miscellaneous Devices" and after that "External USB Ports", and then "disable External USB ports".
Step 3: Upon the completion of the above processes, you need to Save and exit the BIOS.
Step 4: Subsequently, you have to restart your computer and see if that whether you've successfully stop code WDF_violation.
Solution 3: Remove Unstable Wireless and Bluetooth Drivers in Safe Mode
If a faulty Bluetooth transceiver link is causing your system to crash, you must drop into a minimal safe boot state to strip out the problem driver files without the system crashing mid-process.
- Trigger Windows 11/10 Safe Mode Boot Options
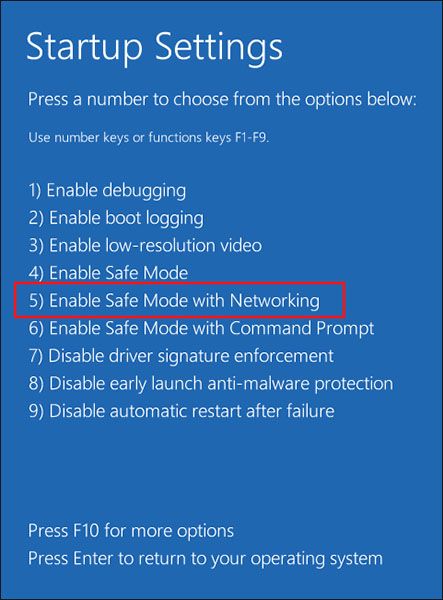
In the WinRE environment, click Troubleshoot > Advanced options > Startup Settings, and then click the Restart button. - Enable Safe Mode with Networking
When the startup options menu appears on your monitor, press the F5 key on your keyboard to select Enable Safe Mode with Networking. This loads Windows with a bare-minimum set of active system drivers.
- Open the Windows Device Manager Platform
Once your desktop loads in Safe Mode, right-click on the Windows Start Menu icon (or press Win + X) and select Device Manager from the administrative options list. - Uninstall the Target Bluetooth Controller Driver
Expand the Bluetooth directory section. Right-click your primary wireless hardware adapter (such as Intel Wireless Bluetooth or Realtek Bluetooth Adapter) and select Uninstall device. Check the box that says Delete the driver software for this device and click Uninstall.
- Restart to Re-initialize the Driver Stack
Restart your computer normally. Windows will automatically detect the wireless card hardware and install a clean, fresh copy of the factory driver file to replace the broken one.
After the successful completion of all the above steps, you have to restart your computer to check whether the problem is now solved or not.
Solution 4: Run System File Checker
WDF_VIOLATION blue screen error can also be caused because of a corrupted system. So, to fix it you need to run System File Checker (SFC) in the safe mode of Windows 10.
Step 1: Start with running the command prompt as admin in the Safe Mode.
Step 2: Once you've opened the Command Prompt window as an administrator, you need to enter the command "sfc /scannow" and hit the Enter button. Once you've done the previous processes you need to wait until the system file check is finished.
Step 3: After the successful completion of all the above steps, please make sure to reboot your computer to check whether the WDF_VIOLATION error is still there.
Tip: Windows installation disk can also be used in the beginning to open Command Prompt. All you need is to follow the following path, go to "Repair your computer" followed by "Troubleshoot". After that, choose "Advanced options" and further click on "Command Prompt" to open it.
Solution 5: Run Startup Repair
There are times that users are unable to enter into Windows Safe Mode to resolve the issue. Therefore as a better alternative, running a Startup Repair is a great choice. Here is how you can do that.
Step 1: You can find "Startup Repair" in the Windows Repair Environment (WinRe) or else you may use the Windows installation disk by which you can boot your PC and after that click on "Repair your computer".
Step 2: Upon doing this, you can click on the "Troubleshoot" option followed by "Advanced Options".
Step 3: After that, go to "Startup Repair". Now you need to select the target operating system to solve the problem. The problem will be found by Windows and it will fix that by itself.
Step 4: You can now restart your computer to check whether the problem is fixed or not.
Solution 6: Perform a System Restore
Sometimes it is better to just perform a System Restore if nothing is working for your problem. System Restore is capable of solving lots of problems such as it will resolve all the issues that are causing your computer slow or not letting it to respond at your pace, it will fix your windows by taking it back to the normal state.
If you already have created your restore point you can use it to restore your system to the normal state by fixing all the current issues such as to stop code WDF_violation. Follow the below steps to do the same:
Step 1: You need to go to the safe mode and press the "Win + S" key to open the Search. Proceed by entering "Restore" in the search box and select the option "Create a restore point" from the appeared results.

Step 2: After following the above step, you need to go to the "System Protection" tab and select "System Restore".

Tip: Here is an alternative for you; you may also navigate to System Restore in WinRE. Just follow the following steps to do so: Head to the "Troubleshoot" followed by "Advanced Options" and after that, you need to go on "System Restore". Once you've done that you need to select the user account and enter the corresponding password.
Step 3: Once you see the "System Restore" window, simply click on the "Next" button.
Step 4: After that, you need to select the system restore point, whichever you want to use, and proceed by clicking on the "Next" button.

Step 5: After that, you have to follow the instruction that is guided on the screen to finish the process.
Tip: System Restore is not going to affect any of your data. However, it will reset all the settings and uninstall the programs along with drivers that are recently installed.
Solution 7: Reset or Reinstall Windows
If any of the above methods didn't solve the issue, try to use the following steps to factory reset your Windows 10 as the last resort.
Step 1: You need to open "Settings" in the first place.
Step 2: Followed by that, you have to go to "Update & Security".
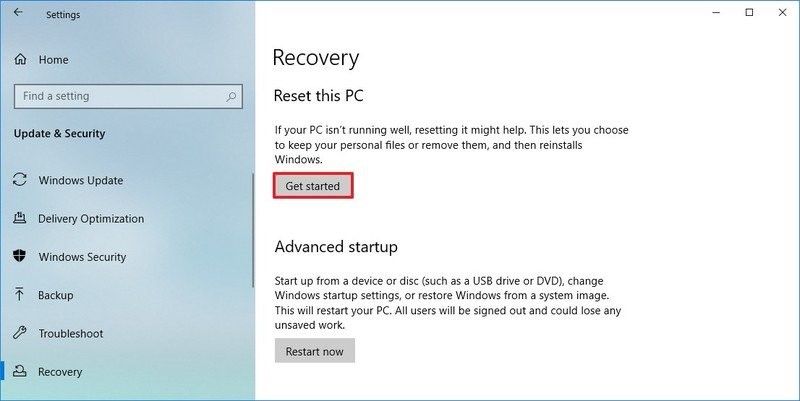
Step 3: Further go to "Recovery".
Step 4: After that click on the "Get started" button underneath the "Reset this PC" section.
Step 5: Afterwards, go to the "Keep my files" option.

Step 6: After performing all of the above steps, proceed to click on the "Next" button. You may also click on the "List of apps to be removed" option.

Step 7: Now you need to select all those apps that you think you'll need to reinstall after the "reset to factory" settings.
Step 8: Click on the "Back" button followed by the "Reset" button.

Part 3: How to Rescue lost data due to Stop Code WDF_violation?
Technical glitches are nothing new and performing certain steps to fix these can easily lead to one of the common problems and that is 'data loss.' This is one thing that anyone of us cannot afford. If this is the case with you and you are struggling to get your important data back, we recommend you Recoverit Data Recovery. Promising the full security and 100% recovery capability, the tool stands out for it has gained millions of users in the past few years.
If you want to recover your data on the computer you need to do the following 3 steps. Here are those.
Before you start, make sure to launch the program after downloading and installing it. Now follow the steps below.
🛡️ Core Recovery Capabilities: Recoverit Crash Recovery Engine
When a WDF_VIOLATION crash halts your computer during an active data write cycle, it can leave your file system cluster maps in an unreadable state. Wondershare Recoverit uses a dedicated sector-carving engine to bypass broken Windows systems and extract your files safely:
| BSOD Crash System State | Data Rescue Success Rate | Target Sector Carving Path |
| Boot Loop Storage Freezes | 99.4% Success Rate | Generates a bootable WinPE USB drive to extract files directly from raw memory channels. |
| Interrupted Registry Edits | 96.8% Success Rate | Bypasses corrupted operational system configurations to pull data from raw drive sectors. |
| System File Checker Overwrites | 95.2% Success Rate | Recovers original data blocks that may have been moved or modified during system file repair operations. |
| Forced Clean OS Reinstalls | 93.7% Success Rate | Scans formatted NTFS/FAT32 volumes to find and rebuild lost directory trees. |
Step 1: Select a location
If you want to recover your data you need to select the specific location from where you have lost your data. You can select any hard disk underneath the "Hard Disk Drives" tab or you may also select Desktop under the "Select location" tab. To commence the process, you need to click "Start"

Step 2: Scan the location
Once you click the button, the scanning will begin at the selected target. Recoverit will be searching the whole target and the process may last for a few minutes. However, if there are large-sized files it may take hours to complete the process successfully.

Step 3: Preview and recover files
Recoverit shows you all the recoverable files and the user can preview it before proceeding to the next Recovery step. To retrieve your file you have to select the targeted files and click on the "Recover" button.

Recoverit supports all kinds of files including images, videos, documents, audios, Outlook emails, and many more.
The Bottom Line
By now, we hope this article has helped you to stop code WDF_violation. We've mentioned all the reasons why you might be facing this problem. Moreover, all the related tutorials are also listed above that will help you solve your issue with ease. If you have the case of crucial data loss, you needn't fret upon it. The tool introduced above i.e. Recoverit Data Recovery is there to recover all kind of your data easily, that have been lost in any of the processes.
People Also Ask
-
What exactly is the relationship between Wdf01000.sys and the WDF_VIOLATION error?
The file Wdf01000.sys is the core binary file for the Windows Driver Framework runtime library. When a third-party driver tries to execute an illegal command or accesses restricted memory locations, the framework catches the error and stops the system to prevent damage, displaying `Wdf01000.sys` on the blue crash screen. The framework itself is rarely broken; rather, it is usually acting as the messenger flagging an error caused by a different, faulty driver file. -
How can I use the Windows BlueScreenView tool to find the exact broken driver?
If your computer can boot into Safe Mode, you can download a lightweight minidump reading utility like BlueScreenView. When you open it, the tool automatically reads the crash log files saved in your `C:\Windows\Minidump` folder. It highlights the exact driver files involved in the crash in red. If you see files like `Rtwlane.sys` (Realtek Wi-Fi) or `Nvlddmkm.sys` (NVIDIA Graphics), you'll know exactly which hardware driver needs to be updated or reinstalled. -
Why does a WDF_VIOLATION error sometimes occur immediately after a Windows 11 update?
Major Windows updates often bring changes to internal kernel security policies and system memory layouts. If an older driver installed on your computer is not fully compatible with these new security configurations, it will trigger a memory fault the next time it tries to load into the updated kernel space. Checking for optional driver updates or installing the latest device updates from your computer manufacturer's website will usually resolve these post-update compatibility issues. -
Can a failing external USB hub trigger a constant WDF_VIOLATION boot loop?
Yes, a physically damaged USB hub or an overloaded external port can cause power fluctuations or drop communication lines while the computer is running. This forces the Windows USB controller driver (`USBHUB3.sys`) into an unrecoverable state, resulting in an immediate system freeze and blue screen. If you suspect an issue, unplug all external hardware links and connect your keyboard and mouse directly to the ports on your computer's motherboard instead.
Computer Troubleshooting
- Win System Crash
- Crack Bios Password
- Fix Run Dll Errors
- Fix Taskbar Disappeared Error
- Fix BootMGR Image Corrupt
- MBR Errors Fixed
- Windows Tips
- How to Edit DLL Files
- How to Test Hard Drive Speed
- Bootcamp Windows 10 No Sound Issue
- Download iCloud on PC
- Difference between File Systems
- Fix Computer Overheat
- Computer Problems
- Best Bad Sector Repair Tools
- Audio Not Working in Windows 10
- Fix Windows 10/11 Error Code 0xc000014c
- Fix Windows 10 Error Code 0xc0000034
- SMART Status Bad Error
- Fix Grub Loading Error
- Remove Admin Password
- Blue Screen Errors


David Darlington
staff Editor