
 TL;DR:
Configuring a QNAP NAS as a DLNA or Emby media server allows you to stream local photos, music, and videos directly to DLNA/UPnP-compatible receivers over your home network.
● Before activating the server, you must first enable the Media Library service, install the Media Streaming add-on, and manually enable sharing for new media receivers.
● Automatic subtitle embedding and on-the-fly video transcoding require the CodexPack installation, with subtitle files placed in the exact same folder and sharing the identical name as the video file.
● If playback hangs, switch your network to non-overlapping wireless channels like 1, 6, or 11, and use Wondershare Recoverit via a wireless connection to restore any accidentally deleted media to a new drive path.
Ask AI for a summary
 ChatGPT
 Perplexity
 Gemini
 Claude
 Grok
Grok

Are you looking for a way to enjoy multimedia content by accessing it from QNAP NAS on UPnP or DLNA? If yes, the DLNA media server for QNAP NAS will be your helping hand to achieve this goal. You can also run DLNA through the Emby QNAP server. Let’s get into a detailed discussion on what a QNAP DLNA media server is and how you can use it to access content from NAS on your smartphone, computer, TV, etc.
Part 1. What is DLNA Media Server?
In case you don’t know, DLNA is the short form of the Digital Living Network Alliance. It was developed by QNAP Systems, Inc. and was introduced around nineteen years ago, in 2003, as of writing this article.
As far as the Emby QNAP/DLNA media server for QNAP NAS is concerned, it helps you access multimedia content on various DLNA devices from NAS. It not only enables you to stream multimedia content from NAS on different DLNA devices but also improves your viewing experience greatly.
The good news is that you can now configure your NAS as the DLNA server to access media files from a NAS, thereby using your home network. The type of content you see on the DLNA server totally depends on the multimedia console settings and your account permissions.
Key Features of DLNA Media Server
Below is a list of the top features of the Emby server QNAP/DLNA media server.
- A potential feature of the DLNA Media Server is to help various devices (connected to the same network) access multimedia files from QNAP NAS.
- It enables you to browse media content on DLNA-certified appliances. You can configure the browsing settings on these appliances.
- Based on your network, QNAP Emby /DLNA media server features an auto selection of the network interface.
- When accessing multimedia files, it boosts your visual experience.
Performance of DLNA Media Server
You can quickly connect DLNA-compatible appliances to your home network. It is pretty similar to connecting your mobile device or personal computer. As soon as you create a successful connection, you can select the folders from the TV screen on the media server. This way, the DLNA media server helps you access multimedia files from QNAP NAS in no time.
This is a highly efficient source to experience the joy of high-quality videos, photos, music, etc. Though you get access to extremely efficient content through the DLNA media server, there are a few rooms for improvements if you are not getting the desired results. Let’s quickly look at how you can improve your streaming experience.
- Try assigning different wireless channels, especially the ones that are non-overlapping, like 1, 6, and 11.
- Try changing the location of your device until you find a good place.
- Using a USB extension cable also results in boosting your streaming experience sometimes.
So, the next time you face any similar issue, try implementing the above-listed suggestions. You will surely see a clear difference.
User Reviews on DLNA Media Server
As far as the user reviews are concerned, there is not enough data available online to pass any solid comment on how a QNAP DLNA media server performs. But we can surely help you understand the credibility of this tool based on our understanding and experience using it.
Talking about its primary function, i.e., accessing media data from QNAP NAS on DLNA appliances, it performs everything wonderfully well. In addition, when it comes to your experience watching videos or listening to music, it adds extra value to it.
Moreover, the automatic selection of the network interface keeping your network in mind, is another fascinating factor associated with the QNAP DLNA media server. Try it and you will be surprised to see its performance and efficiency for sure.
Pros and Cons of DLNA Media Server
A list of a couple of advantages equipped with one drawback is presented below.
Pros
It makes it easy for you to access media content from NAS on UPnP or DLNA-compatible devices.
It takes a step forward to give your viewing experience a solid boost.
Offers easy configuration of general, browsing, and user account settings.
Enables you to set the configuration of your NAS as the DLNA media server.
Cons
Some people have claimed that it gets stuck or sometimes hangs when accessing multimedia content.
Other than that, there is no negative remark found on the DLNA media server so far.
Part 2. Does QNAP Support DLNA?
Yes, QNAP offers great support for the Digital Living Network Alliance (DLNA). This is why you can easily configure QNAP NAS as the DLNA server/Emby server QNAP. As a result, you will be able to access multimedia files (including photos, videos, music content, and other similar stuff) from NAS on DLNA appliances through the home network you have. It all happens in a matter of a few minutes.
Part 3. How to Enable DLNA Media Server on Qnap?
This section presents a detailed discussion on enabling your DLNA media server, along with prerequisites and enjoying multimedia content on UPnP or DLNA devices. Learn more about how to set up your Emby server QNAP for the first time.
To enable the DLNA media server for NAS, you just have to follow the quick steps presented below.
- Open the “Control Panel”
- Click on “Applications”
- Choose “Enable DLNA Media Server”
- Hit “Apply”
Let’s now move toward the prerequisites.
Prerequisites
A few prerequisites you must be aware of are listed below.
Step 1. Go to the “Control Panel,” tap on “Applications,” and choose “DLNA Media Server.” Then, select “Enable DLNA Media Server.” Doing this will help you enable the QNAP NAS DLNA media server, as stated above.
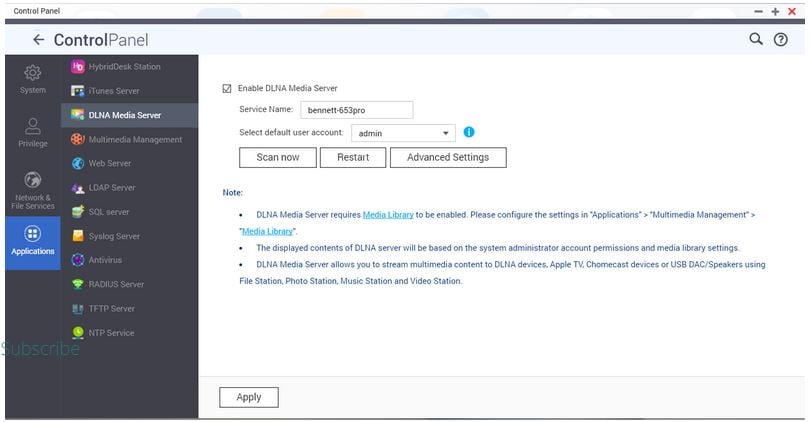
Step 2. Make sure the Media Library service is enabled before you start using the QNAP Emby/DLNA media server for NAS. To enable the Media Library service, follow the below points.
- Navigate to the “Control Panel”
- Go to “Applications”
- Tap on “Media Library”
- Choose “Enable Media Library”
Step 3. It is time to ensure the Media Streaming add-on is already installed. If not, do it first.
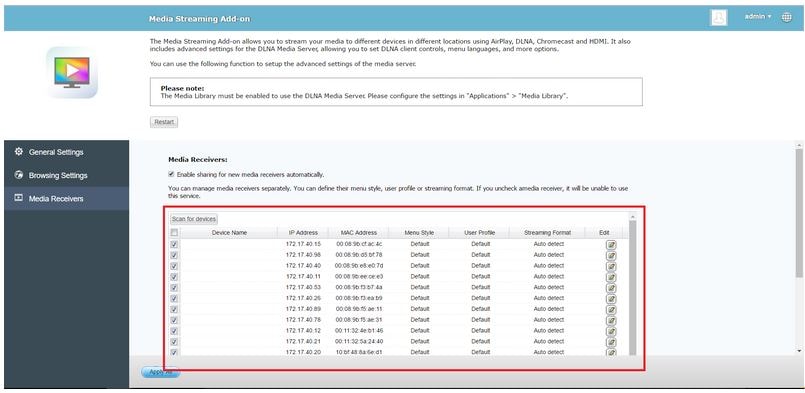
Step 4. Now, enable the option to share media with new receivers. For this, follow the below-listed points.
- Go to “Media Streaming add-on.”
- Click on “Media Receivers.”
- Now, tap on “Enable sharing for new media receivers.”
Note: If you want to improve DLNA stream quality, try installing CodexPack. It will surely make your streaming experience memorable.
Setting the DLNA media server on QNAP NAS
You can set the NAS DLNA media server in 4 simple steps, as given below.
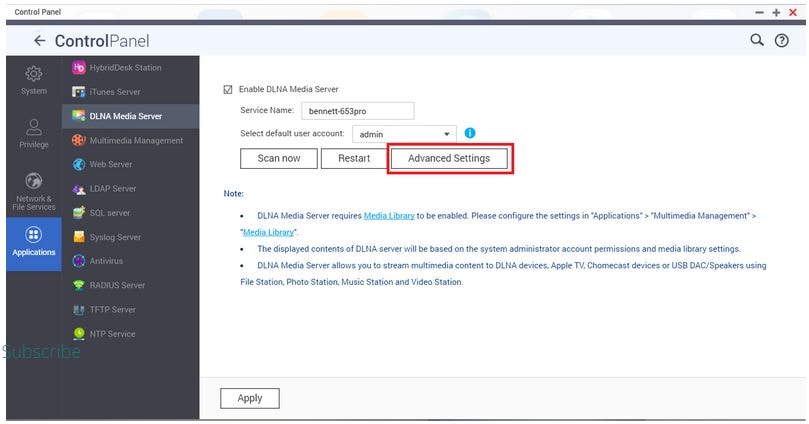
Step 1: Open “Media streaming add-on” or tap on “Advanced Settings.”
Step 2: This step is about configuring general settings.
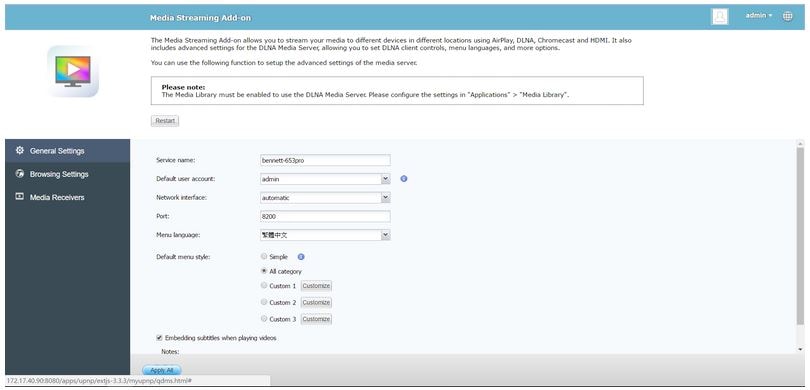
Let’s discuss the parameters displayed in the above image.
- “Server name” is the name of your DLNA media server for QNAP NAS.
- “Default user account” is your account where you will be able to view multimedia content.
- In the “Network interface” section, you have to select a specific network interface. If you choose “Automatic,” it means that your DLNA media server will be able to access all network segments from the NAS server.
- “Port” refers to a particular port used by your NAS DLNA media server.
- “Menu language,” asks you to choose a specific language you feel comfortable with.
- The “Default menu style” option enables you to choose either the default or custom menu style.
Note: The media receivers do not support all languages. Therefore, if you want subtitles to be embedded automatically into the videos, make sure you have enabled the option “Embedding subtitles when playing videos.” This is not possible until you have CodexPack installed on your device.
The “on-the-fly” option is used to transcode videos. One more thing you need to ensure is your subtitle files are in the same folders as the videos, and their names must also be the same.
Step 3: Here, we will learn about configuring browsing settings.
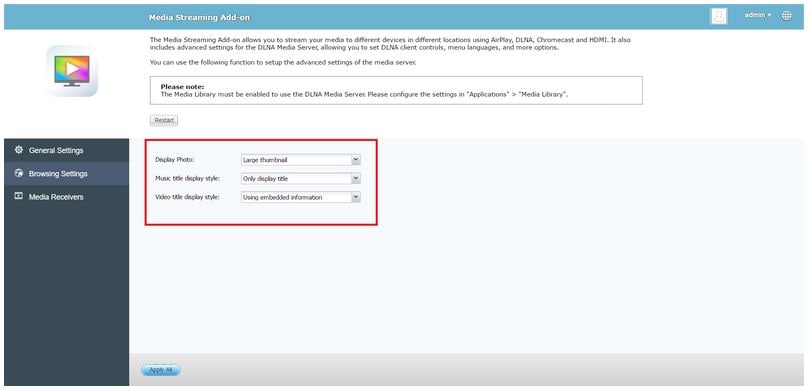
Click on all three dropdown menus to choose an appropriate option for “Display Photo,” “Music title display style,” and “Video title display style.”
- For Display Photo, you have to choose one option from “Original” and “Large thumbnail.”
- The different options for “Music title display style” you will find in the dropdown menu include Track-Title/Artist-Album, Title/Artist, Title/Album, and Track-Title.
- The two options for “Video title display style” are “Using file name” and “Using embedded information.”
Step 4: Here, you will see the list of all media receivers, including but not limited to Mac addresses, IP addresses, and device names.
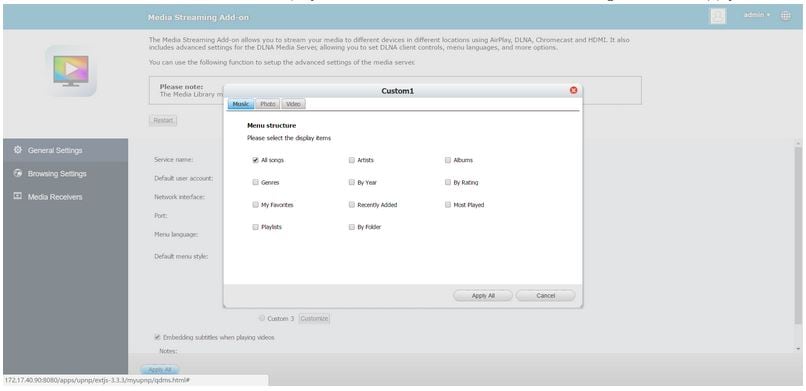
Now, go to the “Menu Style,” and set the display items, as shown below.
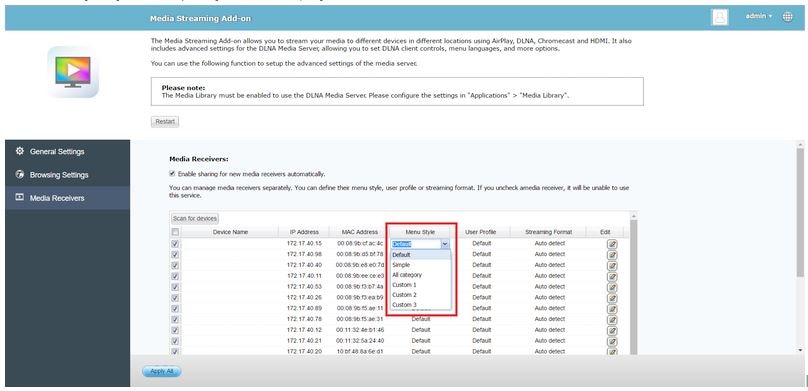
It is time to set the user account from “User Profile.” Based on the privileges and features of every user account, you will be able to view the content accordingly.

Enjoying Multimedia via DLNA/UPnP
Have you configured the DLNA media server for QNAP NAS successfully? Perfect! Now, you can browse or search for all folders to view photos and play music or videos. This section describes how to stream multimedia content with DLNA/UPnP devices by presenting examples of a BubbleUPnP and Samsung TV.
BubbleUPnP
Within 4 convenient steps, you get complete access to multimedia content from NAS on BubbleUPnP.
Step 1: Open the app, tap on the three horizontal lines from the top-right corner, and select your NAS.

Step 2: You will now see a list of photos, videos, music files, and folders on your app screen, as shown below. Choose the one you want to go through.

Step 3: Once you choose the desired folder or file, the application will show you the menu style. You can modify this menu style by following the steps given below.
- Navigate to “Media streaming add-on.”
- Go to “General Settings.”
- Tap on “Default menu style.”

Step 4: Now, you can easily play your favorite multimedia content.

Samsung TV
You will have to follow the 4 simple steps (as listed below) to stream multimedia content on your Samsung TV.
Step 1: On your TV remote, press the “Source” button, and select your NAS.

Step 2: Now, you will be able to see folders, photos, videos, and music files on your TV, as shown below.

Step 3: Once you select a specific folder, Samsung TV will show you the menu style. You can also modify this menu style by following the three steps presented below.
- Go to “Media streaming add-on.”
- Tap on “General Settings.”
- Hit “Default menu style.”

Step 4: Now, you are free to play content on your Samsung TV.
Part 4. The Best Software To Help You Recover Media Data from Your QNAP NAS
We have seen many incidents when people lose their media content from QNAP NAS all of a sudden. This is where they get extremely worried, and of course, they have a solid reason behind it. No one wants to experience this case. To deal with this severe problem, this article presents Wondershare Recoverit.
Well, Recoverit is a high-performance data recovery software launched by Wondershare in 160+ countries with more than 35 registered patents. This tool not only helps you recover your media content from NAS, but it also supports more than 2000 storage media. In addition, you can restore any type of media file, like photos, videos, music files, audio files, etc., with this program.
All these factors have contributed to convincing over 50 million people across the world to download Recoverit and get the maximum out of its data recovery power. Give it a try, and it will not disappoint you at any cost.
For Windows Vista/7/8/10/11
For macOS X 10.10 or later
Steps to Use Wondershare Recoverit to get Your Media Data Back
Just follow the four steps listed below and you will get your deleted or lost media data back instantly. The advanced recovery feature makes the overall process super convenient and efficient at the same time.
Step 1: Once you download Recoverit on your system, open the software. Then, tap on “NAS and Linux” and click on “NAS Recovery.”

The program will start looking for detectable NAS devices.
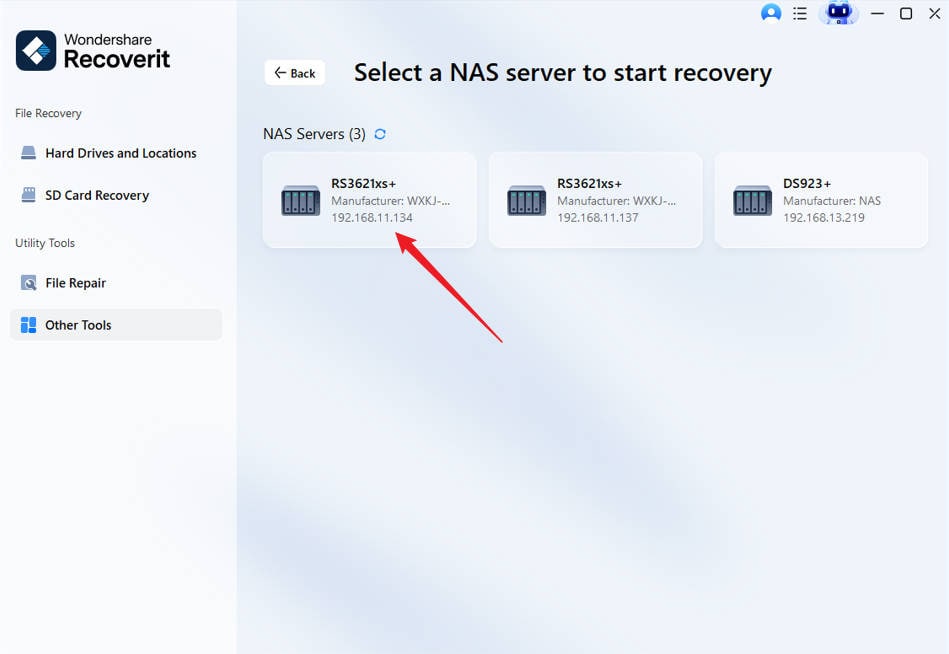
Step 2: Now, you will be able to see a couple of NAS devices on your screen. Select the one where you lost the data.
Step 3: This step will allow you to connect your NAS device wirelessly. For this, you have to click on the “Connect” button. Leave the rest on Recoverit.
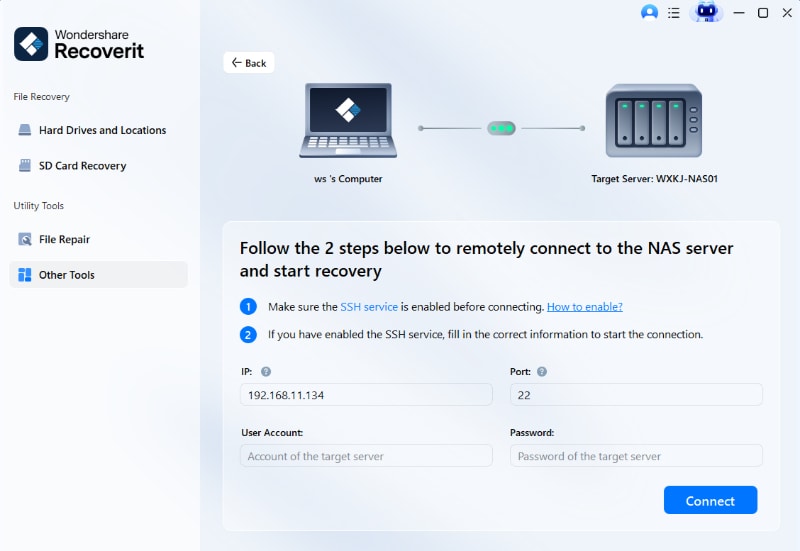
After creating a successful wireless connection to connect your NAS device, Recoverit will start looking for the lost or deleted media data from the selected NAS. You can monitor the scanning status at the bottom of the program’s window, as displayed below.

Step 4: Here, you will preview the scanned data and recover it once you are sure that what you have previewed is the one you want to recover.

Once you are done, the software will now ask you to select a particular path where you want to save the recovered media files on your system. While choosing this path, always keep in mind that it should be different from the path where your files were deleted or lost earlier.

Video Tutorial on How to Recover Files from NAS Server?
For Windows Vista/7/8/10/11
For macOS X 10.10 or later
Takeaway
DLNA media server/Emby server QNAP is a great tool to get complete access to high-definition media content from NAS on your devices, like a computer or mobile phone, through the house network. It is known for providing you with a seamless viewing experience.
In case you have lost some important media data, or it is deleted mistakenly from your QNAP NAS, there is nothing better than downloading Wondershare Recoverit and benefiting from its quick and strong data recovery algorithms with over 95% chance of getting your data back. Give it a try, and it will help you recover your media files successfully on the very first attempt. Good Luck!
For Windows Vista/7/8/10/11
For macOS X 10.10 or later


