
 TL;DR:
You can establish remote file access to your Synology NAS from Windows, macOS, or Linux devices by configuring Network File System (NFS) settings in DiskStation Manager (DSM).
● Activate the protocol version under Control Panel > File Services, then use File Station properties to assign read-only or read-write privileges to specific folders.
● Secure the shared data from unauthorized network entry by explicitly defining allowed remote device IP addresses within the NFS Access Settings.
● Avoid routing highly sensitive information through these shared folders since NFS connections lack default encryption, and implement regular backups to prevent remote data loss.
Ask AI for a summary
 ChatGPT
 Perplexity
 Gemini
 Claude
 Grok
Grok
Accidentally deleted important files on Synology NAS?
No worries. Wondershare Recoverit can get back your lost files within 3 steps. The ultimate and professional NAS data recovery software is totally reliable and 100% safe.
Have you ever wanted to open your files from a different device and realized you couldn’t? NFS on Synology NAS is a perfect solution to your problem of accessing your data remotely. With NFS, you can access all your data anytime from anywhere in the world.
Now, you need to set up NFS on Synology NAS, but how do you do that? Whether a business or an individual, this guide will help you to successfully set up NFS on your Synology NAS, allowing you to access your files from anywhere with an internet connection.
Why Should You Use NFS on Synology NAS?
Network File System (NFS) is a file-sharing protocol between computers that allows you to access files on a Synology NAS from a remote device. Setting up NFS on Synology NAS provides a convenient way to access large amounts of data stored on your Synology NAS.
With NFS, you can easily access your NAS files from a Windows, macOS, or Linux device without the need for complicated file transfer methods. That makes NFS an ideal solution for businesses and individuals who want to access their data from multiple devices or locations.
Overall, NFS can be a valuable addition to your Synology NAS, providing easy remote access, improved collaboration, and increased flexibility in accessing and sharing your data. NFS can help both individuals and businesses become more productive and efficient with their data storage and management needs.
How To Set Up NFS on Synology NAS?
Setting up NFS on your Synology NAS isn’t as hard as you’d think. Therefore, you should check out these few steps for the easiest NFS setup possible. You’ll be able to set up NFS in just a few moments.
Step 1. Enabling Synology NFS Services
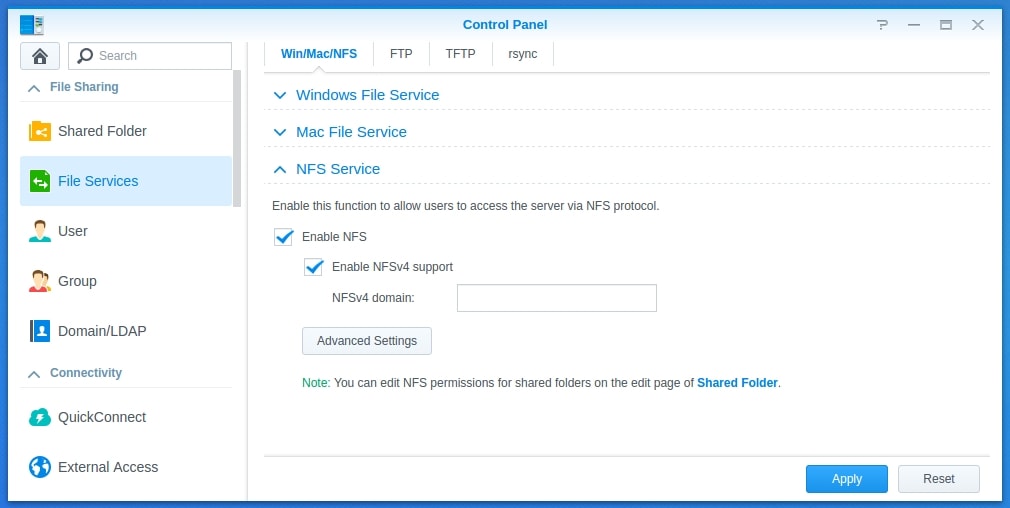
- Log into the DSM (DiskStation Manager) web interface to enable NFS on your Synology NAS.
- Then, navigate to the Control Panel and select File Services. Under the File Services tab, scroll down to the NFS section.
- On the NFS page, simply click the Enable NFS button to activate the NFS service on your Synology NAS. Then, in the NFS Service settings, select the NFS Protocol Version you want to use. Click Apply to save the changes.
You’ll soon be ready to start sharing your NAS folders using NFS. Enabling NFS services is the first step in setting up NFS on your Synology NAS, and it’s crucial to ensure that your NFS configuration is secure and configured correctly to avoid any security risks.
Step 2. Choose a Folder for NFS
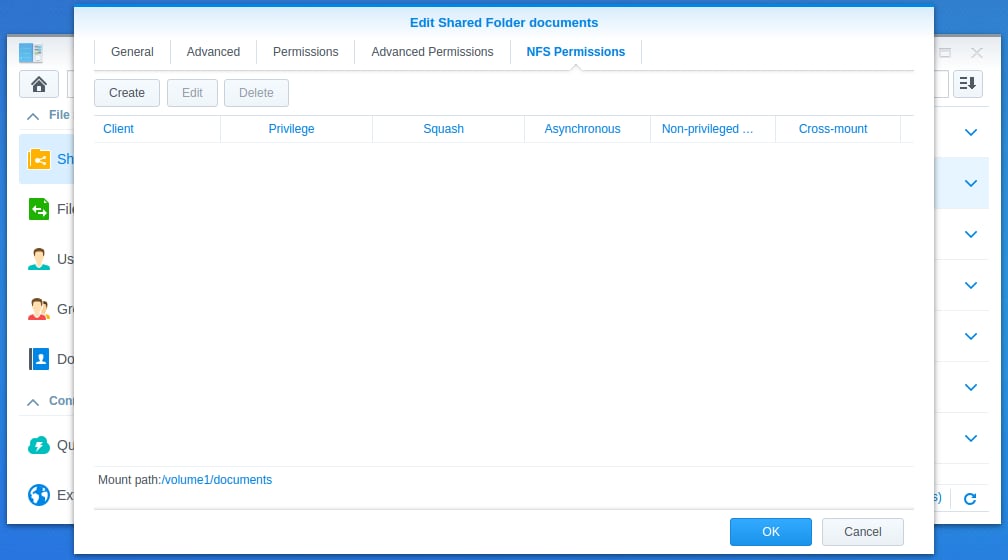
Once NFS is enabled, you must select a folder on your Synology NAS to share via NFS.
To do this, navigate to the File Station and choose the folder you wish to share. Right-click on the folder and select Properties. From the Properties window, select the NFS Permissions tab. Here, you can configure NFS access for specific users or groups.
There are some things to consider when choosing a folder:
- Determine the purpose of the folder you want to share. It will help you determine what files and subfolders you should include in the shared folder.
- Consider the size of the folder you want to share. Large folders may take longer to transfer, so it’s best to avoid sharing large folders if possible.
- Make sure to choose a folder that contains only files that are safe to share. Sharing sensitive files isn’t recommended, as NFS isn’t encrypted by default.
Step 3. Set Up Permissions
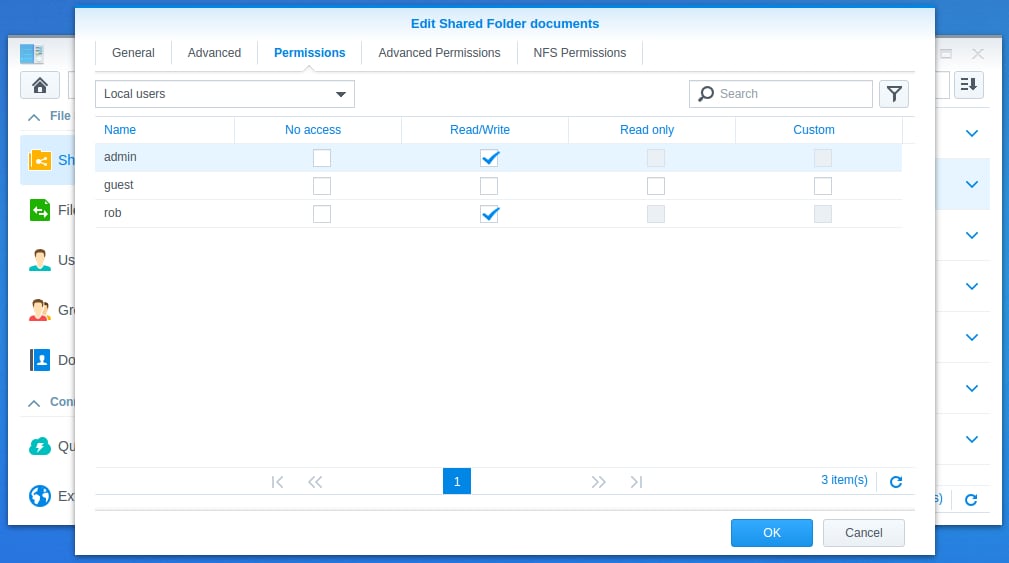
Another thing you need to consider is who will be accessing the shared folder and what permissions they will need. It will help you determine the appropriate access controls for the shared folder.
In the NFS Permissions tab, you can set the NFS permissions for the selected folder. There are several permissions options available, including read-only, read-write, and no access. You can also specify the access privileges for individual users or groups. When configuring NFS permissions, it is crucial to consider the level of security you require for the shared data.
By setting up permissions, you can control who has access to the NFS share and what they can do with the shared files. This way, you can prevent users from modifying or deleting files they do not have permission to change.
Step 4. Choose the Device IP Address
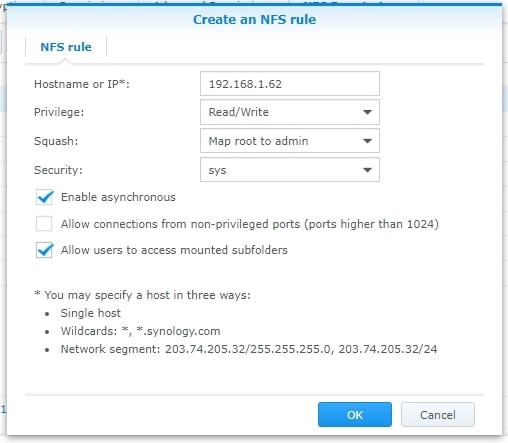
Next, you need to specify the device IP address that will access the shared folder via NFS. To do this, navigate back to the NFS page in the Control Panel and select the Access Settings tab. Here, you can add the IP address of the remote device that will access the shared folder.
It’s a security measure that helps to prevent unauthorized access to your shared files. Unauthorized devices can’t access the NFS share, even if they know the NFS share name and path. Moreover, if there are issues with the NFS share, specifying the device IP address can help you identify which device is causing the issue.
Step 5. Save All the Settings
Once you’ve set up the NFS permissions and specified the device IP address, click the Apply button to save all the settings. You can now open the shared folder on the Synology NAS from your remote device via NFS.
However, be sure to back up the files in the shared folder on Synology NAS regularly. Sharing files over NFS increases the risk of data loss if the files are not backed up. If you delete or lose your data, do no panic; there are several methods available for recovering deleted files from Synology NAS.
Conclusion
Setting up NFS on a Synology NAS is a straightforward process you can complete in just a few steps. With NFS, you can access your NAS files from multiple devices and locations, making it an ideal solution for businesses and individuals.
While it is essential to consider the level of security required for the shared data, NFS provides a convenient way to access large amounts of data stored on your Synology NAS.
For Windows XP/Vista/7/8/10/11
For macOS X 10.10 or later


