
 TL;DR:
Recovering lost data from a NETGEAR ReadyNAS depends on your setup: use the built-in Recycle Bin or ReadyCLOUD snapshots for deleted files, Wondershare Recoverit for logical RAID failures without backups, or NETGEAR's official paid service for severe hardware issues.
● The native ReadyNAS Recycle Bin only retains files for a default of 30 days and exclusively captures deletions made via the CIFS file-sharing protocol, while ReadyCLOUD snapshot restorations will overwrite any current files sharing the same name.
● Wondershare Recoverit NAS Recovery allows for remote data extraction across RAID 0, 1, 5, 6, and 10 configurations without pulling out the disks, provided you can input the device IP, port, user account, and password.
● NETGEAR's official data recovery service involves a remote session or mailing in the drives, requiring a non-refundable initial diagnostic fee of $200 for the first hour plus $180 for each additional hour, with no guarantee of successful recovery.
Ask AI for a summary
 ChatGPT
 Perplexity
 Gemini
 Claude
 Grok
Grok
“My NETGEAR ReadyNAS RN104 died. Can I recover data?” – Reddit
NETGEAR ReadyNAS-based servers are inventive, safe, and robust. It is made up of RAID arrays, groups of NAS hard drives prone to failure. The NAS systems send warnings in the event of an error or malfunction. However, the user sometimes does not receive the alert, and the NAS system crashes. Don't worry now! This article presents the safest and most reliable solutions to NETGEAR ReadyNAS Data Recovery.
Reasons for NETGEAR NAS Data Loss
Many users have used the NETGEAR NAS, a potent network-attached storage device. However, it can be very frustrating when we discover that the files and documents we have stored there have disappeared, especially when they are helpful. In the course of daily use, there are a few common reasons why NETGEAR NAS data loss occurs:
Accidental Deletion
Deleting NETGEAR ReadyNAS data by mistake is common for everyone. This event could happen when using a NETGEAR ReadyNAS device.
NAS Failure
One of the things that could lead to the loss of NETGEAR ReadyNAS data is the NAS device itself failing. Data loss is likely to result from virus infection, system failure, logical failure of the NAS system, and even RAID failures, including overheating the RAID hard drive and improper RAID setup. Furthermore, NAS failure is likely caused by power outages, voltage swings, and overvoltage. Consequently, you will also lose the NAS device's data.
Other Data Loss Scenarios
When using the NETGEAR ReadyNAS device, you run a very high risk of losing NAS data due to installation errors, accidental deletion of important data, and improper hard drive initialization. Additionally, you may lose the data stored on the previous disk if you attempt to swap out the current partition for a new one with more storage space.
In addition to the previously mentioned causes of the NETGEAR NAS data loss, there are also available solutions to fix it. It is shown in the table below.
Causes |
Solutions |
| Accidental deletion | Method 1: Recover from Recycle Bin if it's enabled |
| All data loss scenarios | Method 2: Recover from the Backup in ReadyCLOUD if you have set up an automatic snapshot schedule Method 3: Recover using third-party software Recoverit NAS Recovery |
| Severe physical failure | Method 4: Contact NETGEAR Support for Diagnostics and Recovery |
Method 1: Recover ReadyNAS Deleted Files From Recycle Bin
The Recycle Bin of NETGEAR ReadyNAS is a CIFS (Common Internet File System) protocol feature. Users may still recover deleted files from the ReadyNAS Recycle Bin during the 30 days (default).
When the Recycling Bin is enabled, and a CIFS file-sharing protocol is used to access the Share, deleted files are temporarily stored in the Recycle Bin before being permanently deleted. Delete files are removed immediately when the Share is accessed through another protocol.
How to recover deleted files from ReadyNAS Recycle Bin:
Step 1: Check if the NETGEAR ReadyNAS Recycle Bin is enabled. Browse to Frontview > Shares > Share Listing and click the CIFS tab for your desired Share. Then, scroll down to see if the Recycle Bin is enabled and what the settings are.
Step 2: If the Recycle Bin is enabled, you will see a folder named "Recycle Bin" in the root of the Share containing the deleted files.
Step 3: Review and select the files you want to restore, then right-click them to restore them to a safe location.
However, if the Recycle Bin is disabled, you must go for the following three solutions. Additionally, you can enable the Recycle Bin for future use by following the steps below:
Step 1. From the FrontView main menu, select Share> Share Listing. Then, the screen for Shares on RAID Volumes appears.
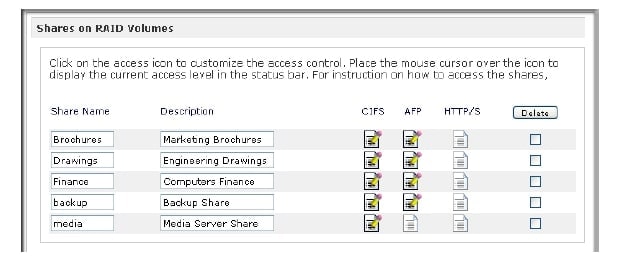
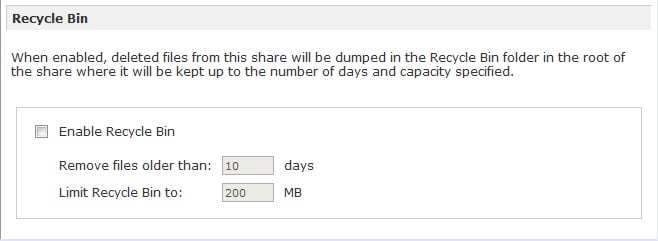
Step 2. Click CIFS access rights to enable the Recycle Bin. Tick Enable Recycle Bin.
Step 3. Next, specify the maximum number of days to keep the files (the value you specify here permanently deletes any older files). In the "Limit Recycle Bin to," set a maximum size for the Recycle Bin (in MB). When the Recycle Bin reaches this limit, files are deleted, starting with the oldest ones. Click Apply.
Method 2: Recover ReadyNAS Deleted Files From ReadyCLOUD
Have any files disappeared from one of your shared folders? You could recover a file using the Recover feature of ReadyCLOUD if snapshots were enabled on these shares. Creating an automatic snapshot schedule can safeguard your data from unintentional deleting, virus attacks, sudden power outages, etc.
Follow the steps below to do NETGEAR ReadyNAS data recovery using ReadyCLOUD.
Step 1. Access your ReadyCLOUD account. Choose Documents Share and click Recover Files.
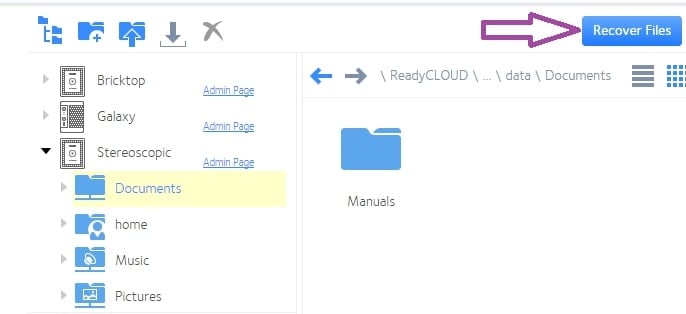
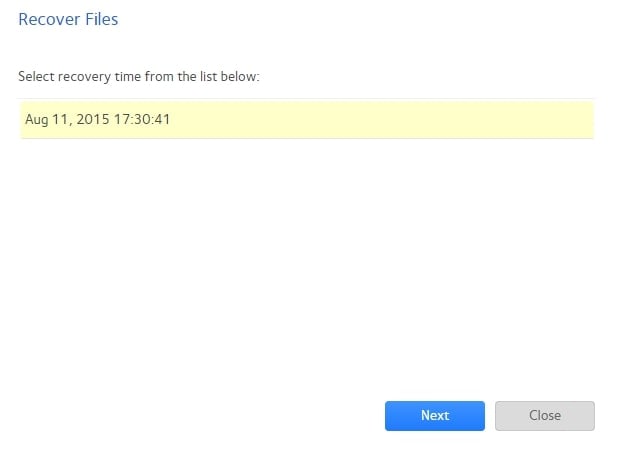
Step 2. Images taken manually and automatically are listed. Press Next after selecting the snapshot time that you want to restore.
Step 3. Tap Recover to recover the data that was in the "Manuals" directory as of the time indicated.
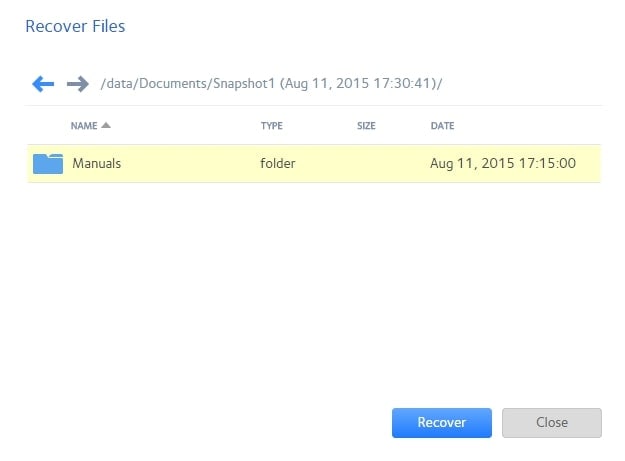
Note: In this example, we recovered an entire folder. Any existing files with the same names will be overwritten by every file from that snapshot's time and date. However, there is no impact on any files that have been added since the snapshot.
Method 3: Perform NETGEAR ReadyNAS Data Recovery With Recoverit
No worries if you don’t have any backups, you can rely on some third-party tool like Wondershare Recoverit NAS Recovery. This data recovery software works well in dealing with NETGEAR ReadyNAS data recovery issues.

Wondershare Recoverit – Almighty NAS Recovery Tool
5,481,435 people have downloaded it.
Assists in all NAS data loss scenarios, such as deletion, formatting, OS crash, RAID failure, faulty controllers, power outages, virus attacks, etc.
Recover ReadyNAS data through the remote connection without disk pull-out.
How To Perform NETGEAR ReadyNAS Data Recovery With Recoverit
Here's a step-by-step guide to teach you how to use this secure and effective Recoverit ReadyNAS data recovery software.
Step 1. Launch Recoverit NAS Recovery
Download and install Wondershare Recoverit on your computer. Then, launch it and click on the NAS Recovery button in the NAS and Linux section.

Step 2. Connect to Your NETGEAR ReadyNAS
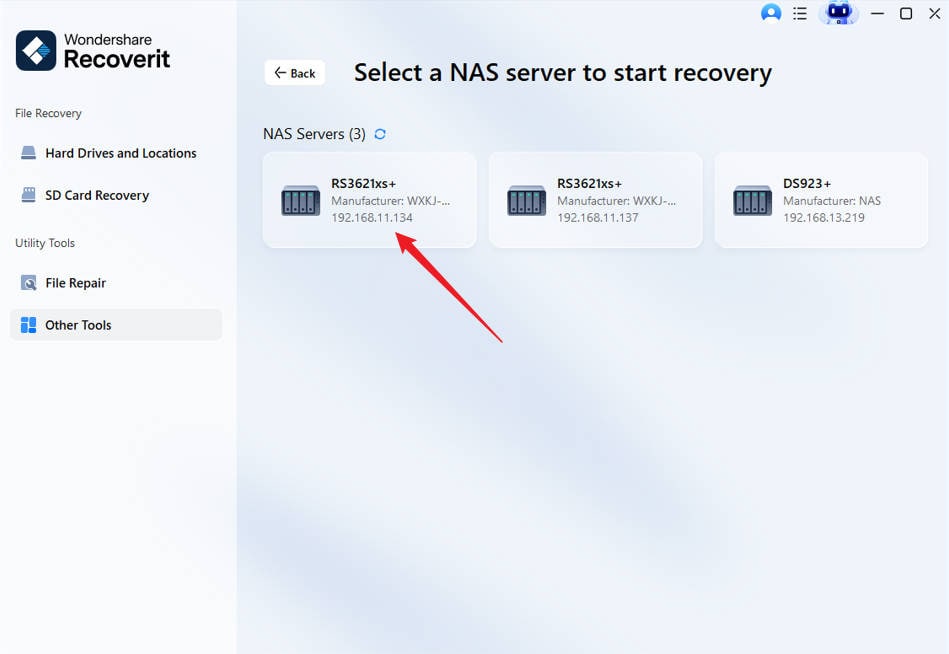
The NETGEAR data recovery tool will start searching for any available NAS devices. Next, select the NETGEAR ReadyNAS from which you want to recover data once the search is done.
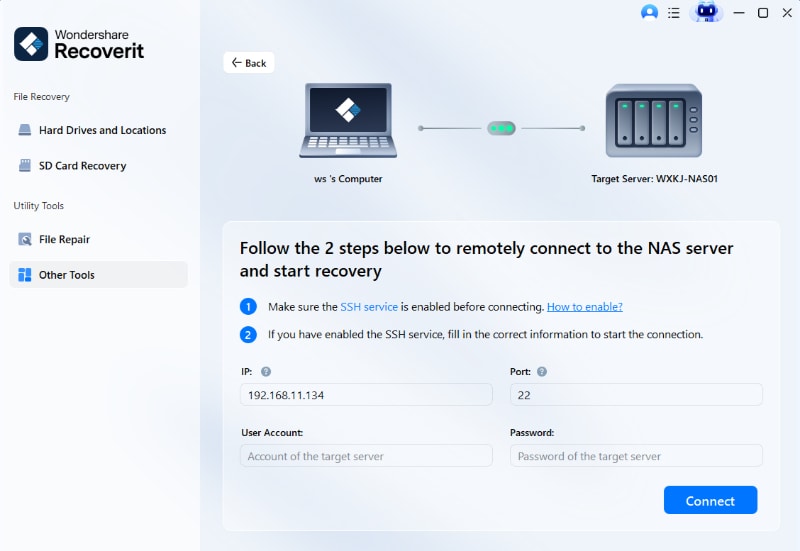
In the next window, you are required to enter your NETGEAR ReadyNAS's IP, port, user account, and password. Finally, click Connect to build the connection between Recoverit NAS Recovery software and your NETGEAR ReadyNAS device.
Step 3. Scan for Lost Data in the ReadyNAS Hard Drive
The scan will start automatically if the connection is established successfully. You can apply filters to find the desired files quickly during the scanning process.

Step 4. Data Preview and Recovery
After completing the scan, you can preview the files to ensure that you recover the correct ones. Finally, click Recover to restore the files to your computer's internal drive or any external hard disk.

Video Tutorial on How to Recover Files from NAS Server?
For Windows Vista/7/8/10/11
For macOS X 10.10 or later
Method 4: Perform ReadyNAS Data Recovery With NETGEAR Data Recovery Service
In most cases, a specialized NAS manufacturer will offer a free data recovery service for a limited time.
When you try several methods but cannot access data, it is time to contact a NETGEAR data recovery specialist. Follow the steps below to do so:
Step 1. Visit the NETGEAR support center and get technical support by opening a support case.
Step 2. If a secure connection establishes, a NETGEAR Technical Support Engineer (TSE) will access your ReadyNAS device to determine the nature of the issue. In most cases, diagnostics and repair via online session may take several days, if not weeks. If the user does not want the TSE to have access to a secure and unattended session, the ReadyNAS unit and its drives can be delivered to a NETGEAR Support office at the user's expense.
Step 3. Following a successful evaluation of the ReadyNAS device, the TSE will provide an assessment report that includes the following:
- a description of the issue
- an estimate of the cost of the continuing recovery process
The user will be asked to ship the ReadyNAS unit with hard drives to NETGEAR for diagnostics if the TSE is unable to:
- create a secure connection
- using a secure connection, diagnose or repair the system
Note: The initial diagnostic fee is $200.00 (per service, up to one hour) and $180.00 per hour (rounded up for partial hours after one hour of initial diagnostics).
As part of its best-effort policy, NETGEAR offers data recovery services, utilizing NETGEAR tools, technical knowledge, and resources. NETGEAR does not guarantee that data recovery will be successful in every instance. The initial diagnostic fee is non-refundable and regional pricing may differ. You can also seek data recovery services from third-party recovery solutions.
Conclusion
A NETGEAR ReadyNAS device can be highly beneficial and efficient. However, you may encounter NAS data loss issues due to various factors while using it, and you can address it with the 3 methods mentioned above. We highly recommend performing NETGEAR ReadyNAS data recovery with Recoverit NAS Recovery, as it’s easy to use and supports all data loss situations.
For Windows Vista/7/8/10/11
For macOS X 10.10 or later


