“My Seagate IronWolf NAS Hard drive suddenly made inappropriate noises. After restarting my NAS server, I lost a few of my essential videos stored in my NAS hard drive. I am really worried! I want to recover my data from NAS hard drive.”
Have you lost data from your NAS Hard Drive recently? Are you worried and looking for more accessible methods to recover data from NAS hard drive? Don't worry. Our article has got your back!
NAS servers deal with an enormous amount of data and information sharing. Therefore, the possibility of losing data from a NAS hard drive is real. However, reading this article will help you with a step-by-step guide to recovering files from NAS drives.
Way 1: NAS Data Recovery Without Unplugging the Hard Drive
While NAS is a reliable solution for increasing storage space, it can also have data issues like being unable to access stored data on the NAS, unintentionally deleting data, or formatting the NAS drive to fix some errors. In this case, you could solve all your problems using NAS data recovery software.
Recoverit NAS Recovery bills itself as a top-tier data recovery program, promising a 95% recovery rate with 35 patents. In addition, it has an easy recovery process through its various filtering options to quickly find the files you need to retrieve.
Highlights of NAS Data Recovery Software Recoverit
5,481,435 people have downloaded it.
Support 500+ data loss scenarios: Recoverit can retrieve data no matter whether the file is lost due to accidental deletion, formatting, virus attack, hard disk damage, or power failure.
Remote Connection: It retrieves data through a remote connection without interrupting the work in your NAS server.
No Disk Pull-out: You can recover data without unplugging the NAS hard drive, which is easy and time-saving.
Easy to Use: The simple point-and-click interface allows you to recover data from NAS hard drives in just a few clicks.
Note: When data loss occurs, you should immediately stop writing new data to the NAS server. Most data recovery methods work by retrieving lost data from the memory addresses. Even if the data appears to be gone, it remains on the disk platters, and the memory addresses where it was stored may still be intact.
To restore data, the memory addresses where the lost data was stored should not be overwritten. If you continue to use this NAS server, new data may overwrite these memory addresses, reducing the chances of recovering the lost data from the NAS hard drive.
Follow the steps below to perform data recovery from the NAS drive without dismantling the NAS server:
Step 1. Select NAS Recovery
Download and install Wondershare Recoverit on your Windows or Mac computer. Then, launch it and choose NAS Recovery under the NAS and Linux tab. Recoverit will start searching for your NAS devices.
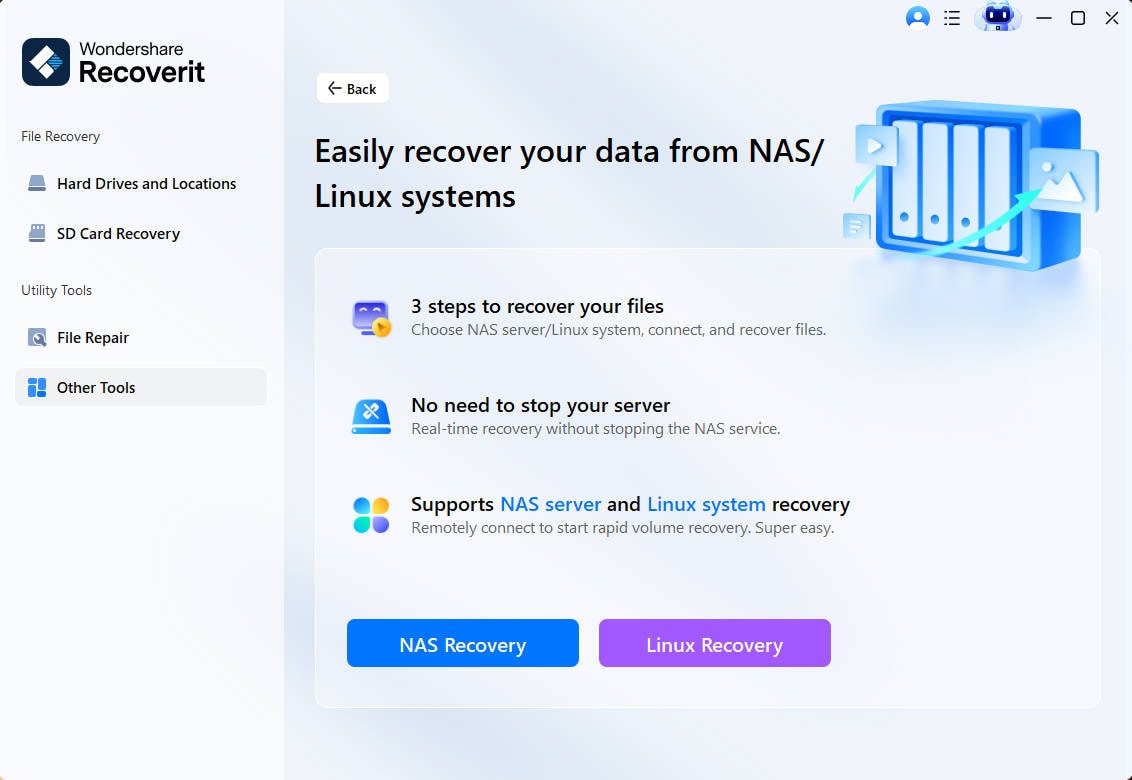
Step 2. Connect to Your NAS Server
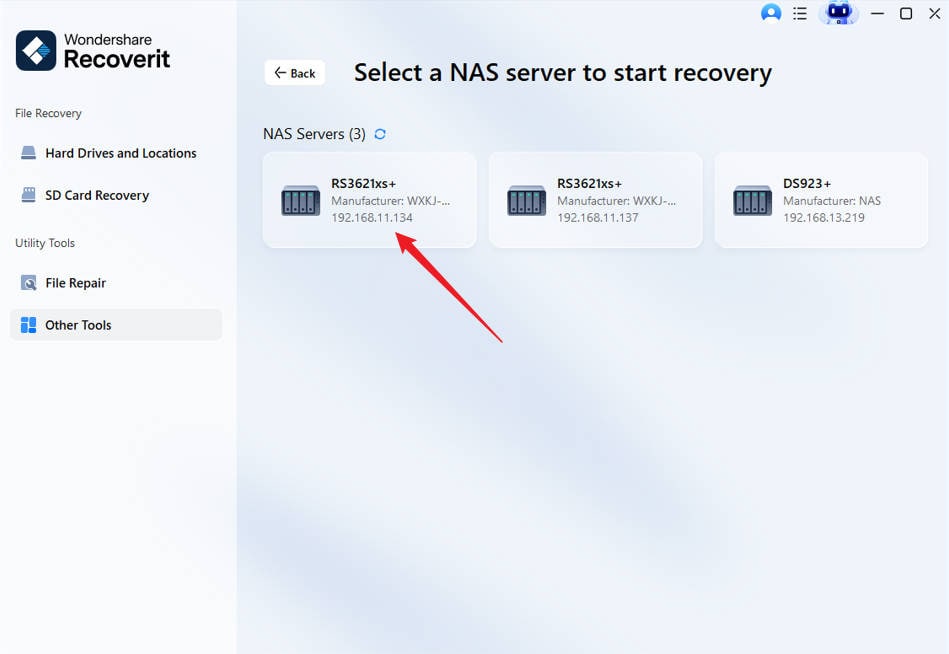
Once the search is done, you will see a list of your NAS storage devices under NAS Servers. Select the NAS device where you have deleted or lost your files.
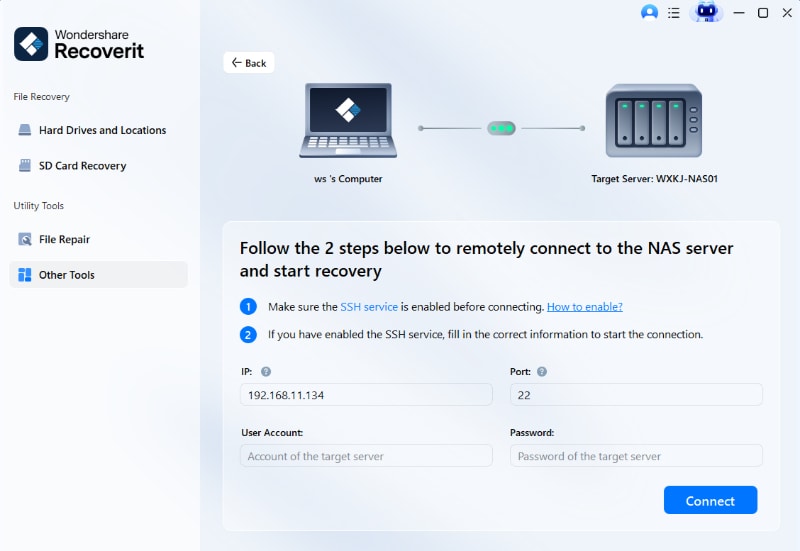
You are required to enter your NAS server's IP, port, username, and password. Then, click the Connect button to establish a remote connection between your NAS hard drive and the NAS data recovery software.
If the connection failed, you can go to Recoverit Support Center to find the fixes for NAS Connection Failed Issue.
For Windows Vista/7/8/10/11
For macOS X 10.10 or later
Step 3. Scan the NAS Drive for Lost Files
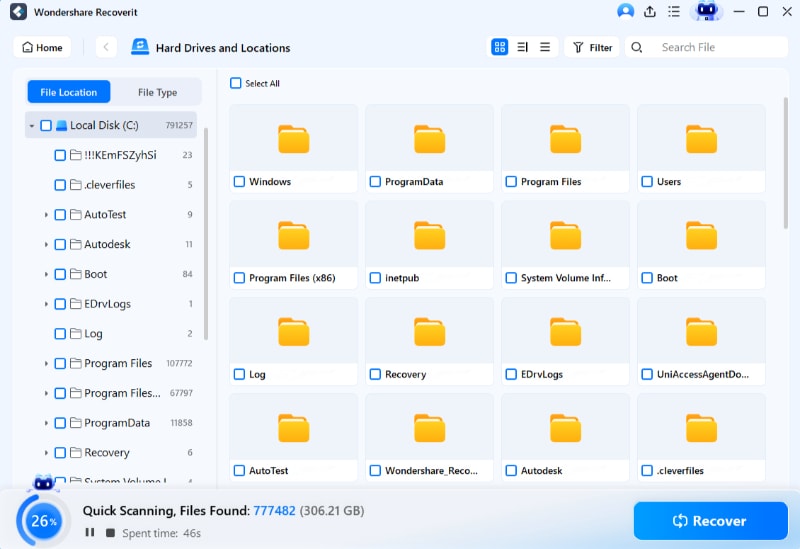
After a successful connection, Recoverit will automatically scan for lost data in the selected NAS server. The scan process will take some time, depending on how many files you store in your NAS server.
Step 4. Preview and Recover NAS Drive Data
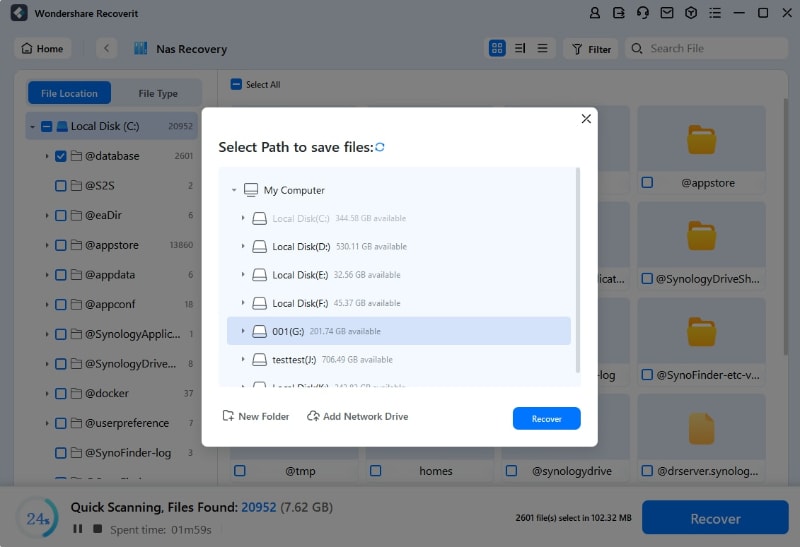
You can filter and preview the files during scanning to determine whether you are recovering the correct file. Finally, click Recover to restore the selected files. Recoverit will now save the files on your hard drive.
For Windows Vista/7/8/10/11
For macOS X 10.10 or later
Way 2: Recover Data From NAS Drive by Unplugging the NAS Drives
Except for performing data recovery from NAS drive through a remote connection, you can also pull out the hard drive from the NAS server and recover data by connecting it to your computer. But this method is not recommended because the unplugging process may damage the NAS hard drive if not done correctly.
Prerequisites
Disconnect your NAS from the Internet.
A NAS (Network Attached Storage) hard drive is shared with many users over a centralized network. It allows different users to write and read data from your NAS server. But whenever you lose data and wish to recover it, you must disconnect your NAS system from the Internet to prevent new data from overwriting the lost one.
Remove the hard drive from the NAS setup.
The second step should be to remove your Hard Drive from the NAS setup. The data recovery methods require using techniques or tools that can't be run on your NAS live server. Therefore, you must remove the Hard Drive from which you have lost data from your NAS setup.
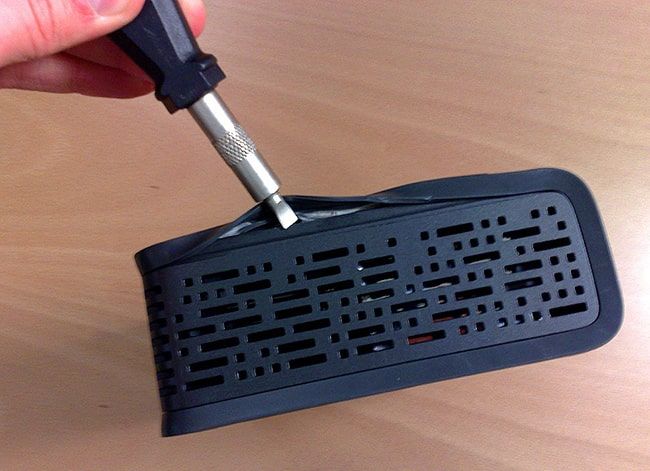
You can remove the hard drive by opening up the case of your NAS device. If you feel it is too harsh for you, consider taking help from an expert or a technical person. When you remove the disks from the NAS, label each one with the bay to which it belongs. If necessary, these labels will assist you in reassembling everything similarly.
Once the Hard Drive is removed and your NAS setup has other hard drives, you can turn the NAS server back online. Because now the users won't overwrite the Hard Drive from which you have lost the data.
Connect the hard drive to your computer.
After removing the hard drive from which you lost data from your NAS setup, it's time to connect your Hard Drive to a fully functional computer. This computer will serve the primary purpose of recovering your data back.
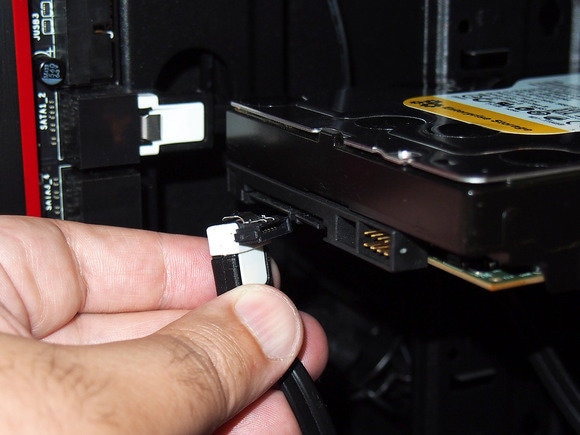
You can connect your Hard Drive using SATA cables or any other means depending on the kind of NAS Hard Drive you use. Once the Hard Drive is attached to a working computer, you are ready to move to the next section and begin your NAS Hard Drive data recovery.
You will learn the 3 most appropriate methods for recovering data from your NAS hard drive by unplugging it from the NAS device. Let's look at the specific methods below:
Method 1: Recover Data From NAS Hard Drive Using CMD
The first way to recover data by dismantling the NAS server from your NAS hard drive is using the built-in CMD (Command Prompt) tool of Windows PC. The CMD method fixes the attributes of your files on your NAS hard drive.
Note: Be careful in using this method, as no undo function holds you back if you enter the wrong character or run the wrong command.
Step 1. Make sure your NAS hard drive is connected to your computer. Press Win + R and type "cmd" in the Run window to launch the Command Prompt.
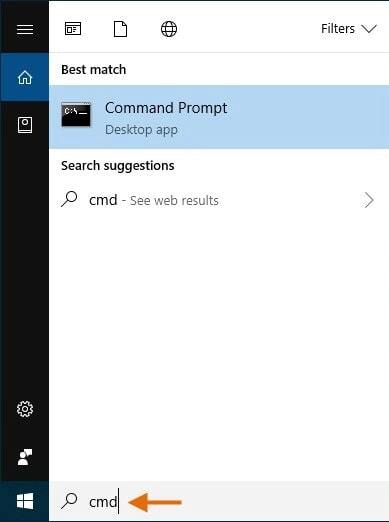
Step 2. In CMD, type the following command and press Enter:
ATTRIB -H -R -S /S /D X:*.*
Replace X with the letter of your NAS SSD or HDD drive. After entering the command, you will see your missing files on your NAS hard drive.

Method 2: Recover Data From NAS Hard Drive Using ReclaiMe NAS Recovery Software
If you want an easier way of recovering data from your NAS drive, use a third-party tool like ReclaiMe NAS recovery software. It is designed to restore RAID configuration parameters such as disk order, block size, start offset, and others. However, ReclaiMe Free RAID Recovery does not support file-by-file recovery; instead, it works with entire arrays.
Adhere to the following steps to recover your files using ReclaiMe NAS recovery software by dismantling the NAS server:
Step 1. Install the ReclaiMe File Recovery software. Make sure the unplugged NAS hard drive is connected to the computer. To manage an array, most NASes employ MD-raid or LVM drivers. If the MD-raid and LVM control structures are not too severely damaged, ReclaiMe can break them.
Step 2. Select the NAS volume to be recovered and press Start. The volume will be under the BTRFS section for btrfs-based NASes like NETGEAR; for other NASes, look for it under the Linux MD-raid or Linux LVM section.
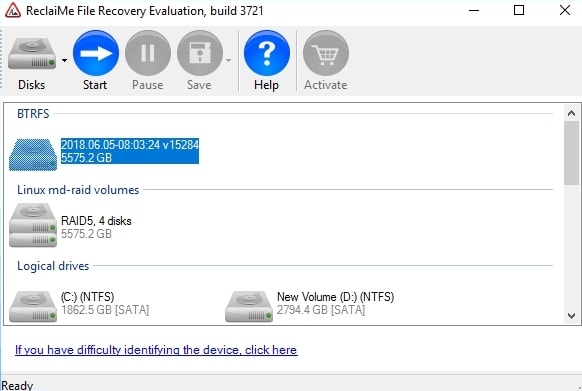
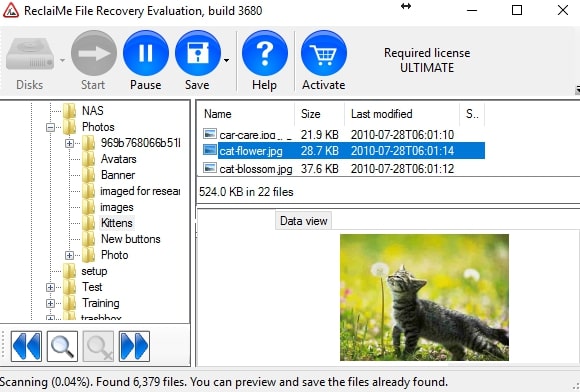
Step 3. Wait until the ReclaiMe File Recovery begins to bring files, then click Preview to check the quality of the recovery. After purchasing the license key, copy the recovered data to the prepared storage device.
Note: If the array is not visible in ReclaiMe File Recovery, you must first recover the RAID configuration using ReclaiMe Free RAID Recovery software. When the parameters have been determined, return here and select Run ReclaiMe to recover data in the ReclaiMe Free RAID Recovery tool.
Method 3: Consult a Professional Service Agency
If you cannot recover data from your NAS hard drive using the first two methods, then there's only one option left: ask a professional service agency for help. These professional data recovery companies assist in the recovery of data damaged in even the worst-case scenarios.
You can make an in-person or online appointment with a professional data recovery service provider. And the cost of their data recovery service depends on the data's size/volume you need to recover.
Tips to Prevent NAS Data Loss
As you know, NAS hard drive manipulates and works with a tremendous amount of data. There is no hard drive that can eliminate the possibility of data loss. Moreover, 100% data safety through NAS hard drives is never guaranteed.
Still, you can follow some essential tips to maintain your NAS hard drive for more extended periods. These are well-researched, practically implemented, and result-oriented tips that work in every scenario.
Tip #1: Manage data access rights.
Although file sharing by multiple users is one of the benefits of NAS, it can also be a disadvantage. For example, a user may delete data without realizing that other users may require it. As a result, you should control data access rights to avoid data deletion.
TIP #2: Set up automatic backups for your NAS hard drives.
The more backups you have, the better your chances of restoring data in the worst-case scenarios. Back up all of your data on external devices regularly. Additionally, you should keep offsite backups and encrypt data stored on external devices.
TIP #3: Assess NAS properly.
Configure the NAS system correctly to manage and control NAS devices efficiently. NAS is typically configured with RAID; thus, depending on your needs, you should choose a suitable RAID configuration.
TIP #4: Keep proper documentation.
Proper documentation is essential for reducing NAS data loss as it aids in data recovery and device repair. Record information such as file systems used, controller version, BIOS version, and so on.
TIP #5: Make use of standardized disks.
Always use compatible disks with the NAS system. Additionally, use dependable disks with standard file systems. NAS-optimized drives reduce the total cost of ownership, eliminate downtime, and reduce outages. Furthermore, standard drives significantly improve storage uptime and overall reliability.
TIP #6: Plan beforehand.
Prepare disaster plans so that you can take measures to restore all of your data. Furthermore, you should avoid attempting data recovery alone.
TIP #7: Antivirus Scan.
It is highly recommended to regularly use proper antivirus software to scan your NAS hard drives. Antiviruses will help your NAS hard drive avoid severe damage due to viruses, malware, or threats.
FAQs
Is Data Recoverable from a Corrupted NAS Drive?
Yes, it is possible by using NAS data recovery software. A damaged or corrupt RAID-based NAS drive cannot be accessed or repaired unless the installed NAS hard drives are formatted.
What Are Some Recommendations for NAS Drives?
Some of the recommended NAS drives that we have tried and tested are listed below:
● Western Digital Red
● Seagate IronWolf
● WD Red Pro
● Seagate Exos
● Toshiba N300
● Synology SAT5200
These NAS hard drives are the top ones out there. You can buy them online or from your nearby store.
Further reading: Best NAS Hard Drives
The Bottom Line
A NAS Hard Drive is vulnerable to data loss. However, things aren't as bad as they may sound. Data recovery from NAS hard drive is possible.
For NAS hard drive data recovery, you can use CMD to fix your drive's attributes or use help from a professional agency. But Recoverit NAS recovery is the most suitable choice, as you don’t need to pull out the hard drive from your NAS server. Furthermore, it is a highly recommended automated tool because a user with almost no expertise can use it firmly.
For Windows Vista/7/8/10/11
For macOS X 10.10 or later

 ChatGPT
 Perplexity
 Google AI Mode
 Grok
Grok


