
 TL;DR:
You can optimize your VMware ESXi environment by integrating a Synology NAS as an NFS datastore for virtual machine storage expansion or deploying Synology Active Backup for Business for automated VM retention.
● To utilize the NAS as a datastore, USB connections are unsupported; you must enable the NFS File Service, assign Read/Write privileges directly to your VMware IP address, and mount the shared folder path using the VMware ESXi web client.
● VM backup tasks require linking your hypervisor through the VMware vSphere tab within Synology Active Backup for Business, which allows you to enforce retention policies and enable Changed Block Tracking, data transfer compression, and application-aware backups.
● If NAS data is formatted or accidentally deleted, Wondershare Recoverit NAS Recovery can retrieve the lost files remotely over an SSH connection using your NAS IP and login credentials without requiring physical disk extraction or RAID reconstruction.
Ask AI for a summary
 ChatGPT
 Perplexity
 Gemini
 Claude
 Grok
Grok
Is your VMware ESXi serving you well, but you need more space for running virtual machine data? If you own a Synology NAS device, that could be the best solution for your problem. In this guide, you’ll find out all about setting up Synology with VMware ESXi.
How You Can Use Synology NAS on VMware ESXi
Your Synology NAS can serve many purposes.
You can use it as a host device for virtual machines, which you can create and manage using Synology Virtual Machine Manager (VMM). You can also use your NAS device as storage space in combination with another external device as a VM hypervisor.
One popular alternative to Synology VMM is VMware ESXi.
Synology NAS and VMware ESXi are an excellent match. Here’s why:
Both Synology and VMware are reliable industry leaders that most of us already have in our home labs/tech stacks. NAS provides an efficient storage addition to ESXi in at least two common scenarios – VM data center or VM backup.
- Storing Virtual Machine Data
When you need more space for running VMs, you can mount your Synology NAS shared folders on your VMware ESXi servers and use them as a datastore.
- Backing up Virtual Machine Data
If you want to back up your virtual machine data, you can use Synology NAS.
First, let’s see how you can set up Synology NAS to VMware as a datastore.
How To Set Up Synology NAS to VMware as Storage Using NFS
Your Synology NAS has a USB port, but that’s only for connecting chargers and similar devices. You can’t use it to connect NAS with VMware, so we’ll explain a different method – setting up Synology NAS to VMware as a datastore using Network File System (NFS).
Before you can do anything else, you need to enable the NFS File Service and use it to create a shared folder for your Synology NAS, which you will mount on the VMware ESXi.
Here’s how to do that step-by-step.
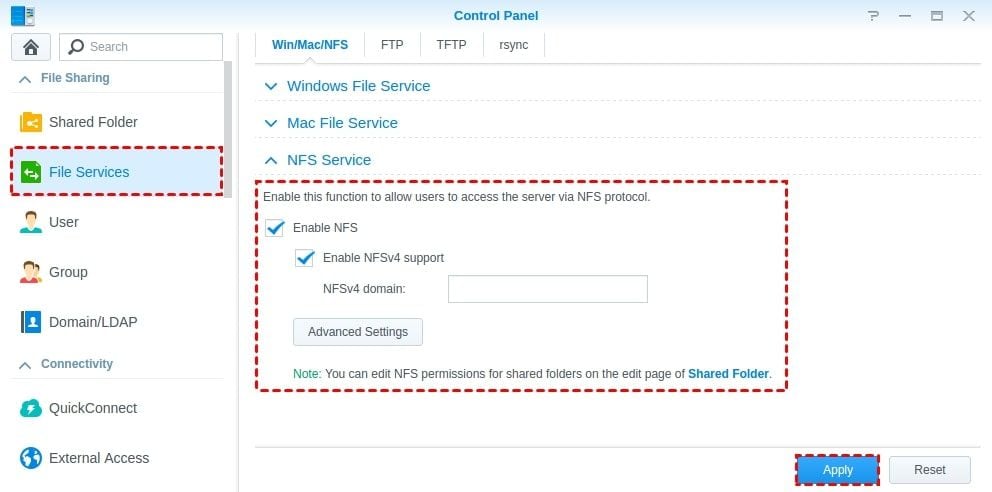
Step 1Enable NFS Services
Enabling NFS File Service is a simple one-step process: Navigate to your Synology NAS Control Panel and click the File Sharing icon. On the left side of the screen, you’ll see a File Services section. Click to open. Then, click NFS Service. You’ll see an option to Enable NFS. Tick the box to enable it and save the settings by pressing Apply.
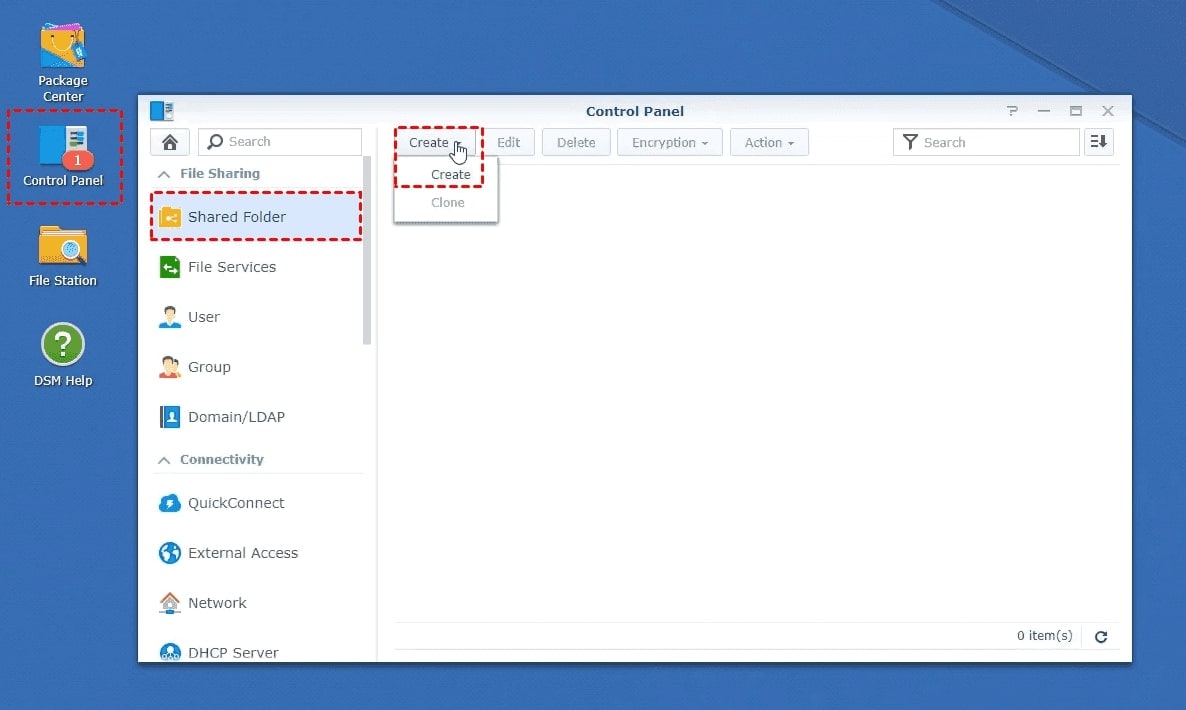
Step 2Create a Shared Folder
At this step, you need to create a shared folder for your Synology NAS, which you will mount on the VMware ESXi later.
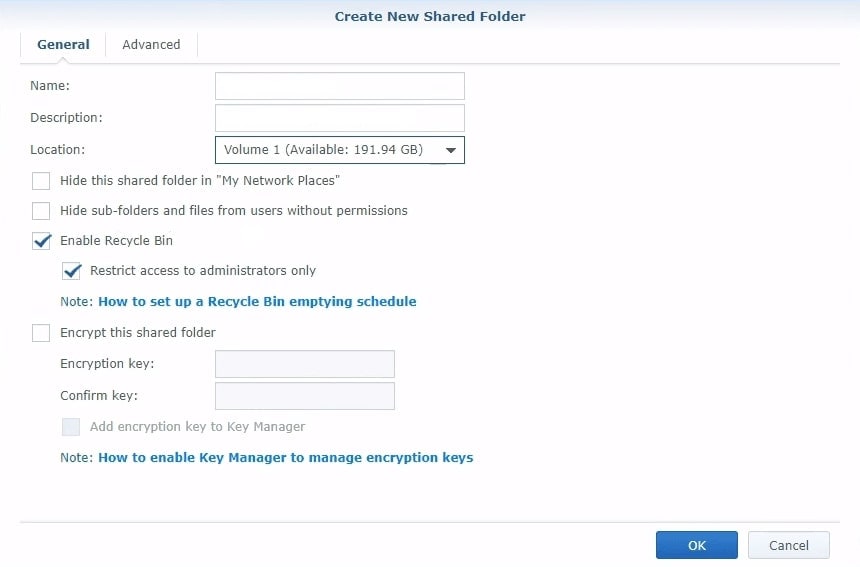
- Return to File Sharing and find the Shared Folder section. Open it and click Create to initiate the Shared Folder Creation Wizard.
- The wizard will need you to specify General configurations for your shared folder, like Name and Location, and Advanced settings, such as Encryption. Once you do that, click Apply to save the new settings.
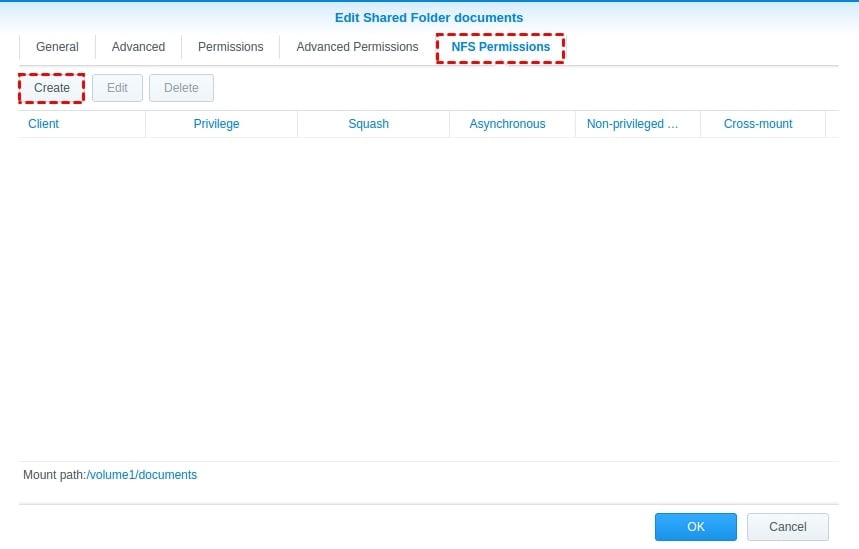
Step 3Add NFS Permissions
Now, you have to create NFS permissions. Here’s how:
- Return to the Shared Folder section and click the Edit button. You’ll see an option that says NFS Permissions. Click to open a pop-up window, and then click Create.
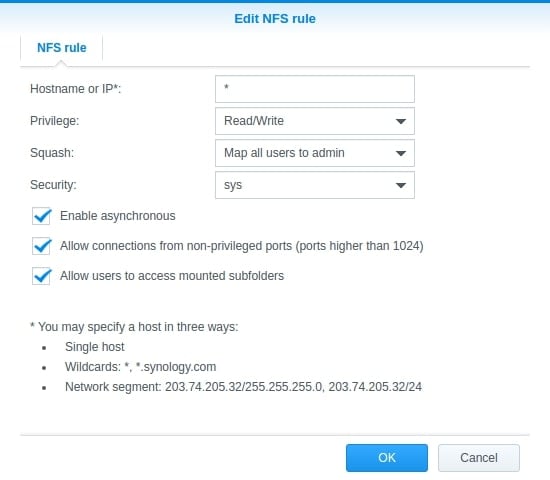
- When you see the Edit NFS rule window, add your VMware IP address and click Privilege to select Read/Write. After that, click OK to apply the new rule.
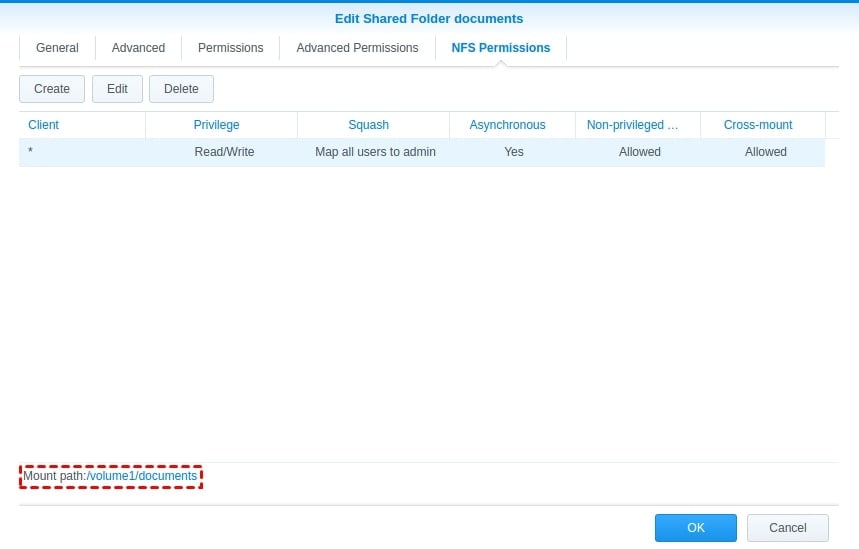
- After returning to the Shared Folder section, click the NFS Permissions tab. At the lower left corner of the screen, you’ll see a line that says Mount path. Copy it to the clipboard.
Step 4Mount Synology NAS Shared Folder
During these last few steps, you’ll need to mount the shared folder you’ve just created on your Synology NAS to VMware ESXi. Follow these steps:
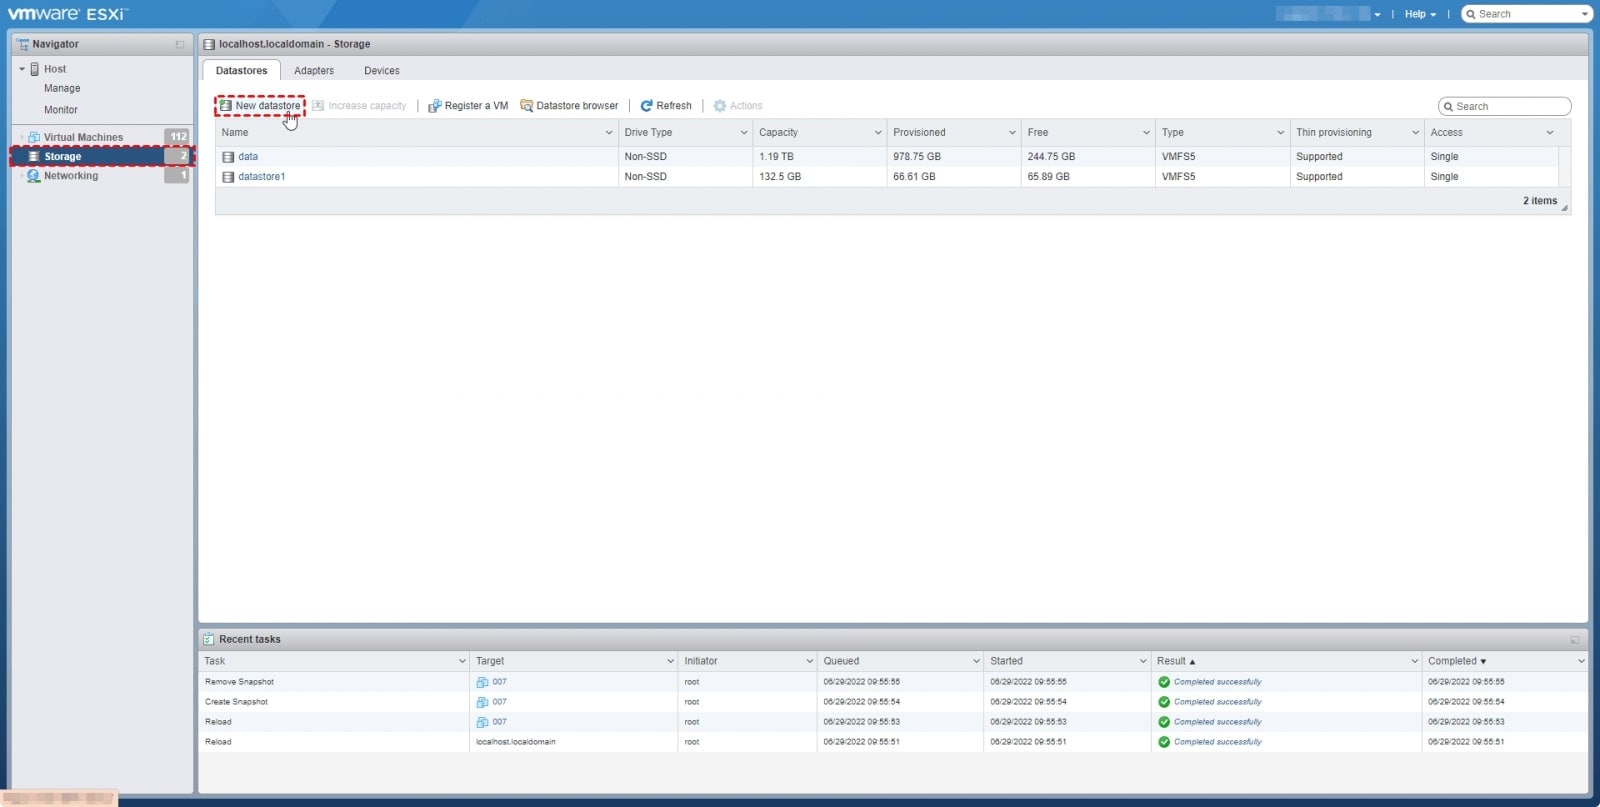
- First, you need to open a new datastore. You can do that from the Storage section of the VMware ESXi web client. On the Datastores tab, click New datastore.
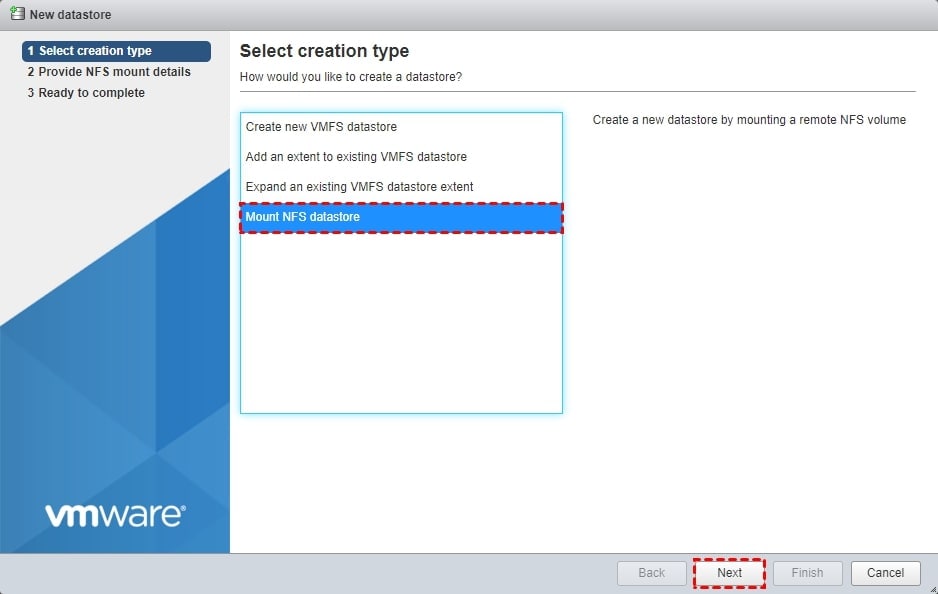
- The previous step will initiate a New datastore creation wizard. When it starts, click Select creation type to choose how to create your new datastore. Select Mount NFS datastore and click Next.
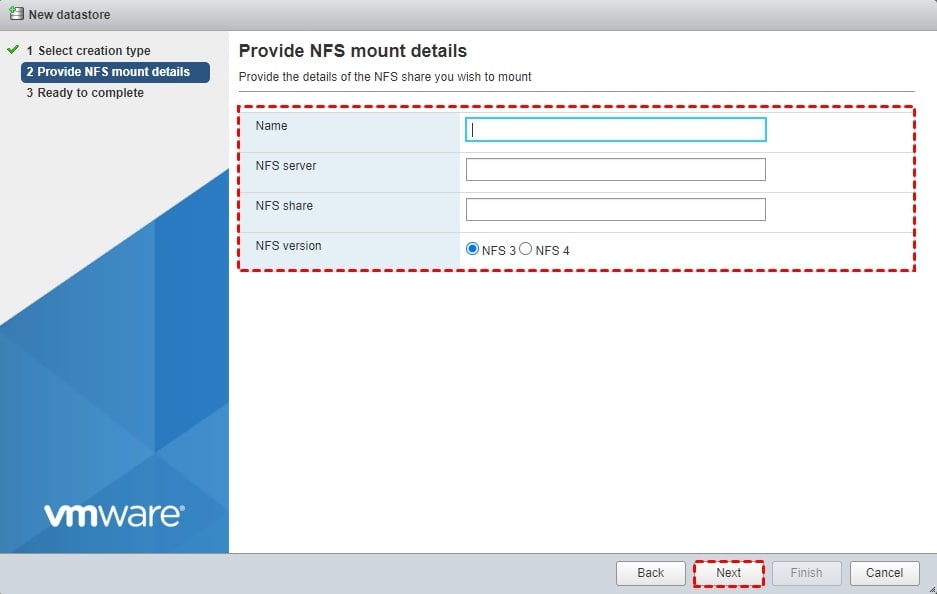
- After that, you’ll have to Provide NFS mount details. Add a Name and other information, and click Next.
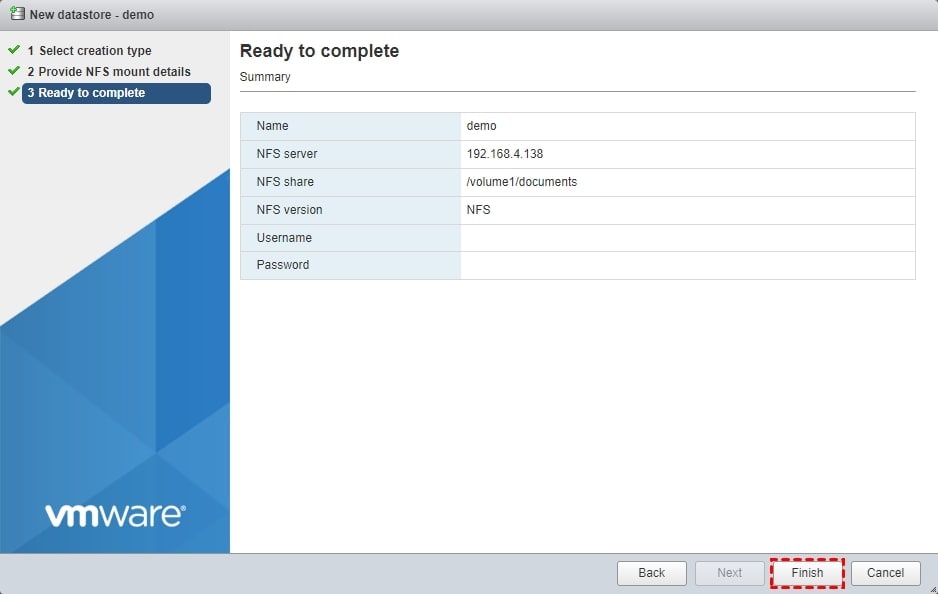
- The wizard will create a Summary of your settings. Read it carefully and click Finish if everything seems OK.
How To Back Up VMware to Synology NAS With Synology Active Backup for Business
If you want to use your Synology NAS device as a backup for virtual machine data, one of the easiest ways to set that up is with Synology Active Backup for Businesses tool.
Now, let’s take a step-by-step walkthrough of the backup process.
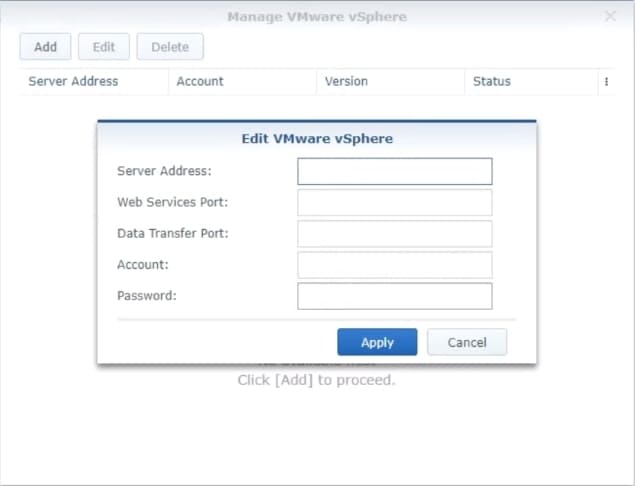
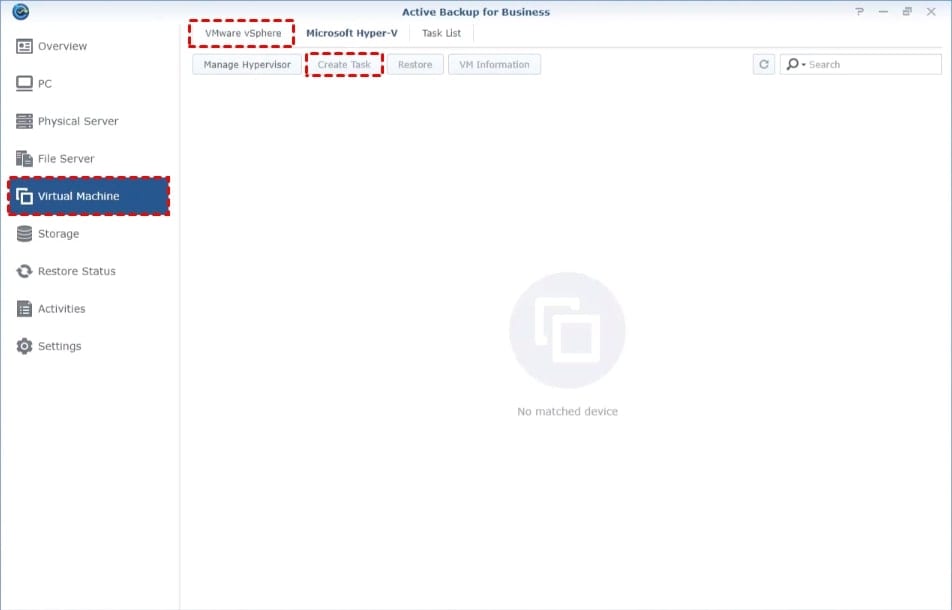
- Step 1: Open the Active Backup for Business and then the Virtual Machine section on the left part of the screen. After that, locate the VMware vSphere tab and click it. From there, go to Manage Hypervisor and click Add.
- Step 2: Return to the Virtual Machine section and click the VMware vSphere tab again. Then, select the virtual machine you want to back up and click Create Task.
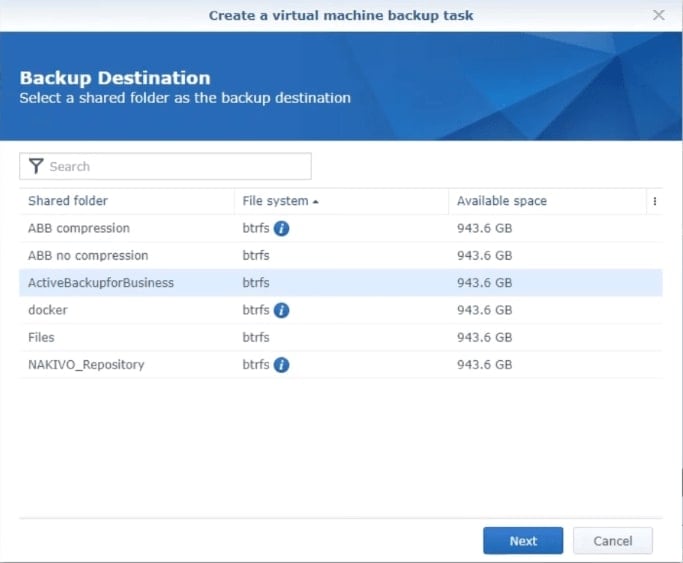
- Step 3: In Backup Destination, select ActiveBackupforBusiness and click Next.
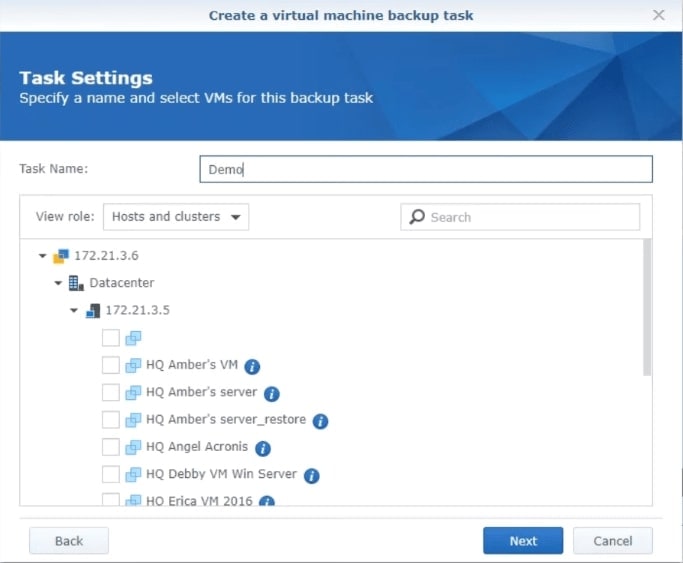
- Step 4: Name the task and choose the virtual machines you want to back up. Then, go to Next.
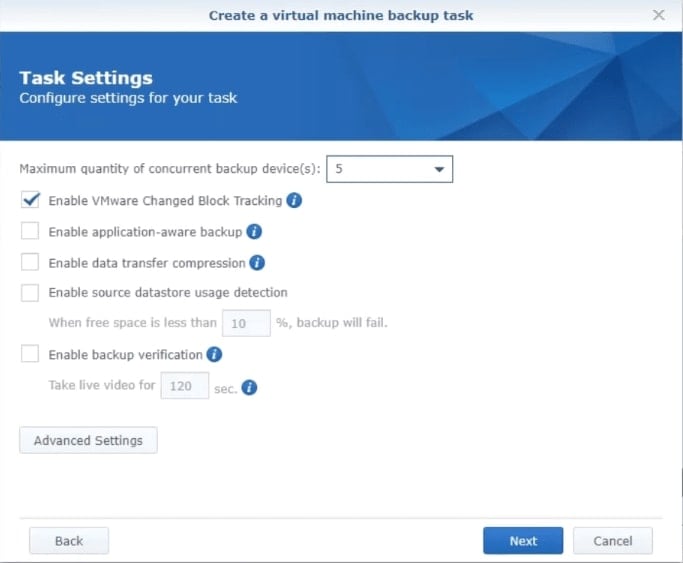
- Step 5: In Task Settings, set your desired maximum quantity of concurrent backup device(s) and check the boxes for Data transfer compression, Changed Block Tracking, Application-aware backup, and others if that’s how you want to configure settings for this task. Once you do that, click Next.
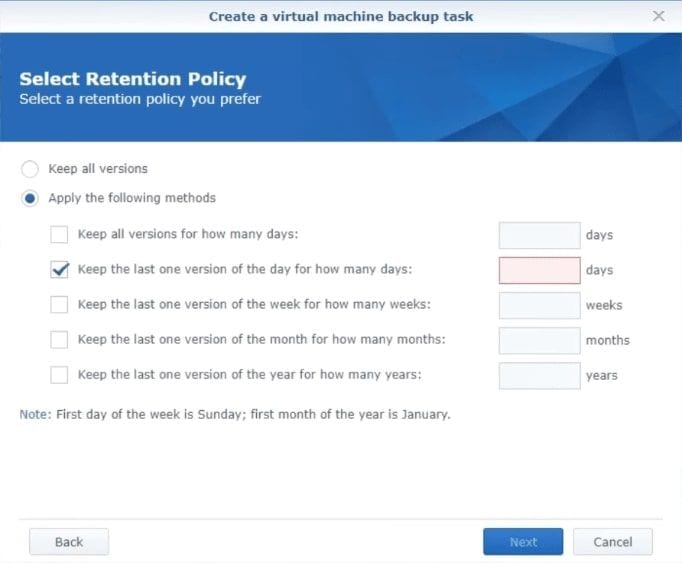
- Step 6: Choose your desired Retention Policy and then click Next.
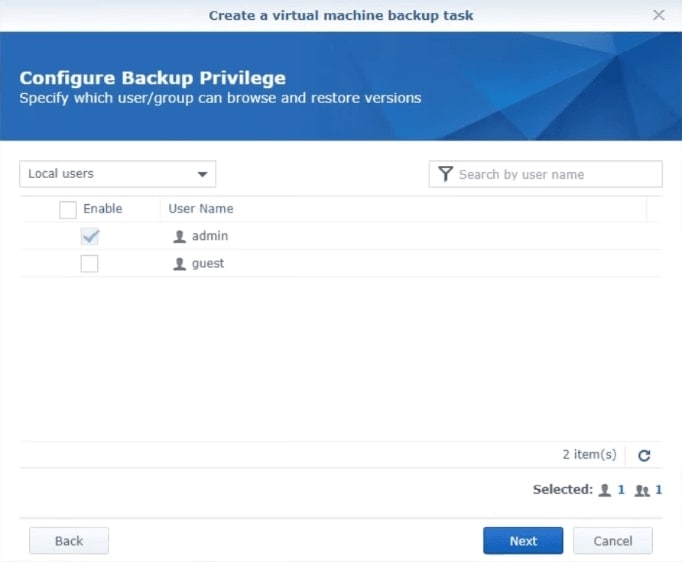
- Step 7: Configure Backup Privilege for other users or groups. After that, hit the Next button.
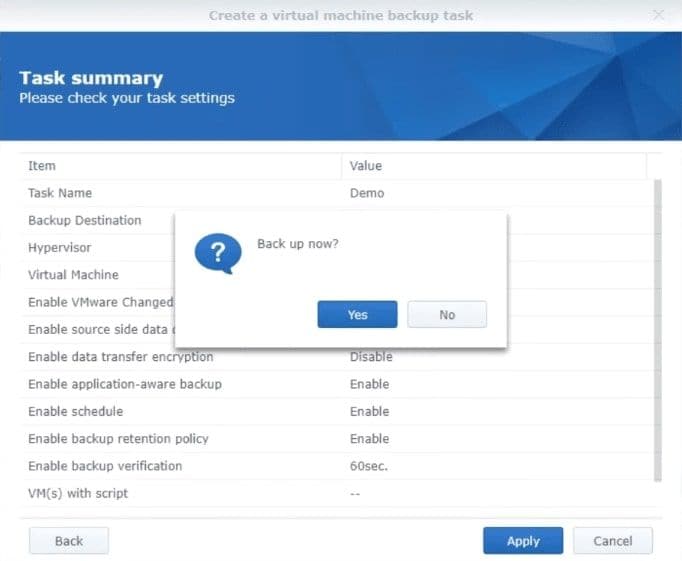
- Step 8: The wizard will show you your Task summary. If everything is fine, click Apply. Then, click Yes to initiate the backup. .
Steps You Can Take if You Lose Backed-up Files
Synology NAS is famous for being robust and reliable. Still, it’s not immune to mistakes, especially when they are man-made. Whether you use it as a VM datastore or to backup VM data, some of the files going missing shouldn’t surprise you. Data loss is a dreaded reality, but there’s a solution.
Wondershare Recoverit NAS Recovery can help retrieve lost data in any scenario involving Synology NAS. Those can include accidental deletion, hard drive formatting, or something else. It’s a versatile tool that works on all media formats and operating systems.
Some of the best features of Wondershare Reciverit include:
- Real-time recovery – it can retrieve lost/corrupted data without interrupting NAS.
- No disk pull-out – best of all, Recoverit works without unplugging the NAS drive.
- No complex RAID reconstruction – there’s no need to rebuild RAID in the process.
- User-friendly interface – turn on SSH, find your NAS, locate your lost files, and retrieve them.
For Windows Vista/7/8/10/11
For macOS X 10.10 or later
If you ever find yourself in the middle of a panicky data loss scenario, here’s a quick step-by-step guide to recovering files from Synology NAS using Recoverit:
Step 1Choose NAS Recovery
Download Wondershare Recoverit and set it up on your PC. Upon opening the program, you’ll see the NAS and Linux section on the left side of the window. Click to open and proceed to NAS Recovery.

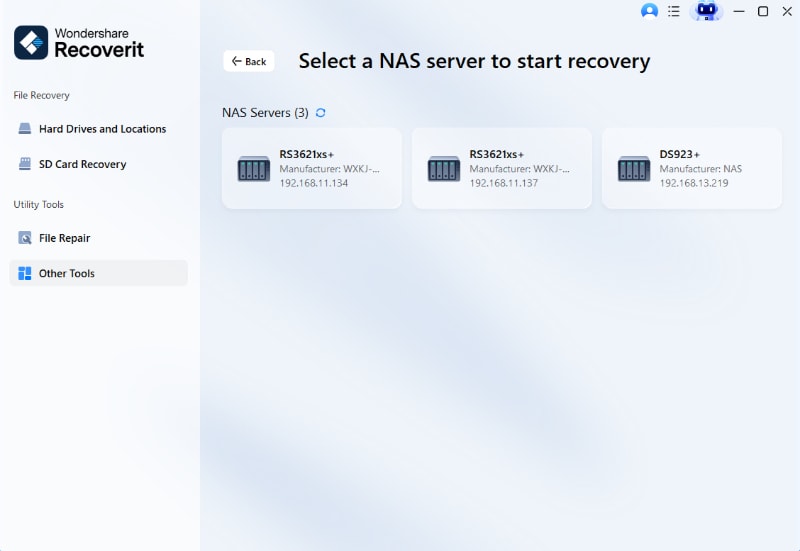
Step 2Select Your Synology NAS
Wait for Recoverit to find your NAS device. Select the NAS where you’ve lost files if you have multiple devices.
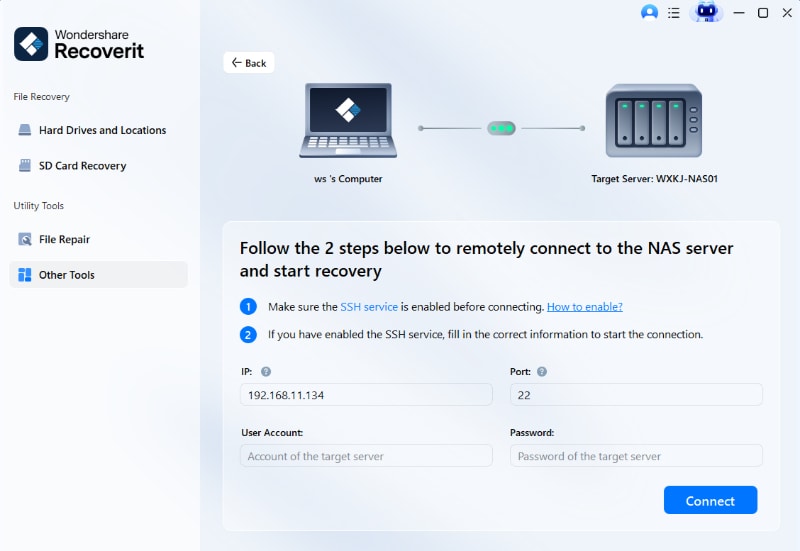
Step 3Connect to Your Synology NAS
Enter the IP, Port, User Account, and Password. Then, click Connect and wait for Recoverit to establish a connection.
Step 4Scan Your Synology NAS
The NAS data recovery software will start scanning for deleted or lost files in your Synology NAS automatically upon successful connection. Now sit and wait for the program to finish scanning your device.

Step 5Recover Lost Data
Find and select the files you want to retrieve and click the Recover button. Choose where you want to save restored files. You can preview the files before recovering to make sure you get the correct files.

For Windows Vista/7/8/10/11
For macOS X 10.10 or later
Conclusion
Setting up Synology NAS with VMware ESXi is nothing complicated, as you can see. The two make a perfect pairing in a range of virtualization scenarios, but they are specifically handy as a datastore/backup and hypervisor combo for your virtual machines.
If you run into any problems following our guide or lose your Synology NAS files and want to set up Recoverit, feel free to contact us.


