
 TL;DR:
Because Synology does not natively support WireGuard in its Package Center, you must manually install the VPN by either finding a pre-built Docker image or compiling a custom SPK file tailored to your NAS hardware.
● Identifying your exact NAS CPU architecture, such as ARM or X86_64, and your current DSM version in the Info Center is a strict prerequisite before locating or compiling a matching installation package.
● Building your own SPK requires installing Docker, enabling SSH, logging into the DSM terminal as a root user, and executing a privileged Docker run command containing your specific architecture and DSM variables.
● After manually uploading and installing the generated SPK file through the Package Center, the application cannot be launched from the graphical interface and must be started using a specific SSH root command.
Ask AI for a summary
 ChatGPT
 Perplexity
 Gemini
 Claude
 Grok
Grok
Accidentally deleted important files on Synology NAS?
No worries. Wondershare Recoverit can get back your lost files within 3 steps. The ultimate and professional NAS data recovery software is totally reliable and 100% safe.
Wireguard is a modern, open-source VPN protocol with significant performance jumps over older protocols such as OpenVPN or IPsec. The app uses the latest cryptography methods to secure your connection and increase performance. It focuses on simplicity, and its small code makes it easier to patch security risks, which makes a Synology Wireguard server extremely secure. It’s why Synology Wireguard is one of the fastest VPNs you can add to a NAS and why so many have been using it since 2018 when it was released.
However, installing Wireguard on Synology NAS might be tricky. Fortunately, this guide can help you.
Synology Still Doesn’t Offer Support for Wireguard

Although Wireguard is available on all major platforms and operating systems, such as Windows, Mac, Linux, Android, and iOS, Synology doesn’t support it natively. It’s unavailable through Synology’s Package Center. Unlike installing Zerotier on Synology NAS or OpenVPN on Synology NAS, you can’t simply download and install it on Synology units. Installing Wireguard on Synology NAS units and the DSM operating system requires additional steps.
Solution to Install Wireguard on Your Synology NAS - Building a Wireguard SPK
Even though no Synology Wireguard application is available to download, you’re not helpless. Of course, it will take a few minutes, but installing and using Wireguard on Synology NAS is entirely possible.
However, it takes a few advanced steps, and that’s precisely why we’ve written this guide to help you install and run Wireguard on Synology NAS. Read below to learn about installing prebuilt Wireguard Synology Docker images or building your own Wireguard SPK.
Step 1Identify Your Synology CPU Architecture
When compiling a Synology SPK file and building your Wireguard SPK, CPU architecture will determine whether the app will run. That’s why the first step you must take care of is identifying your CPU architecture.
Different Synology NAS devices come with various CPUs, and since they come from manufacturers such as Intel, AMD, and Realtek, they all have different architectures. Even CPUs from the same manufacturer can significantly vary depending on the generation.
Usually, your Synology NAS can either have an ARM architecture CPU or an X86_64 one. However, ARM versions are essential; you should choose the correct one. On your Synology NAS, open the Control Panel and click the Info Center button. Look for CPU.
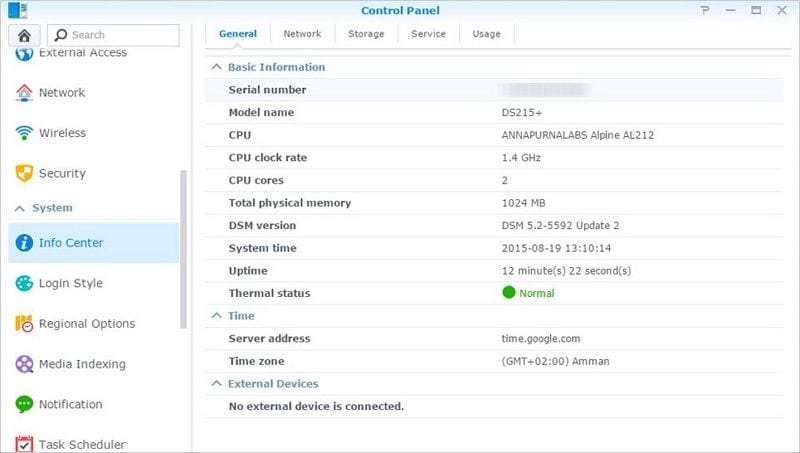
You can also check by going to Synology’s website, heading to the Knowledge Center, and finding the thread called “What kind of CPU does my Synology NAS have?” You’ll see the exact CPU model and the package architecture you need there.
Step 2Download Wireguard SPK Docker Images
After you’ve checked your CPU architecture, you can check for premade Wireguard SPK Docker images. Hundreds of people use Synology NAS Wireguard, and many versions of already-made Wireguard SPKs might match your CPU architecture and run on your Synology NAS.
You should check the internet for Wireguard Synology Docker images before trying to build your SPK, as you can avoid a few steps and run Wireguard without any trouble. Depending on your Synology NAS model or the version of the DSM you’re running, you might be in luck.
However, with newer versions of Synology’s DSM, or newer NAS devices, you might have to deal with building your own Wireguard SPK. Fortunately, we’ve dealt with that part, too, and you can learn more about making an SPK below.
Step 3 Build an SPK
If you can’t find prebuilt Wireguard SPK Docker images for your NAS device or the DSM version you’re running, it’s time to build your own Wireguard SPK. You can do so by using Docker, and you’ll need to use it with the root account and use SSH. You can follow the steps below to build the Wireguard SPK.
- Install Docker on your Synology NAS by finding it and downloading it through Package Center.
- Enable SSH on your NAS by going to the Control Panel, clicking the Terminal and SNMP button, and activating SSH.
- Use Terminal or Putty to log in to your DSM.
- Enter the following command to enter root mode and enter your password:
sudo -i - After that, enter this command, but change the package architecture to match your CPU’s architecture and the DSM version to match your DSM version:
sudo docker run --rm --privileged --env PACKAGE_ARCH=<yourNASarch> --env DSM_VER=7.1 -v /volume1/docker/synowirespk71:/result_spk naswireguard/synobuild71 - Finally, enter this command to add the location for the SPK and choose where you want to save it:
/your_local_folder_path:/result_spk - Give it a few minutes, as finishing can take a while.
If you’ve followed all the steps, you should have successfully built your own Wireguard Synology NAS SPK package, and you’ll end up with an SPK file with a name that depends on your CPU architecture, which you’ve saved in a folder of your choosing.
Step4Install Wireguard on Synology NAS
After successfully creating the Wireguard SPK package, you can finally install it. This process is simple; however, we’ve created a short guide that you can follow below.
- Open the Package Center on your Synology NAS device.
- Click the Manual Install button in the top right corner.
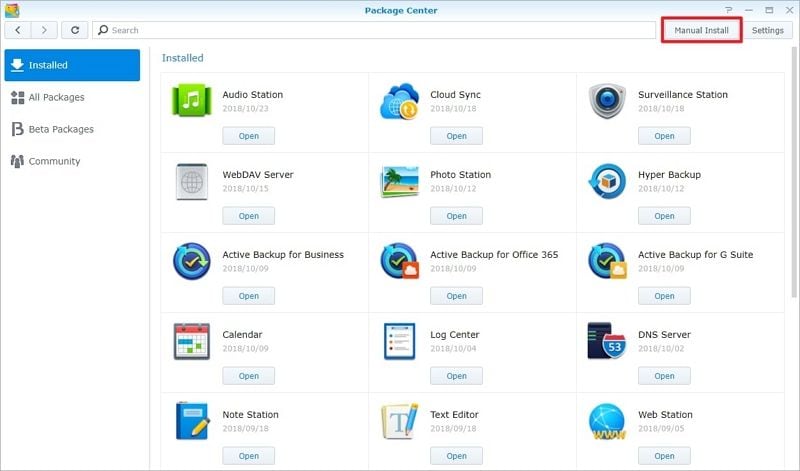
- Browse for the Wireguard SPK package, and then hit the Next button.

- Follow the prompts that pop up and click the Apply button.
You should have successfully installed Wireguard now, and that was no easy task as it isn’t simply finding the app, downloading it, and installing it. Of course, you can now run it, but this part requires SSH, too. Read below to find out how to run the Synology Wireguard server.
Step 5Start Wireguard
To start WireGuard, you can’t simply double-click the application, as you didn’t install it like other Synology apps. Instead, you built your own Wireguard SPK, and you can follow the steps below to run it.
- Head back to your SSH prompt.
- Enter the following command as the root user:
/var/packages/WireGuard/scripts/start

This command should successfully start the Wireguard application on your Synology NAS device. To confirm that Wireguard is running, you can:
- Head to the Package Center.
- Click the Installed tab on the left, and select Wireguard to see if it’s running.
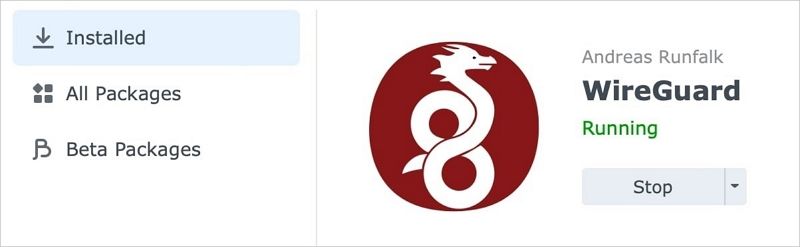
Congratulations, you have successfully installed and run Synology NAS Wireguard. If you’ve followed this guide, everything works now, and you can use Wireguard on a Synology NAS device.
Conclusion
Wireguard is a fantastic new protocol with excellent performance, especially compared to OpenVPN or other older protocols. However, you can’t run it out of the box as other older protocols, which makes running Synology NAS Wireguard slightly more complicated.
Fortunately, we’ve created a guide to help you install and use Wireguard on your Synology NAS device. It requires using prebuilt Wireguard Docker images or building your own SPK package. You should be successful if you’ve followed our guide to running Synology NAS Wireguard.
For Windows XP/Vista/7/8/10/11
For macOS X 10.10 or later


