
 TL;DR:
Configuring OpenVPN on TrueNAS requires first establishing a Public Key Infrastructure using easy-rsa to generate or import certificates before setting up the server and client interfaces.
● For proper OpenVPN configuration, the server Device Type must be set to TUN, AES-256-GCM should be used as the default cipher, and the client requires the Nobind option to run simultaneously with the server.
● WireGuard serves as a viable alternative VPN solution, requiring administrators to define wireguard_enable and wireguard_interfaces variables in System Tunables and create a Post Init script to load the wg0.conf file upon system boot.
● Setting OpenVPN to start automatically during the boot process requires both the data pools and network to be actively running, while the Wondershare Recoverit tool can be utilized independently to retrieve deleted TrueNAS or FreeNAS files.
Ask AI for a summary
 ChatGPT
 Perplexity
 Gemini
 Claude
 Grok
Grok
Accidentally deleted important files on TrueNAS?
No worries. Wondershare Recoverit can get back your lost files within 3 steps. The ultimate and professional NAS file recovery tool is totally reliable and 100% safe.
Are you having trouble adding a virtual private network to your TrueNAS system? If yes, this guide is for you. If you’ve been struggling with setting up your TrueNAS OpenVPN configuration, these guidelines will introduce you to the most straightforward way to get your OpenVPN on TrueNAS to work.
However, before you get to business, delve deeper into the best reasons to use a VPN on TrueNAS and how it can help protect your data and privacy. A VPN hides your location and IP address from prying eyes, thus protecting your data from hacker attacks, data loss, and other online threats.
In this article
Part 1. Why Use a VPN on TrueNAS
A VPN is an additional security level that ensures extra privacy for your private network over public resources. A VPN also enables remote clients on public networks to tap into your private network and access your data via a secure connection.
TrueNAS comes with the OpenVPN feature. It provides a VPN function that you can use as a system-grade service. That’s actually great because the OpenVPN TrueNAS system provides VPN client and server functionalities.
TrueNAS utilizes a single UDP or TCP port to enable you to use it as a primary VPN server. It doesn’t matter if your NAS system has limited access to public networks or is located in a separate location. You’ll still have the option to integrate it with a VPN.
Part 2. How To Set Up OpenVPN on TrueNAS
Here are the guidelines for getting your TrueNAS OpenVPN configuration to work.
Step 1. Get a PKI
Before you configure TrueNAS as an OpenVPN client or server, you must first get a Public Key Infrastructure (PKI). TrueNAS requires PKI to operate as a VPN. PKI requires certificate authorities and certificates that you must import to or generate in TrueNAS.
Follow these steps to get your PKI:
Linux/BSD/Unix
- Locate the easy-rsa subdirectory (/usr/share/doc/packages/openvpn or /usr/share/doc/openvpn);
- Initialize the PKI using the following set of commands:
. ./vars, ./clean-all, ./build-ca; - The next step is to generate a certificate and key using the commands:
./build-key-server serverand./build-key client.
Windows
- Go to a Command Prompt window and cd to \Program Files\OpenVPN\easy-rsa;
- Copy configuration files in the selected destination using the
init-configcommand; - Edit the vars.bat file and set the parameters (“KEY_COUNTRY, KEY_PROVINCE, KEY_CITY, KEY_ORG, and KEY_EMAIL”);
- Generate a certificate and key for the server and client using the commands:
build-key-server serverandbuild-key client.
Step 2. Configure OpenVPN Server
Follow these steps to configure your TrueNAS OpenVPN server:
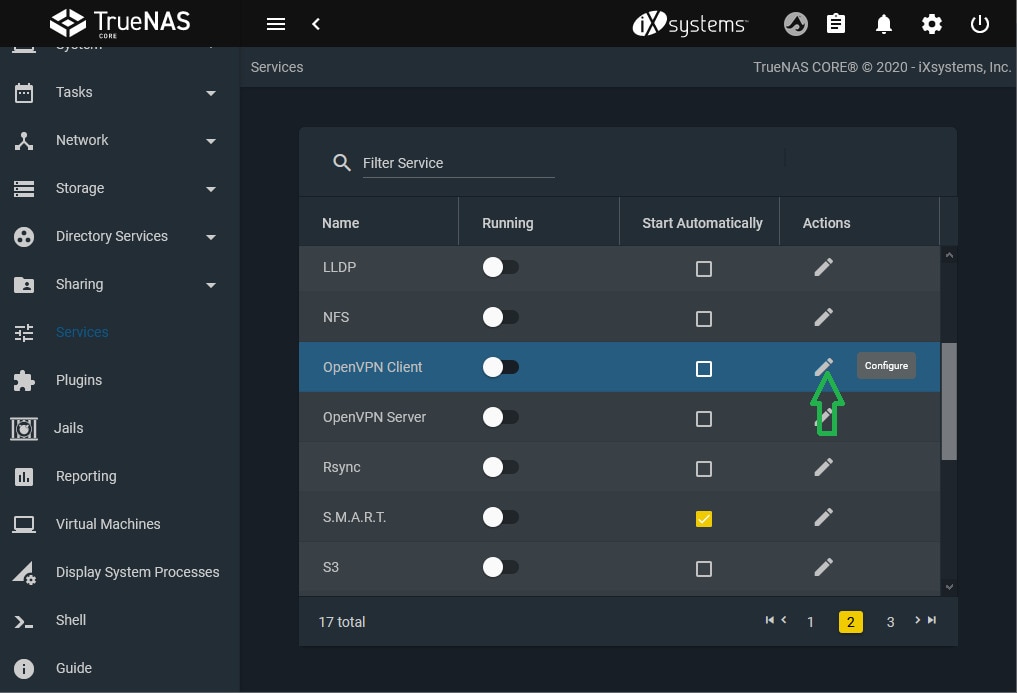
- Open Services and navigate to the OpenVPN server tab;
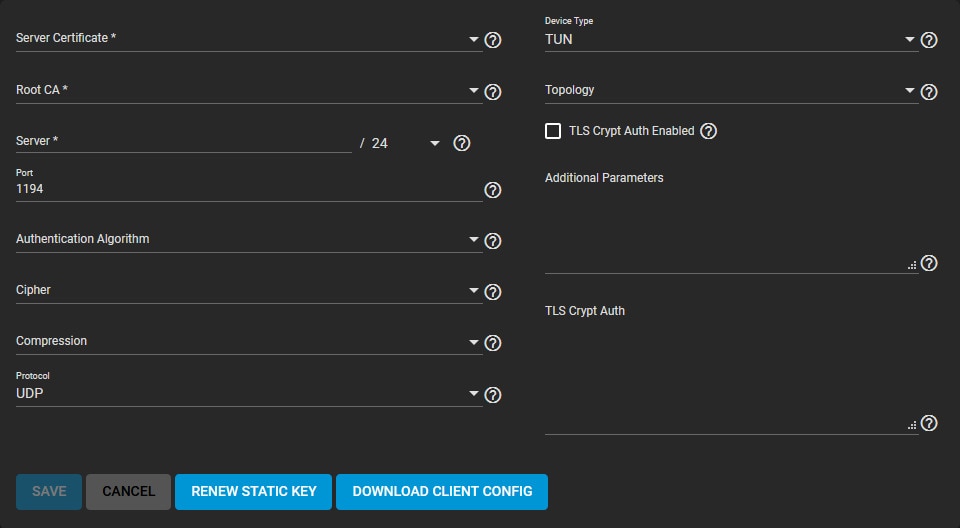
- Select Configure and choose Server Certificate (must be in active state and imported/created in TrueNAS);
- Under the Server tab, define your OpenVPN IP address and netmask;
- Proceed to Connection Settings and select your performance requirements and network environment;
- Select TUN in Device Type;
- Select a preferred virtual addressing method for your server in the Topology tab;
- If you need to change the default static key, select Renew Static Key;
- Ensure your network security is compatible with the given options by visiting the Security Options tab;
- Configure and save your server settings;
- Import client configuration files in the Client Certificate section.
Step 3. Configure OpenVPN Client
These steps will help you configure your OpenVPN TrueNAS client:
- Locate OpenVPN Client in the Services section;
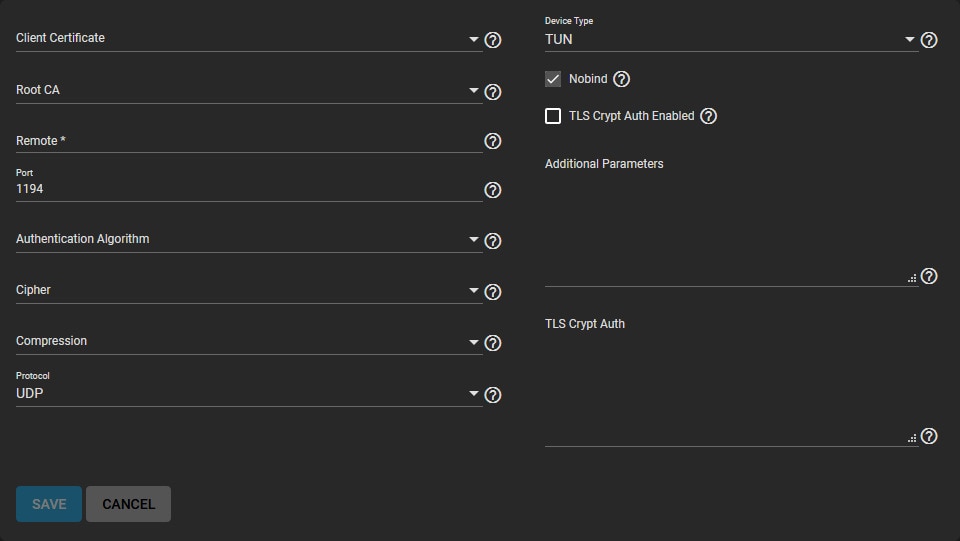
- Click Configure and select your OpenVPN certificate;
- Enter the IP address and hostname in the Remote OpenVPN server section;
- Review performance requirements, change connection settings, and ensure that your OpenVPN server device type matches the default Device Type;
- The Nobind option enables you to run your TrueNAS OpenVPN server and client at the same time;
- Ensure your OpenVPN server is set to use TLS Encryption by copy-pasting the static encryption key into the TLS Crypt Auth field.
Step 4. Activate the Service
Once you’ve finished configuring the client and server service, do the following to activate your TrueNAS OpenVPN:
- Click the related toggle in Services to activate the service;
- Hover over the toggle to check its status and current state;
- You can set up OpenVPN to start automatically whenever TrueNAS starts booting by selecting Start Automatically (data pools and the network must be running).
Step 5. Configure Security Options
Since OpenVPN offers several optional security settings, here’s how to configure your security to ensure data protection:
- Authentication Algorithm – this section allows you to set the standard algorithm to validate data exchange over your network connection. Opt for SHA1 HMAC unless your network requires a particular algorithm.
- Cipher – add another layer of security to your connection by encrypting data packages exchanged through your networking environment. Verify the cipher requirements and opt for AES-256-GCM as your default choice unless instructed otherwise.
- TLS Encryption – choose TLS Crypt Auth Enabled to encrypt all TLS data packets.
Part 3. An Alternative to OpenVPN on TrueNAS - WireGuard
If you’re looking for an excellent alternative to the OpenVPN on TrueNAS, you should opt for the TrueNAS WireGuard configuration.
WireGuard is a great solution for anyone looking for a reliable OpenVPN alternative. You can set it up and connect your TrueNAS to a WireGuard network by following these steps.
Step 1. System Tunables Configuration

Use these settings to configure system tunables for TrueNAS WireGuard:
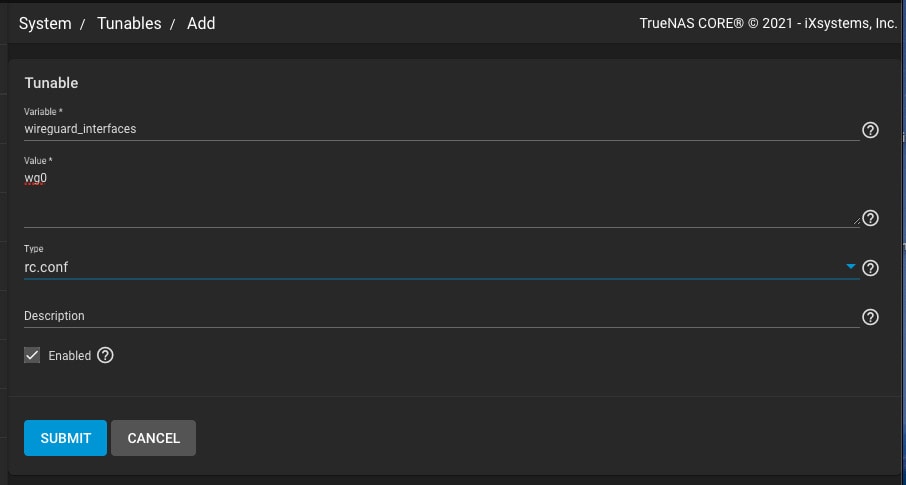
- Enable WireGuard on TrueNAS by navigating to System > Tunables > Add;
- Select Variable = wireguard_enable;
- Select YES for Value;
- Choose rc.conf under the Type section
- Define the networking interface by creating another tunable using these commands: Variable = “wireguard_interfaces”; “Value = wg0”; “Type = rc.conf”.
Your TrueNAS will now set and enable the two variables.

Step 2. Init/Shutdown Script Configuration

So, what’s next, you ask? The next step is to select the correct location for your TrueNAS WireGuard configuration at startup.
You do this by configuring a post-init script:
- Select Add in the Tasks > Init/Shutdown Scripts tab;
- Configure your system to load the WireGuard .conf file at every boot with these commands:
Type = Command
Command = mkdir -p /usr/local/etc/wireguard && cp /root/wg0.conf
/usr/local/etc/wireguard/wg0.conf && /usr/local/etc/rc.d/wireguard start
When = Post Init
Step 3. Wireguard File Configuration
Define your TrueNAS WireGuard network by configuring the /root/wg0.conf file and applying to your configuration. Wireguard fule configuration enables different use cases, such as using your smartphone to access your TrueNAS, managing your TrueNAS on a remote network, linking NAS to NAS, and using a remote laptop to access your TrueNAS data.
Here’s how to configure your Wireguard file:
- Generate the /root/wg0.conf file to apply at boot (you’ll need a valid /root/wg0.conf);
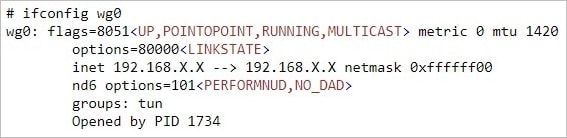
- Reboot the system to run the TrueNAS WireGuard interface;
- Navigate the output of
ifconfigto find a wg0 device.
Conclusion
These guidelines should be enough to get your TrueNAS OpenVPN and WireGuard configurations up and running. Now, aside from ensuring additional security layers for your TrueNAS data, you should also consider having a readily available NAS data recovery software to ensure your TrueNAS storage remains safe and secure.
With that in mind, the Wondershare Recoverit TrueNAS data recovery tool is an ideal solution for retrieving deleted TrueNAS/FreeNAS files.
For Windows XP/Vista/7/8/10/11
For macOS X 10.10 or later


