


 TL;DR:
Resolve the "USB Accessories Disabled" power warning on a Mac by connecting the device directly to another Mac port to bypass unpowered hubs, or by ensuring your self-powered USB hub is actively plugged into an AC adapter.
● Do not apply traditional Intel SMC reset key combinations to Apple silicon Macs, because these newer models automatically reset the SMC when you restart or shut down and power on the computer.
● If an Apple silicon Mac laptop asks "Allow accessory to connect?" instead of showing a disabled message, this is a distinct security authorization managed under System Settings > Privacy & Security > Accessories, not a USB power failure.
● Never format or erase a storage device to clear this warning, and if files remain inaccessible after the connection stabilizes, recover the data to a different healthy drive to prevent overwriting the original source.
Ask AI for a summary
 ChatGPT
 Perplexity
 Gemini
 Claude
 Grok
Grok
If your Mac shows "USB Accessories Disabled", "USB Devices Disabled", or a message saying that a connected device needs more power, start with the USB connection and power path instead of jumping straight to an SMC reset. Apple's current USB Devices Disabled guidance recommends reconnecting the device, trying another Mac port, bypassing a USB or Thunderbolt hub, and making sure a self-powered hub is connected to AC power.
Quick Answer
- First check: Safely disconnect and reconnect the accessory, then try another compatible port on the Mac.
- If a hub is involved: Connect the accessory directly to the Mac, or make sure a self-powered hub is plugged into its AC adapter.
- On Apple silicon: Do not use old Intel SMC key combinations. A restart, or a shutdown followed by power-on, resets the SMC automatically.
- If a drive works again but files are missing: Stop writing to the source drive and recover files to a different healthy drive.
In This Article
-
- Step 1. Disconnect and Reconnect the Affected Accessory
- Step 2. Try Another Port on the Mac
- Step 3. Bypass the USB or Thunderbolt Hub
- Step 4. Power a Self-Powered Hub From AC
- Step 5. Restart the Mac
- Step 6. Reset the SMC Only on an Intel-Based Mac If Needed
- Step 7. Escalate If the Warning Still Returns
Part 1. What "USB Accessories Disabled" Means on a Mac
Before trying fixes, identify which type of USB problem macOS is actually reporting. A power warning, an accessory-approval prompt, a dead USB port, and a storage device with missing files can look similar at first, but they require different actions.
The "USB Devices Disabled" warning is primarily about available USB power. Apple says drives, cameras, keyboards, hubs, and other connected devices can request a limited amount of power. When a device is not recognized and macOS says that it needs more power or that USB devices are disabled, troubleshoot the connection and power path first.
One important distinction is the "Allow accessory to connect?" prompt on a Mac laptop with Apple silicon. That is a security-authorization prompt, not the same power warning. Apple documents it separately in its accessory approval guidance for Apple silicon Mac laptops.
| What You See | What It Usually Points To | Best Next Step |
| "USB Accessories Disabled," "USB Devices Disabled," or "device needs more power" | Insufficient power somewhere in the current USB connection path | Reconnect, try another Mac port, bypass the hub, or power the self-powered hub from AC. |
| "Allow accessory to connect?" | Accessory authorization on a Mac laptop with Apple silicon | Unlock the Mac and approve the accessory, or review Privacy & Security > Accessories. |
| No power warning, but several known-good USB devices fail on the Mac | A broader USB-port or Mac connection problem | Use the dedicated Mac USB ports not working guide. |
| The storage device reconnects, but files are missing or inaccessible | A data-loss or storage problem after the connection issue | Stop new writes and move to the recovery path in Part 5. |
Part 2. Protect Your Data Before Disconnecting a USB Drive
If the affected accessory is an external SSD, hard drive, USB flash drive, memory-card reader, or camera, protect the data before repeated troubleshooting. The goal is to avoid turning a connection problem into a larger data-loss problem.
- If the drive is still mounted and a file transfer is stable, let the current operation finish, then eject the drive before unplugging it.
- If files have already disappeared, stop copying new data to the source device. New writes can overwrite recoverable data.
- Do not erase, initialize, or reformat a storage device just to clear a USB power warning.
- If the drive reconnects but files are corrupted or unreadable, use the dedicated corrupted or unreadable USB flash drive guide rather than treating file corruption as a USB-power issue.
- If a hard drive repeatedly disconnects, makes unusual mechanical noises, smells burnt, has liquid damage, or shows severe physical damage, stop powering it on and use a professional recovery service rather than repeated software scans.
Note: Data-protection steps matter most when the accessory contains irreplaceable files. Repair, erase, and formatting operations should come only after important data has been copied or recovered whenever that is still possible.
Part 3. How to Fix "USB Accessories Disabled" on Mac
Now that you have separated the power warning from data-loss and authorization problems, work through the fixes below in order. The first four follow Apple's warning-specific guidance; later steps are escalation options when the message keeps returning.
Step 1. Disconnect and Reconnect the Affected Accessory
Start by refreshing the physical connection without changing the disk itself. If the accessory is removable storage and is still mounted, eject it first. Then disconnect the accessory, wait a moment, and reconnect it securely. If several USB devices are attached, reconnect them one at a time so you can identify which connection causes the warning to return.
Step 2. Try Another Port on the Mac
The next check is whether the warning follows the accessory or stays with one port. Connect the same accessory to another compatible port on the Mac. If the warning disappears but one port remains unusable with multiple known-good accessories, the problem has moved beyond this warning-specific page and should be handled as a broader USB-port issue.
Step 3. Bypass the USB or Thunderbolt Hub
If changing ports does not help, simplify the connection path. When the accessory is connected through a USB hub, Thunderbolt hub, dock, display, or adapter chain, connect it directly to the Mac when possible. This removes a shared connection from the power path and is one of Apple's recommended checks for this warning.
Step 4. Power a Self-Powered Hub From AC
If you need to keep using a hub, verify how that hub receives power. A self-powered hub has its own external power adapter; make sure that adapter is connected and working. A powered hub can help when the shared connection does not provide enough power, but it will not repair a faulty accessory, cable, hub, or Mac port.
Step 5. Restart the Mac
If Apple's connection and power checks do not clear the warning, restart the Mac before trying controller-level steps. On a Mac with Apple silicon, Apple says no manual SMC key sequence is required: restarting, or shutting down and powering the Mac back on, resets the SMC automatically.
Step 6. Reset the SMC Only on an Intel-Based Mac If Needed
If the Mac is Intel-based and the warning persists after the earlier checks, an SMC reset can be considered as a later troubleshooting step. The SMC manages functions that include USB port power, but Apple also says that most users do not need to reset it. Confirm the Mac type and follow Apple's current SMC reset instructions rather than using an old one-size-fits-all key combination.
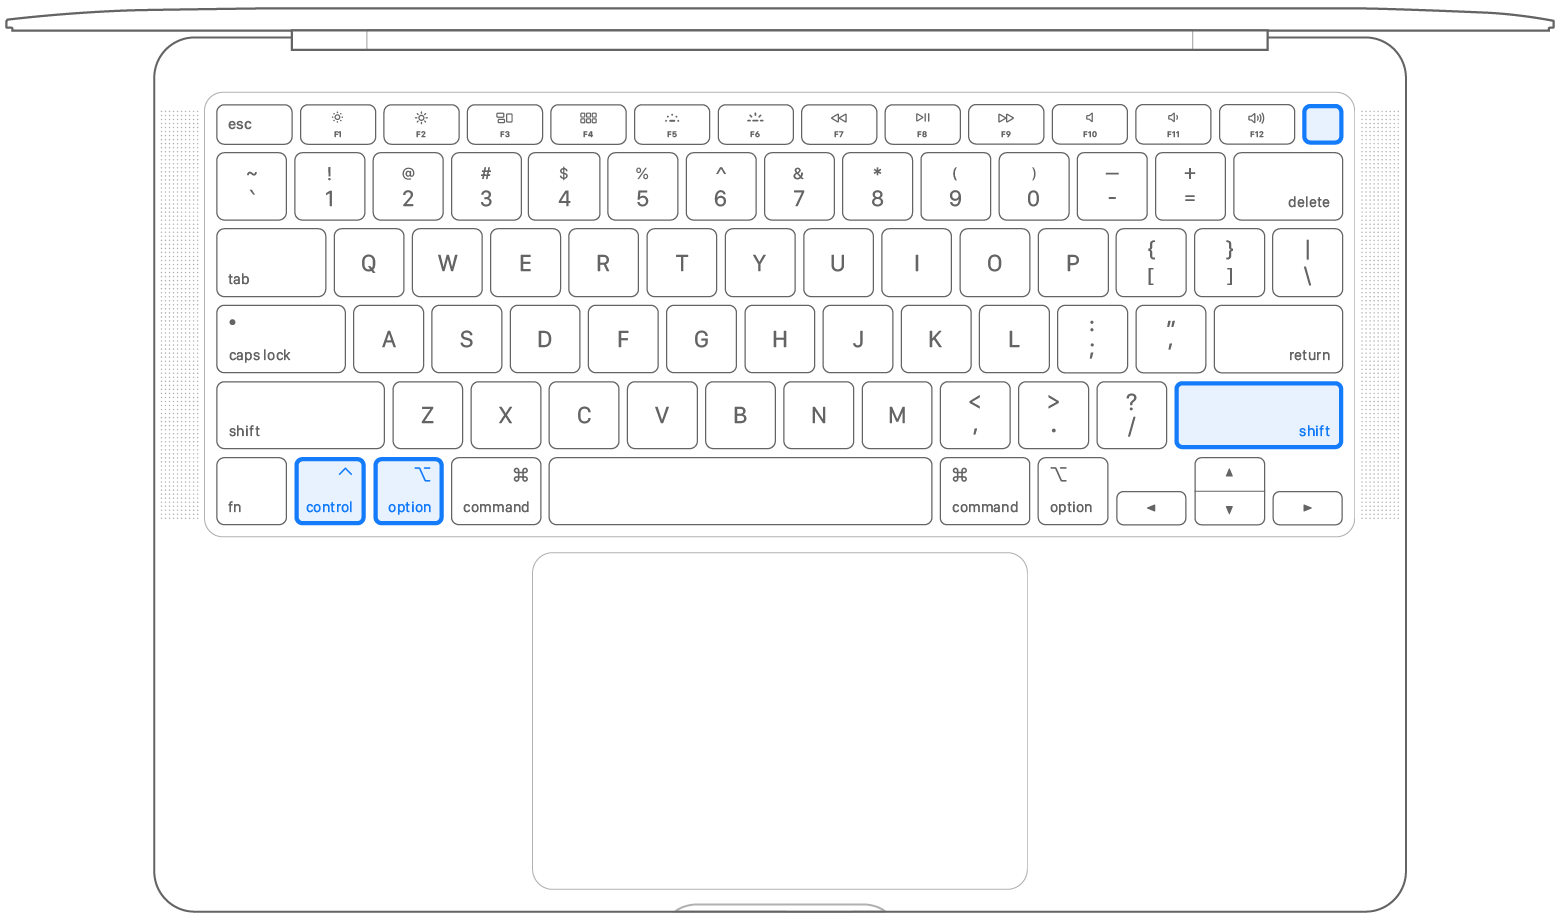
Intel Mac Laptop With the Apple T2 Security Chip:
- Shut down the Mac.
- Hold left Control, left Option (Alt), and right Shift for 7 seconds.
- Keep holding those three keys and also hold the power button for another 7 seconds.
- Release all keys, wait a few seconds, then press the power button to turn on the Mac.
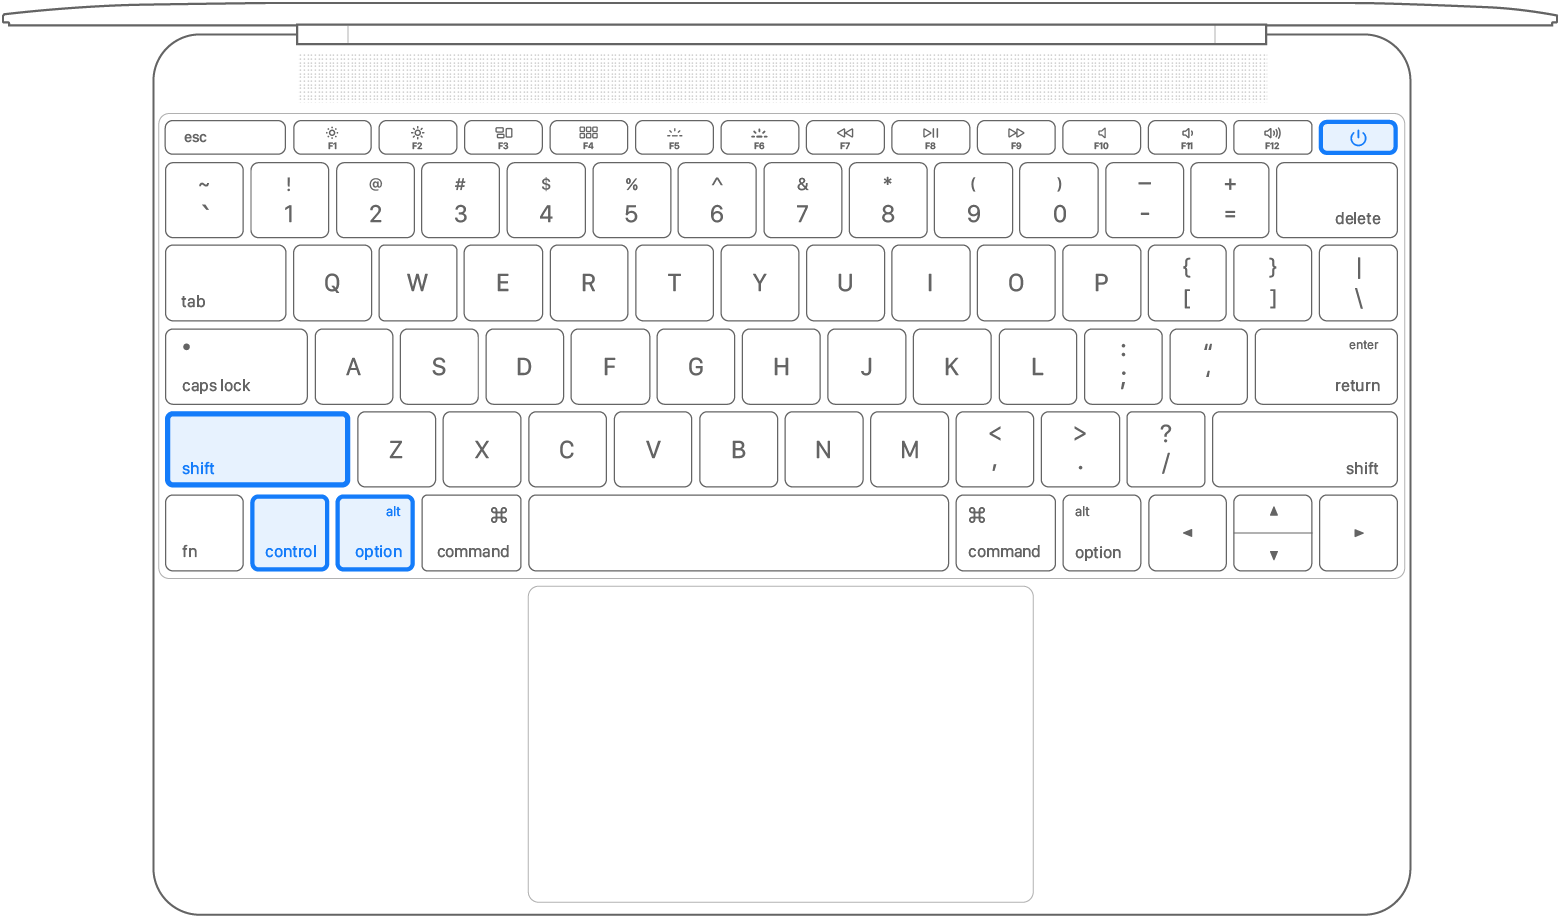
Intel Mac Laptop Without Apple Silicon or a T2 Chip:
- Shut down the Mac.
- Hold left Shift, left Control, left Option (Alt), and the power button together for 10 seconds.
- Release all keys, then press the power button to turn on the Mac.
Intel Desktop Mac: Shut down the Mac, unplug the power cord for 15 seconds, reconnect it, wait 5 seconds, and then turn the Mac on. Apple provides the same unplug-and-wait sequence for a desktop Mac with the T2 chip.
Step 7. Escalate If the Warning Still Returns
If the warning survives the power-path checks and the correct Mac-specific restart or SMC path, stop repeating the same resets. If one known-good accessory connected directly to the Mac still triggers the warning, or the message returns when no external accessory is connected, use Apple Support for hardware-level diagnosis. Avoid destructive disk actions or unverified Terminal commands just to suppress the message.
Part 4. Is It Actually "Allow Accessory to Connect"?
If the message on screen asks you to allow an accessory rather than saying USB devices are disabled, switch from power troubleshooting to accessory authorization. On a Mac laptop with Apple silicon, a new or unknown USB, Thunderbolt, or SD-card accessory can trigger an approval prompt. Apple says this is expected security behavior.

If you dismissed or denied the prompt, reconnect the accessory. You can also review the current setting by following Apple's USB and accessory connection guidance:
- Choose the Apple menu and open System Settings.
- Select Privacy & Security.
- Scroll to Accessories.
- Choose the appropriate "Allow accessories to connect" behavior. Apple lists "Ask for new accessories" as the default.

This setting does not solve a real "USB Devices Disabled" power warning. Use it only when macOS is asking for permission to connect the accessory.
Part 5. Recover Files After the USB Connection Works Again
Once the connection problem is resolved, check the storage state before doing anything destructive. Recoverit becomes relevant only if the external device is detectable but important files are deleted, formatted, missing, or inaccessible. If macOS detects the drive but Finder does not show it normally, use the dedicated external hard drive not showing up on Mac guide for that separate detection or mounting path.
For a detectable device with genuine data loss, the current Recoverit for Mac user guide follows a select, scan, preview, and recover workflow. The three steps below keep the recovery process focused on preserving the source device.
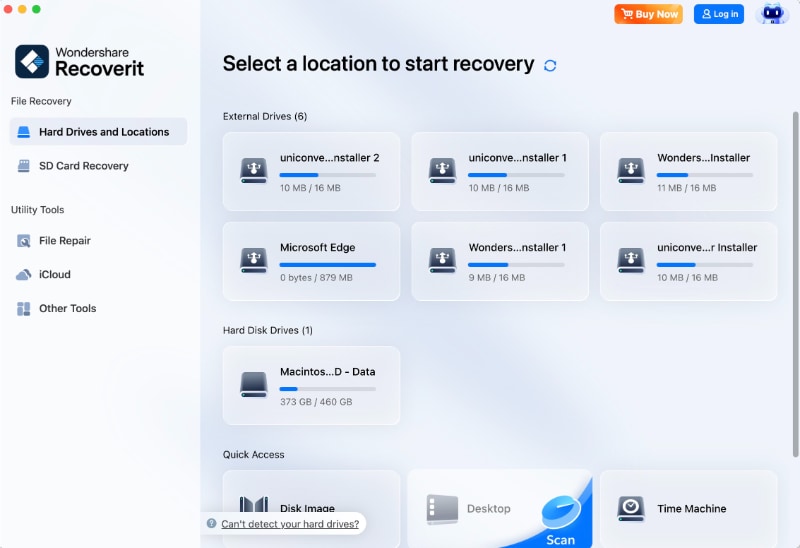
Step 1. Select the External Device
Connect the storage device directly and launch Recoverit for Mac. Choose the affected external device as the target location. If the source is specifically a USB flash drive, the USB flash drive recovery on Mac guide covers that recovery scenario in more detail.
Step 2. Scan the Removable Media
After selecting the source device, start the scan and use the available path, file-type, and search filters to narrow the results. Avoid copying new files to the source device while the scan is in progress because new writes can overwrite data that might still be recoverable.

Step 3. Preview and Recover to a Different Drive
When the scan returns results, preview the files you need, select the recoverable items, and click Recover. Save recovered files to a different healthy drive or location, not back to the source device, so the recovery process does not overwrite additional data.

No recovery software can guarantee that a file will be recoverable after its data has been overwritten. If the device repeatedly disconnects, makes unusual noises, overheats, or shows other signs of physical failure, stop scanning and use a professional recovery service.
Part 6. What Not to Do
When the warning involves a storage device, some common troubleshooting actions can create more risk than the original USB problem. Keep these actions out of the first-line workflow unless the connection is stable and important data is already protected.
- Do not format or erase the drive to fix a power warning: Formatting changes the storage device and is unrelated to Apple's first-line USB power fixes.
- Do not use old SMC shortcuts on Apple silicon: Apple says the SMC resets automatically when an Apple silicon Mac restarts or is shut down and powered on.
- Do not make Terminal or NVRAM resets your first move: Apple's warning-specific guidance starts with reconnecting, changing ports, simplifying the connection, and supplying AC power to a self-powered hub.
- Do not keep power-cycling a physically failing drive: Repeated attempts can worsen a hardware problem and reduce the chance of safe recovery.
Part 7. How to Prevent the Warning From Returning
After the Mac and accessory are working normally again, a few connection habits can reduce the chance of seeing the same power warning during future transfers or backup sessions.
- Give high-demand storage devices a direct Mac connection when practical.
- If several devices must share a hub, use the hub with its intended external power adapter when it is designed to be self-powered.
- Replace visibly damaged USB or Thunderbolt cables and avoid loose adapter chains.
- Eject external storage before unplugging it and keep a separate backup of irreplaceable files.
- If the same accessory repeatedly triggers the warning on different ports or computers, stop relying on it until the accessory and its cable or power supply can be checked.
Conclusion
When a Mac reports "USB Accessories Disabled" or "USB Devices Disabled," begin with the connection and power path: reconnect the accessory, change ports, bypass the hub, and supply AC power to a self-powered hub. Treat Apple silicon accessory approval as a separate security prompt, and reserve manual SMC resets for the appropriate Intel Mac cases. If the storage device becomes detectable but files are missing or inaccessible, protect the source from new writes before starting data recovery.
Recover Files After the USB Connection Works Again
 Security Verified. Over 7,302,189 people have downloaded it.
FAQ
-
Why does my Mac say "USB Accessories Disabled"?
Apple's warning-specific documentation says connected devices can request a limited amount of power. If a device is not recognized and macOS reports that it needs more power or that USB devices are disabled, first reconnect it, try another Mac port, connect it directly instead of through a hub, and make sure a self-powered hub is connected to AC power. -
How do I re-enable USB accessories on a Mac?
For the power warning, start with the connection: reconnect the accessory, try another port, bypass the hub, and power a self-powered hub from AC. If the issue persists, restart the Mac. Use an SMC reset only as an Intel-specific later step, not as the universal first fix. -
Where is "Allow accessories to connect" on Mac?
On a Mac laptop with Apple silicon, open System Settings > Privacy & Security > Accessories. Apple says "Ask for new accessories" is the default option. This setting controls accessory authorization, not USB power overload. -
Do M-series Macs need an SMC reset for USB problems?
No manual SMC key sequence is needed on a Mac with Apple silicon. Apple says restarting, or shutting down and turning the Mac back on, resets the SMC automatically. -
Will a powered USB hub fix "USB Accessories Disabled"?
It can help when the current shared connection does not provide enough power. Apple specifically advises making sure a self-powered USB or Thunderbolt hub is connected to an AC adapter. It will not fix a faulty accessory, cable, hub, or Mac port. -
What if the warning appears when nothing is plugged in?
Restart the Mac. If the warning returns with no external accessory connected, the normal warning-specific connection checks are exhausted, so contact Apple Support rather than repeatedly resetting or erasing devices. -
Can Recoverit fix the USB power warning itself?
No. Recoverit is a data recovery tool, not a USB power-management repair tool. Use it only after the storage device is detected and you have a real data-loss problem such as deleted, formatted, missing, or inaccessible files.


