Phones primarily use SD cards as additional or expandable external storage. However, nowadays, it is also being used for other aspects, such as your laptop, computer, and more. Nonetheless, once you are to use your USB or SD card on a new device, it is advisable to format it.
Formatting the new SD card ensures it is prepared for the new device. Under some circumstances, you may fail to format the SD card on Ubuntu Linux, a commonly used operating system. In this case, you may use an SD formatted Ubuntu to streamline and speed up the formatting process. There are a variety of methods that you can use to format the USB or SD card in Ubuntu Linux.
This blog guides you on how to format SD card Ubuntu. Go through it to improve your understanding and make the process easier.
Worried for Data from Formatted SD Card, Try Wondershare Recoverit to Perform Data Recovery

In this article
Which File System to Use for SD Card Formatting?
The file system you use for an Ubuntu format SD card completely depends on the card's capacity and whether it is supported. The file system that the device supports will have a huge role in determining whether formatting will be easier or faster.
Some of the top file systems to use for SD card formatting are as follows:
- FAT 12/16: This is applicable for SD cards up to 2 GB.
- FAT32: This is an ideal choice for SD cards up to 32 GB. However, this cannot transmit files larger than 4 GB.
- exFAT: This is usually beneficial for SDXC or microSDXC. It has a capacity of over 32 GB and can easily transfer large files. This may not be compatible with all the devices.
- NTFS: Also referred to as New Technology File System, is mostly compatible with Windows computers. Not only does it offer larger file support, but it also assists with data encryption.
- EXT: Linux operating systems are always covered by EXT or Extended File System. Comparatively, this offers better compatibility with Linux systems, improved performance, and security. This file system will not be available for macOS or Windows OS.
When formatting the SD card, it is usually advisable to use exFAT because it offers better compatibility. However, when it comes to Linux, it is advisable to opt for EXT only.
Why You Might Need to Format an SD Card in Ubuntu Linux?
When you opt for an Ubuntu format SD card, it is important to understand what are the main reasons behind it. Some of the common reasons for which you need to format the SD card in Ubuntu Linux are as follows:
- Malware and virus infection can hamper the storage devices. Therefore, when you try to access the SD card, you will constantly receive error messages and warnings. Therefore, it is advisable to use Ubuntu SD format to completely erase malware and viruses. Formatting improves the performance of Ubuntu and makes it operational.
- If you are going to begin any new work using the SD card, it is best to format it. This not only cleans the SD card and removes all data but also plays an important role in refreshing the SD card.
- Under some situations, there may not be any technical reason for the Ubuntu format SD card. However, the SD card may have had any data that could be used across all devices. Therefore, formatting the SD card will help to remove all the unwanted data from the respective SD card.
- When you are to use SD cards across different systems, it is advisable to format them the same to determine compatibility. Different devices have different compatibility requirements. Therefore, you must change the file system and make it compatible with the respective device. Conducting Ubuntu format may help to fix the issue.
How to Format an SD Card on Ubuntu Linux?
Before you opt to learn how to format an SD card on Ubuntu Linux, it is important to make sure of a few things. These include:
- You must ensure to take a back up of all data on your SD card and ensure that it is backed up without any abnormalities.
- There should not be any physical damage on the SD card as it will lead to severe errors and prevent the card from being read.
- The computer or laptop on your formatting device should be connected to power.
Once you have met the above-mentioned criteria, you may follow the steps given below for how to format sd card in ubuntu:
Method 1: Format SD Card in Linux Using Disk Utility
You can format an SD card in Linux using the Disk Utility feature. This is one of the most convenient methods and will determine proper formatting in the long run.
Below are the steps to format SD card Ubuntu using the Disk Utility Feature on Linux:
Step 1: Using a card reader, insert the SD card into your system. Then, visit the file manager and check if the SD card is reflecting. From the Applications menu in the system, you need to open the Disk Utility feature.
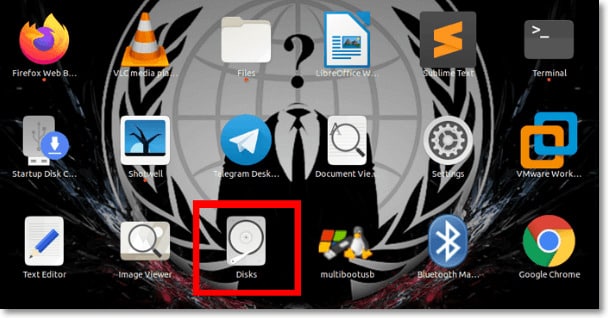
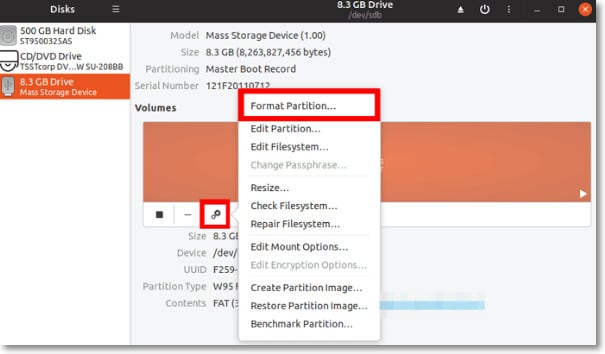
Step 2: On the top left panel, you will get the SD card option, open it. Now, click on the Gear icon to open the Settings menu on your screen. From the drop-down menu, click on the Format Partition option.
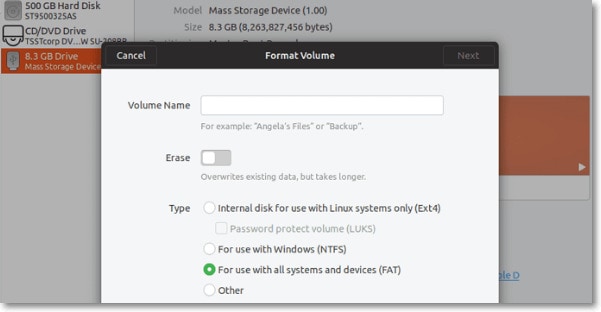
Step 3: A new window will open wherein you can get all the options for formatting the SD card. Customize the settings on this window, like Volume Name, to define the tag for the SD card. Here, you will receive an Erase option as well, toggle it on. This will help to remove all data from the SD card. Next, click on the Ok option.
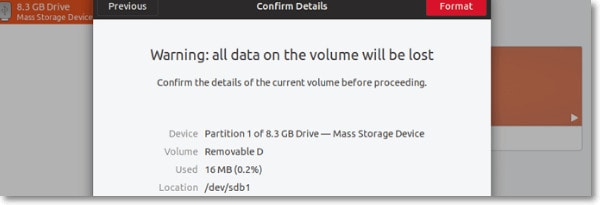
Step 4: In the next window, you will receive a warning message prompting you to determine the confirmation of Ubuntu format. Confirm the process by clicking on the Format button.
Method 2: Format SD Card in Linux Using Terminal
You must have an active Terminal on your Linux device to format SD card Ubuntu. It is advisable to adopt the right steps to format the SD card via Terminal.
Below is a step-by-step guide on how to format an SD card in Ubuntu using Terminal:
Step 1: Connect your SD card to the Linux device. Now, browse through the Applications menu and locate the Terminal app. As soon as the Terminal app is launched, use any of the commands given below to determine if the drive is formatted:
sudo df
sudo df-h
sudo fsdisk -I

It is very important to identify the right drive so as to execute the task appropriately.
Step 2: If the SD card is mounted, you will have to unmount it. You can unmount the same from the command line on the Terminal app by writing the following command:
sudo unmount

Step 3: Browse to the drive on your Linux system. Based on the file system in your app, you can enter any of the commands below to execute the process. These commands for different file systems include:
For vFAT:
sudo mkfs.vfat /
For NTFS:
sudo mkfs.ntfs /
For EXT4:
sudo mkfs.ext4 /

Method 3: Format the USB Drive in Linux Using the GParted Tool
If you have a format USB Drive in Linux using GParted Tool, you must install the same on your device. The GParted Tool is considered to be one of the most efficient tools for formatting USB drives or SD cards in Linux.
Below are the steps you need to follow to format USB Drive in Linux using the GParted Tool:
Step 1: Install the GParted Tool in Your Linux System
Open Terminal and write the command ‘sudo apt install gparted -y’ to install the GParted Tool.
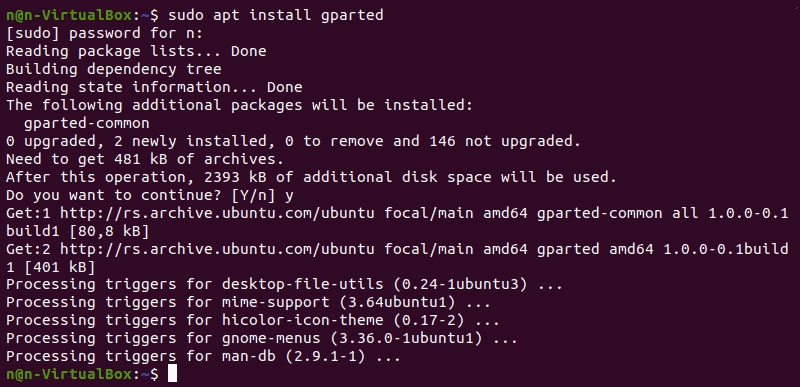
Once the tool is installed in your Linux system, run it with the command ‘sudo gparted’. The terminal will open the GParted program.
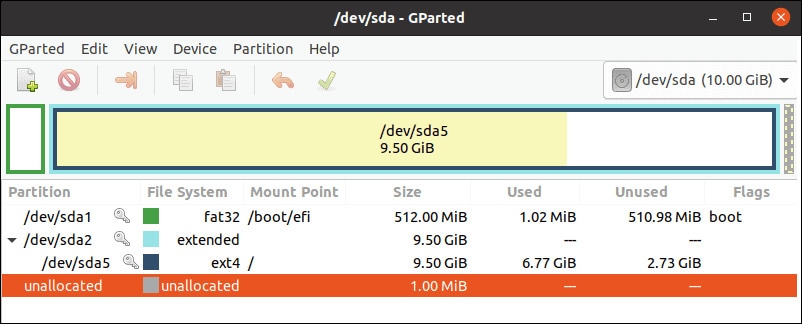
Step 2: Select the USB Device and File System
On the top of the GParted home screen, you will need to choose your device from the drop-down menu.
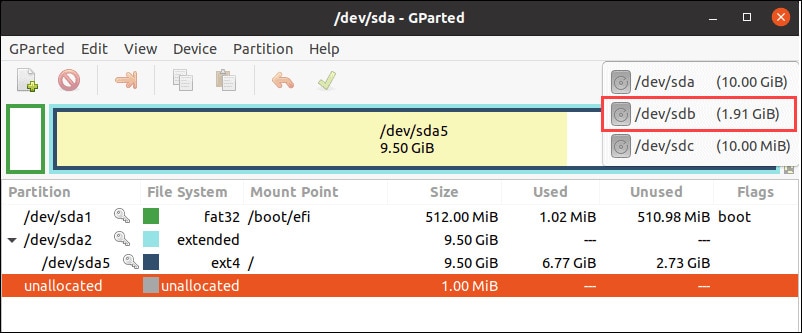
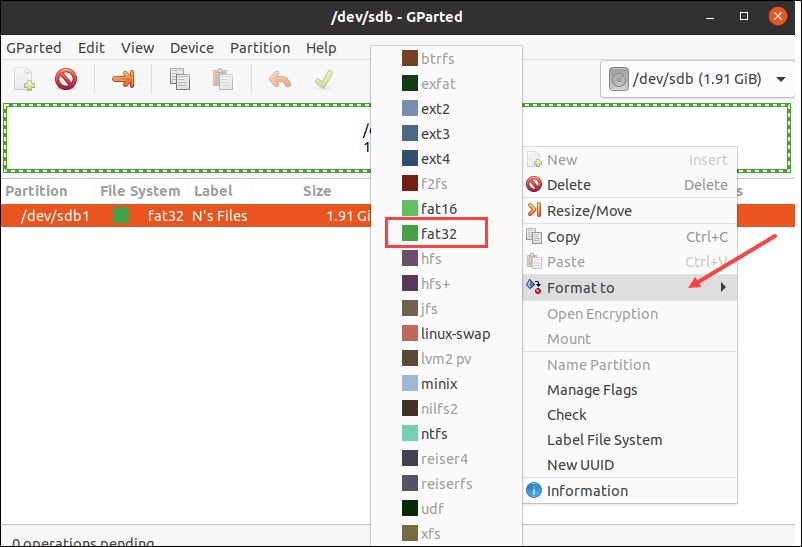
Right-click on the partition, and from the drop-down menu, click on the Format option. From the list, you will have to select a preferred file system.
Step 3: Initiate the Formatting Process
You will come across the green checkmark option on the taskbar on the taskbar. Click on it to apply all operations.

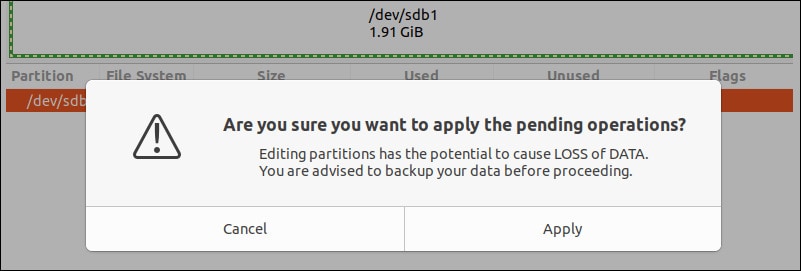
On your GParted Tool screen, you will receive a pop-up screen with a warning message about the data deletion procedure. This will prompt the GParted Tool to initiate the Ubuntu format. However, the time taken for the formatting procedure will depend on the size and type of the USB drive.
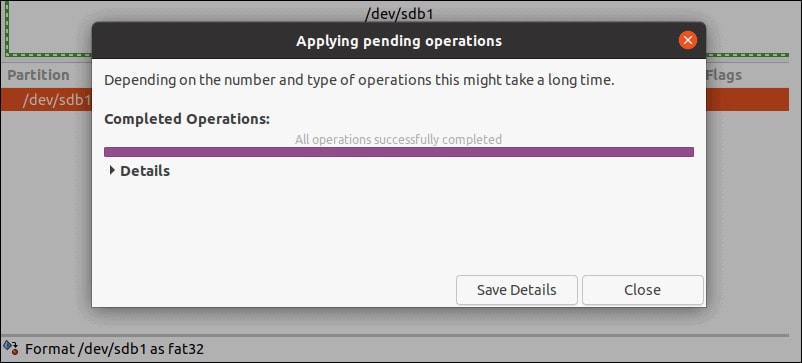
Once the formatting is completed, click the Close button to edit the menu from the GParted Tool.
Worried About Losing Data? Backup Your SD Card Contents First With Wondershare Recoverit
When you are formatting your data, one thing you must take care of is to get a backup of all the data. However, sometimes you accidentally delete all the data as a result of formatting. Such a situation can be highly frustrating. Therefore, you may want to back up your SD card using Wondershare Recoverit.
- Wondershare Recoverit is one of the top tools through which you can get a backup of all the data from the formatted or corrupted SD card.
- Wondershare Share Recoverit helps in getting a backup of data from the SD card due to a virus attack, accidental deletion, or formatting.
- The success rate of backup and recovering data from Wondershare Recoverit is usually higher.
Wondershare Recoverit is available for data recovery for both macOS and Windows OS devices. You can leverage the benefits of the free version as well as the paid version. You need to download and install Wondershare Recoverit on your system to back up the data from the SD card.
Below are the steps through which you can back up the SD card content in case you're worried about it using Wondershare Recoverit:
Step 1: Launch the Software and Connect the SD Card to the Device
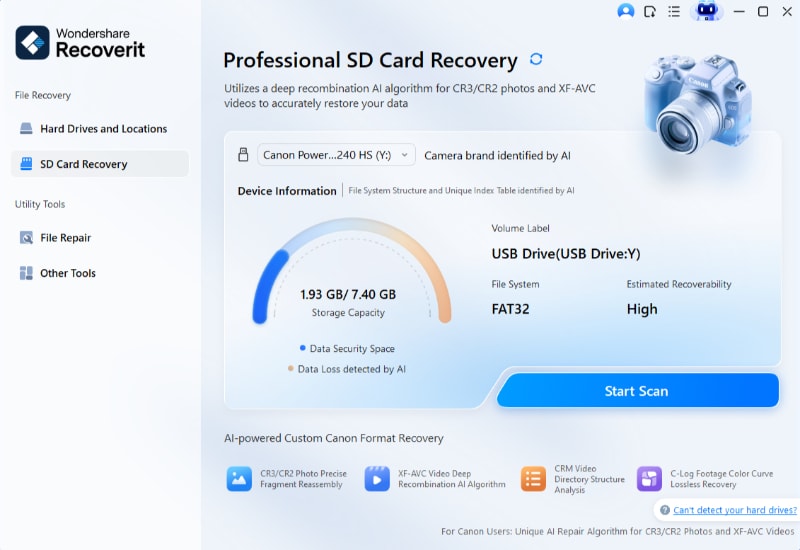
Once Wondershare Recoverit is installed in your system, you need to launch in. In this case, you need to connect your SD card to the device for it to be read. Once the SD card is ready by the device, it will reflect under the SD card section in Wondershare Recoverit. Now, click on the SD card and hit the Scan button.
Step 2: Scan the Damages SD Card
Wondershare Recoverit will begin scanning the card and look for all the files to back them up. The first scan should provide the relevant results. If it does not, or you're unsatisfied with the results, you must run Deep Scan mode. The Deep Scan mode will scan the card for more files.
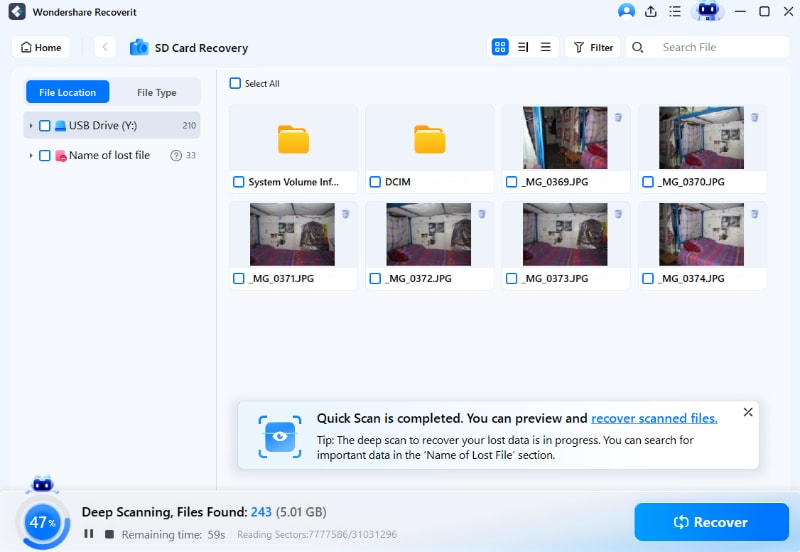
Step 3: Preview and Recover the Files
At the end of Deep Scan, you will get all the data from the SD card. You can take a preview of all the data on the SD card and check if that's all you need. Now, click on the Recovery button next to those files and click on the Recover option. This will save the files on your computer’s hard drive. As a result, you will get an additional backup of all the data.

Methods to Recover Files from SD Cards on Ubuntu Linux
You will probably lose all the data once you use an Ubuntu format SD card. However, sometimes you will want to recover the files. In this case, you may use Ubuntu Linux to recover files from the SD cards. Below are some of the top methods through which you can recover the files from an SD card on Ubuntu Linux once that has been formatted:
Method 1: Repair the SD Card With Ubuntu’s GNOME Disk Utility
The GNOME Disk Utility feature of Ubuntu is one of the top methods to look forward to when recovering data. It repairs the SD card and ensures that the storage is available.
Here are the steps to repair the SD card with GNOME Disk Utility:
Step 1: Launch GNOME Disk Utility on your device.
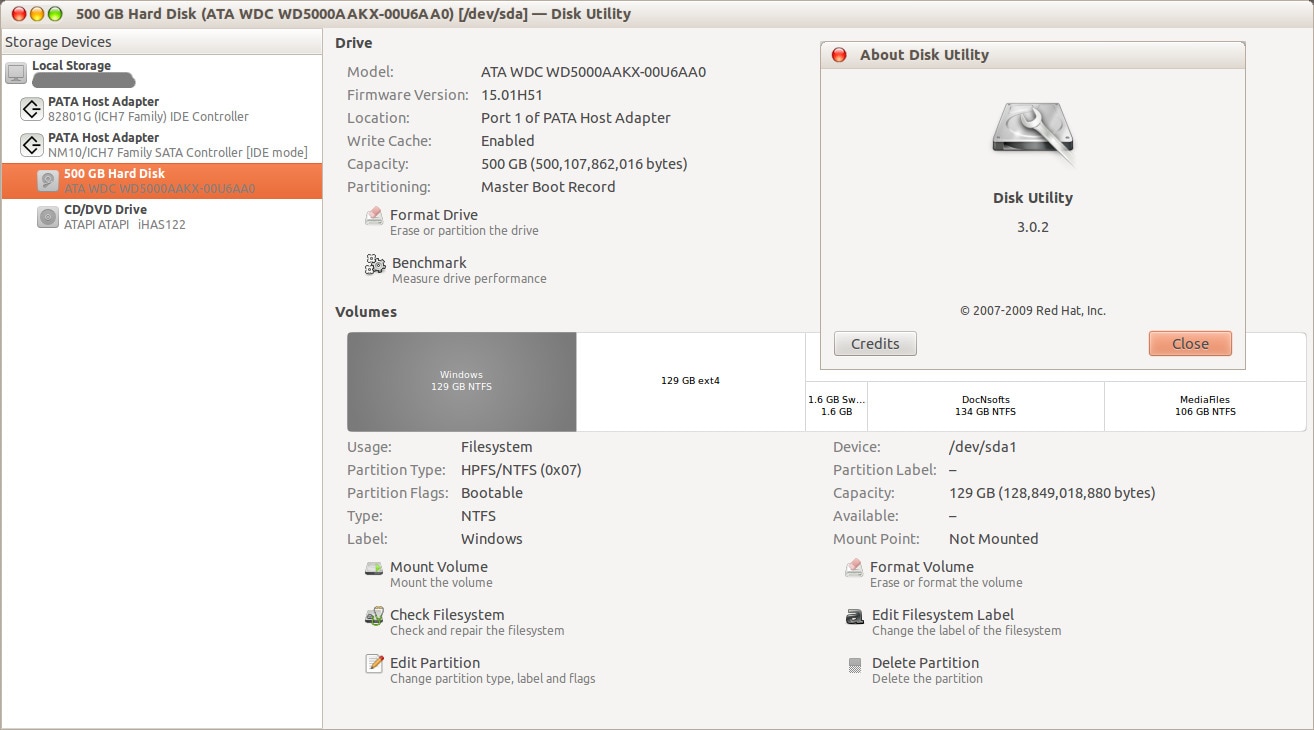
Step 2: Browse for the file you're searching for using flash reader. This is available under the ‘single flash reader' option.
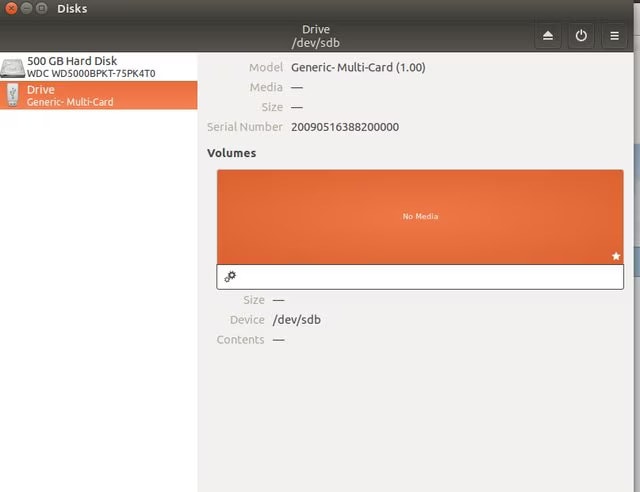
Step 3: If this is available under the storage graph, select the downward-facing around and mount it. Once the device is mounted, you can begin with copying the files.
Step 4: You will sometimes receive the No Media option. Therefore, disconnect it and connect the card again. Now, click on the gear icon and proceed with the Create disk image option.
Step 5: Next, save the image files. Then, proceed to the next step.
Step 6: Eject the card properly from your PC. Now, connect a new SD card of the same size to the system. Go to the gear menu and write the disk image into the newly connected card.
Step 7: Mount for the new file system. The new card should be blank before mounting the new files, or else the existing data will be overwritten and lost.
Step 8: After you unmount the partition, Ubuntu may still detect it. However, a consistency check should be run to determine the proper file system recovery. If FAT32, FAT 16, or FAT 12 is detected, you can run the sudo fsck.msdos -r /dev/sdd1 command. sdd1 is usually the code assigned to the partition in the disk utility.
Step 9: Once the card is formatted to be compatible with the Linux file system, enter fsck.ext# and check if it is working. # is the ext number of the code.
Method 2: Recover Deleted or Lost Photos From an SD Card with PhotoRec for Linux
PhotoRec can also help recover the files. It doesn't let you fix it, but simply recover the data.
So, you can follow the steps given below to recover deleted or lost photos from an SD card with Photorec:
Step 1: Install PhotoRec using the command sudo apt-get install photorec.
Step 2: Once installed, enter photorec on your terminal and run it. Hit the Enter key on the keyboard.
Step 3: Select the SD card from the given SD card list on Photorec.
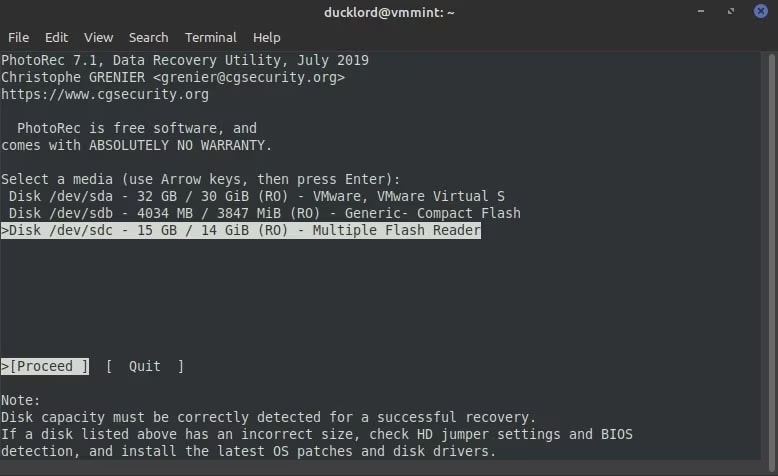
Step 4: Although partition will be detected, it is advisable to move ahead with the No Partition option for a complete scan of lost disk files.
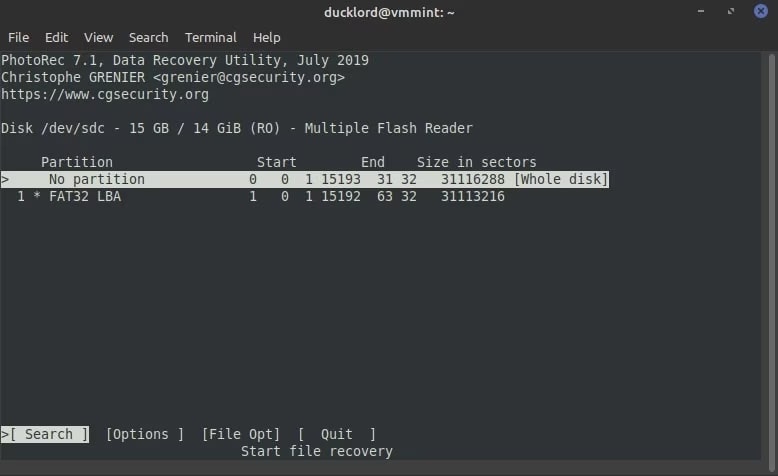
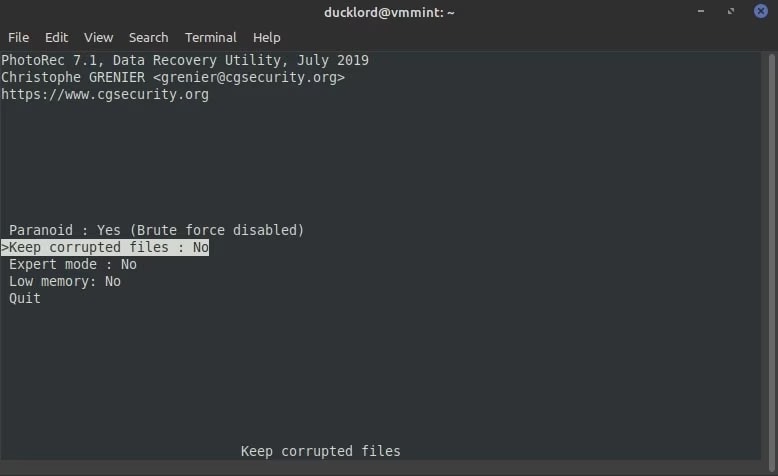
Step 5: Browse to Options and click on the Keep Corrupted files option. This may be unused, but it will help you save the fragmented test files. Enable Low Memory Mode before hitting the exit from the options page.
Step 6: Once you are on the main menu, check for all the files that you want PhotoRec to recover.
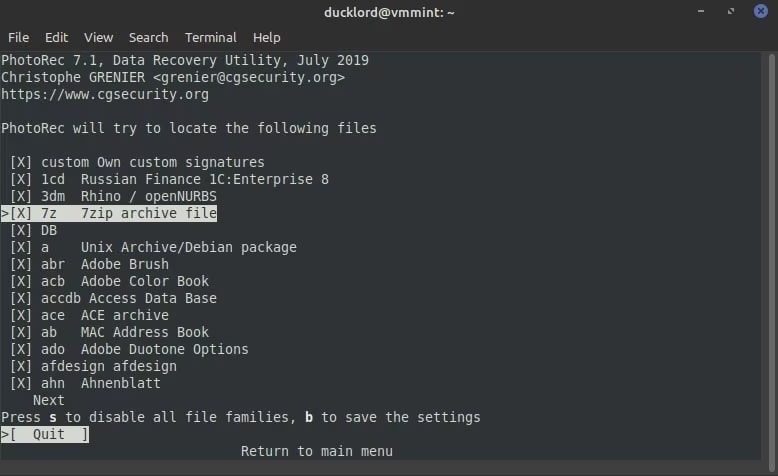
Step 7: Disable the files that you don't want to recover. This speeds up the scan process.
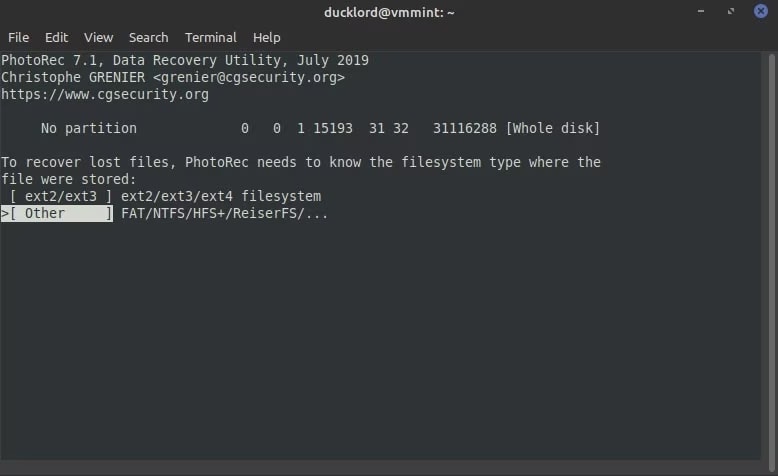
Step 8: You will receive a prompt from PhotoRec on how you want to scan the files system on the SD card. Select Others.
Step 9: Select the destination folder where you want to recover the files.
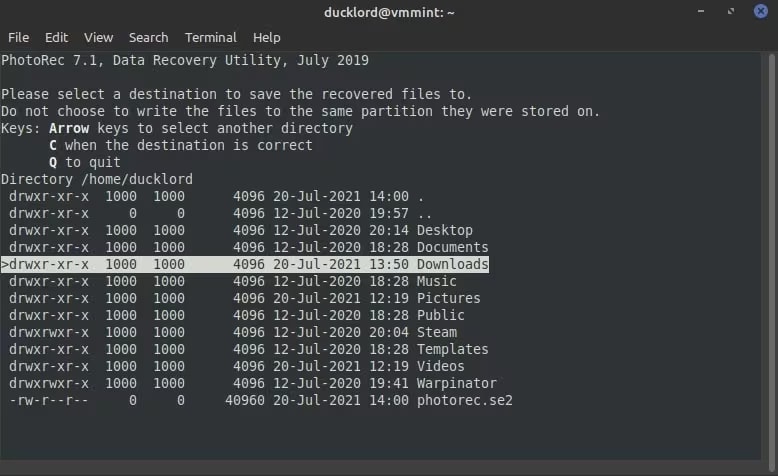
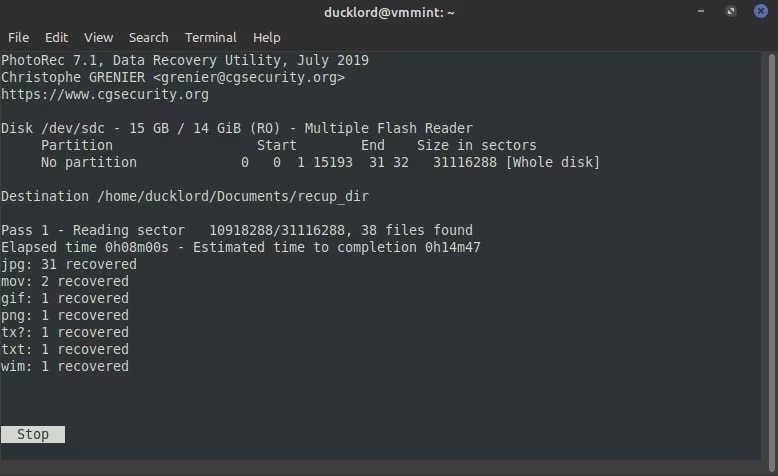
Step 10: PhotoRec will initiate the scan process and then provide a list of files that it has located. Terminate the process as soon as the file you're looking for is detected.
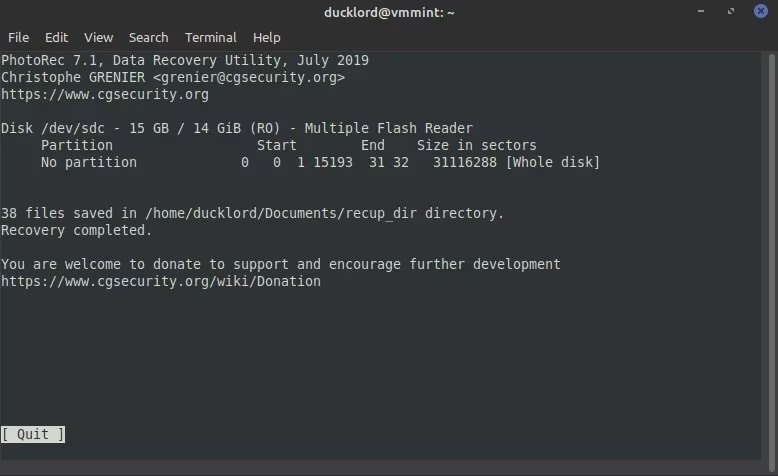
Step 11: As soon as the termination is over, you will receive a reminder from PhotoRec about the location where the recovered folders are saved and a number of files detected.
Method 3: Repair the SD Card on a Dual-Boot Ubuntu System
Dual-boot is one of the prominent methods on the Ubuntu system, which may help recover lost data from the FAT devices. You can follow the steps below to repair the Ubuntu format SD card:
Step 1: Reboot your computer. As soon as the GRUB option appears, use the required keyword to prompt it to initiate the Microsoft installation process.
Step 2: Press Windows + E on your keyboard and open Windows Explorer.
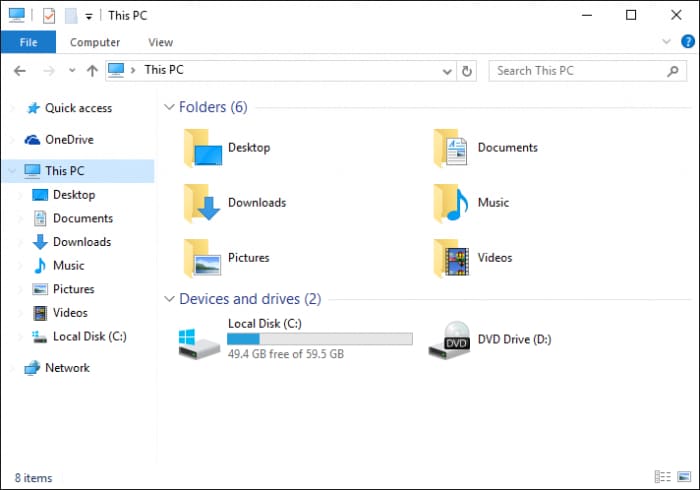
Step 3: Browse to the drive letter assigned to the memory card.
Step 4: Launch the Command Prompt from your keyboard.
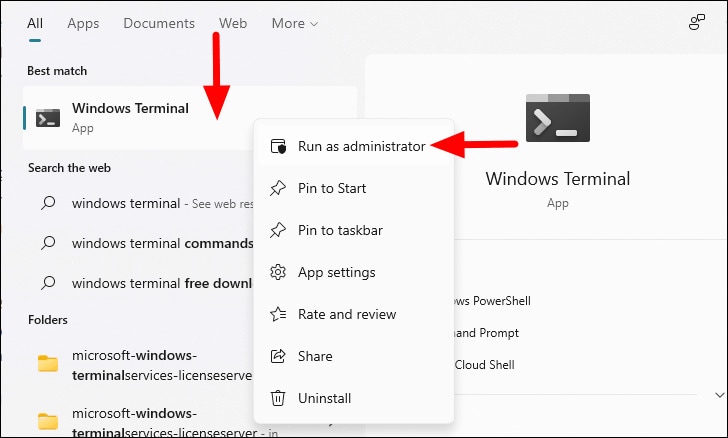
Step 5: Type chdsk /f E: command in the command prompt. E is the drive letter assigned to your memory card.
Step 6: In case there is an error message, it means that Windows was not able to recover the files.
Step 7: Now, try on Ubuntu and run the command sudo fsck.msdos -r /dev/sdd1. sdd1 must be replaced with the part code assigned to the card.
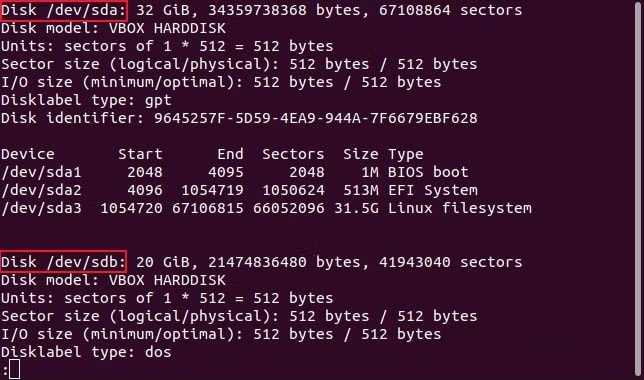
Step 8: If the GNOME Disk Utility fails to take the NTFS disk image, you can use the ntfsclone -so dsk.img /dev/ sdd1 command. This will allow you to restore files from Linux effectively.
Method 4: Recover Deleted or Lost Files From an SD Card With TestDisk for Linux
When the built-in tools fail to recover deleted or lost files on Linux, then installing TestDisk for Linux on your system is advisable. This will allow you to recover different data types in a few minutes.
Here are the steps you need to follow to recover deleted or lost files from an SD card with the TestDisk feature for Linux:
Step 1: Install TestDisk on your system, running the command sudo apt-get install TestDisk
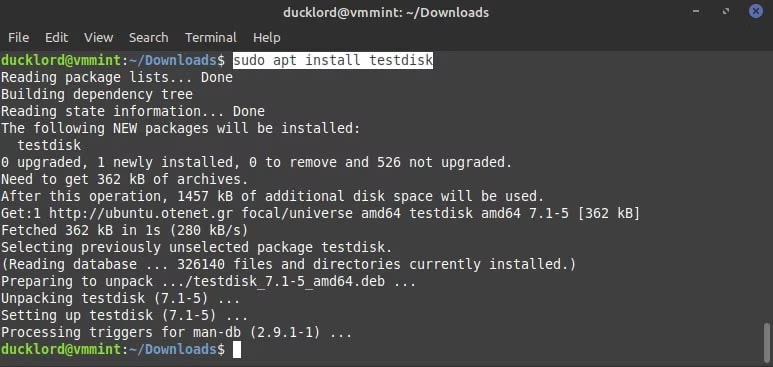
Step 2: Once TestDisk is installed, run a thorough scan to check for all potential issues in the SD card and determine how to fix them. Type the test disk command on the terminal and hit the Enter button.
Step 3: Establish a new log file by selecting Create on the first menu.
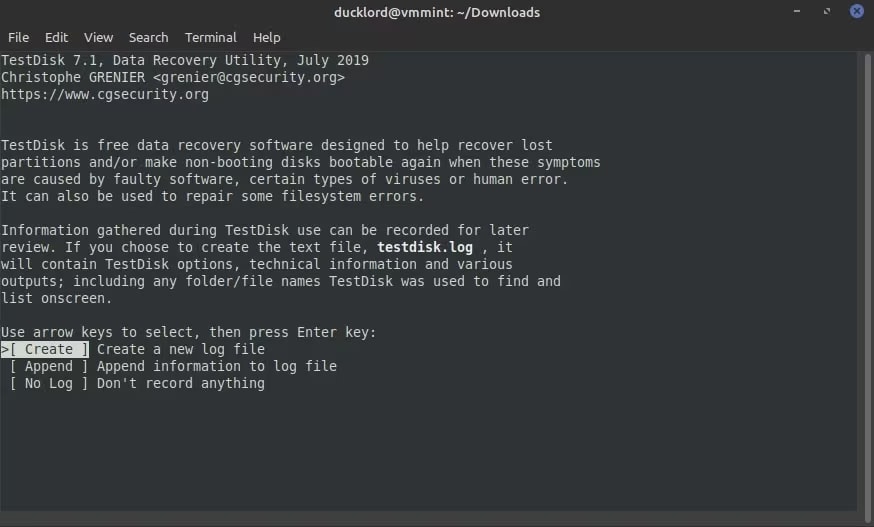
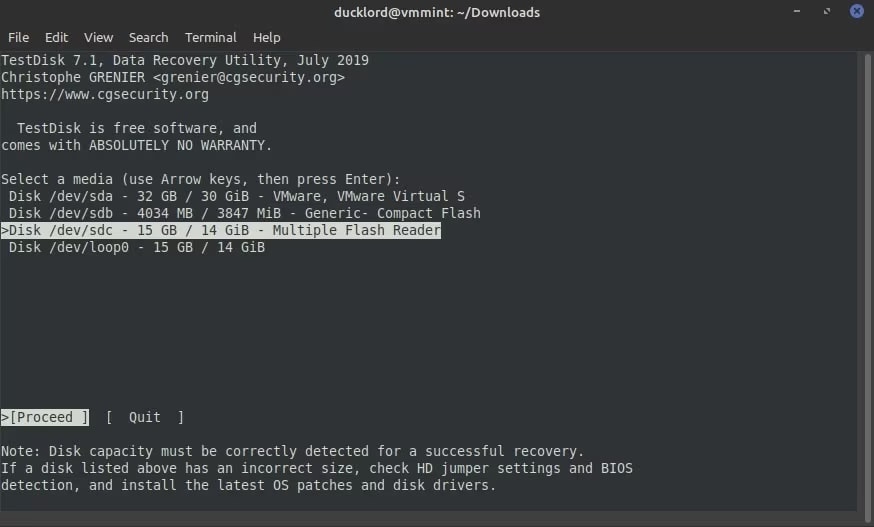
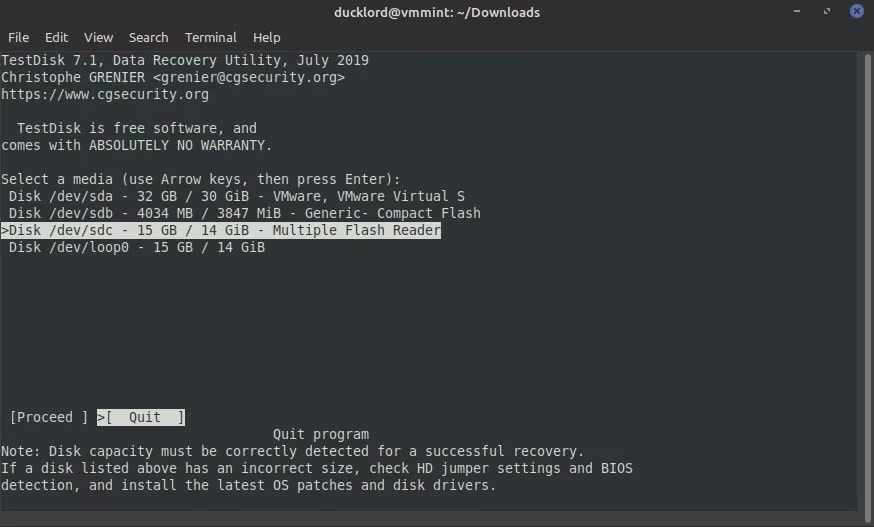
Step 4: TestDisk will provide a list of SD cards. Use your cursor to select the respective SD card and then highlight Proceed. Once you select the SD card, click on the Enter button.
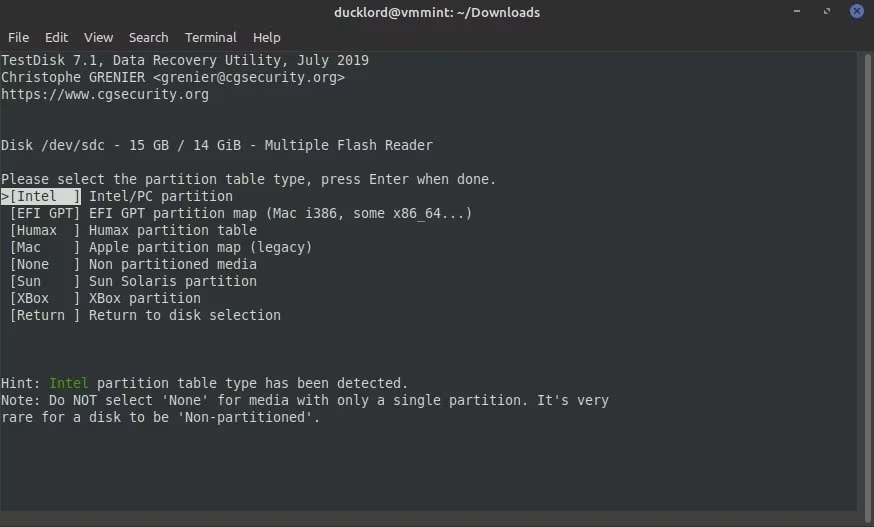
Step 5: Select the partition table table type. Linux will scan the data and provide you with a suitable option. If you are going to use your SD card for a camera, PC, or other devices, click on Intel.
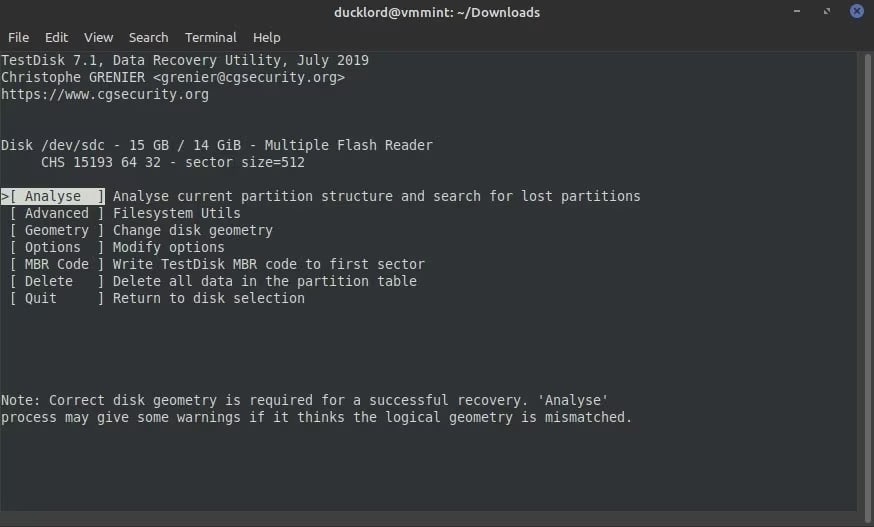
Step 6: Now, click on Analyze. This will help to detect any corruption or lost partition across the structure of the card.
Step 7: TestDisk may suggest performing a quick search when no partition is detected. This can help undelete any lost partition. Accepting the suggestion, hit the Enter button.
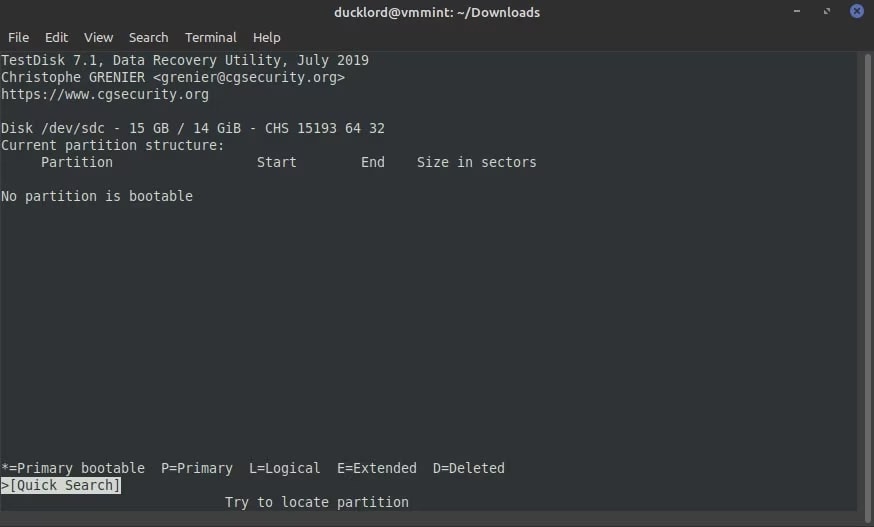
Step 8: TestDisk will scan for all possible partitions in the case of an SD card. Normally, there should be one partition for SD cards. View the provided option and change the partition type to make it bootable. Use your keyboard. Enter the key to recover the partition from the SD card.
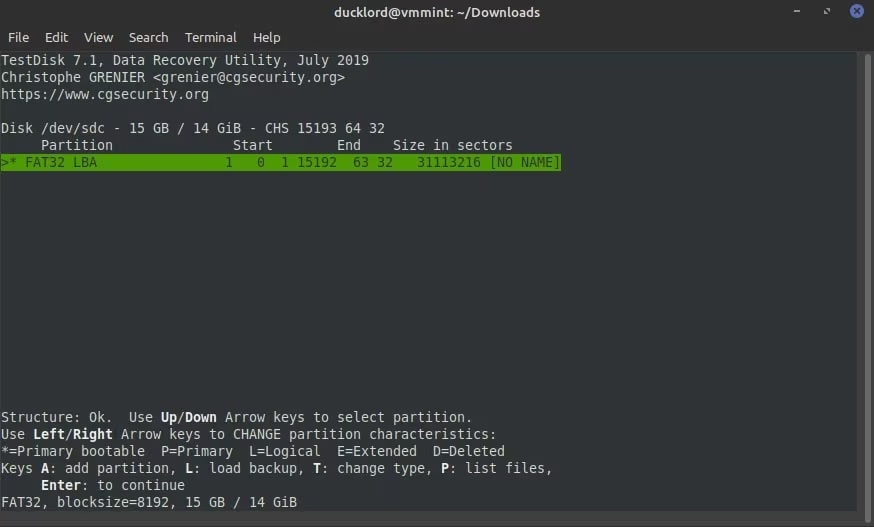
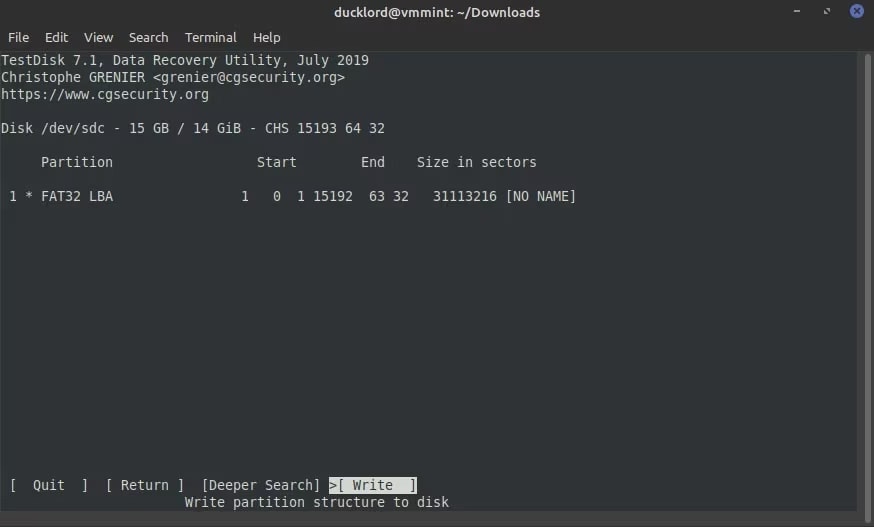
Step 9: Sometimes, TestDisk may not find the partition, so proceed with Deeper Search. As soon as the search is complete and the partition is detected, hit on Write. This is to undelete the partition
Step 10: Click on the exit button and close TestDisk.
Conclusion
You may follow the methods given above to format SD card Ubuntu. These methods allow you to format the SD card on your Linux system. You can either clean the SD cards or completely remove the data from them using these methods. However, it is advisable to recover the data from the SD card before completely formatting it. Follow the appropriate steps of the tutorial to format the SD card or recover the data.
FAQ
-
1. Can I format the SD Card to FAT32 on Linux?
Yes, you can format an SD card to FAT32 on Linux. For this purpose, you must use the GNOME Disk Utility option available on Ubuntu. This process will help to ensure faster and easier formatting. -
2. How do I format a memory card in Ubuntu?
If you want to format an SD card Ubuntu, you can adopt different ways to do so. To complete this process, you may use the Linux terminal, Disk Utility, or the GParted tool. -
3. How do I format a Linux SD Card in Windows 10?
You may prefer using an SD formatter Ubuntu to format Linux SD cards in Windows 10. Check if the respective tools offer the option of Quick Format for seamless and easy operation.


 ChatGPT
 Perplexity
 Google AI Mode
 Grok
Grok


