

 TL;DR:
Immediately stop using the affected SSD to prevent TRIM discard notifications from permanently erasing the deleted blocks, check the Recycle Bin or versioned backups for intact copies, and only scan with recovery software if the drive is stable and readable.
● Consumer tools like Windows File Recovery and Wondershare Recoverit can retrieve logical data, but they cannot reverse completed garbage collection, recover overwritten bytes, or bypass missing BitLocker or FileVault encryption credentials.
● Never install recovery applications or save the rescued files onto the same source SSD; you must use a completely separate physical drive to prevent background writes from destroying the remaining recoverable fragments.
● Power down the device and consult a professional data recovery provider if the SSD is undetected, reports zero capacity, repeatedly disconnects, or suffers from hardware-level controller failures that make software scans impossible.
Ask AI for a summary
 ChatGPT
 Perplexity
 Gemini
 Claude
 Grok
Grok
Deleted SSD files may become unrecoverable faster than HDD data because TRIM can release their storage blocks. Learn what to stop doing, which recovery methods to try first, and when backups or professional help are the only realistic options.
The safest order is simple: stop writing to the SSD, check the Recycle Bin or Trash, restore an existing backup, and only then consider a recovery scan. If the SSD is disappearing, reporting the wrong capacity, or not detected at all, repeated software scans can make the situation worse.
"I deleted a folder with about 40gb of work files off my laptop SSD last week. Client projects, invoices, some personal photos mixed in..." - Ok-Concentrate8650
TL;DR: What to do after deleting SSD files
- Stop using the SSD: New downloads, app updates, temporary files, and normal background activity can overwrite data or give the SSD more opportunity to process released blocks.
- Check intact copies first: Restore from the Recycle Bin, Trash, File History, Time Machine, cloud version history, NAS snapshots, or another backup before scanning.
- Do not install or save on the affected drive: Run recovery tools from other storage and save results to a separate physical drive.
- Treat TRIM status carefully: A Windows setting can show whether delete notifications are enabled, but it cannot prove that a particular deleted file is still recoverable.
- Use software only when the SSD is readable: Recovery software may help with logical loss, but it cannot reverse completed TRIM, overwrite, secure erase, missing encryption keys, or controller failure.
- Escalate valuable cases early: If the SSD is unstable, undetected, encrypted without credentials, or contains irreplaceable business data, contact a qualified recovery provider before experimenting.
Try Recoverit to Recover Deleted Files From an SSD
 Security Verified. Over 7,302,189 people have downloaded it.
In this article
-
- Method 1. Restore Files From Recycle Bin or Mac Trash
- Method 2. Restore SSD Files From File History or Time Machine
- Method 3. Recover Files With Windows File Recovery
- Method 4. Check Cloud, NAS, or Synced Backups
- Method 5. Recover Deleted SSD Files With Wondershare Recoverit
- Method 6. Use a Professional SSD Data Recovery Service
Part 1. Can Deleted Files Be Recovered From an SSD?
Yes, deleted SSD files can sometimes be recovered, but there is no universal recovery window or guaranteed success rate. The result depends on whether the file is still in a bin, whether a backup exists, whether the operating system issued a TRIM or UNMAP notification, whether that notification reached the device, what the SSD controller did afterward, and whether new data replaced the original content.
This is why two people can delete similar files from similar SSDs and get completely different results. One may restore the file from the Recycle Bin in seconds. Another may see the original filename in a scan but receive a zero-filled or corrupted file because the underlying blocks are no longer returned by the drive.
SSD File Deletion vs. HDD File Deletion
When a file is permanently deleted from a traditional hard disk drive, the file system normally marks its space as available without immediately overwriting every magnetic sector. Until another write reuses those sectors, an undelete tool may be able to reconstruct the file from directory records or recognize its content by file signature.
An SSD adds another layer. NAND flash cannot overwrite a used page in place. The controller manages logical addresses, physical flash pages, wear leveling, spare capacity, and garbage collection. To help it identify storage that no longer contains needed data, the operating system can send a discard notification called TRIM or UNMAP.
The important distinction is not simply "SSD versus HDD." Recovery depends on the complete path from file system to operating system, driver, storage protocol, bridge controller, SSD firmware, and NAND. That path determines whether a discard command was issued and honored.
How TRIM Affects Deleted SSD Data
Microsoft defines delete notification, also known as TRIM or UNMAP, as a notice to the underlying storage device that clusters have been freed by a file deletion. Microsoft states that delete notifications are enabled by default for NTFS unless an administrator disables them. A device that reports no TRIM support does not receive those notifications.
TRIM does not mean Windows personally overwrites each deleted file at the instant you press Delete. It tells the storage stack that the logical blocks are no longer required. The SSD may then stop returning the original content, and its controller may erase underlying flash pages during garbage collection. Timing and implementation vary, which is why claims such as "you always have one hour" or "recovery is guaranteed if you scan immediately" are not reliable.
On Windows, an administrator can query the file-system setting with:
fsutil behavior query DisableDeleteNotify
For NTFS, a value of 0 means delete notifications are enabled, while 1 means they are disabled. This result describes the Windows file-system setting. It does not confirm that TRIM reached a particular SSD, identify whether a specific file's blocks were discarded, or tell you whether the original content remains readable.
For the original manufacturer walkthrough referenced in this article, see SanDisk's instructions for checking TRIM in Windows.
Do not disable TRIM as a recovery trick: Changing the setting after deletion cannot reverse discard commands that were already issued. It can also reduce normal SSD performance over time. Preserve the drive and focus on intact copies or a controlled recovery attempt instead.
When Deleted SSD Files May Still Be Recoverable
- The files are still in the Recycle Bin or Trash: They have normally been moved into a special folder rather than permanently deleted, so restoring them does not require a low-level scan.
- A backup or versioned copy exists: File History, Time Machine, cloud version history, NAS snapshots, and offline backups do not depend on deleted blocks remaining accessible on the original SSD.
- TRIM was disabled, unsupported, or not passed through: The original blocks may still be readable if no later write replaced them. This is possible, not guaranteed.
- The loss is logical rather than file deletion: A damaged file system, missing drive letter, lost partition entry, or inaccessible volume can hide data without deleting every file.
- The SSD was disconnected immediately: An external SSD that was safely removed after the loss may have experienced fewer later writes, although disconnecting it does not undo TRIM that already reached the device.
- A disk image captured readable content: Imaging can preserve the logical state that remains available and reduce repeated access to the original. It cannot restore content the SSD already stopped exposing.
Internal SSD vs. External SSD Recovery
Internal SATA and NVMe SSDs commonly receive discard notifications when the operating system, file system, driver, and device support them. A boot SSD also receives constant background writes from logs, browser caches, updates, swap, indexing, and applications. Continuing to use the computer can therefore reduce recovery chances even if TRIM is not the decisive factor.
External SSD behavior is less predictable. USB, USB-C, Thunderbolt, an enclosure bridge, the storage protocol, and the operating-system driver can determine whether TRIM or SCSI UNMAP reaches the SSD. Some external paths pass discard commands; others do not. An external SSD should never be assumed to behave like an HDD simply because it connects over USB.
For an external SSD, safely eject and disconnect it after discovering the loss. For an internal system SSD containing critical files, shut down the computer if practical. Installing a tool "on another partition" of the same physical SSD is not safe because it still writes to the same device.
When SSD Recovery Is Unlikely
- The SSD no longer returns the deleted blocks: Completed TRIM and garbage collection can make the original content unavailable to both software and many laboratory workflows.
- The blocks were overwritten: Recovery software cannot reconstruct original bytes that have been replaced by new data.
- Secure erase or sanitization completed: NIST SP 800-88 Revision 2 defines media sanitization as making access to target data infeasible for a given level of effort. A successful, appropriate sanitization process is intended to prevent recovery.
- Encryption credentials are unavailable: Recovery tools cannot legitimately bypass BitLocker, FileVault, hardware encryption, or another encryption system when the required key or authorized credentials are missing.
- The controller or NAND has failed: Consumer software generally requires a stable, detected device. Modern SSD controller mapping and encryption can also limit chip-level recovery.
| SSD data-loss scenario | TRIM impact | Realistic recovery outlook | Best first option |
| File still in Recycle Bin or Trash | No permanent deletion has occurred in the normal workflow. | Very favorable if the item is present and the bin works normally. | Restore directly from the bin. |
| Shift+Delete or emptied bin on an internal SSD | Delete notifications may be sent quickly. | Unpredictable and often poor after discard or continued use. | Check backups first, then assess a controlled scan. |
| Permanently deleted file on an external SSD | Depends on whether the connection passes TRIM or UNMAP. | Unpredictable. Disconnection limits later writes but does not undo discard. | Disconnect safely, check backups, then scan from another system if appropriate. |
| Quick-formatted SSD | Formatting may trigger broad discard behavior depending on the system and format operation. | Variable, frequently worse than on a formatted HDD. | Stop use and scan only if the SSD remains stable and readable. |
| Deleted or lost partition without formatting or reuse | Removing partition metadata does not always discard all file data. | Possible if the volume content remains readable and no later operation altered it. | Scan for the lost partition or recover files to another drive. |
| Secure erase, sanitize, or cryptographic erase | The process is designed to remove access to stored data. | Extremely unlikely when the operation completed correctly. | Restore from an independent backup. |
| SSD not detected, reports 0 capacity, or repeatedly disconnects | TRIM is not the primary question. | Software recovery is inappropriate or impossible. | Power down and consult a professional SSD recovery provider. |
Part 2. What to Do Immediately After Deleting Files From an SSD
The first minutes matter because ordinary use creates new writes and may change what the SSD exposes. Follow these steps before choosing a recovery method.
- Stop saving, downloading, and installing: Pause work on the affected device. Do not browse, update apps, synchronize large folders, render media, or copy new files onto the SSD.
- Identify the physical device: Confirm whether the loss occurred on the internal system SSD, a second internal SSD, an external SSD, or a partition that shares the same physical drive. Different drive letters do not necessarily mean different hardware.
- Do not install recovery software on the source: Installation packages, temporary files, logs, and scan databases can overwrite data. Use another physical drive or a separate clean computer whenever possible.
- Avoid formatting, optimizing, repairing, or repartitioning: Do not run secure erase, reset, CHKDSK with repair options, Disk Utility repair, partition creation, or a new operating-system installation before important data is secured.
- Check intact copies first: Look in the Recycle Bin or Trash, File History, Time Machine, OneDrive, iCloud Drive, Google Drive, Dropbox, NAS snapshots, email attachments, project repositories, and offline backups.
- Disconnect an external SSD safely: Eject it if the operating system is responsive, then unplug it. If the drive is repeatedly disconnecting or making the system unstable, stop accessing it.
- Prepare a separate destination: Recovered files must go to another physical SSD, HDD, or network location with enough free space. Never restore them to the source SSD during the recovery session.
- Decide whether the case is DIY-safe: If the data is irreplaceable, legally sensitive, encrypted without known credentials, or on unstable hardware, professional evaluation may be safer than another software attempt.
Important for internal boot SSDs: Merely choosing another folder or partition on the same SSD does not prevent writes to the affected hardware. Windows and macOS also create background writes while running. For high-value data, a controlled secondary-device or professional imaging workflow is safer.
Part 3. How to Recover Deleted Files From an SSD
Try the methods in this order. The first four recover intact copies and avoid depending on deleted SSD blocks. Software scanning comes later because TRIM may already have made those blocks unavailable.
Method 1. Restore Files From Recycle Bin or Mac Trash
An ordinary Delete action usually moves a file into the Recycle Bin on Windows or Trash on macOS. Because the item has not yet been permanently deleted in the normal workflow, this is the fastest and safest recovery route.
Restore From the Windows Recycle Bin
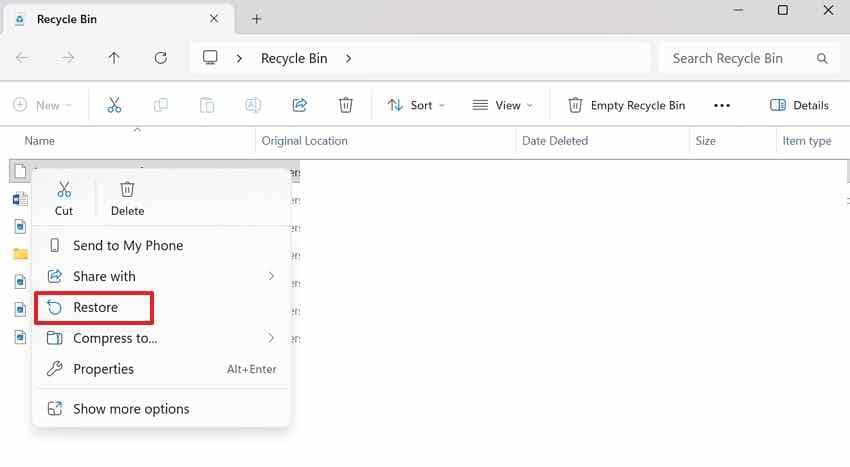
- Open Recycle Bin from the desktop or search for it from Start.
- Use the original location, deletion date, name, or file type to find the missing items.
- Right-click the selection and choose Restore. Windows returns each item to its original location.
Restore From Mac Trash
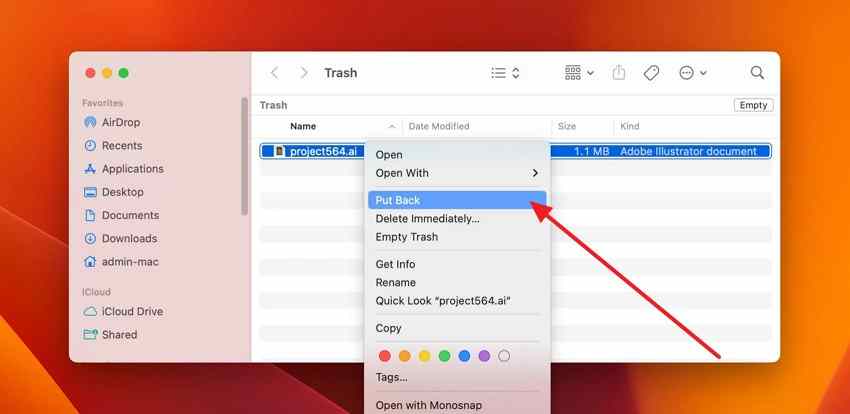
- Open Trash from the Dock.
- Locate the files you want to recover.
- Control-click the selection and choose Put Back. Apple explains this workflow in its Mac file deletion guide.
If the file is missing from the bin, do not empty the bin again, run cleanup utilities, or start a large download. Move to backups.
Method 2. Restore SSD Files From File History or Time Machine
Backups are more reliable than undelete scanning because they contain separate file copies. File History or Time Machine must have been configured before the deletion.
Microsoft's broader Windows backup, restore, and recovery guidance confirms that available backup copies should be checked before relying on deleted-file scanning.
Restore With Windows File History
Microsoft's current File History guidance confirms that File History can restore deleted content or return files and folders to an earlier state.
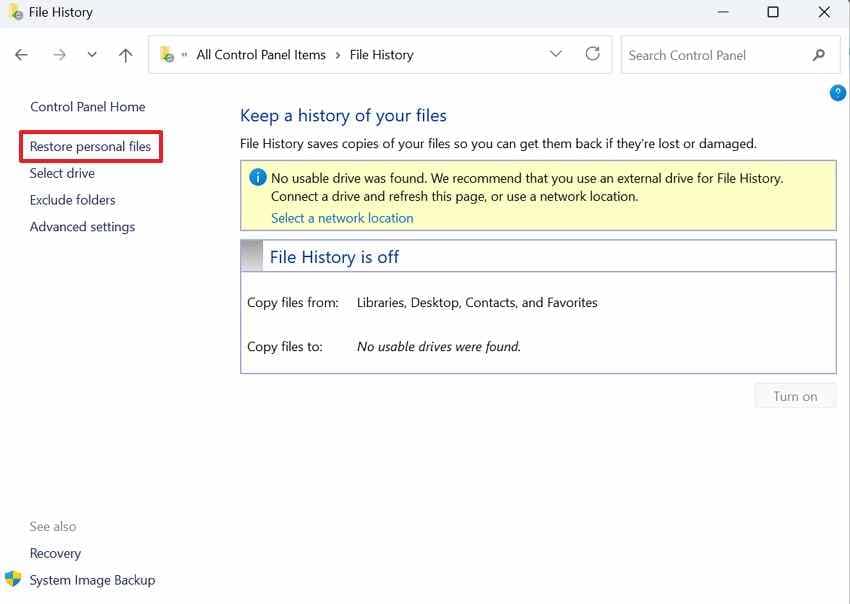
- Open File History: Connect the backup drive, then open Control Panel > File History.
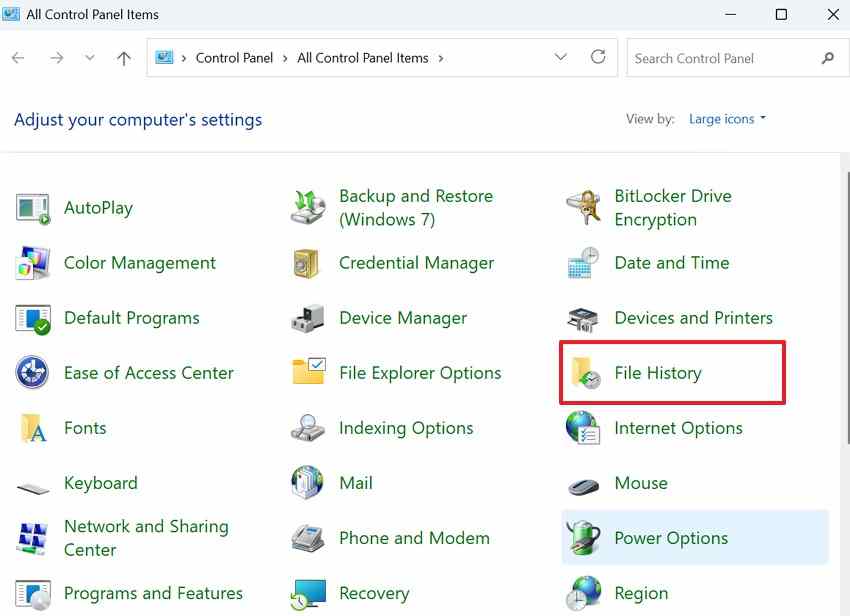
- Locate the backup: Select Restore personal files, move through the available backup dates, and find the deleted files.
- Restore the files: Select the required items and click Restore. To avoid replacing a current copy, use the option to restore to another location when available.
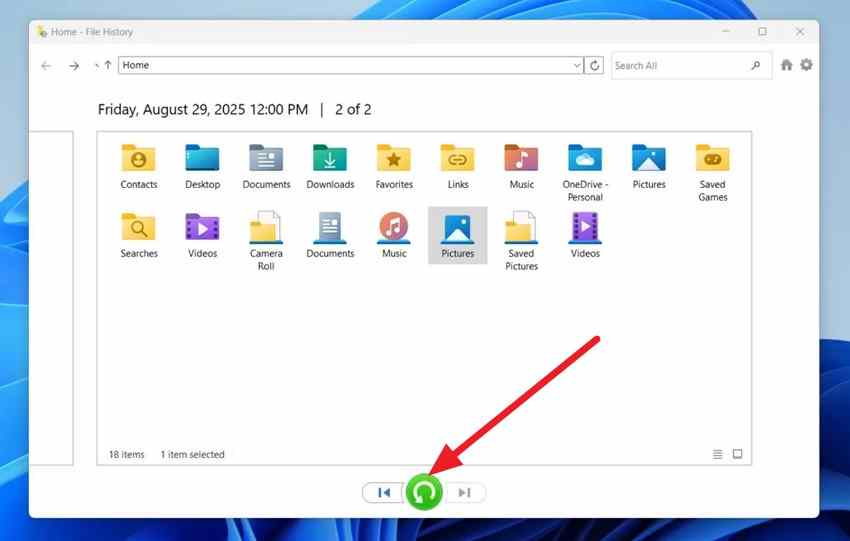
You can also navigate to the folder that previously contained the file, right-click it, and select Restore previous versions. Preview the version before restoring whenever possible.
Restore With Mac Time Machine
Connect the Time Machine disk or make the configured network backup available, then open the folder where the missing item previously existed.
- Open the backup browser: Choose Browse Time Machine Backups from the Time Machine menu.
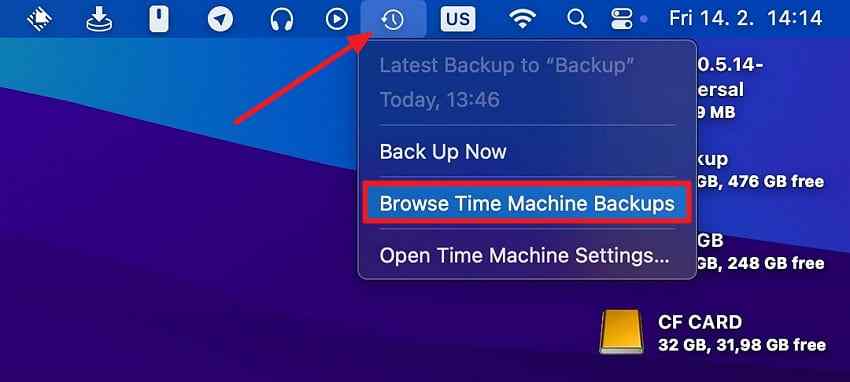
- Choose and restore the file: Move through the backup dates, select the missing items, and click Restore. See Apple's guide to restoring items with Time Machine for the current macOS workflow.
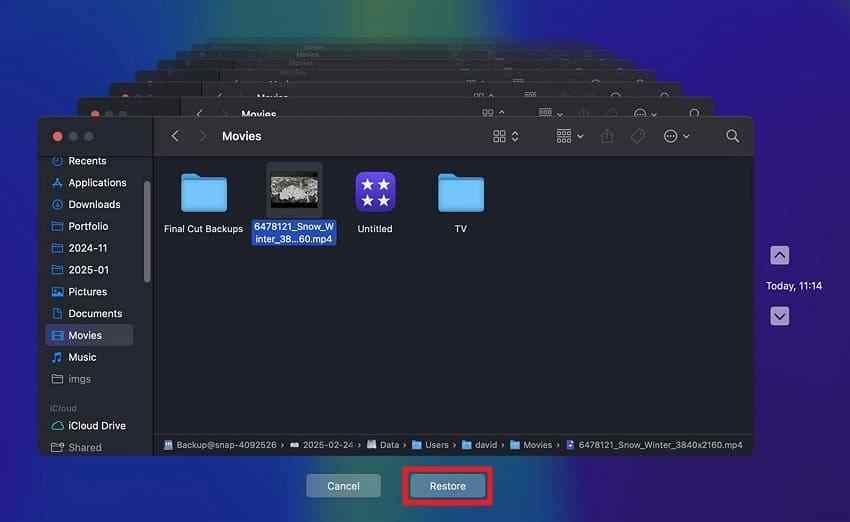
Before restoring an entire backup, confirm that it predates the deletion and contains the required files. Restoring selected items reduces the risk of replacing newer work.
Method 3. Recover Files With Windows File Recovery
Windows File Recovery is Microsoft's command-line application for deleted files on local storage. It supports internal drives, external drives, and USB devices, but not cloud storage or network file shares. The source and destination must be different drives. The canonical Microsoft Windows File Recovery guide contains the current syntax and mode table.
Microsoft recommends Regular mode for a recently deleted file on a healthy NTFS volume. Use Extensive mode for older deletions, formatted or corrupted NTFS volumes, and FAT or exFAT storage. On an SSD, neither mode can retrieve content that the drive no longer returns after TRIM or overwrite.
- Prepare another physical drive: Connect a destination such as E:. Do not create a new partition on the affected SSD.
- Install Windows File Recovery only if the write risk is acceptable: Installing it on an affected system SSD creates activity. For critical internal-SSD loss, consider professional or secondary-device recovery instead.
- Open Windows File Recovery as administrator: Approve the system prompt.
- Run a filtered command: Replace the username and drive letters with the correct values. For a recent deletion from Documents on healthy NTFS, use
winfr C: E: /regular /n \Users\<username>\Documents\. - Confirm and inspect the destination: Press Y when prompted. Microsoft creates a folder named
Recovery_<date and time>on the destination drive.
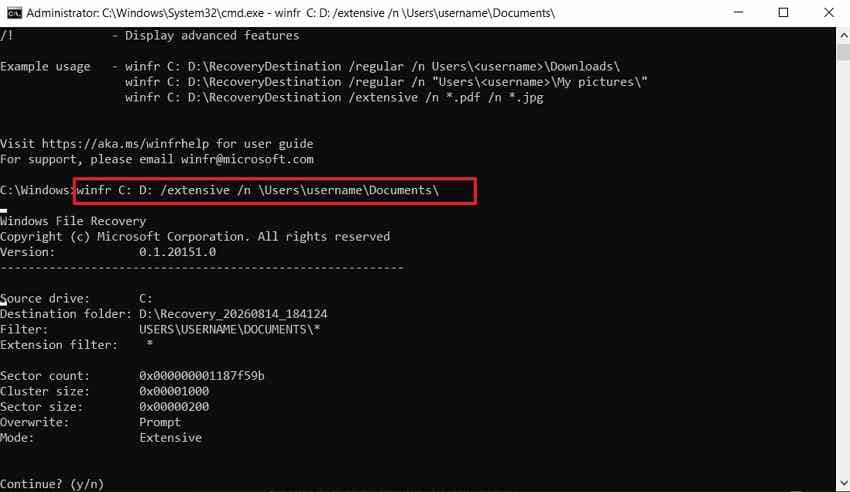
If Regular mode finds nothing, Extensive mode may inspect the volume differently, but repeated scans cannot bring back trimmed or overwritten blocks. Stop if the SSD becomes unstable.
Method 4. Check Cloud, NAS, or Synced Backups
Cloud synchronization is not always a backup because deletion can sync to every device. However, many services keep a deleted-items area, version history, retention window, or administrator restore option. A NAS may also provide snapshots that preserve the state of a shared folder before deletion.
- Sign in to the service through a trusted browser or its official app.
- Check the original folder, deleted-items area, version history, activity log, and available snapshots.
- Confirm the version date and file size before restoring.
- Download or restore the files to a healthy location, not the affected SSD.
- If the account belongs to an organization, contact the administrator before retention periods expire.
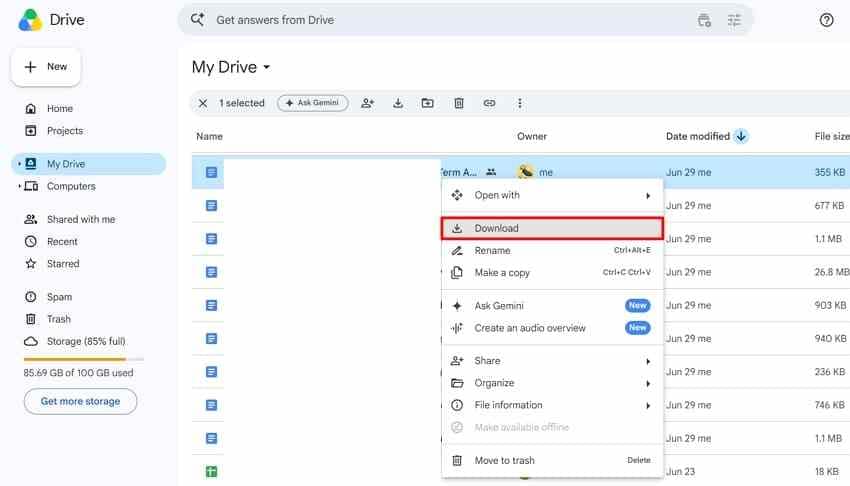
Check OneDrive, iCloud Drive, Google Drive, Dropbox, SharePoint, project-management attachments, email, source control, collaboration tools, and any NAS snapshot system used by your team. Do not assume a missing local file has also disappeared from every remote copy.
Method 5. Recover Deleted SSD Files With Wondershare Recoverit
Use recovery software when no intact copy exists, the SSD is stable and detected, and the loss is logical rather than physical. The recommended Wondershare Recoverit hard drive recovery solution supports scanning internal and external SSD storage that remains accessible to the operating system.
The current Recoverit product page lists SATA, PCIe, M.2, U.2, mSATA, and NVMe storage, plus external SSD connections such as USB-C and Thunderbolt. It also lists more than 1,000 recoverable file types, file preview, deleted-file scanning, formatted-volume recovery, RAW-volume recovery, and lost-partition workflows. These are product capabilities, not a guarantee that a particular trimmed or overwritten SSD file will be recoverable.
When Recoverit Is a Reasonable SSD Recovery Option
- The SSD is detected with the expected capacity and remains stable during reading.
- The files are absent from the Recycle Bin, Trash, and available backups.
- The loss involves deletion, a readable formatted volume, a RAW or inaccessible file system, or a missing partition.
- You can install the application away from the affected SSD and save recovered files to another physical device.
- You understand that TRIM, overwrite, encryption, and physical failure may prevent recovery.
Recoverit cannot reverse completed TRIM, recover overwritten bytes, bypass missing encryption credentials, securely undelete sanitized data, or repair a physically failed SSD.
How to Recover Deleted Files From an SSD Using Recoverit
Before scanning, connect a separate destination drive with enough free space. If the lost files were on the system SSD, avoid downloading or installing Recoverit onto that same physical device whenever another recovery environment is available.
- Choose the SSD to scan: Open Recoverit, go to Hard Drives and Locations, and select the SSD or affected partition. Confirm its name and capacity before continuing.

- Find the deleted files: Let the scan run and use file type, path, date, size, and filename filters to locate important data. Avoid other activity on the source while scanning.

- Preview and save: Preview supported files to assess whether their content remains intact. Select the required items, click Recover, and save them to a different physical drive.
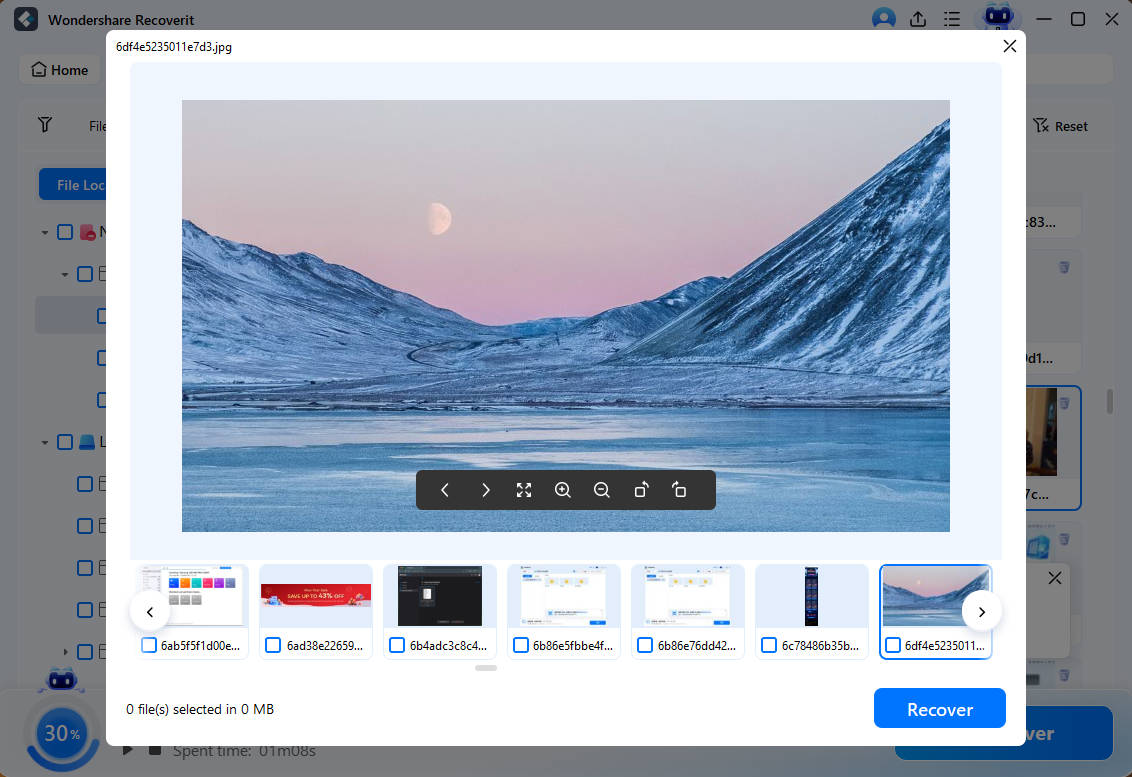
A filename or thumbnail is not proof that the entire file is healthy. Open representative recovered documents, photos, archives, and videos from the destination drive. Keep the source unchanged until you verify that the important results are complete.
Try Recoverit to Recover Deleted Files From an SSD
Security Verified. Over 7,302,189 people have downloaded it.
Method 6. Use a Professional SSD Data Recovery Service
Stop DIY attempts and request professional evaluation when the SSD is not detected, reports 0 GB or the wrong capacity, repeatedly disconnects, overheats, has liquid or electrical damage, or contains data whose value exceeds the cost of a specialist. NIST's digital evidence program also documents the scientific and forensic challenges involved in acquiring and interpreting data from digital devices.
A qualified provider may have hardware imagers, power-control equipment, firmware knowledge, donor components, and procedures for unstable media. SSD recovery can still be limited by controller-specific mapping, hardware encryption, damaged NAND, completed TRIM, and overwritten or sanitized content. Ask the provider about evaluation fees, confidentiality, encryption requirements, return shipping, and whether payment depends on useful recovered data.
- Do not repeatedly power-cycle an unstable SSD.
- Do not open or heat the device.
- Do not update firmware during a recovery incident unless a qualified specialist directs it.
- Do not accept a guaranteed recovery percentage before diagnosis.
- For legal or regulated data, confirm evidence handling and chain-of-custody procedures.
Part 4. Which SSD Recovery Method Fits Your Situation?
Choose the method by loss type, not by whichever tool appears first in search results. The following table separates intact-copy restoration from logical scanning and hardware-level cases. For additional technical context, see the original NIST guidance on digital investigation and deleted-data recovery referenced by the source document.
| Situation | Best recovery method | Software needed | Main limitation |
| Deleted files still in Recycle Bin or Trash | Restore directly with Restore or Put Back. | None. | Works only while the item remains in the bin. |
| Shift+Delete or emptied Recycle Bin | Check backups and version history, then consider a controlled scan. | Windows File Recovery or data recovery software if no copy exists. | TRIM may already have made the content unavailable. |
| Formatted SSD | Restore a backup first. Scan the stable, readable SSD only when no copy exists. | Recovery software. | Formatting may have issued broad discard commands. Results are unpredictable. |
| RAW or inaccessible SSD partition | Recover files before formatting or repair. | Recovery software if the SSD is detected and stable. | Physical instability, encryption, or severe corruption may block access. |
| Deleted or lost partition | Scan the physical SSD for the missing volume and recover files elsewhere. | Partition-aware recovery software. | Later formatting, repartitioning, TRIM, and new writes reduce the available data. |
| SSD is not detected, reports the wrong capacity, or repeatedly disconnects | Power down and request professional diagnosis. | Specialist hardware and firmware tools. | Controller failure, encryption, and NAND damage may still prevent recovery. |
| Secure erase or factory sanitization completed | Restore from an independent backup. | Backup software or the original cloud/NAS service. | Successful sanitization is designed to make data recovery infeasible. |
| Encrypted SSD without the password or recovery key | Use the vendor's authorized account or key-recovery process. | The applicable BitLocker, FileVault, or device-management recovery method. | Recovery software cannot bypass properly implemented encryption. |
Part 5. Why SSD File Recovery Sometimes Fails
- TRIM or UNMAP released the logical blocks: The operating system notified storage that the blocks were no longer required, and the SSD stopped returning their original contents.
- Garbage collection erased underlying flash pages: The controller reclaimed storage internally after deletion. This process is managed by the SSD and is not reversed by an undelete scan.
- New data overwrote the old content: Downloads, updates, caches, swap, application activity, and recovered files saved to the source can replace what remained.
- The SSD was formatted, reset, or sanitized: Some operations alter metadata only, while others issue discard commands or perform secure erasure. The exact operation matters.
- Encryption prevents authorized access: BitLocker, FileVault, or hardware encryption can make readable blocks useless without the required key or credentials.
- Only metadata survived: A scan may reconstruct a filename and folder path from file-system records even when the underlying file content returns zeros or fragments.
- The file is fragmented: Signature scanning may locate the beginning of a file but fail to reconstruct non-contiguous pieces without reliable metadata.
- The controller or NAND is failing: A drive that cannot maintain stable communication cannot be scanned reliably with consumer software.
- The wrong device was scanned: Users sometimes scan a recovery partition, a second drive letter, a cloud placeholder folder, or an enclosure that exposes a different device.
- The recovered file was saved back to the source: Writing results to the affected SSD can overwrite other files that had not yet been recovered.
No recovery application can guarantee a fixed percentage without controlled testing against the exact SSD, firmware, file system, deletion method, connection path, time interval, workload, and encryption state. Treat universal "99 percent" or "100 percent" SSD undelete claims as marketing, not a prediction for your case.
Part 6. How to Improve SSD Recovery Chances
- Stop activity immediately: Shut down a computer whose internal system SSD contains critical deleted files, or safely disconnect an external SSD.
- Record the loss details: Note the device model, operating system, file system, deletion time, original path, file types, encryption state, and everything done afterward.
- Prefer intact copies: Check bins, backup drives, cloud retention, NAS snapshots, collaborators, email, and exported project versions before scanning.
- Preserve the source: When appropriate, create a sector-level image with a trusted workflow and scan the image rather than repeatedly accessing the original. Imaging preserves only data the SSD still returns.
- Use another physical device for tools: Do not install recovery software on another partition of the same SSD and assume it is safe.
- Filter before recovering: Search by high-priority filenames, extensions, paths, dates, and sizes instead of writing every found item to the destination.
- Save results elsewhere: Use a healthy physical SSD, HDD, NAS, or other destination with enough capacity.
- Validate before changing the source: Open important recovered files, compare sizes, inspect media playback, extract archives, and keep a second verified copy.
- Stop when hardware symptoms appear: Repeated disconnects, capacity errors, read instability, overheating, or disappearance from firmware are reasons to escalate.
- Set realistic expectations: Fast action reduces avoidable writes, but it does not guarantee that TRIM has not already affected the deleted blocks.
Part 7. How to Prevent SSD Data Loss
- Maintain at least three copies of important data: Keep the working copy plus two backups, with at least one copy on separate or offline storage.
- Enable versioned backups before an incident: Configure File History, Time Machine, cloud version history, or NAS snapshots and confirm that the important folders are included.
- Keep one backup isolated: A continuously connected backup can be deleted, encrypted, synchronized, or damaged with the primary system.
- Test restoration: Recover sample files on a schedule. A successful backup job is not useful if its files cannot be opened.
- Monitor SSD health: Review manufacturer tools and supported S.M.A.R.T. information, but remember that an apparently healthy status cannot predict every sudden controller failure.
- Install firmware updates deliberately: Follow the SSD manufacturer's instructions and make a verified backup before firmware or system changes.
- Avoid interrupted writes: Use safe eject for external SSDs and stable power during operating-system updates, firmware updates, and large transfers.
- Respond to warning signs: Repeated I/O errors, unexpected read-only mode, capacity changes, disappearing drives, or frequent disconnects justify immediate backup and replacement planning.
- Protect encryption recovery keys: Store BitLocker, FileVault, and hardware-encryption recovery information somewhere separate and secure.
- Replace aging or unreliable storage before failure: SSDs are consumable devices. Migration from a questionable drive is safer than waiting for a total loss event.
Part 8. Conclusion
To recover deleted files from an SSD, stop using the device and look for an intact copy before scanning. The Recycle Bin, Trash, File History, Time Machine, cloud retention, or a NAS snapshot can restore the file without depending on what remains in deleted blocks.
If no backup exists and the SSD is stable, readable, and detected with the expected capacity, Windows File Recovery or Wondershare Recoverit may locate recoverable data. Run the tool away from the affected SSD, preview results when possible, and save everything to another physical drive.
TRIM changes the odds, not the recovery workflow. It is not a timer you can see or reverse, and checking whether it is enabled does not reveal the state of a specific file. If the blocks were discarded, overwritten, sanitized, or locked behind unavailable encryption keys, neither software nor a laboratory can promise their return.
Try Recoverit to Recover Deleted Files From an SSD
Security Verified. Over 7,302,189 people have downloaded it.
FAQ
-
Can deleted files be recovered from an NVMe SSD?
Sometimes. NVMe describes the storage interface, not whether deleted content remains available. Recovery depends on TRIM, controller behavior, later writes, encryption, and whether the SSD still returns the affected blocks. Check backups first, then consider a controlled scan if the drive is stable and detected. -
Does disabling TRIM after deletion bring files back?
No. Disabling TRIM after a deletion cannot reverse discard notifications already issued or restore flash pages already reclaimed. The Windows query shows whether delete notifications are enabled at the file-system level, not whether one deleted file remains recoverable. -
Can cloning an SSD improve data recovery safety?
A sector-level image can preserve the logical data that a stable SSD still exposes and lets you perform later scans on a copy. It cannot recover blocks already removed by TRIM, and DIY imaging is inappropriate when the SSD is unstable, repeatedly disconnecting, or not detected. -
Why can recovery software find file names but not open the files?
File names and paths are stored in file-system metadata, while file contents occupy separate data blocks. Metadata can survive after the SSD stops returning the original content, so a scan may list the correct name but recover a zero-filled, incomplete, or corrupted file. -
Can files be recovered after formatting an SSD?
Possibly, but the result depends on the format operation and whether it caused discard commands, overwrite, encryption changes, or new file-system activity. Stop using the SSD, restore a backup first, and scan only if the device remains stable and readable. Do not assume a quick format is harmless on an SSD. -
How long do deleted files remain recoverable on an SSD?
There is no dependable time window. Some deleted data may become unavailable quickly, while other content can remain readable when TRIM was unsupported or did not reach the drive. Time alone cannot predict recovery because the storage path, controller, workload, and later writes all matter.


