

 TL;DR:
Keep TRIM enabled on your SSD to preserve fast write speeds and drive longevity by automatically wiping unused data blocks, unless you are actively attempting file recovery or using older, unsupported hardware.
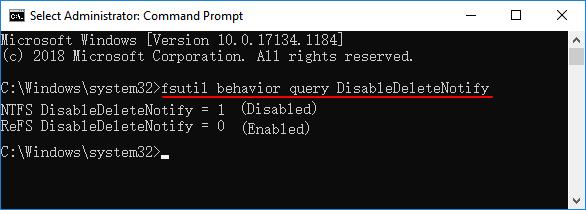
● To verify TRIM status on Windows, run Command Prompt as an administrator and execute `fsutil behavior query DisableDeleteNotify`; a return value of `0` confirms it is active, while `1` indicates it is disabled.
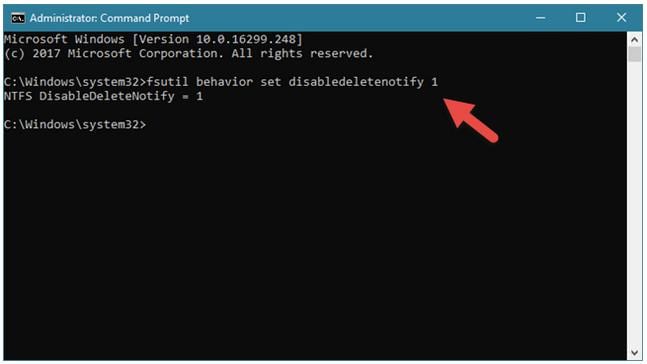
● You must temporarily disable TRIM using the command `fsutil behavior set DisableDeleteNotify 1` if you need to recover lost files, because active TRIM permanently destroys deleted data and makes restoration impossible.
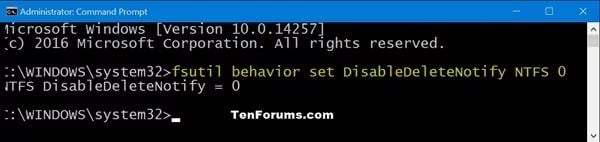
● For targeted drive management, Windows users can apply the enable or disable commands specifically to NTFS or ReFS file systems by inserting `NTFS` or `ReFS` before the `0` or `1` state identifier.
Ask AI for a summary
 ChatGPT
 Perplexity
 Gemini
 Claude
 Grok
Grok
SSDs use TRIM to avoid some of the problems that can hamper their performance and longevity. TRIM, when enabled, helps keep the SSD sharp by listening for unneeded blocks, which can slow things down as time goes on, and then deleting those blocks. How to enable TRIM on SSD depends to a great extent on the operating system you use. But it’s a relatively simple process and worth doing to ensure that your drive remains snappy and responsive.
TRIM should be enabled on most modern systems, but it never hurts to verify and correct things if wrong. On Windows, it’s Command Prompt for more manual overhead, on macOS the commands are in Terminal, and on Linux variations you’ll often find built-in features. Turning off TRIM is seldom necessary, but if you do, do so in the same way. One simple, yet effective way to protect the health of your SSD is to leave TRIM on.
Try Recoverit to Perform SSD Data Recovery
 Security Verified. 3,591,664 people have downloaded it.
In this article

About SSD TRIM, Everything You Need to Know
SSDs are now the main hard drives, focusing on linear with their consistent and fast work. But that SSD performance is made possible by a feature known as TRIM. But what does SSD TRIM actually do? It would oversee how data is wiped from your drive, keeping everything working.
When you delete any file, the data in your SSD does not just disappear. While the space is marked as free, the drive still retains this data until it has actually been erased as well. This is eventually slowed down by the requirement of extra work for writing new data, which will overwrite the old, "deleted" data. This is addressed by the function known as SSD TRIM, which actively informs the SSD which data blocks are now no longer required and therefore could be deleted. This ensures that any overhead created by the correction and management of stale and unneeded data does not consume the time of the drive.

SSDs would eventually become less efficient without TRIM, which would result in reduced read and write speeds. Maintaining optimal performance as the drive fills with data is particularly dependent on TRIM. Modern operating systems like Windows, macOS, and Linux usually handle it automatically, but in certain situations, you might need to manually enable it.
When working with older SSDs that don't completely support TRIM or when using specific data recovery programs, you may want to disable TRIM on SSD. However, it is generally advised to maintain TRIM active unless absolutely essential because deactivating it can eventually result in performance reduction.
In conclusion, SSD TRIM makes sure that data blocks are appropriately cleared out and prepared for new information, which helps your drive retain optimal speed. Unless you have a good reason to disable it, ensure TRIM is enabled if you're utilizing an SSD.
Explore all the top ways to recover deleted files from SSD drive without affecting the performance of your system.
Reasons Why People Enable or Disable Their SSD TRIM
Although Solid State Drives (SSDs) have speed and efficiency as their biggest features, their performance over time depends on managing how the data is organized. A key aspect that contributes to an SSD’s health is TRIM. TRIM is an interface which enables the operating system to tell the SSD which data blocks are no longer in use and can be wiped and prepared for new data when they are free, allowing for better storage management. Some users enable TRIM for SSD but others do disable it for some reasons. Here are five typical reasons why TRIM is enabled or disabled on their SSDs.
1. Enabling TRIM for Better Performance
Enabling TRIM on SSD helps in preserving Its speed and effectiveness, and is one of the primary reasons why people consider enabling TRIM on an SSD. SSD's lack of TRIM requires the SSD to each time deal with old, unused data, resulting in a gradual decrease in write speed. When TRIM is enabled, the operating system informs the SSD about which files are no longer needed, so it can erase the data in advance rather than attempting to write over it later on, which would slow down performance.

2. Disabling TRIM for Data Restoration
So, when some SSD users want to restore their lost files, they disable TRIM. After enabling TRIM, deleted data cannot be recovered. In cases where someone has accidentally deleted important files or needs to use specialized recovery software, temporarily disabling TRIM can help increase the odds of data retrieval.
3. Enabling TRIM to Extend SSD Lifespan
SSDs have a limited number of write cycles, so excessive writing can wear them out more quickly. TRIM helps the drive to organize its data more efficiently; this means it avoids unnecessary write cycles, and improves the longevity of the SSD itself. Most users activate TRIM on an SSD to prolong its lifespan as much as possible.
4. Disabling TRIM for Compatibility Issues
Some older SSDs and certain types of RAID have poor or no TRIM support. If you have TRIM enabled for an unsupported SSD, you can cause a wide variety of performance problems, data corruption and other unexpected result. People encounter such problems with TRIM being enabled for so many more SSDs, so they disable TRIM to make sure system stability.
5. Enabling TRIM for Consistent Write Speeds
An SSD without TRIM can also speed up over time because deleted data builds up. This results in inconsistent write speeds and also a drop-in overall performance. Enabling TRIM helps users to keep their SSD performing at full speed so that day to day functions, games or professional work can be done smoothly.
So, the final conclusion is that its a decision of the end user whether you want to have TRIM enabled or disabled based on your own needs. Although enabling TRIM is the best way to keep your drive fast and in peak condition for as long as possible, it might well be necessary to disable it for a while regularly. It helps users choose the best option for their SSD setup.
How to Check if TRIM is Enabled on Windows & Mac?
TRIM is a crucial component for preserving Solid State Drive (SSD) performance. It ensures effective write operations by assisting the operating system in communicating with the SSD to remove unnecessary data blocks. Users may need to manually verify the status of TRIM because not all systems have it activated by default.
Verifying TRIM is rather simple on Windows since you will just be running a basic command in the Command Prompt. Alternatively, users can check for TRIM status using the Command Prompt opened as an administrator and by entering the corresponding command. The TRIM output confirms that SSD optimization is already enabled. Users who have disabled TRIM may consider enabling it to ensure their SSD is working well. Note though, that some users may also disable TRIM on SSD if they want to recover deleted files because TRIM marks it as truly deleted rather than just logically deleted.
Checking the TRIM state is as easy for Mac users. There is a built-in method in macOS to check if TRIM is active. Users can see whether TRIM support is enabled and obtain information about their SSD by going to the system report area. For Apple-certified SSDs, the majority of contemporary Mac systems automatically activate TRIM; however, third-party SSD users might need to manually activate it. TRIM on SSD is frequently enabled by users who want to increase SSD performance, guaranteeing the drive's longevity and optimal speed.
Although most users benefit from TRIM, there are several situations in which turning it off can be required. Performance problems or data corruption may result from older SSDs or RAID configurations that do not completely support TRIM. Users may need to turn off TRIM on SSDs in these situations in order to preserve system stability. However, the best choice for long-term performance on most contemporary SSDs is to keep TRIM enabled.
Being able to determine the TRIM status on both Mac and Windows aids consumers in making well-informed choices regarding the performance of their SSD. Enabling TRIM can increase writing speeds and prolong the drive's life if it is currently disabled. However, users may choose to temporarily stop TRIM on SSD if they require data recovery or have compatibility issues. Knowing the effects of TRIM, whether enabled or off, guarantees that an SSD will continue to operate effectively over time.
How to Enable or Disable TRIM on Windows?
An essential component that preserves a Solid State Drive's (SSD) longevity and performance is TRIM. By turning on TRIM for SSD, write speeds are maintained while deleted data is effectively destroyed. For compatibility or data recovery concerns, some users might have to turn it off. Here's how to turn Windows' TRIM on or off.
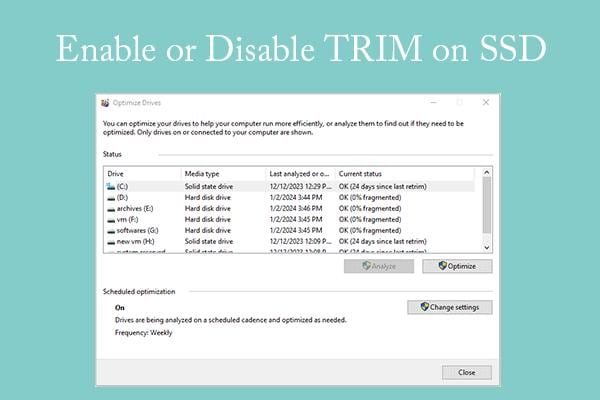
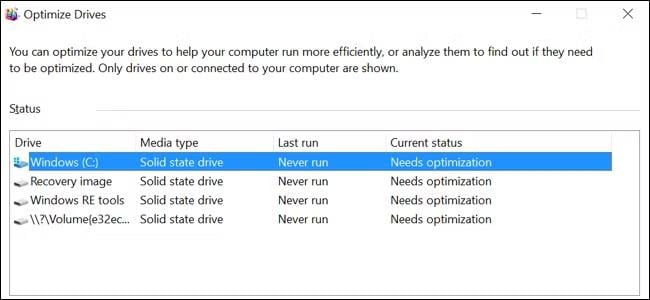
Method 1: Manage TRIM on SSD via Command Prompt
Using Command Prompt to manage TRIM on an SSD gives users command over how the system responds to erased data. By removing unnecessary storage blocks, the TRIM command SSD function preserves speed and effectiveness. A quick and efficient method of managing SSD performance is to use Command Prompt, whether you need to inspect, enable, or disable TRIM.
Steps:
Checking and enabling TRIM on SSD using Command Prompt is a simple process. Follow these steps to ensure your SSD is running efficiently.
Check if TRIM is Enabled
1. Begin by clicking on the Start button on your system and typing cmd into the search bar.
2. To open Command Prompt, click on the right mouse button and select the Run as an administrator option.
3. Type the command in the Command Prompt window: fsutil behavior query DisableDeleteNotify and press Enter.
4. If the result is DisableDeleteNotify = 0, TRIM is enabled on your SSD. If it shows DisableDeleteNotify = 1, TRIM is disabled.
Enable TRIM on SSD via Command Prompt
1. Click the Start button and type cmd in the search bar.
2. Right-click Command Prompt and choose Run as Administrator.
3. To enable TRIM on SSD, type the following command and press Enter: fsutil behavior set DisableDeleteNotify 0
4. If you want to disable TRIM on the SSD, use 1 in place of 0 in the above command.
Following these steps ensures your SSD stays optimized for performance.
Method 2: Enable or Disable TRIM support for SSDs with NTFS file system
By removing unnecessary data blocks, TRIM helps SSDs stay fast and efficient, albeit its usefulness varies depending on the file system being utilized. To maximize performance or avoid unintentional data loss, you can set or disable TRIM for SSD if your SSD is formatted with NTFS. Here's how to use the NTFS file system to control TRIM functionality for SSDs.
Steps:
1. Press the Start button on your computer and search cmd in the Search Bar.
2. Go to Command Prompt and run it as administrator to open a new elevated command prompt.
3. Enter the command below to enable TRIM: fsutil behavior set DisableDeleteNotify NTFS 0
4. For disabling TRIM on SSD, use this command: fsutil behavior set DisableDeleteNotify NTFS 1
Method 3: Enable or Disable TRIM support for SSDs with ReFS file system
Like NTFS, the Resilient File System (ReFS) supports TRIM to maintain SSD performance and is tailored for today's storage requirements. In order to maximize speed, users might need to enable TRIM or disable it for particular use scenarios. Here's how to use Command Prompt to handle TRIM functionality for SSDs utilizing the ReFS file system.
Steps:
1. Click the Start button and type cmd in the search bar.
2. Right-click Command Prompt and select Run as administrator to open an elevated command prompt.
3. To enable TRIM, enter the following command and press Enter: fsutil behavior set DisableDeleteNotify ReFS 0
4. To disable TRIM, use this command instead: fsutil behavior set DisableDeleteNotify ReFS 1

Bonus Tip: Recovering Lost Data After TRIM Using Wondershare Recoverit
Although SSDs provide dependable and quick storage, unintentional data loss is always possible. What does SSD TRIM do when files are removed is a question that many people have. Data is permanently erased by TRIM, making recovery challenging. Nevertheless, you can still recover deleted files with Wondershare Recoverit. SSD data recovery is quick and simple with this robust program, which is compatible with both Mac and Windows.
Steps:
1. Open Wondershare Recoverit and select the drive where you lost your data and click Start to initiate the scan.

2. The software now performs its deep scan on the chosen drive. The scan duration depends on the volume of data, lasting anywhere between a few minutes to a few hours. You can pause or terminate the scan at any time. For videos that have been lost, the Enhanced Recovery option will allow a deeper scan.

3. Once scanning is completed, preview the recovered files. Choose the ones needed and click Recover, and select a safe location to save them.
How to TRIM SSD Manually?
Solid State Drives or SSDs are built to be faster and better than old hard drives. But, eventually, performance declines, as data is stored and deleted. Enter TRIM, a feature that enables the OS to communicate to the SSD that data blocks are not in use anymore so they can be wiped and made ready for new data. In modern operating systems, TRIM is handled automatically, but on certain occasions, you will need to TRIM your SSD yourself to keep optimum performance. If your system isn’t invoking TRIM regularly, your SSD can slow down as it works overtime to deal with aged, unneeded data.

Understanding how to enable TRIM on SSD is essential for keeping the speed and life of your SSD. Running TRIM manually is a way to help the SSD clear out unused storage blocks, which helps ensure that the SSD can continue to write new data effectively. In some cases, like after deleting large files or formatting the drive, you may want to manually trigger TRIM to ensure that the SSD isn’t holding on to unwanted data in the background. This is particularly useful for people who regularly deal with larger files like video editors or gamers.
Both Windows and macOS systems enable TRIM manually through simple commands from the built-in terminal. TRIM settings allow you to free up space, and you can manipulate them in order to keep your SSD health in check.
Conclusion
Understanding what does SSD TRIM do; is essential for maintaining SSD performance and longevity. TRIM identifies and eliminates unused data blocks, which enables faster write speeds and allows storage devices to manage storage more efficiently. Proper TRIM management (checking its status on Windows and Mac, enabling or disabling TRIM, or simply running it manually) prevents giving the slowpoke feeling. Moreover, after TRIM and loss of data, Wondershare Recoverit can help recover those files too. TRIM increases the operational life of the SSD, and sustains a high speed of them with a more responsive computer.
FAQ
1. Can SSD TRIM be recovered?
No, destroyed data is permanently erased once TRIM is activated and run, making recovery all but impossible. SSDs do not save deleted files like conventional hard drives do. In rare instances, though, recovery tools such as Wondershare Recoverit might be helpful.2. Does TRIM damage SSD?
No, an SSD is not harmed by TRIM. Instead, by cutting down on pointless write cycles and improving data management, it helps the SSD last longer. The longevity and performance of SSDs are really improved by TRIM, which stops excessive wear and guarantees effective storage operations.3. Does trimming SSD make it faster?
Yes, by removing unnecessary data blocks and enabling faster write operations, TRIM enhances SSD speed. SSDs may gradually slow down as deleted data builds up without TRIM, thus either manual or automatic TRIM is necessary to keep performance at its best.


