
Jun 22, 2026 • Filed to: Answer Hard Drive Problems • Proven solutions
 TL;DR:
Resolve an undetected SSD in Windows 10/11 by initializing new drives with MBR or GPT partitioning and assigning missing drive letters through Disk Management.
● Diagnose hardware failure risks by running wmic diskdrive get status in Command Prompt, or repair bad sectors using CHKDSK /F /R before formatting RAW volumes, which requires Wondershare Recoverit to restore erased files.
● Change the SATA Controller Mode to IDE Compatibility Mode within the BIOS settings if the computer completely fails to recognize the connected hardware.
● Preserve drive lifespan and performance by never defragmenting the SSD, which irreparably wastes finite write cycles, and by keeping storage utilization strictly below 75 percent.
Ask AI for a summary
 ChatGPT
 Perplexity
 Gemini
 Claude
 Grok
Grok
When you open up Windows and go to "This PC", the drives displayed there are the first things you see, right? What sets them apart? Each drive has a drive letter. These letters help you identify your SSD from other drives; they also help your Windows recognize and access the SSD.
So, what happens when errors hide the SSD from Windows? Problems abound, of course: Running applications in your Windows becomes an issue while moving files between your drives are next to impossible. These occur because the drive letters that guide your OS in executing the actions are missing. Use the solutions below to fix this.
Why SSD Is Not Recognized?
🔍 SSD Drive Status Diagnostic Matrix
To isolate why your Solid-State Drive is hidden from File Explorer, locate your drive's physical state below to find the correct system repair protocol:
| Disk Visibility Status | Probable Root Cause | Target System Layer | Recommended Correction Strategy |
| Invisible in File Explorer; Visible in Disk Management as Unallocated. | Brand-new storage media requiring sector mapping layout. | Windows Disk Management | Initialize Disk using GUID Partition Table (GPT) mode. |
| Visible in Disk Management but marked as an empty bar without a letter. | Missing, dropped, or conflicting system volume drive letter. | Logical File System | Manual assignment via 'Change Drive Letter and Paths'. |
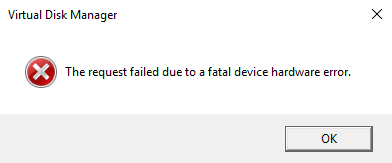
| Displays as 'RAW' volume or Unreadable partition file structure. | Corrupted file allocation table or sudden partition volume error. | Drive Sector Blocks | Extract data via Wondershare Recoverit, then format to NTFS. |
| Completely invisible in both File Explorer and Disk Management. | Misconfigured motherboard storage controller or faulty connection. | Hardware / System UEFI BIOS | Switch storage mode settings to AHCI/NVMe or inspect physical cables. |
Since it's already been established that SSDs can fall victim to errors, the obvious step to take is to determine what those errors are. Don't worry about fixing them for now. That will be delved into a little later. Know the errors so you can identify them when you see them, alright?
- New SSD that is Yet to Be Initialized
It's going to be quite ironic-and hilarious-if you plug in a brand-new SSD into your PC and see it doesn't work, won't it? The fix is simple, fortunately. You just have to initialize the SSD so it becomes usable.
- Driver Issues
The problem here could be as simple as your PC running on outdated drivers. And remember, the SSD you're connecting to your PC may be more recent than the Windows installed in it, which could make updated drivers a necessity for you to be able to even detect the SSD. You can use Windows' native "Device Manager" to update your drivers. If it comes to it, you could even use a third-party driver updater tool, but that should be your last option.
- The Drive Letter of the SSD Partition Goes Missing
This issue is common with both HDD and SSD. Your Windows might be a little less efficient sometimes as it fails to assign a drive letter to a partition or drive. The error is mostly caused by file system issues or even with the SSD itself. Another simple way out of this issue is to assign a drive letter yourself using "Disk Management."
- Improper Connection
Did you check the connection to make sure you inserted the SSD's USB cable properly into your USB port? Make sure it's pushed in there so it's snug. Better yet, examine the cable and make sure it's not damaged. That's a likely problem too.
This problem thus has nothing to do with your Windows. It's either a hardware issue (USB cable) or a result of you being too hasty when you plug in the cable.
What's The Difference Between SSD and HDD?
7 Solutions to SSD Not Showing up in Windows 10/11
The errors listed up there are only a few of the many that could be wreaking havoc on your SSD, so it's time to get to work. It's time to teach you amateurs how to get yourselves out of the mess you put yourselves in. Why only 7 solutions, though?
Well, 7 is a lucky number, isn't it? As pervasive as the errors affecting your SSD are, you might not need to go beyond these 7 solutions to fix the problematic SSD.
1 Analyze Storage Health Metrics and File Integrity
Before applying system fixes, check the underlying physical health of your solid-state drive using built-in Windows diagnostics.
- Check Hardware Health via Command Line (Query S.M.A.R.T. disk parameters)
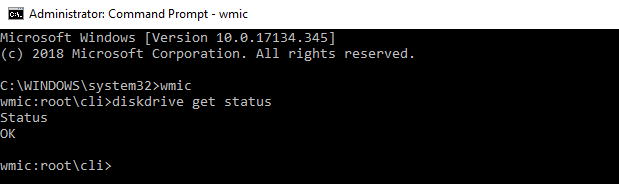
PressWindows + S, typecmd, right-click Command Prompt, and select Run as administrator. Type the following command and press Enter:
(Note: For modern environments, you can also use the PowerShell commandwmic diskdrive get statusGet-PhysicalDisk | Select-Object DeviceId, FriendlyName, OperationalStatusto view precise status arrays). If the output showsOK, your drive hardware is physically healthy. If it returnsPred FailorUnknown, immediately back up your files.
- Execute an Internal System File Sector Repair (Fix soft file table corruptions)
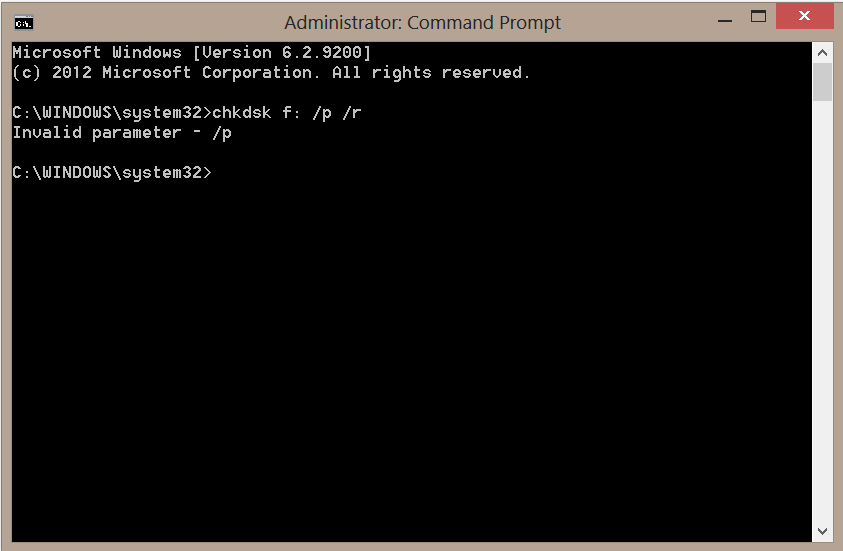
If your drive status is healthy but partitions are glitching, run a file system scan. In the administrative prompt, type the following command and press Enter:
(Replacechkdsk C: /f /r /xC:with your targeted SSD drive letter if applicable). The system will scan, lock the volume, and patch sector allocation table errors automatically.
- Run Windows Graphical Error Checking Tools (Alternative interface diagnostic route)
PressWindows + Eto open File Explorer. If the drive shows up here but is unreadable, right-click the drive icon, select Properties, click the Tools tab, and select Check under the Error Checking section.

2 Configure Motherboard Storage Controllers in BIOS/UEFI
If your solid-state drive is completely invisible to Windows administrative tools, the motherboard's firmware might be blocking the device connection interface.
- Enter Motherboard Firmware Interface (Reboot into system setup)
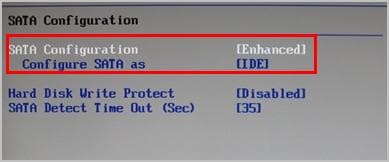
Restart your PC. During the initial system boot screen, repeatedly press your motherboard’s setup key—typically F2, Del, or F12—to enter the BIOS/UEFI configuration utility panel. - Adjust SATA and NVMe Device Configurations (Switch controller protocol profiles)
Navigate to the Storage Configuration, System Configuration, or Onboard Devices menu screen. Locate the SATA Controller Mode or NVMe Configuration setting and switch it from legacy modes to AHCI or Enabled. Save your changes and exit to reboot into Windows.
3 Force Device Driver Stack Re-Indexing
Corrupted or outdated storage controller drivers can cause Windows to drop communication loops with attached storage hardware.
- Launch the Windows Device Manager App (Open the primary driver console)
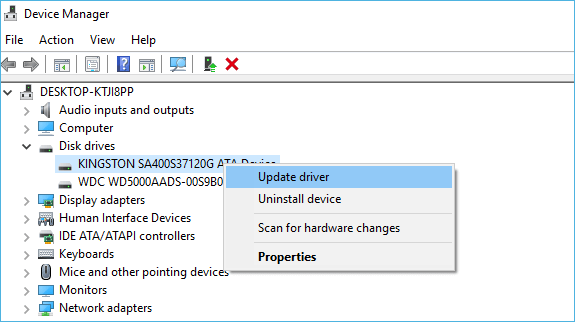
Right-click the Windows Start menu icon and select Device Manager from the administrator quick-access list. - Uninstall and Refresh the Storage Drive Controller Node (Force a clean system driver reload)
Expand the Disk drives category list. Right-click your missing or flagged SSD name and select Update driver. If the drive is still not showing up correctly, select Uninstall device, then click the Scan for hardware changes icon on the top menu bar to force Windows to cleanly reload the driver stack.
4 Initialize a Newly Installed Solid-State Drive
Brand-new out-of-the-box SSD drives possess no active partition boundaries or master record maps. You must initialize them before Windows can assign a storage path.
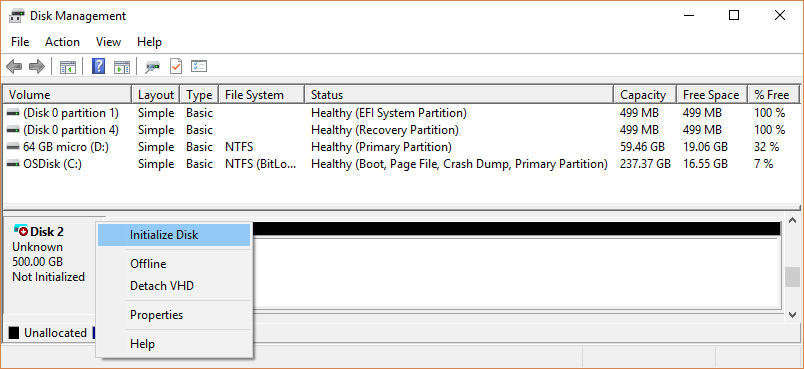
- Open the Advanced Disk Management Interface (Access system volume layouts)
PressWindows + Rto bring up the Run dialog window. Typediskmgmt.mscinto the field and press Enter to open the tool.
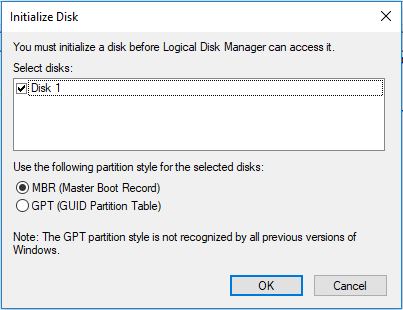
- Select Partition Style Schemes (Choose MBR or GPT maps)
If an uninitialized drive is connected, a prompt will automatically pop up. Select GPT (GUID Partition Table)—which is required for modern systems and Windows 11 compatibility—and click OK. - Build a New Simple Allocation Volume (Format and assign path letters)
Right-click the unallocated space block on your drive map and select New Simple Volume. Click Next, define your partition size boundaries, select a drive letter, and format the volume as NTFS to complete the setup.
5 Rebuild Corrupt Partition Blocks via Disk Management
If your drive partition has turned into a RAW file structure or lost its volume mapping due to unexpected disconnects, re-formatting the storage blocks will fix the communication error.
- Isolate the Problematic Unallocated Disk Space (Identify target volume rows)
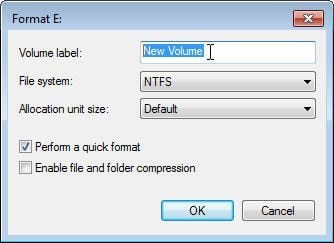
Launch thediskmgmt.mscconsole tool and locate the drive layout row showing your unallocated or RAW storage bar blocks. - Execute a Safe System Volume Format (Re-map logical storage blocks)
Data Warning: This step erases indices. If important files are trapped on the drive, run a Recoverit deep scan first. Right-click the RAW partition bar block, click Format, choose NTFS as the target file system structure, check the Perform a quick format box, and click OK.
6 Assign a Manual Logical Drive Letter Path
If an existing drive with data on it suddenly stops showing up, Windows may have simply failed to assign a drive letter to the partition path.
- Open Virtual Disk Service Managers (Locate hidden healthy partitions)
Open Disk Management. Look through your connected drives for a long bar that reads Healthy, but has no drive letter (like D:, E:, or F:) listed next to its volume name.
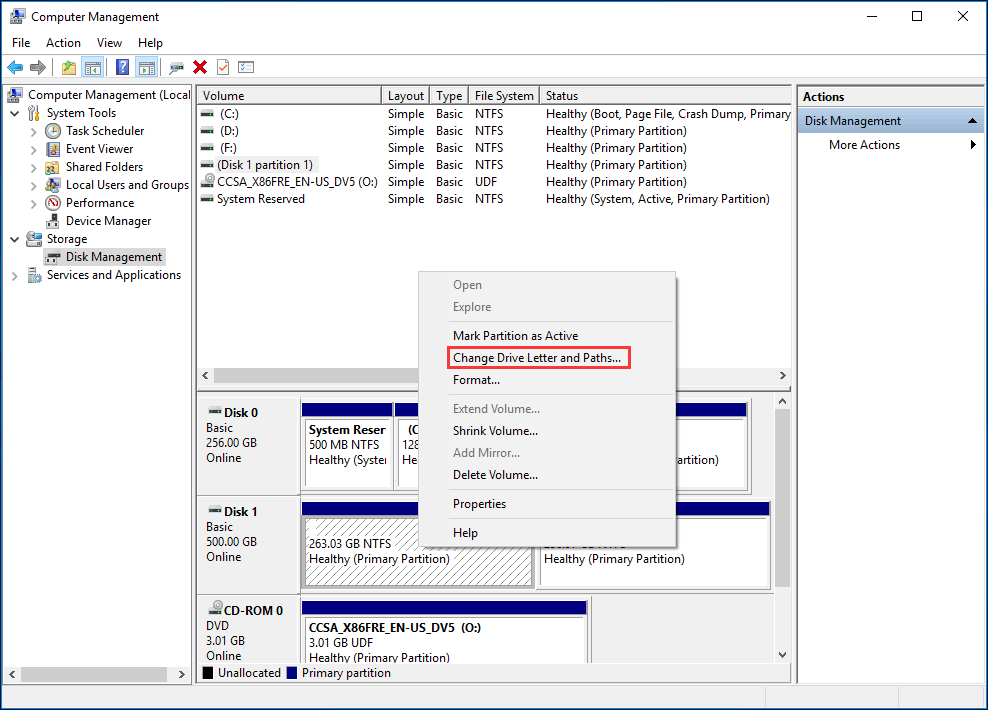
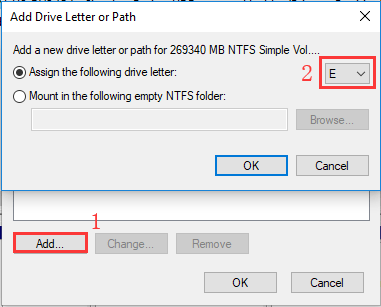
- Inject a New Drive Letter Path Designation (Mount the partition back to File Explorer)
Right-click the healthy partition block and select Change Drive Letter and Paths. Click the Add... button, select an available letter from the dropdown option menu, and click OK. The drive will instantly mount and show up inside File Explorer.
7 Securely Recover Files with Wondershare Recoverit
If you had to format your drive, encountered a sudden RAW partition error, or accidentally initialized an older drive, your files are not permanently gone. The underlying data sectors remain intact on the flash memory cells. Wondershare Recoverit is designed to bypass broken Windows logical paths, read these raw sectors directly, and safely reconstruct your lost files.
Ponder no more, because Wondershare Recoverit data recovery software is here to save your files. As one of the leading data recovery software currently in the market, Recoverit prides itself on its ability to dig through a hard drive and recover files and data that were believed to be gone for good.
The software not only delves into each sector of a formatted or corrupt SSD, but it also executes the same function with excellent results on HDD. Recoverit was developed to cater to both Windows and macOS (there are separate versions for either operating system).
Don't fret about complex procedures or clicking multiple buttons to make Recoverit work. 3 steps are enough to get the job done. Follow them below:
Step 1: Choose a Location
- Connect the SSD to your PC and start Recoverit, then choose the SSD from the list of drives you see on the PC.
- If you don't know which of them is your SSD, just look under the "External Devices" category. It should be there. Check your SSD's size to be sure you chose the right drive. Click on "Start."

Step 2: Scan the Location
- Recoverit will start scanning the SSD. The moment the scan is done, the next window you see will show you a preview of the files that were in the SSD before it was formatted.
- Recoverit makes it possible for you to select and deselect filters to make your search easier and with little time wasted. Take note of the "File Type" filter in particular because if you only intend to recover certain files types, it simplifies the process for you.

Step 3: Preview and Recover Data
- Once you're done selecting the files or data to be recovered, click on the "Recover" button-it will be at the bottom and to the right. Recoverit will restore everything you've ticked. All you have to do is wait for the process to start and end
- Don't save the recovered files in the same SSD. Plug in an external or look for anywhere else on your PC where you have space, then save the files there.
So, a quick recap on how to use Recoverit: Select your SSD, scan it, preview your files and restore them to a new location.

SSDs are more complex than HDDs, so it wouldn't be wise to use any average data recovery software on them. Disregard what you hear about other data recovery software and give Recoverit a spin
The features it comes loaded with means neither the capacity nor the model of your SSD will matter. The software will scan it thoroughly, then recover your files and keep them for you anywhere you want. Recoverit is surprisingly simple to use, yet it's shockingly powerful; enough reasons to use it if the need arises.
Professional Guidelines for SSD Maintenance and Data Protection
Solid-State Drives utilize NAND flash memory chips, which operate differently than older mechanical hard disk drives (HDDs). Follow these maintenance practices to maximize your drive's performance and service life:
- Maintain Thermal Threshold Guardrails: Keep your computer configuration well-ventilated. High-performance NVMe M.2 expansion cards generate significant heat under heavy use. Always use passive metal heatsinks to prevent thermal throttling and component damage.
- Avoid Voltage and Power Interruptions: Sudden power losses or voltage drops during a disk write cycle can corrupt your drive's translation layer, causing it to show up as an unreadable RAW disk. Connect your computer system to an Uninterruptible Power Supply (UPS) to ensure a safe shutdown during power outages.
- Observe Storage Capacity Boundaries: Try to keep at least 15% to 20% of your total disk capacity unallocated and free. Solid-state drives require empty blocks to efficiently run background optimization processes like wear leveling and garbage collection. Filling a drive to 100% capacity will significantly slow down its write performance.
- Do NOT Run Manual Defragmentation Utilities: Never run traditional disk defragmentation software on an SSD. Mechanical hard drives need defragmenting to group scattered data blocks together, but solid-state drives have no moving parts and can access any sector instantly. Running a defragmentation cycle simply creates unnecessary writes that wear down your drive's endurance cells.
Closing Words
SSDs are justifiably more expensive than HDDs, but you still have to take care of them to extend their lifespan even further. Just because they are very capable and efficient pieces of hardware doesn't mean you should subject them to anything which can damage them. If this happens, in the end, your files will suffer more than anything else.
If, for some unavoidable reason, you do end up losing your files from your SSD, make use of Recoverit Data Recovery and get everything back. The more time you waste, the more your files remain in jeopardy, so be quick about it, yeah?
What's Wrong with Drive
- Recover Your Drive
- Get WD files back now.
- Recover Seagate data easily.
- Drive damaged? Recover data
- Recover Toshiba drive data.
- Top tools to recover hard disk.
- Recover deleted files from C drive
- Fix Your Drive
- Repair external hard drive
- Fix an undetected hard disk.
- Fix drive I/O error.
- Solve hard drive crash.
- Remove all bad sectors.
- Get data off old hard drive
- Fix "The file or directory is corrupted and unreadable"
- Format/Wipe Drive
- Best hard drive eraser.
- Recover hard drive without formatting
- How to unformat a hard drive
- Erase Mac drive
- Format external hard drive on Mac
- Know Your Drive
- What is PATA?
- What is a Solid State Drive?
- What is a hybrid drive and do i need it?
- What is optical drive and how does it work?
- Magnetic Disk Guide
- Increase hard drive speed.
- What Is Zip Drive?
- What Is Floppy Disk?
- What Is SATA?
- What Is NVMe?
- Top 10 cheapest external drive.
- 5 external drive for Mac.
- Clone your hard drive.
- Recover data from dead computer


Theo Lucia
chief Editor