

 TL;DR:
To safely clean a nearly full Windows 10 C drive without breaking the operating system, use built-in utilities like Storage settings and Disk Cleanup rather than manually deleting unfamiliar folders in System32, Program Files, or ProgramData.
● You can remove superseded update files and the Windows.old folder via Disk Cleanup to free gigabytes of space, but this permanently eliminates your ability to roll back to a previous Windows version.
● If you do not require hibernation or Fast Startup, running the command powercfg /hibernate off in an elevated terminal securely deletes the protected system hibernation file.
● In the event of accidental data loss during cleanup, immediately stop saving new files to the C drive to prevent overwriting, as recovery software cannot retrieve overwritten files or repair a broken Windows installation.
Ask AI for a summary
 ChatGPT
 Perplexity
 Gemini
 Claude
 Grok
Grok
A nearly full C: drive can be caused by temporary files, Windows update leftovers, large applications, WSL or Docker data, OneDrive files kept offline, old installation files, or personal media. The safest way to learn how to clean C drive Windows 10 is to identify the category using Windows Storage first, then remove only the data that category manages.
Start with the Recycle Bin, temporary files, unused apps, and personal files you can identify. Use Disk Cleanup or Storage Sense for system-managed data. Do not delete unknown folders inside Windows, System32, Program Files, ProgramData, or boot and recovery locations simply because they are large.
This guide explains how to clean C drive in Windows 10 without deleting important files, including how to handle Windows.old, hibernation data, restore points, the page file, OneDrive offline copies, and accidental deletion during cleanup.
In this article
Part 1. Check Where Your C Drive Space Is Going
Before deciding how to clean drive C Windows 10, check what is consuming the space. Open Settings > System > Storage and review the categories for the system drive. Windows can show usage from apps, temporary files, documents, pictures, videos, and system-managed storage before you remove anything.
Do not assume that a C: drive with few visible personal files is empty. WSL distributions, Docker images, virtual machines, package caches, browser profiles, and application data can be stored below user or program folders. Identify the largest category first so your cleanup addresses the cause rather than repeatedly deleting small caches.
| Storage area | Common space users | Can you clean it? | Best approach |
| Temporary files | Update cache, thumbnails, logs, and application working data | Usually, after review | Storage settings or Disk Cleanup |
| Apps and games | Installed software, game libraries, and supporting data | Yes, if unused | Uninstall through Settings or the application’s uninstaller |
| Downloads and personal files | Installers, archives, photos, videos, documents, and projects | Only after review | Open, back up, move, or delete selected files |
| Windows Update files | Superseded update components and delivery cache | Through Windows cleanup tools | Disk Cleanup or Storage settings |
Windows.old |
Files from the previous Windows installation | Only when rollback is no longer needed | Remove through Disk Cleanup or Storage |
| System Restore and system files | Restore points, page file, hibernation data, and Windows components | Adjust with care | Use the feature’s own settings or leave it managed by Windows |
Windows 10 support ended on October 14, 2025 for the normal supported lifecycle. Microsoft’s Windows 10 support notice explains the end of support. Some specialized LTSC editions and eligible Extended Security Updates arrangements follow separate terms, so do not treat an older PC as fully supported merely because Windows 10 still starts.
Built-in cleanup tools can still work on Windows 10, but support status matters when deciding whether to keep troubleshooting an older installation, upgrade the device, or replace a small system drive.
Part 2. Start With the Safest C Drive Cleanup
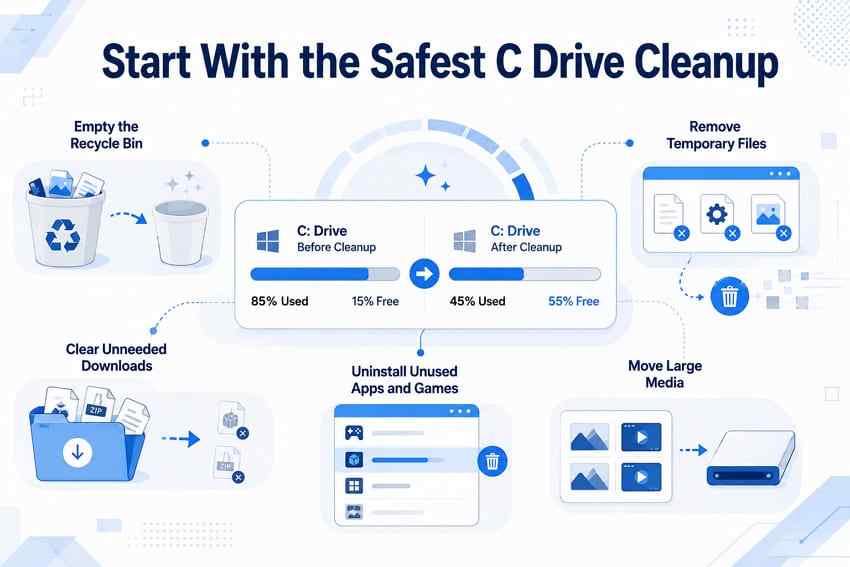
When users search how to clean the C drive Windows 10, they usually want more free space without losing documents or breaking Windows. Begin with actions that are reversible or limited to data you can identify.
- Empty the Recycle Bin. Open it first, restore anything important, and empty it only after confirming that the remaining files are no longer needed.
- Remove temporary files. Open Settings > System > Storage > Temporary files, wait for Windows to calculate the categories, and review Downloads, Recycle Bin, and previous-installation entries carefully.
- Clear unneeded Downloads. Sort by size or date and remove only installers, archives, exports, or other files you can identify as unnecessary.
- Uninstall unused apps and games. On Windows 10, open Settings > Apps > Apps & features. Uninstall recognized software instead of deleting its Program Files folder.
- Move large personal files. Move videos, photos, documents, virtual-machine files, and project folders to another physical drive or external storage, then verify the destination copy.
These steps may not recover every gigabyte. If the largest category is system data, a large application, WSL or Docker storage, or offline OneDrive content, use the matching method below rather than deleting random folders.
Part 3. How to Clean C Drive Windows 10 System Files
System files need a different approach from personal files. Use the Windows utility that knows which files are safe to remove, and read the consequence of each category before confirming.
Method 1. Use Disk Cleanup
Disk Cleanup can list temporary and system-file categories that are not obvious in File Explorer. Microsoft’s current free-up-drive-space guidance documents Disk Cleanup together with Storage Sense and other Windows cleanup options.
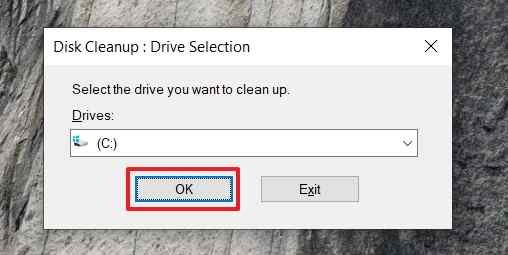
Step 1. Search for Disk Cleanup in the Windows search box, open it, select C:, choose OK, and wait for Windows to calculate the available cleanup categories.
Step 2. Review the categories and their descriptions. Select only items you understand, then choose OK > Delete Files. To review system categories, choose Clean up system files, select C: again if prompted, and review the new list.
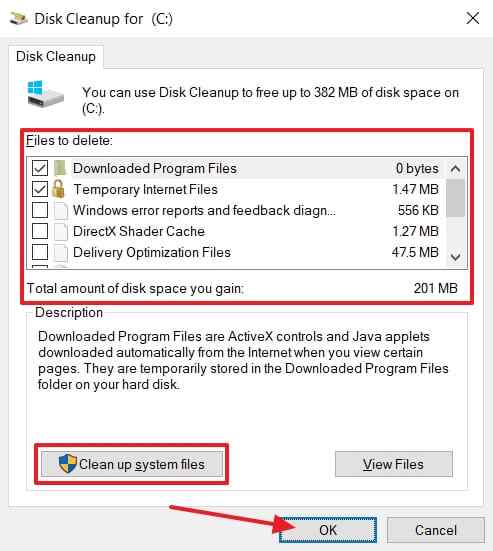
Do not select a category only because its size is large. Previous Windows installation files can remove rollback capability, and some cleanup categories may remove files needed for a particular recovery or uninstall action.
Method 2. Remove Old Windows Update Files
Windows Update can leave cleanup data after newer components replace older ones. Removing update cleanup files through Disk Cleanup can free space, but it may also remove files needed to uninstall some older updates.
Step 1. Open Disk Cleanup, select C:, choose Clean up system files, and select the drive again if Windows asks.
Step 2. Review and select Windows Update Cleanup when it appears, then choose OK > Delete Files. Restart if Windows requests it.
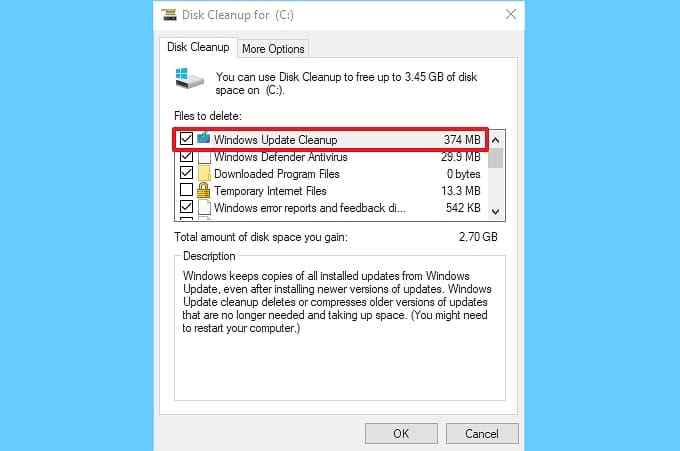
If Windows Update is currently installing, rolling back, or reporting an error, let that operation finish before removing update-related files. Do not delete folders inside C:\Windows\SoftwareDistribution as a first-line storage fix.
Method 3. Delete Windows.old When Rollback Is No Longer Needed
Windows.old stores files from a previous Windows installation and may occupy several gigabytes. Remove it only after the current Windows 10 installation, drivers, applications, and personal files work correctly and you no longer need to return to the previous version.
Step 1. Confirm that you will not use Windows rollback. The rollback window is limited and depends on the upgrade, but once the previous-installation files are removed, the normal rollback option is no longer available.
Step 2. Open Disk Cleanup > Clean up system files, select Previous Windows installation(s), review the description, and confirm the deletion.
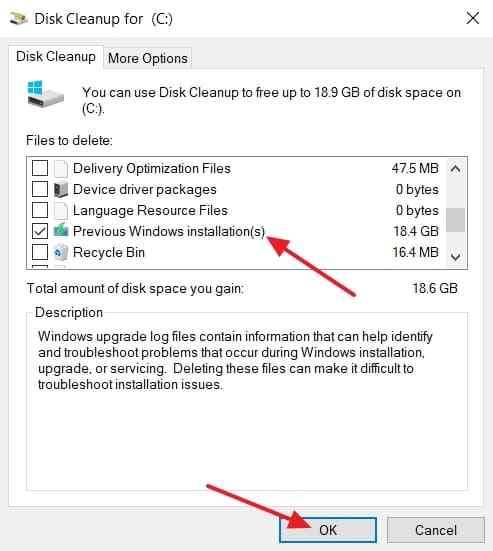
Microsoft’s Windows.old cleanup reference explains the consequence of removing the previous installation. Use Windows cleanup tools rather than deleting Windows.old manually.
Method 4. Use Windows Tools Rather Than Deleting by Hand
Storage settings and Disk Cleanup can identify system-managed categories. Hand-deleting system folders can break applications, interrupt updates, remove recovery resources, or prevent Windows from starting. If a folder is unfamiliar, identify which application or Windows feature owns it before changing anything.
For hidden-file questions, the source article also links to Recoverit’s hidden files recovery guide. That article is relevant when a file is missing or hidden, not as permission to delete unknown Windows folders.
Part 4. Find the Hidden Files Taking Up C Drive Space
Some large items do not look like ordinary documents in File Explorer. They are managed by Windows or a sync application, so change them only through the relevant control.
| Space consumer | Why it can be large | Should you remove it? | Safe method |
| Hibernation file | Stores memory state and supports hibernation; size depends on configuration | Only if you do not need hibernation or Fast Startup | Use powercfg from an elevated terminal |
| System Restore points | Windows reserves space for restore snapshots | Reduce the limit carefully; do not treat it as a personal-file backup | System Protection settings |
| Page file | Supports virtual memory and can change with workload | Normally leave it to Windows | Advanced system settings |
| Temporary app data | Browsers, creative tools, package managers, and apps create caches | Clear only through Windows or the application’s own controls | Storage settings or app settings |
| OneDrive offline copies | Full files are stored locally for offline access | Make selected items online-only after confirming cloud availability | OneDrive Free up space |
| Old installer or update files | Setup packages, logs, and replaced components remain after an operation | Use Windows or app cleanup tools | Disk Cleanup, Storage, or the owning app |
Way 1. Reclaim the Hibernation File
The hibernation file is a protected system file used for hibernation. It can also support Fast Startup. Its size is not a universal fixed percentage: it depends on the hibernation type and current configuration.
Step 1. Open Command Prompt or Windows PowerShell as administrator.
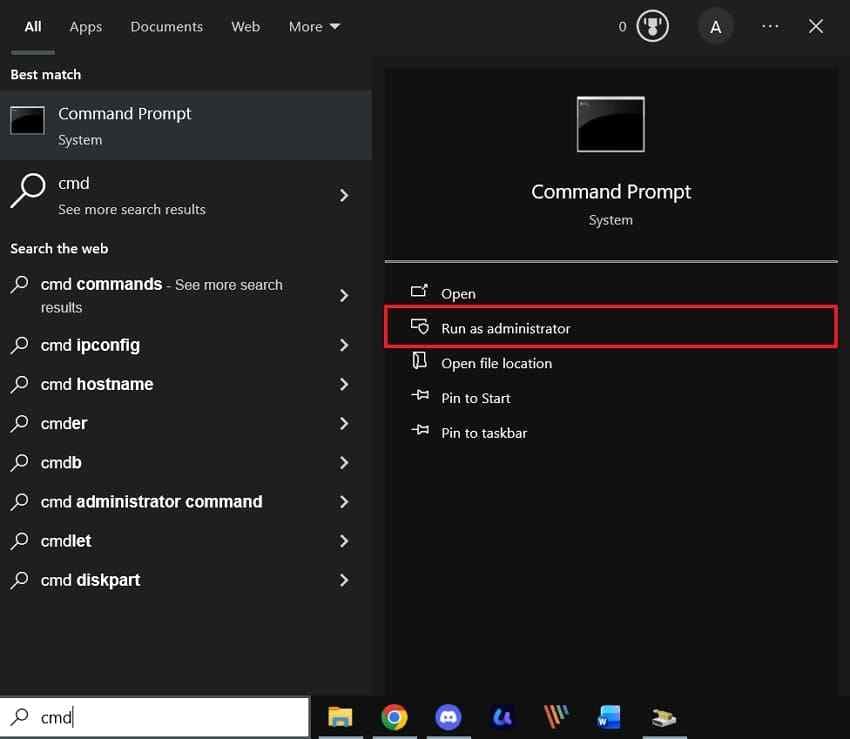
Step 2. To disable hibernation and remove its file, run:
powercfg /hibernate off
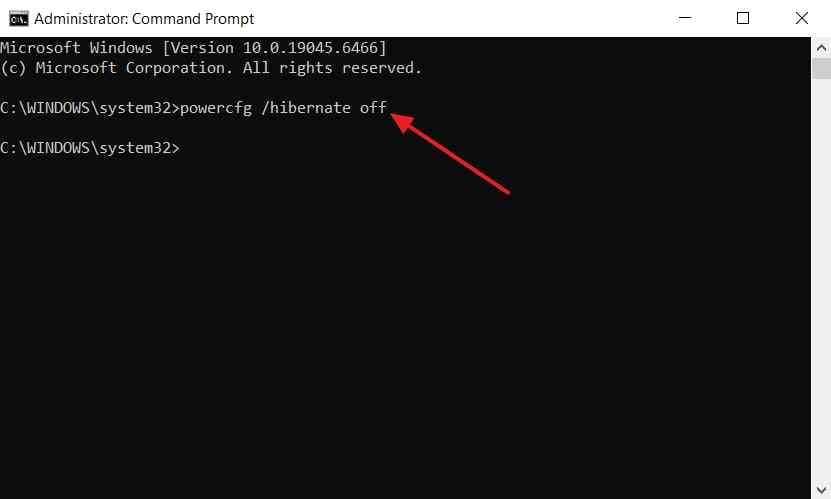
This also disables Fast Startup. Do not run the command if you rely on either feature.
Step 3. To keep hibernation but request a smaller full hibernation file, use a supported size between the limits documented by Windows:
powercfg /hibernate /size 50
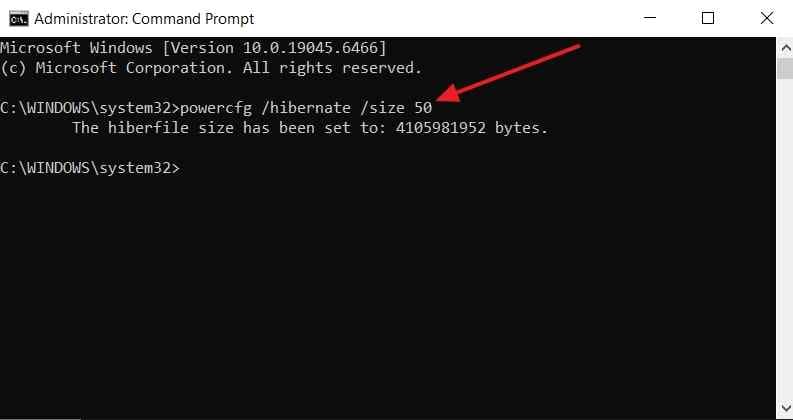
Do not treat a custom size as a guarantee that every workload will fit. If Windows rejects the value or the feature behaves unexpectedly, return to the default configuration.
Step 4. To restore hibernation later, run:
powercfg /hibernate on
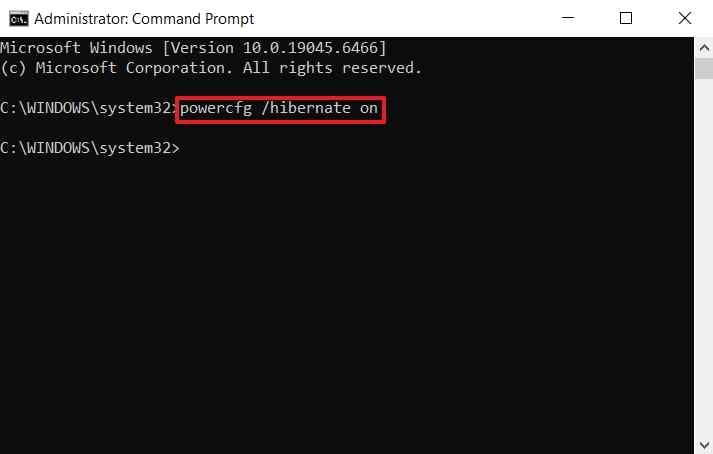
Microsoft’s system power states documentation explains the Windows power states behind sleep and hibernation.
Way 2. Limit System Restore Space Carefully
System Protection can reserve space for restore points. Restore points can help with some system changes, but they are not a complete backup of personal documents, photos, or projects. Lowering the limit can remove older restore points, so choose a limit based on the drive and your recovery needs rather than copying a fixed percentage.
Step 1. Search for Create a restore point, open it, select the C: drive, and choose Configure.
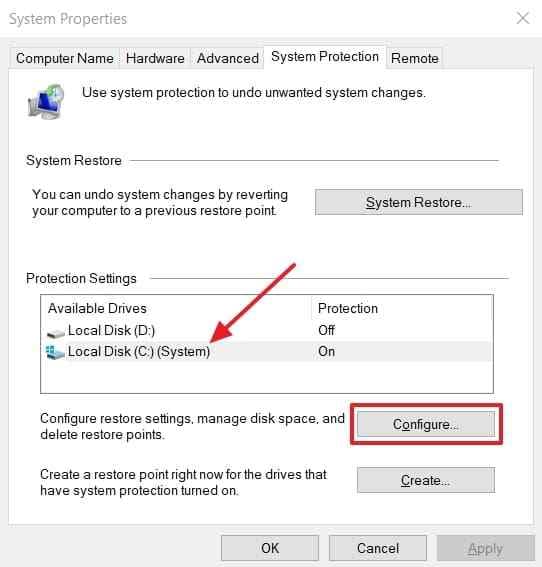
Step 2. Adjust Max Usage only if you understand that older restore points may be removed. Keep Turn on system protection selected when you still want this recovery option, then choose Apply.
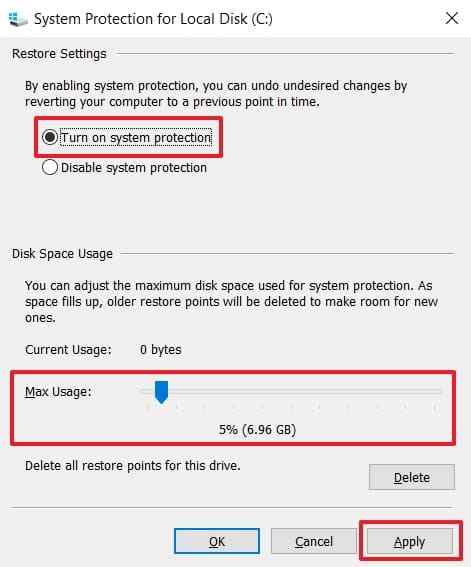
Microsoft’s System Protection guidance explains how disk-space usage is configured for restore points.
Way 3. Leave the Page File to Windows
The page file supports virtual memory and can be important when physical RAM is under pressure. Windows normally manages its size based on memory needs and workload. Do not delete or disable it just to free C: space; use Storage categories, application cleanup, or another drive for a less risky reduction.
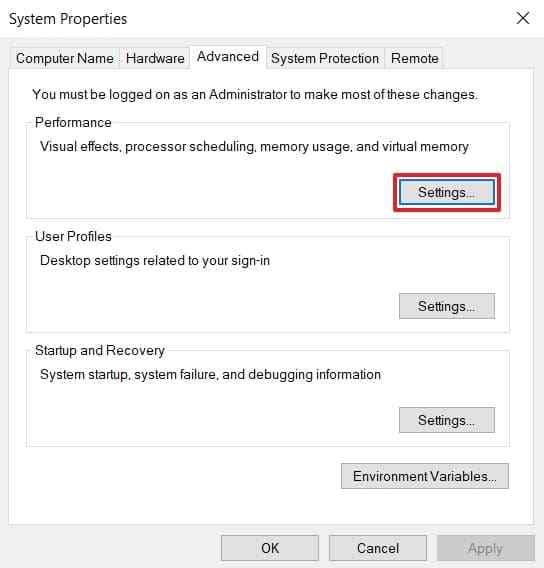
Step 1. Search for View advanced system settings, open it, and choose Settings under the Performance section.
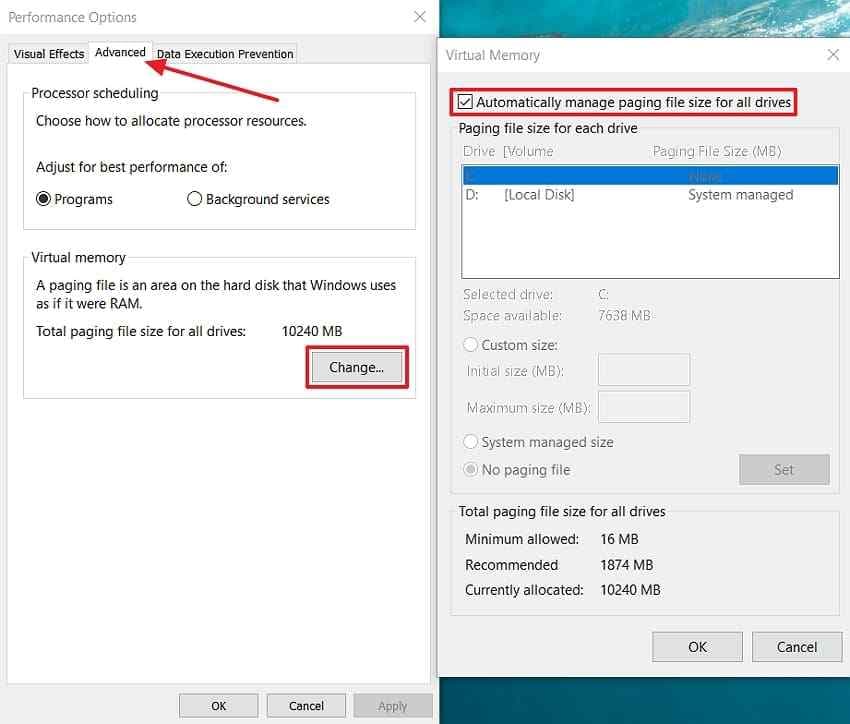
Step 2. Open the Advanced tab, choose Change under Virtual memory, and keep Automatically manage paging file size for all drives selected unless you have a documented reason to configure it manually.
Way 4. Clear Temporary App Data
Storage settings can remove broad temporary categories, but application-specific caches may need to be cleared from the application itself. This matters for browsers, creative tools, package managers, WSL, Docker, and development environments, where data may be large but still actively used.
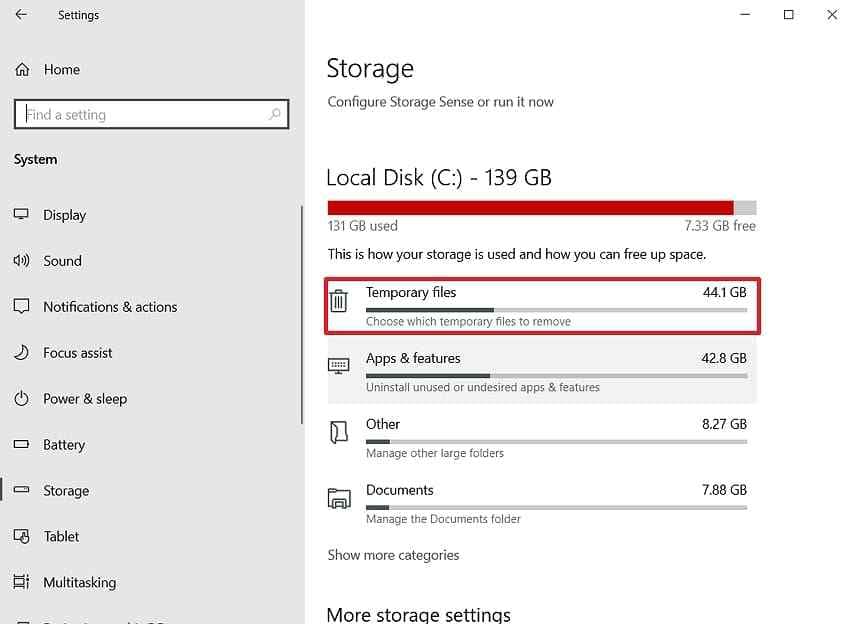
Step 1. Open Settings > System > Storage > Temporary files and wait for Windows to calculate the available categories.
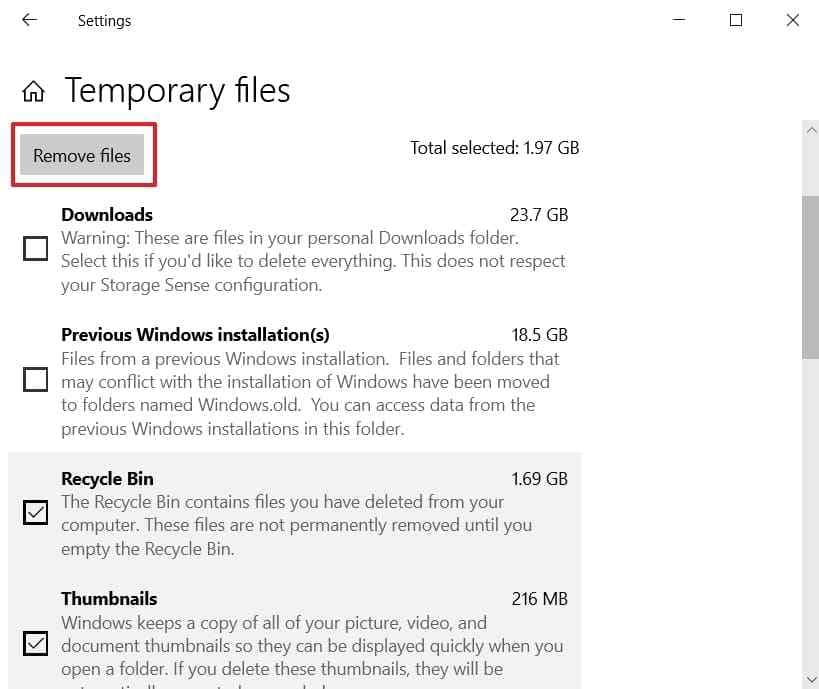
Step 2. Review the list, select only files you no longer need, and choose Remove files.
For Docker, WSL, npm, Python, or other development tools, use the tool’s own storage commands and documentation. Do not delete a distribution, virtual disk, package cache, or container-data folder manually unless you have confirmed what it contains and have a backup.
Way 5. Free OneDrive Offline Space
OneDrive Files On-Demand lets supported files remain visible in File Explorer without storing every full file locally. Making a file online-only frees local space but does not create an independent backup. Confirm that the file is available in OneDrive and that you can access the account before changing its local state.
Step 1. Open the OneDrive cloud icon in the taskbar, choose Help & Settings, and open Settings.
Step 2. In the current OneDrive settings interface, review the sync and backup or advanced settings for Files On-Demand. Labels can vary by OneDrive build.
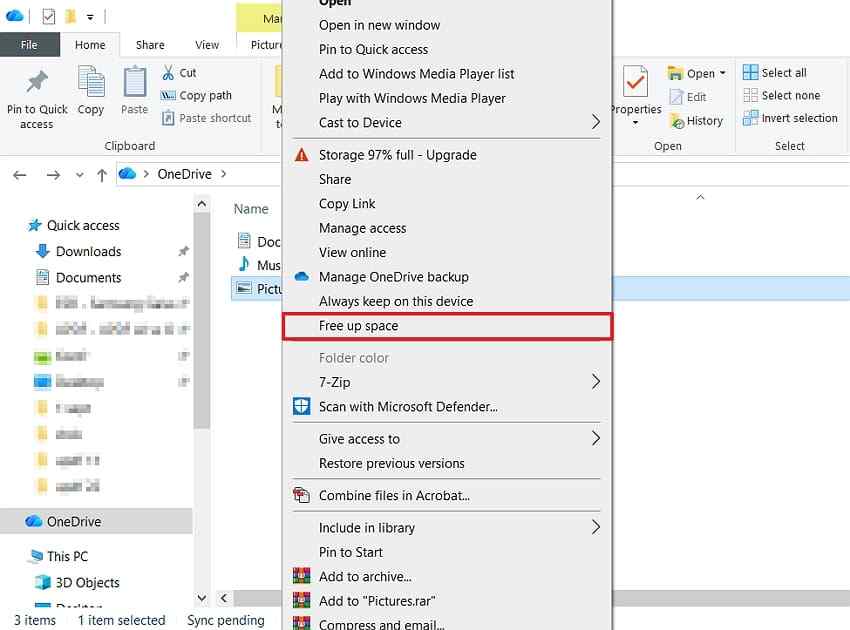
Step 3. Open the OneDrive folder in File Explorer, right-click a file or folder you want to keep in the cloud, and choose Free up space. To keep a file locally, choose Always keep on this device.
Microsoft’s Files On-Demand guidance explains the online-only, locally available, and always-available states.
Way 6. Remove Old Installation Files Through Windows Tools
Windows upgrades and application setup can leave installation data behind. Use Disk Cleanup or Temporary files to remove categories Windows marks as removable. Avoid deleting unknown installer folders from C:\Windows, C:\ProgramData, or AppData just because they have old-looking dates.
If the cleanup category is connected to a current update, repair, rollback, or uninstall operation, finish that operation first. Back up important files before using any reset, reinstall, partition change, or other destructive repair.
Part 5. How to Automate Windows 10 C Drive Cleanup
Storage Sense can reduce recurring temporary-file buildup, but automation should not be allowed to remove personal content that has not been reviewed. Microsoft’s Storage Sense documentation explains that it can remove unnecessary temporary files and manage Recycle Bin items based on your settings.
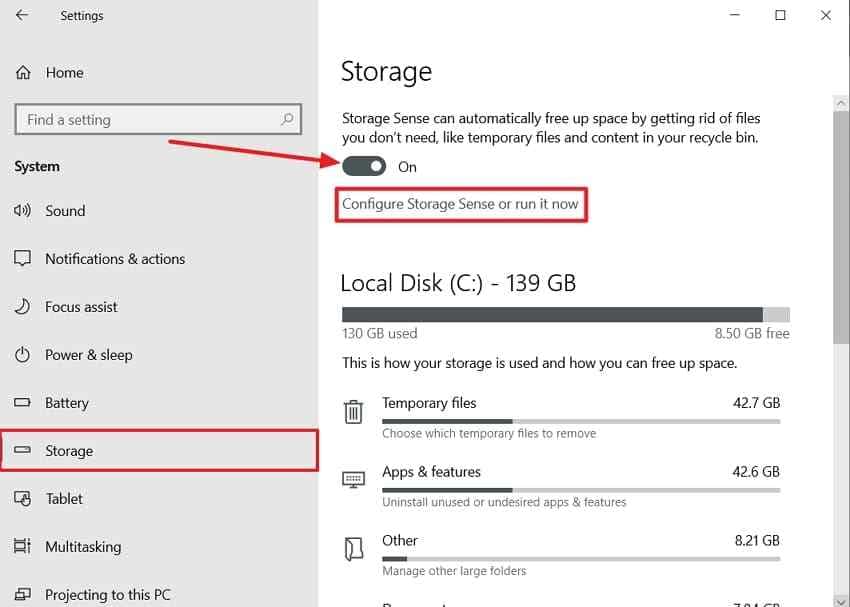
Step 1. Open Settings > System > Storage, turn on Storage Sense, and choose Configure Storage Sense or run it now.
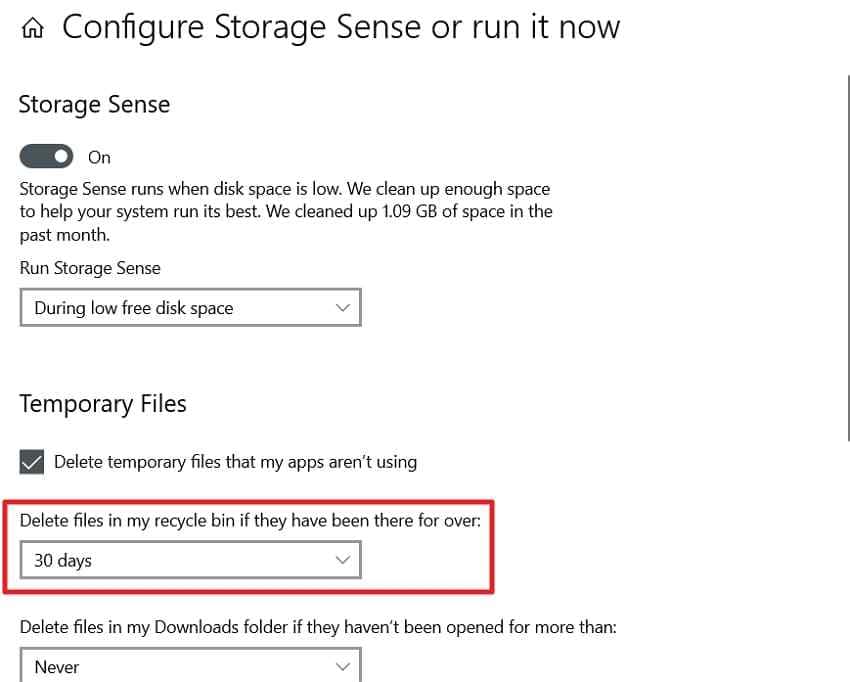
Step 2. Select how often Storage Sense runs and how long Recycle Bin items should be kept.
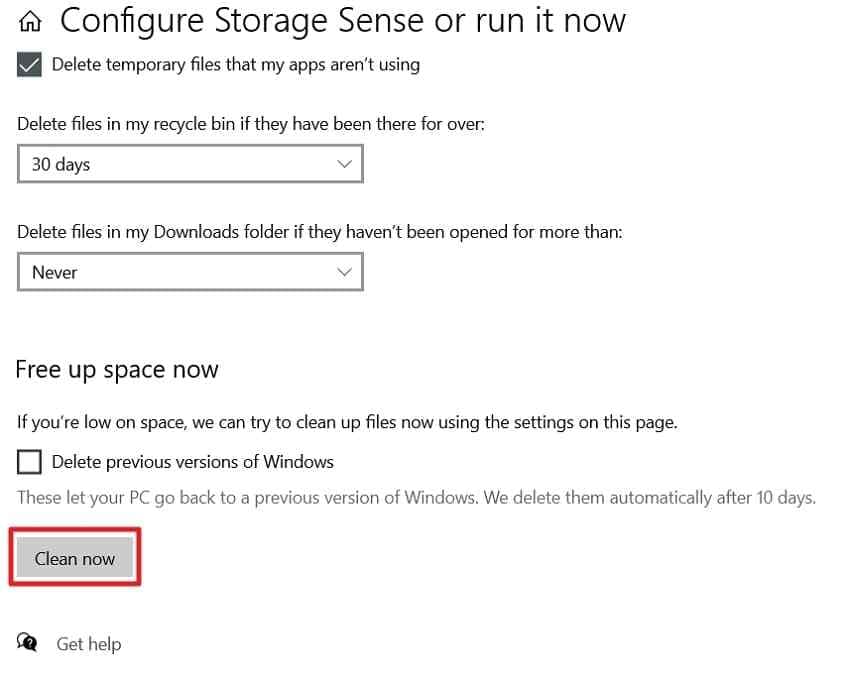
Step 3. Use Clean now when the drive is low on space between scheduled runs.
Storage Sense does not manage Downloads or cloud files unless you specifically configure those options. Keep Downloads set to a reviewable policy unless you have a separate backup and deliberately accept automatic removal.
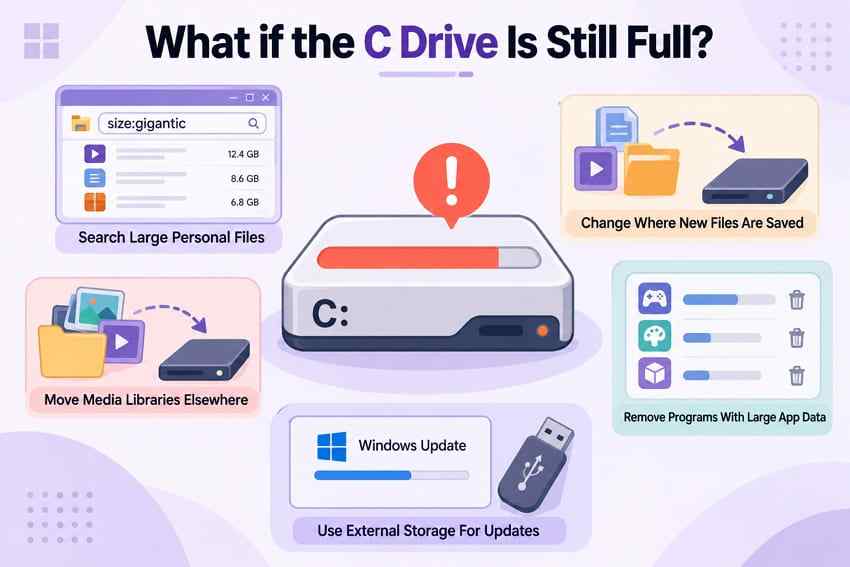
Part 6. What If the C Drive Is Still Full?
If you have removed low-risk clutter and still need to clean up C drive in Windows 10, use the following checks before changing system settings or reinstalling Windows.
- Search for very large personal files. In File Explorer, sort folders by Size or search with a size filter such as
size:gigantic. Open files before deleting or moving them. - Change where new files are saved. Review Settings > System > Storage > Change where new content is saved and move supported future content to another drive. This does not automatically move existing files.
- Move large personal libraries elsewhere. Move photos, videos, music, archives, project files, and virtual-machine data to another internal drive or external storage, and keep a second copy of irreplaceable data.
- Review programs with large app data. Uninstall unused apps properly and use the app’s own cache or storage controls. WSL, Docker, package managers, and creative software can have separate data-management workflows.
- Use external storage for Windows updates only when Windows offers that path. If Windows Update reports insufficient space, connect a suitable external drive and follow the amount and instructions shown by Windows. Do not rely on a fixed free-space number for every update.
- Check for malware. If storage grows unexpectedly or unknown files keep appearing, use the built-in Windows Security app and investigate detections before deleting system data.
Microsoft’s free-up-drive-space guidance covers moving personal files, Storage Sense, Files On-Demand, and the low-space Temp-folder issue. If Microsoft Store .appx files repeatedly refill Temp, follow the documented Store reset and Windows Update troubleshooting path instead of repeatedly deleting the folder.
Do not reset or reinstall Windows until important files are backed up. A reset, reinstall, partition change, or drive replacement can make later recovery more difficult.
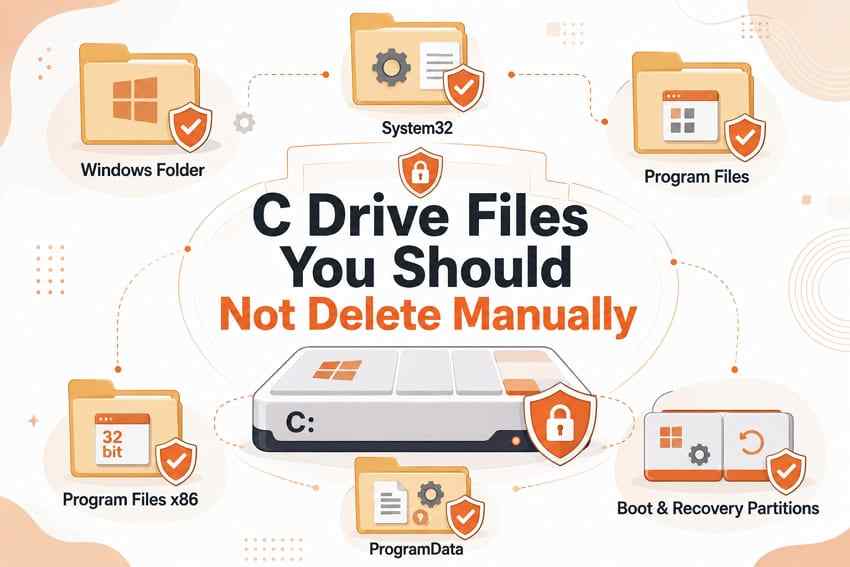
Part 7. C Drive Files You Should Not Delete Manually
Understanding how to clean the C drive Windows 10 includes knowing what to leave alone. These locations can contain files required by Windows, installed applications, startup, recovery, or user profiles.
- The Windows folder. It contains operating-system components, services, drivers, update files, and troubleshooting resources.
System32. It contains critical Windows libraries, executables, drivers, and services. Deleting unfamiliar files can stop Windows or applications from starting.Program Files. It stores installed 64-bit applications and supporting components. Use the application’s uninstaller or Windows Settings.Program Files (x86). It commonly stores 32-bit applications on 64-bit Windows. Hand-deleting folders can leave broken apps, services, and registration data.ProgramData. Shared settings, databases, licensing data, caches, and application resources may be stored here.- Boot and recovery partitions. These contain files used to start, repair, reset, or recover Windows. Do not delete or format them to free ordinary C: drive space.
- Unfamiliar content in
AppData. AppData can contain caches, but it can also store profiles, saved data, extensions, databases, and application configuration.
If a folder is large but its owner is unclear, identify the program or Windows feature first. A disk-usage tool can locate space; it cannot make every located file safe to delete.
Part 8. Recover Files Lost While Clearing the C Drive

Some cleanup actions permanently remove selected files instead of sending them to the Recycle Bin. If an important document, photo, video, archive, or project disappears, stop creating new data on the C: drive. New writes can overwrite deleted file data and reduce recovery chances.
Check the Recycle Bin, OneDrive, File History, external backups, and another computer first. If no usable copy exists, Recoverit Hard Drive Recovery can help scan readable local storage for deleted or lost files that may still remain. It cannot recover data that has been overwritten, restore files purged from a cloud service, bypass encryption, or repair Windows.
Install recovery software on another physical drive when possible and save recovered files to a different destination. The source also includes a dedicated NTFS file recovery guide for readable NTFS storage.
Step 1. Choose the system drive.
Open Recoverit, select Hard Drives and Locations, and choose the C: partition where the files were stored.

Step 2. Scan for lost files.
Start the scan and use available file-type, location, or description filters to narrow the results. A result can be incomplete or damaged, so do not assume that every listed item will open correctly.

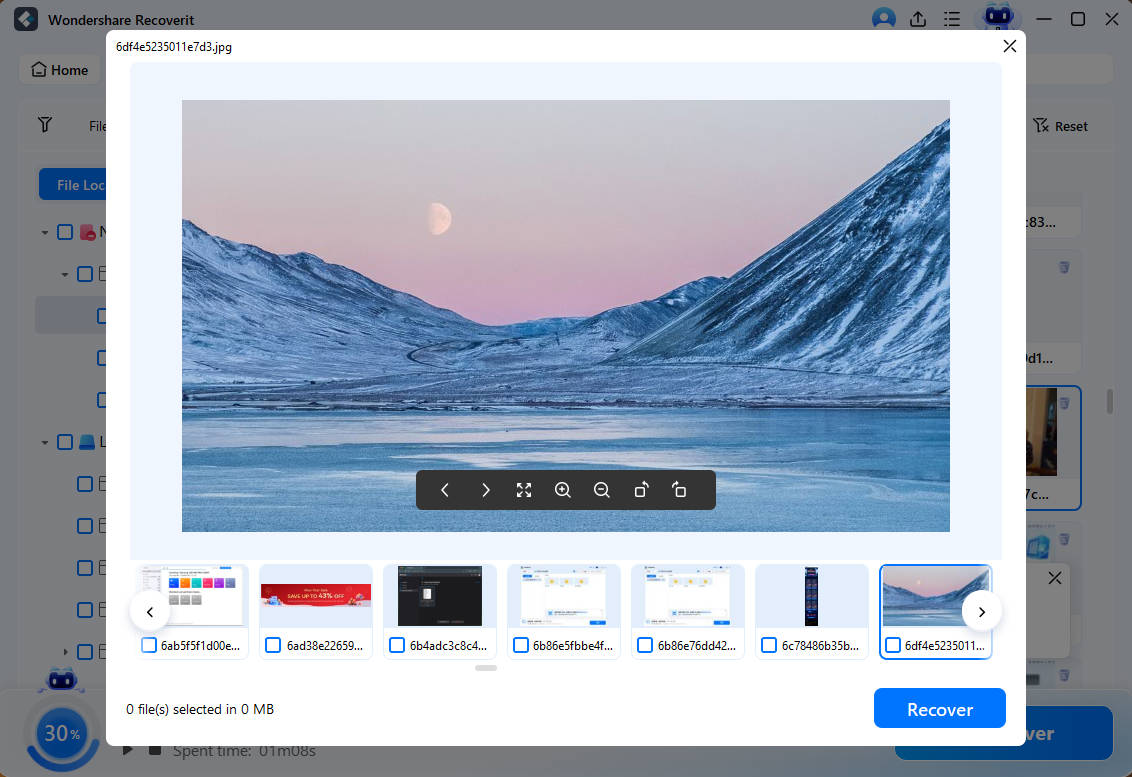
Step 3. Preview and export the files.
Preview files when preview is available, choose Recover, and save them to another internal drive or external storage. Open several recovered files before continuing cleanup on the original C: drive.
Recover Files Lost While Clearing the C Drive
 Security Verified. Over 7,302,189 people have downloaded it.
Recoverit is relevant to local file recovery, not to routine disk cleanup, Windows repair, malware removal, driver repair, or system reset. If the drive is disconnecting, reporting hardware errors, or failing, minimize use and consider professional recovery before repeated scans.
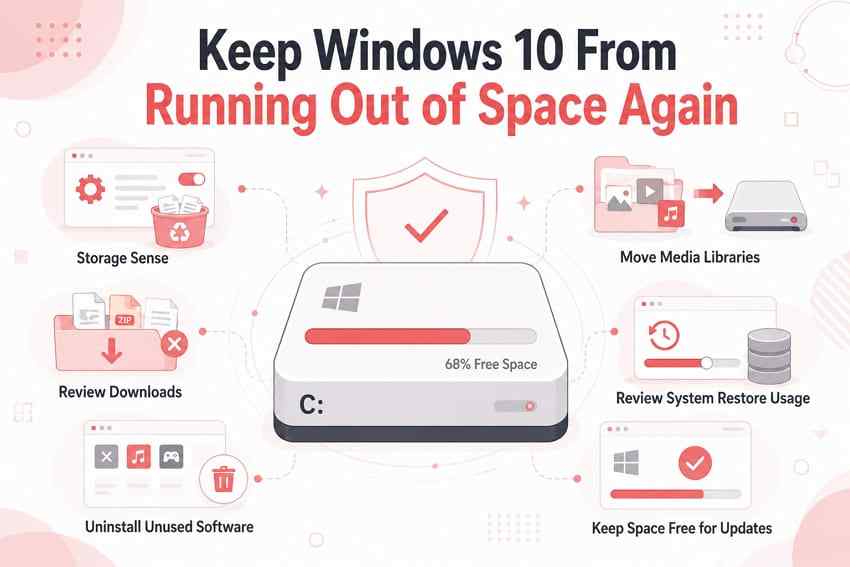
Part 9. Keep Windows 10 From Running Out of C Drive Space Again
You should not need to search how to clean c drive in Windows 10 every few months. After identifying which category grows, use habits that target that category.
- Let Storage Sense run on a deliberate schedule. Manage temporary files and older Recycle Bin items, but review Downloads and cloud-file settings.
- Review Downloads regularly. Remove installers, archives, and exports only after checking their contents and confirming that another copy exists when needed.
- Uninstall unused software. Remove apps and games through Windows or the official uninstaller rather than deleting their folders.
- Keep large media off C: when appropriate. Store photo, video, project, and archive libraries on another drive or external storage, with a separate backup.
- Review System Restore usage. Keep protection if you rely on it, but periodically check its storage allocation and understand that restore points are not file backups.
- Manage OneDrive offline states. Use Files On-Demand for suitable files, but remember that online-only content depends on account access and connectivity.
- Leave working space for updates and applications. Check Storage before major updates, exports, Docker builds, or virtual-machine work instead of waiting for the drive to turn red.
- Maintain a tested backup. Cleanup tools reduce local usage; they do not replace File History, an external backup, cloud version history, or another copy.
Windows 10 is outside its normal support period as of October 14, 2025. Keep the operating system and recovery plan appropriate for your edition, and back up important files before upgrades, repairs, or storage changes.
Conclusion
The safest answer to how to clean C drive in Windows 10 is to diagnose first. Use Storage settings to identify the largest category, then remove temporary files, unused apps, and reviewed personal files. Use Disk Cleanup, Storage Sense, System Protection, OneDrive, and powercfg only for the specific system feature they manage.
Do not delete unknown folders from Windows, System32, Program Files, ProgramData, AppData, boot, or recovery locations. If cleanup removes an important file, stop writing to C:, check existing copies, and use Recoverit only when local recovery is relevant. It cannot recover overwritten data or repair the underlying Windows installation.
FAQ
-
Is it safe to delete temporary files in Windows 10?
Many temporary-file categories can be removed after review, but do not select everything automatically. Check Downloads, Recycle Bin, and previous Windows installation files carefully. Storage settings and Disk Cleanup are safer starting points than deleting unfamiliar Temp subfolders by hand. -
Can I delete the hibernation file from the C drive?
Do not delete it manually. If you do not need hibernation or Fast Startup, open an elevated Command Prompt or PowerShell window and runpowercfg /hibernate off. This disables hibernation and Fast Startup and removes the hibernation file. You can restore the feature withpowercfg /hibernate on. -
Should I remove Windows.old on Windows 10?
Remove Windows.old only after the current Windows installation is stable and you no longer need to return to the previous version. Use Disk Cleanup or Storage settings. Removing it frees space but removes the normal rollback option and cannot be undone through Windows cleanup. -
Does cleaning the C drive improve Windows 10 performance?
Freeing space can help when very low storage is causing update failures, application errors, or resource pressure, but it is not a guaranteed performance fix. If the drive fills again, identify the growing app, update, sync, personal-file, or malware category. -
What should I recover first if cleanup deleted an important file?
Stop saving new data to C:, then check the Recycle Bin, OneDrive or another cloud copy, File History, and external backups. Prioritize irreplaceable documents, photos, videos, and projects. If no copy exists, scan readable local storage and save recovered files to another drive.


