

 TL;DR:
To safely repair a corrupted HFS+ SSD on a Mac, immediately stop writing data to the drive and systematically apply macOS built-in tools like Disk Utility, Terminal, or FSCK before using read-only recovery software for severe volume damage.
● Disk Utility is the safest initial step by running First Aid starting from the lowest volume upwards, while Terminal provides targeted command-line volume repairs for logical file system errors that the graphical interface cannot resolve.
● The low-level FSCK command is strictly for instances where the Mac fails to boot or the SSD is completely unmountable, and it must be executed in macOS Recovery mode after backing up data due to the risks of modifying directory catalogs.
● If system tools fail, prioritize read-only file extraction using Wondershare Recoverit via a bootable USB rescue drive, and prevent future structural corruption by constantly maintaining 10 to 20 percent of free space on the SSD.
Ask AI for a summary
 ChatGPT
 Perplexity
 Gemini
 Claude
 Grok
Grok
An HFS+ SSD is a disk drive on a Mac that uses Apple's HFS Plus, also known as Mac OS Extended. HFS+ was released in 1998, replacing the older HFS to improve performance, eliminate fragmentation, and handle larger files. It uses B-tree indexing, supports longer filenames, and can be journaled.
The HFS+ SSD repair for Mac restores deleted files, saves your data, and prevents loss. Learn how to repair a corrupted HFS+ Solid-State Drive on a Mac using Disk Utility, FSCK, Terminal, and recovery tools in this guide.
Try Recoverit to Perform Mac SSD Data Recovery
 Security Verified. 3,591,664 people have downloaded it.
In this article

Part 1. Symptoms That Show You Must Repair a Corrupted HFS+ Solid-State Drive on Mac
Before fixing a corrupted HFS+ SSD on a Mac, you should know the common warning signs given below:
- Apps Crashes Often: Programs can freeze or crash suddenly, or close without saving work. This generally occurs when the SSD is not able to read or write data properly.
- Slow or Frozen Mac: When your Mac is slow or frozen, sluggish to start, or shows the spinning wheel, the drive might have trouble reacting.
- Disk Warnings: Diagnostics like S.M.A.R.T. may report bad sectors or hardware faults. These alerts indicate serious drive issues that need repair.
- Unexpected Restarts: The Mac may restart randomly without showing any warning to you. This happens when the system encounters SSD corruption or hardware errors.
- File Transfer Fails: Copying or moving files may stop midway or fail altogether. In severe cases, the Mac itself may not correctly boot.
Part 2. Repair Corrupted HFS+ Solid-State Drive on Mac | 3 Simple Solutions
Before leading to any further details, here are the 3 simple methods of repairing Mac SSD when your HFS + drive is corrupted. They will assist in repairing typical disk failures, regaining access to any files, and ensuring that your Mac continues to run well.
Method 1. Disk Utility
Disk Utility is the simplest built-in utility to repair a corrupted HFS+ SSD on Mac. By using the First Aid feature, it checks and fixes file system errors to make the drive usable. To begin Mac SSD recovery with the Disk Utility method, consider the guide below:
Step 1. Open “Disk Utility” from macOS Recovery, enable “Show All Devices,” and select your HFS+ SSD starting with the lowest volume to click the “First Aid” button.
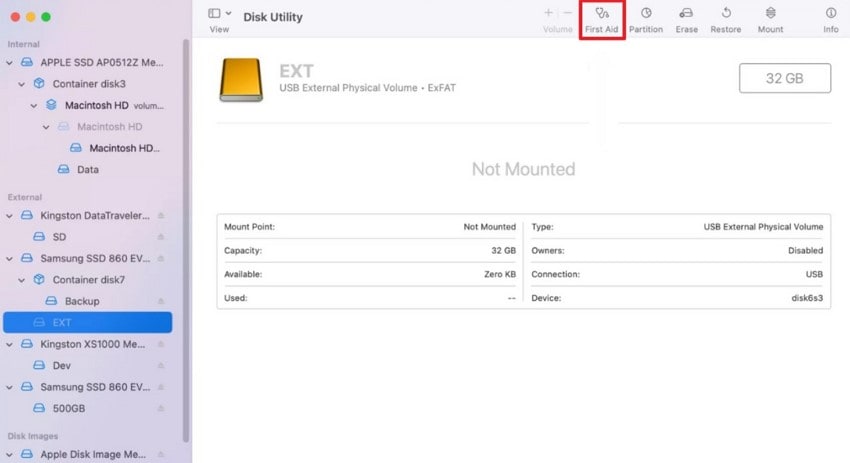
Step 2. Here, you'll click on the "Run" option from the pop-up menu, which will finish your process. When complete, restart your Mac and monitor SSD performance to ensure stability.

Points to Remember
- Start repairing at the lowest volume and move up to the device for comprehensive error correction.
- Keep macOS and firmware updated to prevent future drive corruption.
Method 2. Terminal
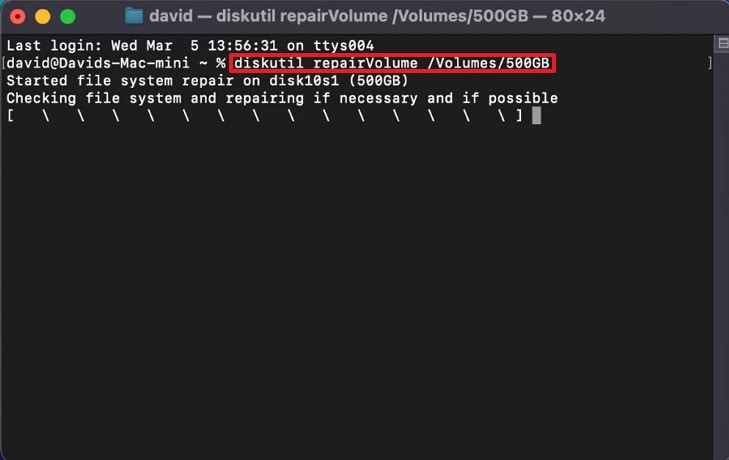
When Disk Utility is unable to perform Mac SSD data recovery, Terminal also offers you direct control. The command checks the disk, reports clear errors, and attempts repairs that the graphical tool may miss. This only targets exact disks, force unmounts, and runs read-only checks to avoid risky writes. For a command-line approach with deeper control, follow the guide below:
Step 1. Open “Terminal” by selecting “Application” in the left sidebar and type “diskutil list.” Use the command “diskutil repairVolume /dev/X,” while replacing “X” with the volume to be checked. This will attempt to fix the logical file system and drive volume problems.
Points to Remember
- Terminal commands are powerful, so double-check the device name before the command to avoid accidental changes.
- If the drive is not mountable, you may need to use the FSCK command in single-user mode.
Method 3. FSCK Command
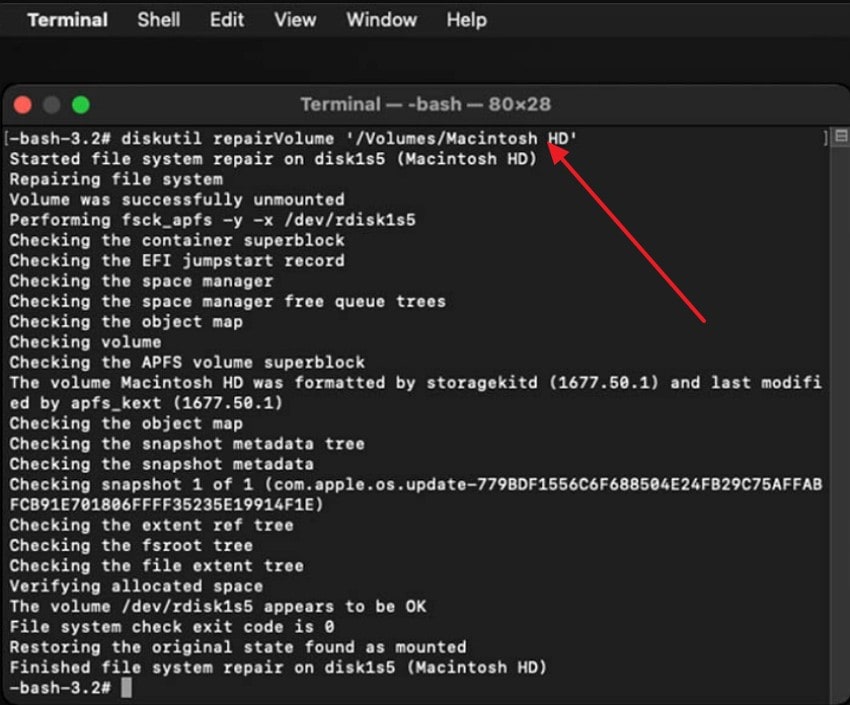
FSCK is a powerful, low-level Mac repair tool for Mac SSD recovery. It checks and repairs HFS+ file systems, metadata, and directory catalogues. User can run it in single-user mode or macOS recovery when required. Furthermore, it can be used for mount failure, boot issues, and post-crash inconsistencies. This command is done for the internal and the external disks with the correct identifier. To define how it operates, please follow the steps below:
Step 1. First, shut down and hold the “Power” button until loading startup options appear. Next, select the “Options > Continue” button and sign in if prompted. In recovery mode, open “Utilities > Terminal”, run “diskutil repairVolume /dev/disk0s2” and replace “disk0s2” with your actual drive.
Points to Remember
- Always have a backup before running FSCK, especially if data is critical.
- If repeated FSCK runs do not resolve your issues, then seek advanced recovery software.
- Used when disks are unmountable, the Mac fails to boot, or Disk Utility is unable to resolve issues.
Part 3. Wondershare Recoverit for Mac: Partition Recovery For Mac SSD Recovery
Wondershare Recoverit for Mac is a user-friendly data recovery tool built to rescue lost or deleted files from SSDs and other drives. It handles tough situations, accidental deletion, partition loss, or macOS crashes while supporting 1000+ file types. Along with that, it is also used to find lost partitions by scanning in read-only mode to avoid further wear.
With a 99.5% success rate, Recoverit focuses on a data-first approach for Mac SSD data recovery, prioritizing file recovery over risky disk repairs. It reads partition maps and file system metadata to locate volumes, then falls back to signature-based deep scanning when structures are damaged.
Key Features
- Restores Deleted Partitions: After you have accidentally deleted/lost partitions due to file system corruption, viral attack or format, it can restore these deleted partitions.
- Guided Workflow: Select the disk, allow Recoverit to scan, preview the recovered files, and restore only the files you need, no technical knowledge required.
- Deep and Quick Scan Modes: Offers a quick scan to recover files that have been deleted, in addition to a deep scan to recover data from severely damaged SSDs and partitions.
- Bootable Media Creation: Offers data recovery from a crashed or unbootable Mac by creating a bootable USB rescue drive, so you can scan the SSD and restore files.
- Enhanced Video and Photo Recovery: It specializes in repairing and recovering Ultra HD/4k/8k videos and automatically fixes corrupted videos or photos, ideal for editors and filmmakers.
Complete Step-by-Step Guide to Fix Corrupted HFS+ SSD on Mac
The following is a simple explanation that will help you understand how to fix a corrupted HFS+ SSD on Mac using Recoverit:
Step 1. Access Software and Choose Partition for Recovery
Here, install and open the software, then on the home screen, under “Hard Drives and Location,” select the drive with the lost partition.

Step 2. Start Disk Scan and Monitor Progress
Next, click the “Start” button to initiate the process for lost partitions and removed files.

Step 3. Preview and Restore Lost Files
Finally, once the scan is complete, double-click on the file for a preview, then press the “Recover” button.

Part 4. How to Prevent the Need to Repair Corrupted HFS+ Solid-State Drive on Mac - Tips
So far, you have seen how to repair a Corrupted HFS+ Solid-State Drive on a Mac. Now, to reduce the risk of HFS+ SSD corruption on Mac, follow these prevention tips:
- Consistent Backups: Implement a method to automatically back up your machines regularly or use another reliable backup application. Add regular backups that allow you to rebuild quickly after crashes or corruption.
- Always eject drives safely: Try to eject external SSDs in Finder before physically unplugging the cable. This prevents sudden disconnects that corrupt files and damage directory metadata.
- Avoid Sudden Power Loss: UPS or surge protector will help to avoid sudden power failure. Always save your work frequently since there are always chances of unforeseen shutdowns that corrupt active file systems.
- Update macOS and Apps: Keep macOS, firmware, and applications updated to benefit from stability fixes. Storage and filesystem improvements in updates reduce bugs that cause data corruption.
- Don’t Overfill Your SSD: Maintain at least 10-20% free space on SSDs. Adequate headroom preserves performance, reduces wear, and prevents allocation failures later.
Conclusion
To conclude, HFS+ is still a reliable file system for Mac SSD. While the mount issues are still present, there are three built-in, safe methods in this guide for Mac SSD repair, such as Disk Utility, Terminal, and FSCK. If data is still missing after careful attempts, use Recoverit to scan in read-only mode, preview results, and recover to another drive.
FAQ
-
1. What should I do first if I suspect HFS+ SSD corruption?
Move important files to a different drive as soon as possible and do not write anything new to the SSD. Open Disk Utility, enable show all devices, and run First Aid by starting with the lowest volume. -
2. Will using FSCK delete my data or make things worse?
FSCK will mend the file systems, but all low-level modification is a kind of risk. First, clone the drive or make a disk image and manually run FSCK on the clone where possible. -
3. How can I recover files if the drive won’t mount or macOS won’t boot?
A scan can be performed with a read-only data recovery product (e.g., Wondershare Recoverit). Booting, create a bootable USB, booting to external drive, recovery, re-create, or safe format.


