

 TL;DR:
Immediately isolate a compromised Mac from the network and secure credentials using a separate device before recovering data or patching the CVE-2026-65400 Screen Sharing vulnerability, as premature scans or full-system backups can destroy evidence and restore attacker access.
● Prioritize retrieving intact files from iCloud, Trash, or a pre-incident Time Machine snapshot, manually selecting only safe documents and media instead of executing a full-system restore that could migrate the malware.
● Scan readable storage with Wondershare Recoverit only if files were permanently deleted or logically lost, keeping in mind that the software cannot decrypt ransomware, bypass FileVault credentials, or clean an infected drive.
● Erase the compromised drive and perform a clean installation of macOS Tahoe 26.6.1, Sequoia 15.7.9, or Sonoma 14.8.9 before returning any recovered files to the computer.
Ask AI for a summary
 ChatGPT
 Perplexity
 Gemini
 Claude
 Grok
Grok
If malware or an intruder deleted, encrypted, renamed, or corrupted files on your Mac, do not treat the incident as an ordinary undelete job. A rushed scan, reinstall, backup connection, or password change from the compromised Mac can overwrite recoverable data, destroy evidence, expose new credentials, or restore the attacker along with your files.
This guide uses the actively exploited macOS Screen Sharing vulnerability CVE-2026-65400 as a real 2026 example. It explains how to contain the Mac, verify and install Apple's fix, recover clean copies from Trash, iCloud, or Time Machine, use Wondershare Recoverit for Mac when files were actually deleted, and decide when a forensic responder or data recovery laboratory is the safer choice.
TL;DR: What to do first
- Isolate the Mac: Disconnect Ethernet and Wi-Fi so an intruder, miner, or other malware cannot continue communicating. Do not reconnect backups yet.
- Use a clean device for account security: Change the Apple Account password and other high-value credentials from a trusted phone or computer, not from the possibly compromised Mac.
- Preserve evidence when required: If the Mac belongs to a business, handles regulated data, or may be part of a wider breach, contact IT or an incident responder before deleting malware, patching, or erasing the disk.
- Patch CVE-2026-65400: Install macOS Tahoe 26.6.1, Sequoia 15.7.9, or Sonoma 14.8.9. If patching cannot happen immediately, turn off Screen Sharing and Remote Management and block public access to the service.
- Recover clean copies before deep scanning: Check Trash, iCloud recovery, app version history, and a Time Machine snapshot from before the compromise.
- Use recovery software only for deletion or logical loss: Recoverit can scan readable storage for deleted files. It does not remove malware, decrypt ransomware, bypass FileVault, prove a Mac is clean, or replace forensic response.
Try Wondershare Recoverit to Perform Data Recovery
 Security Verified. Over 7,302,189 people have downloaded it.
In this article
Part 1. CVE-2026-65400: What Is Confirmed?
The Confirmed macOS Screen Sharing Risk
Apple's Tahoe 26.6.1 security note describes CVE-2026-65400 as an authentication issue in Screen Sharing. Apple says an attacker on the network may be able to authenticate without valid credentials. The same fix appears in the official notes for macOS Sequoia 15.7.9 and macOS Sonoma 14.8.9. All three updates were released on August 6, 2026.
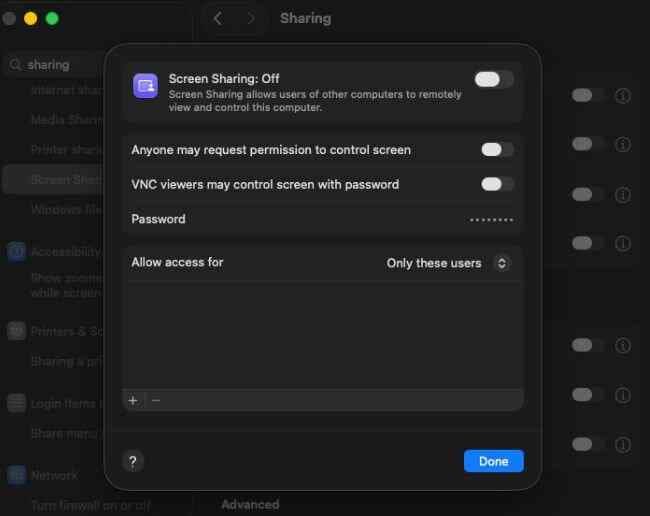
The vulnerability affects macOS Screen Sharing, which uses the Remote Framebuffer protocol associated with VNC. Apple's Mac User Guide says Mac Screen Sharing uses TCP port 5900 by default. A different port can be configured, so checking only 5900 is not enough to prove a system was never exposed.
The Netherlands National Cyber Security Centre advisory NCSC-2026-0280 is especially important because it goes beyond theoretical impact. NCSC-NL says it received a report of active exploitation on multiple systems where port 5900 was reachable from the internet. In every observed case described by the advisory, the attacker obtained root access and installed a Monero cryptocurrency miner.
This does not mean every Mac was remotely compromised. The documented risk is highest when a vulnerable Mac has Screen Sharing or related remote management exposed to an attacker through the local network, port forwarding, a hosted Mac environment, or another reachable network path.
Who Is Exposed?
| Mac condition | CVE-2026-65400 risk | Immediate action |
| Tahoe earlier than 26.6.1 with reachable Screen Sharing | Vulnerable to the documented authentication bypass. | Isolate, investigate, and update to 26.6.1 or later. |
| Sequoia earlier than 15.7.9 with reachable Screen Sharing | Vulnerable to the documented authentication bypass. | Isolate, investigate, and update to 15.7.9 or later. |
| Sonoma earlier than 14.8.9 with reachable Screen Sharing | Vulnerable to the documented authentication bypass. | Isolate, investigate, and update to 14.8.9 or later. |
| Patched Mac with no signs of compromise | The CVE is fixed in the listed builds, but unrelated threats remain possible. | Keep the update installed and review remote-access exposure. |
| Vulnerable version but Screen Sharing was off and unreachable | Exposure through this specific path is lower, not proof of overall safety. | Patch anyway and verify Remote Management and network rules. |
| Unexpected root activity, miner process, high CPU, or unknown remote session | Treat as a possible compromise rather than a patch-only problem. | Isolate the Mac and begin incident response before restoring files. |
Huntress research explains that the flaw occurs before successful authentication and that common configuration changes such as rotating a VNC password or removing allowed Screen Sharing users do not correct the vulnerable code. The durable fix is the Apple security update. Disabling Screen Sharing is a temporary exposure-reduction step when immediate patching is impossible.
Timeline and Severity
| Date | Verified event | Why it matters |
| August 6, 2026 | Apple released Tahoe 26.6.1, Sequoia 15.7.9, and Sonoma 14.8.9. | These are the first listed builds that fix CVE-2026-65400. |
| August 7, 2026 | NCSC-NL published the initial advisory. | The government advisory documented the improper-authentication risk. |
| August 12, 2026 | NCSC-NL revised the advisory to note public proof-of-concept code and known active exploitation. | The issue moved from a patching concern to a confirmed incident-response priority. |
| August 14 to 15, 2026 | The NVD record shows CISA-ADP scoring and SSVC changes. | Later reporting dates should not be confused with Apple's August 6 patch release. |
Severity numbers currently differ by source. The NCSC-NL page displays CVSS 3.1 7.1, while the NVD record shows a CISA-ADP CVSS 3.1 score of 9.8 Critical as of its August 15 modification. The safe editorial approach is to disclose the source and date of the score rather than present one number as universally settled.
Part 2. Contain the Mac Before Recovering Files
Data recovery and security incident response solve different problems. Recovery tries to retrieve files. Incident response tries to stop the attacker, preserve evidence, determine scope, remove persistence, and prevent reinfection. Start scanning too early and you may recover files onto a system the attacker still controls.
Home User Response
- Disconnect the network: Unplug Ethernet and turn off Wi-Fi. If the Mac is a hosted or remote machine, use the provider's console or network controls to isolate it.
- Stop using the Mac for email, banking, or passwords: A root-level compromise can undermine trust in the running system. Use a separate, clean device for sensitive accounts.
- Record what you see: Photograph ransom notes, miner warnings, unfamiliar remote sessions, file extensions, login alerts, dates, and error messages. Do not open suspicious attachments to identify them.
- Secure the Apple Account from a clean device: Follow Apple's compromised Apple Account guidance, change the password, review personal information, remove unrecognized devices, and confirm two-factor authentication.
- Protect other credentials: Prioritize email, password manager, financial, cloud storage, social media, developer, and work accounts. Use unique passwords and revoke unknown sessions or app tokens.
- Do not connect backup disks yet: Wait until the Mac is contained or rebuilt. A writable backup attached to an active compromise can be altered, encrypted, or contaminated.
- Decide whether professional help is needed: If the Mac stored business records, private client data, cryptocurrency keys, legal evidence, or irreplaceable work, stop before making system changes.
If the Mac can be isolated and evidence matters, leaving it powered but unused can preserve volatile information for a responder. If destructive encryption or deletion is visibly continuing and no qualified help is available, powering it down may limit further damage. Organizations should follow their incident-response policy instead of improvising.
Business and Forensic Response
For a company-owned Mac, notify IT or the security team before changing files, uninstalling software, or applying the patch. A root compromise may require investigation of identity systems, remote-access logs, network traffic, other Macs, cloud tokens, and data-exfiltration risk. Legal, regulatory, contractual, cyber-insurance, or law-enforcement obligations may also apply.
NIST SP 800-61 Revision 3 frames incident response as part of broader cybersecurity risk management. For high-impact incidents, capture and preserve the evidence required by the organization's response plan before patching or erasing the endpoint. File recovery should work from an authorized forensic image or responder-approved copy when chain of custody matters.
Important: A recovered document can be useful while the Mac remains untrusted. Do not confuse successful file recovery with proof that malware, persistence, stolen credentials, or attacker access has been removed.
Actions That Can Make Recovery Worse
- Do not erase or reinstall before securing the required files: Erasure may remove remaining recoverable data and incident evidence.
- Do not install multiple cleaners or recovery tools on the source volume: Every installation, update, log, and cache writes new data that may overwrite deleted content.
- Do not save recovered files to the affected disk: Use a separate, clean external SSD or HDD.
- Do not restore an entire old system blindly: A full-system backup can restore malicious apps, launch agents, configuration profiles, scripts, browser extensions, or persistence created before the backup.
- Do not reconnect iCloud and other sync services until account access is secure: Malicious deletion can synchronize to other devices, and restored files can be removed again.
- Do not run Disk Utility First Aid as an undelete method: First Aid repairs file-system structures. It does not reconstruct ordinary deleted files and can change metadata.
- Do not trust random decryptors or driver downloads: Use tools recommended by a known security vendor, government advisory, or responder for the exact malware family.
Part 3. Determine What Happened to the Files
Users often describe every post-incident problem as “my files are gone,” but the correct recovery method depends on whether the files were deleted, moved, hidden, encrypted, corrupted, locked by permissions, or made inaccessible by a damaged disk.
| Symptom | Likely explanation | Best first recovery path |
| Files disappeared but storage usage is similar | Moved folders, hidden files, changed account, iCloud sync, or altered permissions. | Use Finder and Spotlight, inspect the correct user folder, and check iCloud before scanning. |
| Files are in Trash | Ordinary deletion or malware moved them there. | Secure the Mac, inspect the files, and use Put Back only after the threat is contained. |
| Files are missing from iCloud Drive | Deletion may have synchronized across devices. | Secure the Apple Account, then use iCloud Recently Deleted or Data Recovery. |
| Files have new extensions and will not open | Possible ransomware encryption. | Preserve samples and the ransom note, identify the malware, and restore clean backups. Ordinary recovery software does not decrypt the files. |
| Files retain their names but open with errors | Partial overwrite, corruption, interrupted writes, or malicious modification. | Copy the files first, restore earlier versions, and use file repair only on duplicates. |
| Folders show a permission error | Account, ownership, FileVault, or permission changes. | Do not assume deletion. Use authorized account recovery or a responder. |
| The startup disk will not mount or disappears | File-system damage, controller failure, SSD failure, or severe system damage. | Stop repeated repairs and scans if the disk is unstable. Use a professional lab for critical data. |
Build a small loss inventory before recovery: original folder, filename or extension, approximate size, last known good date, whether a clean backup exists, and whether the file contains sensitive information. This prevents hours of scanning for files that are already available in a safer source.
Part 4. Patch the Mac and Close the Screen Sharing Entry Point
Install the Correct macOS Security Update
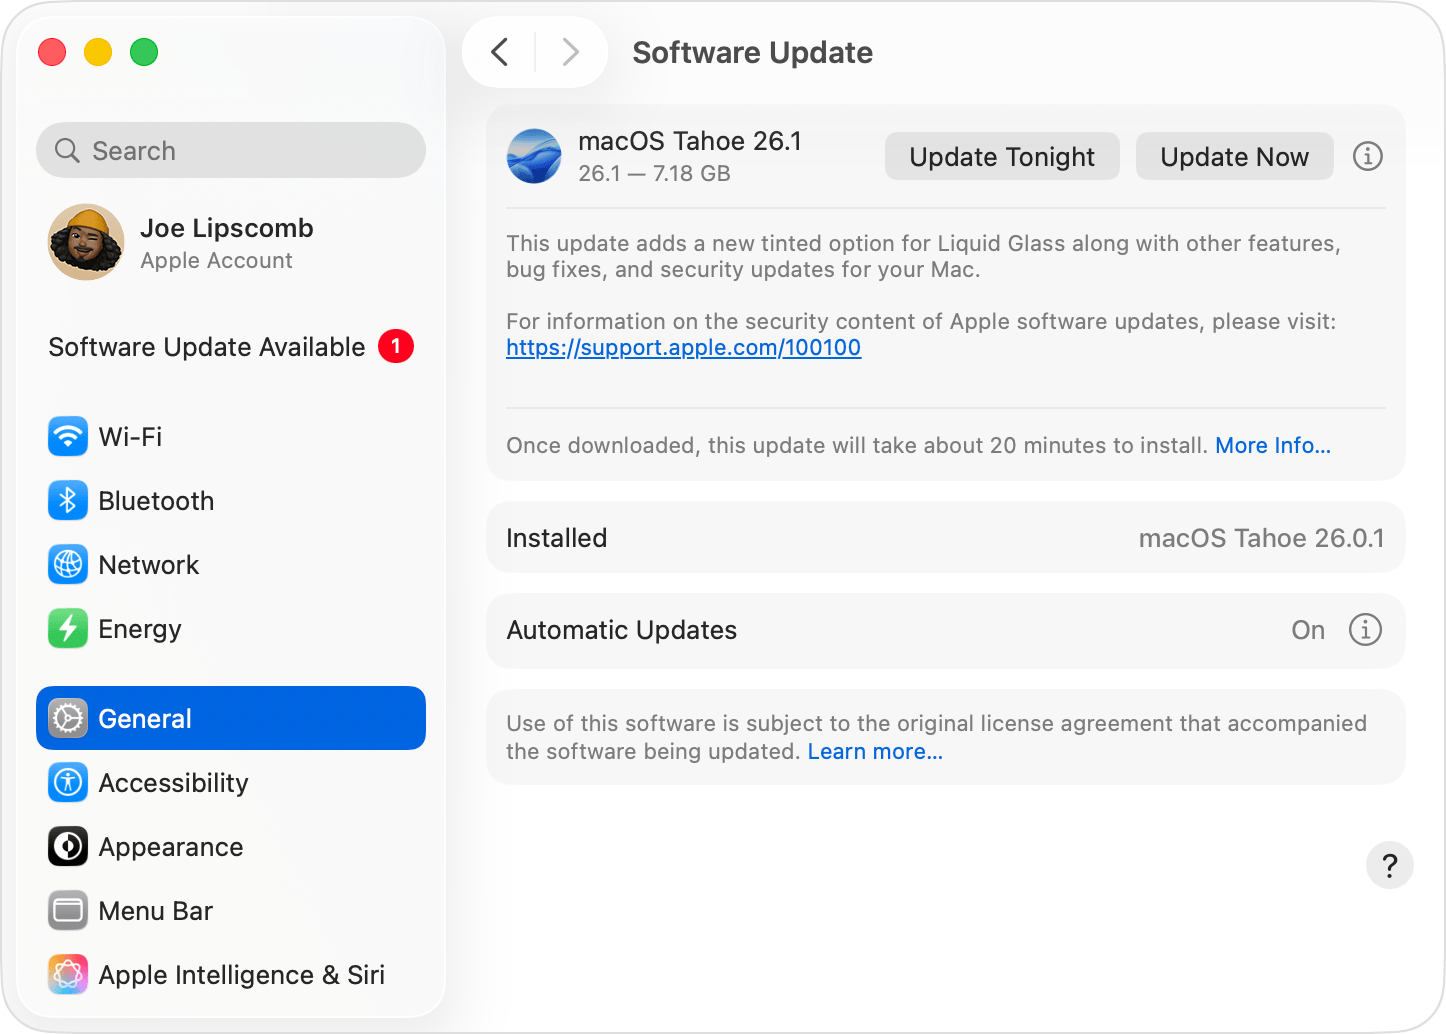
If an organization needs evidence, coordinate patch timing with the responder. Otherwise, once important files and evidence are protected, open Apple menu, System Settings, General, and Software Update. Apple recommends using the latest macOS compatible with the Mac.
| Installed macOS family | Minimum build that fixes CVE-2026-65400 | How to verify |
| macOS Tahoe 26 | 26.6.1 | Choose Apple menu, About This Mac, and confirm 26.6.1 or later. |
| macOS Sequoia 15 | 15.7.9 | Choose Apple menu, About This Mac, and confirm 15.7.9 or later. |
| macOS Sonoma 14 | 14.8.9 | Choose Apple menu, About This Mac, and confirm 14.8.9 or later. |
Do not assume “Your Mac is up to date” means the Mac received one of these specific builds without checking the version. Software Update offers only releases compatible with the Mac model and installed macOS branch.
Disable Unneeded Remote Access
- Open Sharing settings: Go to System Settings, General, and Sharing.
- Turn off Screen Sharing: Apple's guide confirms that other computers cannot connect through Mac Screen Sharing when it is off.
- Check Remote Management: Screen Sharing and Remote Management cannot be enabled at the same time in the standard settings, but either remote-control path should be reviewed.
- Remove public exposure: Delete router port-forwarding rules, cloud firewall rules, and provider security-group rules that publish VNC or Screen Sharing directly to the internet.
- Use a protected management path: If remote access is required, restrict it through a trusted VPN, allowlisted administration network, or a managed remote-access service with logging and strong authentication.
- Review authorized users: After patching, permit only accounts that need access. Do not use “All users” for convenience on an exposed or shared network.
Turning off legacy VNC password authentication alone does not remediate this pre-authentication flaw, according to Huntress. Patch the operating system even if the VNC password option was never enabled.
Why Patching Alone Is Not Incident Cleanup
The update closes the vulnerable authentication path. It does not automatically remove a miner, launch item, altered shell configuration, stolen token, unknown administrator, or other persistence installed before the patch. A Mac with credible compromise indicators should be investigated and, in many cases, erased and rebuilt from a trusted source after data preservation.
Apple's platform security documentation explains that macOS includes Gatekeeper, Notarization, and XProtect layers. XProtect can block and remediate known malware, but no built-in control is a substitute for incident scoping after confirmed root access. Update macOS and its security data, then use an organization-approved endpoint security tool or qualified responder to assess the system.
Part 5. Recover Clean Copies Without Recovery Software
Check Trash, iCloud, and App Versions
- Check Trash after containment: If the missing items are present, inspect their dates and restore only known data files. Do not restore unknown apps, scripts, packages, or executables.
- Search with Finder and Spotlight: Search by filename, extension, content, and date. Inspect the correct folder under
/Users/in case the intruder changed the active account or moved data. - Use iCloud from a clean device: Apple says iCloud.com can recover eligible files deleted from iCloud Drive and other apps within the previous 30 days, unless they were permanently removed.
- Check app version history: Pages, Numbers, Keynote, Microsoft 365, Adobe apps, source-control systems, and cloud collaboration tools may retain earlier versions separate from the local file.
- Export to a clean location: Download recovered copies to a clean external drive or a trusted rebuilt Mac. Keep the originals unchanged until the incident is resolved.
For iCloud Drive, sign in at iCloud.com, open iCloud Drive, select Recently Deleted, and recover the required files. Apple also provides Data Recovery under iCloud settings for files deleted by supported apps. Avoid editing or deleting iCloud Drive data while recovery is running.
Restore Files from a Clean Time Machine Snapshot
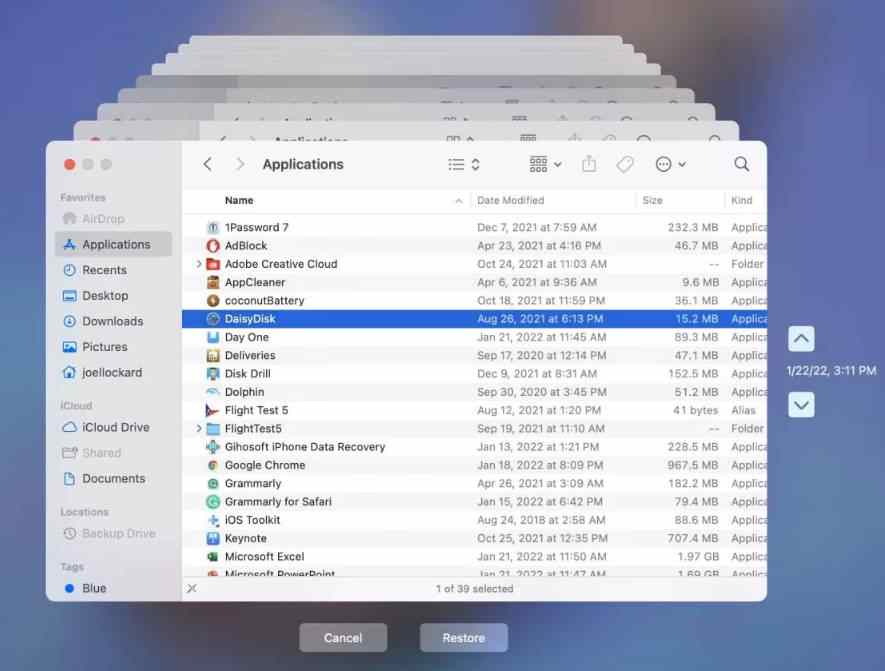
Time Machine is often the best recovery path because it can restore an intact version with its original name, folder, and metadata. Choose a snapshot from before the first suspicious remote session, miner activity, password alert, or unexpected file change.
- Connect the backup only to a trusted environment: Prefer a rebuilt Mac or a responder-approved system. Do not expose a healthy backup to an active compromise.
- Open the original folder: In Finder, navigate to the folder that contained the missing file.
- Open Time Machine: Browse snapshots and select a date before the incident.
- Restore selected data first: Recover documents, photos, videos, and projects. Avoid restoring unfamiliar applications, login items, scripts, configuration profiles, or system settings.
- Scan and validate: Check restored files with updated security software, open representative files, and verify their contents before returning them to production use.
A backup created after the compromise may contain useful documents and malware at the same time. Treat it as evidence or a recovery source, not proof of cleanliness. Restore selected data rather than migrating the entire compromised environment.
Part 6. Recover Files Deleted by Malware with Recoverit
When Recoverit Is an Appropriate Option
Use data recovery software after the threat is contained when the files were deleted or lost from readable storage and no clean backup contains them. This path is particularly relevant to external HDDs, USB drives, SD cards, Time Machine disks, and other media that have not been overwritten.
The current Recoverit for Mac product page lists support for macOS Tahoe 26, Sequoia 15, Sonoma 14, Apple silicon and T2 Macs, and file systems including APFS, HFS, and HFS+. It also lists virus infection as a recovery scenario. These are vendor-stated compatibility claims, not a guarantee that data encrypted, overwritten, securely erased, or removed by SSD garbage collection can be recovered.
Wondershare Recoverit for Post-Malware File Recovery
- Scans readable Mac and external storage for deleted or logically lost files.
- Filters results by file type, path, name, size, and date where metadata remains available.
- Previews supported files before recovery so you can verify likely content.
- Recovers selected files to a different clean drive.
Not included: malware removal, forensic investigation, ransomware decryption, FileVault bypass, account recovery, or proof that the source Mac is safe.
Step-by-Step Mac Malware Data Recovery
- Prepare a trusted recovery environment: If possible, use a clean Mac and connect the affected external drive as a secondary device. For a compromised internal drive or evidence-sensitive case, ask a responder to create a forensic image first.
- Prepare a separate destination: Connect a clean external SSD or HDD with enough free space. The source and destination must not be the same physical device.
- Install Recoverit safely: Download it from the official Recoverit page. Avoid installing it onto the volume that contained the deleted files whenever another startup or application volume is available.

- Select the correct source: Confirm the drive name, capacity, and original file location. Choose the affected external drive, volume, Desktop shortcut, or authorized disk image.
- Start the scan: Let Recoverit search the selected storage. Avoid using the source for other work while scanning.

- Filter by the loss inventory: Narrow results by extension, file type, date, size, path, or known filename. Search for high-priority files before selecting everything.
- Preview representative files: A successful preview is useful evidence that content is present, but every recovered file still needs validation.

- Recover to the clean destination: Never save results back to the affected source disk.
- Scan the recovered data: Use updated security software in a trusted environment. Do not open unknown apps, shell scripts, installers, browser extensions, macros, or configuration profiles.
- Verify content and maintain two copies: Open important documents and media, compare expected sizes, and preserve a second copy before erasing or rebuilding the Mac.
For ordinary deletion workflows, see the Recoverit guide to recovering permanently deleted files on Mac. For files that merely disappeared from the desktop, check the narrower guide to recovering missing Mac desktop files before starting a full scan.
Limits on Apple Silicon, SSDs, and Encryption
- SSD deletion can become irreversible quickly: Continued use, TRIM-related behavior, garbage collection, and new writes can remove or overwrite data that a scanner would otherwise find.
- FileVault requires authorized access: Recovery software cannot bypass FileVault or reconstruct data without the valid credentials or recovery mechanism needed to unlock the volume.
- Apple silicon internal storage is not a removable drive: Hardware integration, encryption, and storage management make many internal SSD cases less recoverable than an external HDD or memory card.
- Overwritten files cannot be restored by scanning: A new file, malware payload, update, or log may occupy the same storage blocks.
- A found filename is not proof of an intact file: Metadata may survive when the content is partly overwritten. Preview and open the recovered copy.
- Software cannot repair physical failure: If the drive disappears, disconnects, reports the wrong capacity, or produces hardware errors, stop scanning.
Part 7. What If the Files Were Encrypted or Corrupted?
Encryption and deletion are different. Deleted-file software searches for file content that remains on storage. Ransomware transforms file content with a cryptographic key. If the encrypted file still occupies the disk, an undelete scan will usually find the same encrypted bytes rather than the original document.
- Preserve samples: Keep copies of the ransom note, one or two encrypted files, original extensions, and observed timestamps. Do not rename every file in bulk.
- Identify the malware through a trusted responder: A known family may have a legitimate decryptor, but many do not. Do not upload sensitive client documents to a public identification service without authorization.
- Check versioned backups: Time Machine, iCloud, collaboration platforms, source control, and offline backups may contain pre-encryption versions.
- Look for deleted originals on copied storage: Some ransomware creates an encrypted copy and deletes the original. A scan of an authorized forensic image or affected external disk may find the deleted original if it has not been overwritten.
- Repair only after recovery: If a file is recovered but damaged, duplicate it before attempting document, photo, or video repair. Repair changes the file and is not a substitute for retrieving the best source copy.
Do not promise decryption, and do not claim a data recovery tool can reverse cryptography. The best outcomes usually come from a clean pre-incident backup, a legitimate decryptor for the exact malware family, or recovery of deleted originals that remain intact.
Part 8. Recover Data When the Mac Will Not Start
Use macOS Recovery Carefully
A Mac that will not boot may have damaged system files, file-system errors, a full disk, malware persistence, or unrelated hardware failure. If the files are critical, attempt data preservation before erase or reinstall.
- Start macOS Recovery: On Apple silicon, shut down, press and hold the power button until startup options appear, select Options, and continue. On an Intel Mac, start the Mac and use the appropriate Command-R recovery shortcut.
- Confirm the disk appears: Open Disk Utility and choose View, Show All Devices. If the internal drive is missing or repeatedly disconnects, stop and seek professional help.
- Recover or image important data first: A business incident should use an approved forensic process. A home user with a readable secondary drive can recover authorized data to an external destination.
- Use First Aid only for file-system errors: Apple says Disk Utility can repair formatting and directory-structure errors. It is not a deleted-file recovery method.
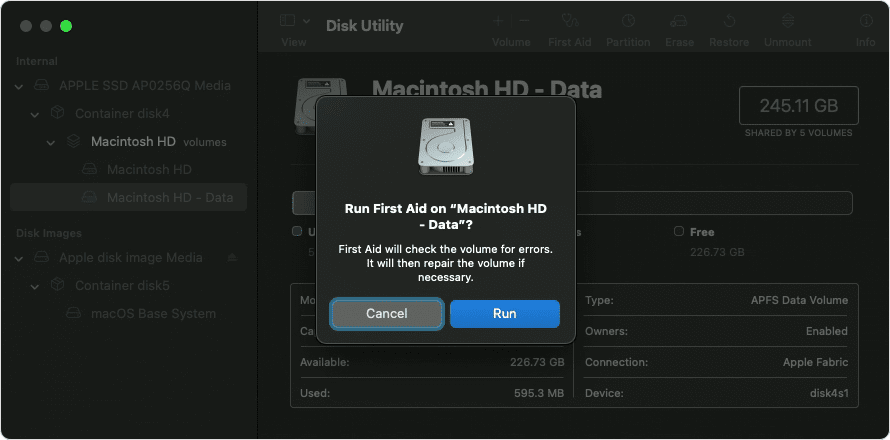
Apple recommends having a current backup before First Aid. In a malware case, preserve critical files and evidence before allowing a repair utility to modify file-system metadata. If Disk Utility cannot repair the volume, its next official option may involve erasing the disk, which is why recovery must come first.
Know When to Stop DIY Recovery
- The internal disk is absent in Disk Utility or startup options.
- The Mac powers off, overheats, or restarts repeatedly during access.
- An external drive clicks, disconnects, or reports inconsistent capacity.
- FileVault credentials are unavailable or the authorized recovery process fails.
- The case involves legal evidence, regulated data, employee monitoring, or suspected data theft.
- The lost data is irreplaceable and one failed scan would materially reduce the chance of laboratory recovery.
Repeated scans do not make a failing device healthier. A professional recovery laboratory can evaluate physical storage problems, while a digital forensics and incident response provider can preserve evidence and investigate compromise. Some cases require both.
Part 9. Rebuild macOS Without Restoring the Malware
After confirmed root compromise, cleaning individual files may not provide enough assurance. The safer endpoint-recovery strategy is often to preserve required data, erase the Mac through Apple's supported process, reinstall a fully patched macOS, and restore selected clean data.
- Confirm recovery is complete: Keep at least two verified copies of important data before erasing anything.
- Preserve the evidence required by policy: Do not destroy the only disk image, log export, or incident timeline.
- Erase and reinstall macOS: Use Apple's official macOS Recovery or Erase All Content and Settings workflow that applies to the Mac model and operating system.
- Install all updates before restoration: Confirm Tahoe 26.6.1, Sequoia 15.7.9, Sonoma 14.8.9, or a later patched release.
- Create fresh credentials: Use a new administrator password and restore account access from a clean device. Revoke old sessions and tokens.
- Reinstall apps from trusted sources: Download current versions from the App Store or verified vendor websites. Do not migrate unknown packages from the compromised Mac.
- Restore selected data: Documents, photos, videos, and known project files are safer than a blind full-system migration. Scan them before opening.
- Monitor the rebuilt Mac: Watch for renewed high CPU, unknown network connections, unauthorized login alerts, unfamiliar profiles, or unexpected Screen Sharing activity.
If the miner or other malware returns after a clean rebuild, investigate shared credentials, cloud sync, restored launch items, network appliances, management profiles, and other devices. Repeating the same restore without identifying the source can recreate the incident.
Part 10. Compare Every Recovery Path
| Recovery path | Best for | Main limitation |
| Trash or Finder search | Files that were moved, hidden, or not permanently deleted. | Does not help after permanent deletion, encryption, or overwrite. |
| iCloud recovery | Eligible iCloud files deleted within the recovery window. | Files permanently removed or never synced are unavailable. |
| Time Machine | Restoring an intact pre-incident file or folder version. | The backup must predate the compromise and should not be restored blindly. |
| Recoverit for Mac | Deleted or logically lost files on readable Mac or external storage. | Cannot decrypt ransomware, bypass FileVault, recover overwritten data, or remove malware. |
| Disk Utility First Aid | Repairing file-system and directory-structure errors. | Not an undelete tool and may modify metadata. |
| Erase and reinstall macOS | Restoring trust after serious compromise. | Destroys remaining local data if recovery is not completed first. |
| Data recovery laboratory | Unstable, unreadable, or physically failing storage. | Cost, turnaround time, and encryption can limit the result. |
| Incident-response provider | Root compromise, data theft, business systems, and evidence-sensitive cases. | Not a substitute for specialized physical media recovery. |
Part 11. Prevent Another macOS Intrusion
- Keep macOS and security data updated: Enable automatic updates and verify important security builds instead of relying only on notification banners.
- Turn off Screen Sharing and Remote Management when unused: Remote-control services should not remain enabled for occasional convenience.
- Never publish VNC directly to the internet: Remove port forwarding and restrict remote administration through a protected, logged management path.
- Use separate standard and administrator accounts: Apple recommends limiting administrator users because compromise of an administrator can cause greater harm.
- Use FileVault and protect its recovery method: Encryption reduces data exposure from stolen hardware, but losing authorized recovery access can also prevent legitimate recovery.
- Maintain versioned and offline backups: Keep one backup that is not continuously writable from the Mac. Test restoration instead of assuming the backup works.
- Protect the Apple Account with two-factor authentication: Review trusted devices and security information regularly.
- Install apps from trusted sources: Keep Gatekeeper, Notarization, XProtect updates, and browser protections enabled.
- Monitor hosted Macs separately: Verify the provider's base image, firewall, remote-access configuration, update schedule, and incident notification process.
- Document a recovery plan: Know who owns containment, evidence preservation, account recovery, backups, data recovery, and clean rebuilds before an incident happens.
Part 12. Final Verdict
Recovering data after a Mac hacking or malware incident is possible only when the recovery method matches the loss. Start with containment and account security, then prefer intact copies from iCloud, Time Machine, version history, or offline backups. Use Recoverit when files were deleted from readable storage and no clean copy exists. Do not use it as a malware cleaner, decryptor, or forensic substitute.
For CVE-2026-65400, the minimum patched builds are macOS Tahoe 26.6.1, Sequoia 15.7.9, and Sonoma 14.8.9. A Mac exposed through Screen Sharing before patching deserves investigation because NCSC-NL has reported real attacks that obtained root access and installed a Monero miner. Patching closes the vulnerability, but a previously compromised Mac may still need a clean rebuild.
The most important recovery rule is simple: do not erase, repair, reinstall, or restore blindly. Preserve what matters, work from a trusted environment, recover to separate storage, and verify both the files and the rebuilt system before returning to normal use.
FAQ
-
What is CVE-2026-65400?
CVE-2026-65400 is an authentication vulnerability in macOS Screen Sharing. Apple says a network attacker may be able to authenticate without valid credentials. Apple fixed it in macOS Tahoe 26.6.1, Sequoia 15.7.9, and Sonoma 14.8.9. -
Has CVE-2026-65400 been exploited in real attacks?
Yes. NCSC-NL says it received a report of active exploitation on multiple systems with port 5900 reachable from the internet. Its advisory states that root access was obtained and a Monero cryptocurrency miner was installed in each reported case. -
Does turning off VNC password access fix CVE-2026-65400?
No. Research describes it as a pre-authentication issue, so changing the VNC password or removing allowed users does not patch the vulnerable code. Install Apple's fixed macOS build. Turn off Screen Sharing as a temporary mitigation if immediate patching is impossible. -
Should I turn off my Mac immediately after a hacking incident?
First isolate it from the network. If evidence matters and the Mac can remain isolated, stop using it and contact an incident responder before shutdown because volatile evidence may be lost. If destructive encryption or deletion is visibly continuing and no responder is available, powering down may limit further damage. Business policy should take priority. -
Can I recover files deleted by Mac malware?
Possibly. Check Trash, iCloud recovery, Time Machine, and app version history first. If no intact copy exists, recovery software may find deleted data that remains on readable storage. Success depends on overwrite activity, SSD behavior, encryption, and hardware condition. -
Can Recoverit remove malware from a Mac?
No. Recoverit is a data recovery product, not an antivirus, endpoint detection tool, forensic platform, or incident-response service. Contain and remove the threat or rebuild the Mac before trusting recovered data. -
Can Recoverit decrypt ransomware files on Mac?
No. Deleted-file recovery and cryptographic decryption are different processes. Use a clean backup, a legitimate decryptor for the exact malware family when available, or recovery of deleted originals that have not been overwritten. -
Can data recovery software bypass FileVault?
No. The volume must be unlocked through an authorized password, recovery key, or approved account-recovery method. Recovery software cannot legitimately bypass FileVault encryption. -
Is a patched Mac automatically clean?
No. Patching prevents exploitation of the fixed vulnerability going forward, but it does not prove that a miner, stolen credential, launch item, malicious profile, or other persistence installed before the patch has been removed. -
Should I restore my entire Time Machine backup after malware?
Not automatically. Select a snapshot from before the compromise and restore known data first. A full-system restore can bring back malicious applications, scripts, browser extensions, configuration profiles, or persistence. Reinstall trusted apps separately when higher assurance is required.


