
Oct 12, 2026 • Filed to: Solve Mac Problems • Proven solutions
⚡ Quick Answer: How to Fix Macintosh HD Not Mounted on Mac?
Restart your Mac and hold Command + R to boot into Recovery Mode (on Apple Silicon, hold the Power button and choose Options). Open Disk Utility, select the unmounted Macintosh HD, and click First Aid. If that fails, run diskutil repairVolume / in Terminal, try Safe Mode (hold Shift), or convert the drive into an external enclosure to recover files. If your data is already inaccessible, scan the drive with Wondershare Recoverit for Mac immediately.
Quick access to your Mac hard drive is helpful. It allows you to view and work on various folders, applications of your system that you require regularly. When your Macintosh HD not mounted, the access to your system becomes complicated. Are you experiencing the same? Nothing to worry! We will take you through the meaning of mounted and unmounted disk, as well as the various ways to fix unmounted Macintosh HD and recover lost files on Mac.
Part 1. Overview of Macintosh HD Not Mounted
Macintosh HD or Mac hard drive is the primary storage medium for Mac users. Sometimes the hard drive fails to mount because of various reasons and prevents you from using the system. Before learning further let's first understand what does it mean by disk mount and disk not mount.
1. What does it mean to mount a disk on Mac?
When a drive is available for reading and writing operations by the operating system, it is referred to as disc mounting. If the computer is working, the disk is visible in the left pane of the Disk Utility. You can even manually mount the disk if it is not accessible by the computer. It can be done by selecting the disk and clicking on the mount link. All this is possible only if the hard drive is detectable.
2. What does disk not mounted mean?
If you are unable to view the Macintosh hard drive in disk utility, here the disk is not mounted. As the hard drive becomes inaccessible, except the erase button, all other operations become disabled or are greyed out. It is also possible that your Mac stops working. There is a high possibility that Mac won't turn on if Macintosh HD not mounted. But why disk does not mount, let's find out the various reasons for it.
3. Why Macintosh HD Not Found?
When you are unable to view the hard drive on the Mac, it can be due to various reasons:
Common Reasons Why Macintosh HD Is Not Mounted
- Preference settings: Your drive may not be set to appear on the desktop or in Finder. Missing preferences can leave Macintosh HD unmounted.
- Faulty connector or cable: A damaged USB port, cable, or connection between the drive and the Mac can prevent mounting.
- Corrupted file system: Logical errors, bad sectors, or a damaged file system can make the hard drive non-mounted in Finder.
- Hard drive failure: Physical damage from a head crash or component failure also stops the drive from mounting.
- Disk Utility failure: Faults in Disk Utility itself can leave Macintosh HD unmounted.
| Symptom | Potential Root Cause | Recommended Fix |
| Drive visible in Disk Utility but greyed out | File system corruption or mounting glitch. | Solution 1 (First Aid) |
| Drive not visible in Disk Utility at all | Physical hardware failure or connection issue. | Solution 5 (External Enclosure) |
| "com.apple.DiskManagement.disenter" error | Incompatible file system or forced ejection. | Solution 2 (Terminal) |
| Mac boots directly to a Question Mark folder | Corrupted Startup Disk/System files. | Solution 6 (Reinstall macOS) |
Part 2. How to Fix Macintosh HD Not Mounted?
If you are using a modern Mac with an M1, M2, or M3 chip (Apple Silicon), the traditional Command + R shortcut will not work. To enter Recovery Mode and fix your unmounted Macintosh HD:
1. Shut down your Mac completely.
2. Press and hold the Power button (Touch ID) until "Loading startup options" appears.
3. Select Options, then click Continue.
This is a crucial first step before attempting Solution 1 or Solution 2 on any Mac manufactured after 2020.
Before you begin with fixing the Macintosh HD that is not visible in Disk Utility, ensure you have a backup of your hard drive. The backup will be beneficial because while troubleshooting the errors, the original data can be overwritten.
Solution 1: Repair Macintosh HD with Disk Utility First Aid
- Boot into Recovery Mode: Hold
Command + Rand release the keys when you see a spinning globe or the Apple logo.

- Open Disk Utility: Select Disk Utility from the macOS Utilities menu.

- Run First Aid: Choose the unmountable Macintosh HD from the left panel and click First Aid to repair cryptic disk errors.

When the repair completes, one of two outcomes will occur:
- Disk repaired successfully: Log out of Recovery Mode and boot into your system as usual.
- Disk Utility can't repair the disk: If the corrupt drive isn't fixed due to Disk Utility limitations, move on to the next solutions below.
If you fall in the second category, there is nothing to worry about as you can resolve the issue with the next solutions. If Disk Utility helps you mount Macintosh HD successfully but fails to repair other disk errors, turn to this guide - Fix "Disk Utility Can't Repair This Disk".
Solution 2: Fix Unmounted Mac HD with Terminal
- Boot into Recovery Mode and select Utilities > Terminal from the menu.
- List available volumes: Enter
diskutil listand note the Volume Identifier of Macintosh HD from the table shown. - Repair the volume: Enter
diskutil repairVolume /disk#— replace#with your Macintosh HD volume identifier.
Solution 3: Repair Macintosh HD with the FSCK Command
- Boot into Single-User Mode: Shut down your Mac, then restart it while holding
Command + S. Release the keys when you see the Apple logo.

- Run the FSCK command: Type
/sbin/fsck -fyand press Enter. If you see the message "File system was modified", retype the command.

- Confirm the repair: When the message "The Volume (name) appears to be OK" appears, your drive is fully repaired — reboot your Mac to finish.

This method helps to repair minor cryptic disk errors.
Solution 4. Try Safe Mode
Rebooting your Mac in safe mode can also help fix the error, the operating system will scan and repair if you find any errors during this process.
- Step 1. Shut down Mac and restart it by pressing the "Shift" key. To start the Mac in safe mode, it is vital to shut it down entirely before restarting it. Start your Mac by pressing the "Shift" key simultaneously.
- Step 2. Release Key when the login window is visible. Once you can see the login window, release the "Shift" key as your computer has restarted in safe mode now.
If your Mac has started property, try to restart and boot it as usual.
Solution 5. Convert Your Unmounted Macintosh HD into An External Hard Drive
By converting your failing drive to an external hard drive, you can recover inaccessible files from the target disk. Complete the process with these easy steps.
- Step 1. Buy an external hard drive enclosure. It is necessary to have an enclosure before proceeding with the steps of conversion of Macintosh HD into an external hard drive.
- Step 2. Remove Macintosh HD from Mac. Safely remove the hard drive from your system. Consult an expert if you are unsure about how to remove it carefully from the Mac.
- Step 3. Slide the removed Macintosh HD into the matching context. Place the removed drive into the enclosure by removing its cover. Close the casing by tightening all the screws that came with the enclosure. Cover the hard drive by putting back the plastic covers.
- Step 4. Connect the drive with the Mac. With the help of USB drive, connect the external drive which was earlier startup-drive to the Mac through the port of it.
- Step 5. Transfer files. Once the external hard drive (earlier start-up disk) is seen in the Finder, start with file transfer.
Solution 6: Reinstall macOS and Erase Macintosh HD
- Boot into Recovery Mode: Hold
Command + Rand release the keys when you see a spinning globe or the Apple logo.

- Open Disk Utility: Select Disk Utility from the macOS Utilities menu.

- Erase the disk: Select the mountable Macintosh HD, click Erase, and update the name, format, and scheme when prompted. Click Finish when done.
- Reinstall macOS: Return to the macOS Utilities screen, choose Reinstall macOS, and follow the on-screen instructions.

| Fix Method | Success Probability | Data Loss Risk |
| Disk Utility First Aid | High (Logical Errors) | Low (Non-destructive) |
| Safe Mode Boot | Medium (Caches/Drivers) | Zero Risk |
| FSCK Command | Medium (Catalog Errors) | Low |
| Erase & Reinstall | 100% (Software Only) | Total Data Loss |
Part 3. How to Recover Data from Unmounted Macintosh HD?
While fixing the unmounted Macintosh HD, if your data is lost or you fail to bring it in the mounted state, you need to recover your critical saved data from it. To help you, Recoverit Mac Recovery software can do it for you.
Wondershare Recoverit for Mac supports over 1000 file formats including images, multimedia files, archives, and emails, and recovers data from internal hard drives, external storage devices, the Trash, and crashed computers in three simple steps.
- Highest recovery rate for unmounted and inaccessible drives.
- Recovers files from Macintosh HD even when the drive is not mounted.
- Works with laptop drives, internal/external storage, and crashed systems.
- Preview files before recovery to make sure you recover the right ones.
- Select a Mac HD: Launch Recoverit, select the non-mounted Macintosh HD drive, and click Start to begin the scan.
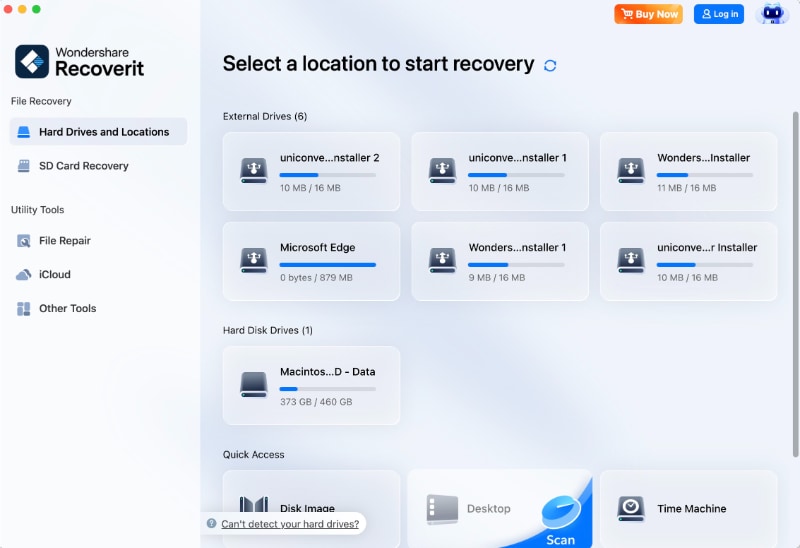
- Scan the Mac HD: Recoverit runs an all-around scan — it can take minutes or hours for large drives, and you can pause or stop it anytime. Use a deep scan if the files aren't found with the standard scan.

- Preview and recover lost files: Preview the found files to confirm they're the right ones, select the targeted files, and click Recover.

Regular backups of stored information are recommended. But if you forget taking a backup, quickly download and install the recovery software Recoverit and retrieve your data.
Video Tutorial on How to Recover Deleted Files That Did Not Go to the Trash Bin

Part 4. Tips Against Macintosh HD Not Mounted
Here are the tips that help you to analyze whether the drive is at fault or the issue is arising because of any other reason. Try to fix it with the basic troubleshooting.
Key Tips Before Fixing Macintosh HD Not Mounted
- Stop using the Mac and back up first. Any repair operation can write or overwrite data. Without a backup, data may need to be recovered from a dead or crashed disk.
- Check the monitor first. A grey boot screen can be caused by a broken monitor. If the fan and backlit keyboard still work but the screen stays dark, get the monitor checked.
- Verify the power supply. Cross-check the adapter light and battery indicator. If you don't hear the normal startup sound, the problem may be the power adapter, not the hard drive.
- Unplug non-essential accessories. Remove USB devices, speakers, and printers — a faulty USB connection can prevent Mac from recognizing Macintosh HD.
- Reset the SMC. System Management Controller settings can affect the boot process and power. Shut down the Mac and unplug it to reset the SMC.
Distinguishing Hardware Failure from Software Locks
If your Macintosh HD is unmounted, it is important to check if the issue is logical or physical. If the "Mount" button in Disk Utility produces an immediate error code (like error 49153), it is likely a software lock caused by a failed file system update. However, if the drive name appears as "Media" with an incorrect size (e.g., 0 GB or 2 TB on a 512 GB drive), the SSD controller has likely failed. In the latter case, stop all "Repair" attempts immediately and use Recoverit to scan for files before the hardware becomes completely unresponsive.
Closing Words
While booting up your Mac, if Macintosh HD fails to show up, check why it is not showing up. It is hard drive problem or the fault is with other parts. As discussed in this article look for the exact cause by following the tips and reasons mentioned here. If you are still not able to see Macintosh HD at startup, then fix it with the solutions listed above.
While fixing the Macintosh HD not mounted, if you lose your data, restore deleted or lost files with Recoverit data recovery software.
People Also Ask
-
How do I fix Macintosh HD not mounted?
Boot into Recovery Mode withCommand + R, open Disk Utility, select Macintosh HD, and click First Aid. If that fails, rundiskutil repairVolume /in Terminal or boot into Safe Mode by holdingShift. -
Why won't my Macintosh HD mount?
Common causes include preference settings, a faulty USB cable or port, a corrupted file system, physical hard drive failure, or Disk Utility faults. Check the drive in Disk Utility to see whether it appears greyed out or not at all. -
How do I enter Recovery Mode on an Apple Silicon Mac?
Shut down your Mac completely, press and hold the Power button (Touch ID) until "Loading startup options" appears, then select Options and click Continue. The traditionalCommand + Rshortcut doesn't work on M1/M2/M3 chips. -
Can I recover data from an unmounted Macintosh HD?
Yes. Stop using the drive immediately and run Wondershare Recoverit for Mac. Select the unmounted Macintosh HD, scan it, preview the found files, and recover them to a different path.
What's Wrong with Mac
- Recover Your Mac
- 5 best data recovery software for Mac
- Recover my trashed files.
- Recover deleted files on Mac.
- 3 ways to restore Mac photos.
- Recover SD card files on Mac.
- Recover files from external hard drive on Mac
- Fix Your Mac
- Fix grey screen at startup.
- Ethernet issues occur | Fixed.
- Mac won't shut down. Boot it.
- Solve flashing question mark.
- Fix slow WiFi after upgrade.
- Delete Your Mac
- Format your USB drive.
- Delete APFS partition.
- How to format APFS drive.
- What can be cleaned on Mac.
- Format external hard drive.
- Learn Mac Hacks


Sue Wayne
staff Editor