A Complete Guide to MacOS Mojave 10.14.4 Update
Do you work on Mac? Being a Mac user, you must have worked on macOS High Sierra. How about moving to the next update? As Apple always aimed at providing the ultimate user experience; it has now come with an updated version of Mojave for Macintosh computers.
Mojave, the successor of macOS High Sierra released in September 2018, made the operating system better than ever. After the first release of Mojave, the operating system came with its four updated versions. Whether you are running macOS Mojave or thinking of moving to Mojave, you can now enjoy working with the Mojave update. The updated version has also fixed all the earlier bugs.
In this post, you will go through the overview of Mac OS Mojave, its system requirements, new features, and improvements. We will also let you know about its installation process and the best method for data recovery.
Part 1. Overview of macOS Mojave 10.14.4
The fourth update 10.14.4 of Mojave is recommended for all its users of Mojave to improve the performance and stability of their Mac device. It comes with many high-end features that offer you an impressive functionality. From dark mode to dynamic desktop, continuity camera, best security, and many more, the new update is also sure to offer you improved user experience.
Have you not upgraded your Mac OS to Mojave yet? Shift to it quickly by installing it from the App Store.
Are you wondering about the compatibility and system requirements for running Mojave? Click on the logo of Apple located at the top on the left side of the screen. Go to "About this Mac" to look whether your Mac model is compatible with Mojave.
In 2024, the system has been updated to macOS 15 Sequoia, will You Upgrade to macOS Sequoia 15.0 Now?
macOS Mojave Runs On the Following Models
- MacBook (Model from Early 2015 or newer)
- MacBook Air ( Model of Mid 2012 or newer)
- MacBook Pro (Mid 2012 Model or newer)
- Mac mini (Late 2012 Model or newer)
- iMac (Late 2012 Model or newer)
- iMac Pro (2017 Model)
- Mac Pro (Late 2013; Mid 2010 and Mid 2012 models with Metal-capable graphics cards)
Mojave needs RAM of 2GB and 12.5 GB of disk space when upgrading from OS X El Capitan 10.11.5 or version later to it. Some of the features of Mojave require Apple ID, while some require compatible Internet service.
The Best Features Included In macOS Mojave
Dark Mode
Enjoy the distraction-free working environment with the new look of OS. It lets you be more focused on work and is best for the eyes too. The dark color scheme in place of white and black text reduces glare and eyestrain. This mode works best with the built-in Mac apps. It is easy to activate dark mode, and you can even switch back if you don't like working in it.
Activate it through the following path:
Apple Menu -> System Preferences -> General -> Appearance -> Select the dark for switching to dark mode -> Close it
Dynamic Desktop
Your desktop will match with the time of the day with Mojave. Activate it with the following path:
System Preferences -> Desktop & Screen Saver -> Select Desktop -> Dynamic Desktop -> Close
Stacks
Managing files is easy with "Stacks" as it organizes desktop content into stacks- on screen's right side in the form of document batches. These can be arranged according to file type and date. You can also tag them with the client's name to make it more manageable.
Turn on Stacks with Finder -> View - > Use Stacks
You can open a file from the stack, by clicking on stack. This gives you an expanded view of the enclosed files. Open the file by double-clicking it with the default app or right-click a file to open it with the selected app.
Screenshot Tool
The easy screen recording tool can be easily launched with a shortcut- Press Shift+command+5. The utility bar allows you to take a screenshot of the entire screen or a specific area. It even allows you to record the screen or its specific area with a start timer and also lets you select the place where you want to save the screenshot.
You can even markup the screenshot for adding comments or other reasons that you want to add in your screenshot.
Continuity Camera
Shoot a photo from your iPhone and let it automatically appear in your Mac with a continuity camera. While working on a document whenever you feel the need of inserting an image, right-click and select the desired option from "Import from iPhone." This opens the camera and lets you choose the desired photo once you have taken it.
Quick Look
This lets you perform your specified actions on the file without actually opening it. You can add a signature, edit and trim videos, rotate, and crop images here.
App Store
Mojave also came with a new App store that helps you effectively discover things. The new app store fine-tunes your search. You can also check in-depth videos and stories about your searched apps.
Privacy and Security
MApple always works on providing optimum privacy and security to its users. Mojave has more robust enhancements for securing your data and keeping trackers away.
Part 2. What's New in macOS Mojave Update
The macOS Mojave came with many new features- Dark Mode, Dynamic Desktops, Stacks, Screenshot Tool, Continuity Camera, Quick Look, and reimagined App Store. As Apple unveiled the Mojave update, the updated 10.14.4 version includes some of the new features:
Apple News+
The subscription services give an extended Apple New experience with the best newspapers and hundreds of magazines. You can even get your recommended topics and reading them in an offline mode is easier as they can be downloaded automatically. The handpicked top articles are available in Canada in both English and French languages. Enjoy Apple News + in the U.S and Canada with additional Canadian magazines.
Safari
The Safari browser for Mac supports Dark Mode for websites with custom color schemes. Logins are streamlined on websites and push notifications are also prompted only after an interaction with a website.
When you try to access an insecure page, it warns you. The intelligent tracking preventions protect you from cross-site tracking.
iTunes
Finding in Apple music or new music and playlists is easier in Mojave Update. The editorial highlights can be seen in the browse tab that too on a single page.
AirPods
The updated version adds support for 2nd generation Airpods.
Along with these features, Mojave 10.14.4 update supports the Air Quality Index for Maps of the UK, US, and India. You can now enjoy the audio recording messages with improved quality and can also go for real-time text for the phone calls made from nearby iPhone and Mac. Mojave Update in activity monitor also provides extended support for external GPUs.
The new update fixes all the previous issues of – App store, graphics compatibility, Wi-Fi connection, and AOL passwords being frequently asked in the mail. The default screen brightness is also corrected in MacBook Air in the Mojave Update. Some more issues were also fixed in its 10.14.4 release; these are discussed in the next part.
Part 3. Reasons for macOS Mojave 10.14.4 Update
Apple launched Mojave 10.14 in September 2018 with many new features. Since then it has released three updated versions, but all the versions have some limitations. To overcome all those faults, Apple released Mojave 10.14.4 for macOS by fixing all previous issues.
The notable issues were:
- After the Mojave update, problems raised as Wi-Fi stop stopped working. The new release addressed this issue.
- There was a problem with AOL passwords during Exchange accounts in Mail App which also got resolved in Mojave 10.14.4.
- The updated version also included support for Apple News+, Safari updates, and updates of iTunes.
- There were issues with USB audio devices reliability in previous versions, these well also resolved in Mojave update.
- After facing a fair amount of disturbance on the audio bug of Group Face Time, Apple fixed it in MacOS updated version of 10.14.4.
- You can also enjoy now your most favorite iPhone apps on macOS Mojave 10.14.4.
- Mojave Update also fixed the issue that prevented apps from getting downloaded from the App store.
If there is a need to install a different version of the operating system then the user just has to replace the above-underlined command with their desired version of OS. For example, if the user wants to install Mac OS Sierra instead of Mojave then they would have to replace "Mojave.app" with "Sierra.app" inside the command line.
Part 4. How to Upgrade to macOS Mojave 10.14.4
Apple released its fourth update of Mac OS Mojave 10.14.4 after its first release in September 2018. Mojave 10.14.4 came after more than a gap of two months after its 10.14.3 release. After fixing the previous version problems, the new version is ready to be installed on your systems.
You can set your Mac to check for updates automatically and select when they can be installed. You can even check for updates manually.
Check updated OS manually with this path:
Apple menu -> System Preferences -> Software Update
To overcome the earlier faults and to enjoy new features of Mojave 10.14.4, install the macOS by following these steps.
Before updating check the compatibility of your system and look for system requirements as mentioned above so that the upgraded version works finely on your system.
Step 1- Select the App Store
Apple menu -> System Preferences -> Software Update
Look for the Apple icon that is there at the top in the left corner of the screen. Once you reach the icon, select App Store from the drop-down menu.

Step 2- Click on Update
In the updates, section click on the update that is written next to Mojave 10.14.4 in the App store. Once the download gets installed in your system, your Mac needs a restart. Save your programs and restart the system to let the upgraded OS effectively work on your Mac.
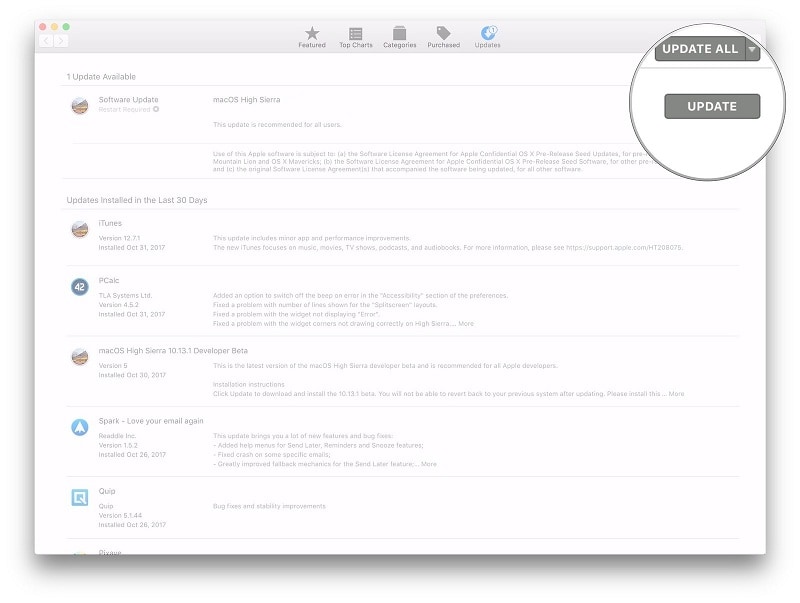
You can also directly download the Mojave 10.14.4 from the App Store if it is not visible in the updated section.
If you want your system to look for updates automatically, you can do it from the following path:
Launch -> Mac App Store -> Click App Store -> Preferences -> Check the box with automatic updates.
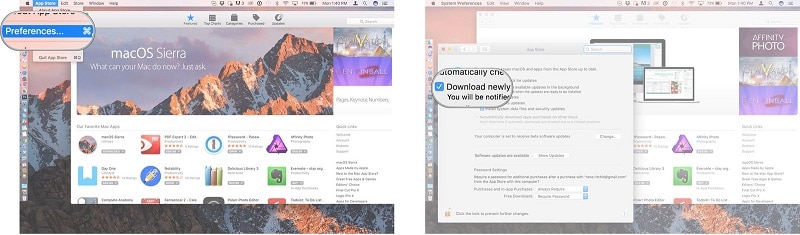
Apple never goes for installing an update until you allow it to update the system. By selecting the option to look for automatic updates, you will have updated versions waiting for you to install them at your preference.
Part 5. What If Data Gets Lost during Mojave Update
While working on your Mac, you can face accidental deletion or loss of data at any time. Even the smallest issue in your system can lead to the corruption of data and loss of your information that is saved on your system. There may be times when you have spent hours creating a file, and a simple miss click can leave you with complete data loss.
Various causes can lead to data loss:
Formatted Hard Drive:
During hard drive formatting, while formatting a particular partition you may lose data by formatting a wrong driver. Improper repartitioning can also lead to loss of data.
Virus Attack:
Many viruses in the internet world are waiting to infect your devices or to steal your vital information. Your hard drive can get infected anytime with these viruses or malware. Formatting is the best way of letting your Mac get rid of infected files. But ultimately your data gets lost.
Along with this accidental deletion, power failure, improper shutdown or system crash is the other possible reasons that lead to loss of data from your Mac.
These are the cases when usually you don't back up your files regularly. So what will you do if you ever meet with any of these situations? Do you think you have lost your files forever? If you think so, that we would like you to inform you that your data is completely recoverable with the best file recovery software- Recoverit Data Recovery software.
Recover your lost data with Recoverit with these easy steps
Step 1: Select the Location
For recovery of lost data from your Mac, select the drive from where the file got lost. If you are not able to view your drive from where data is lost, you can refresh the list.

Step 2: Scan the Location
To search for the lost files, launch the all-around scan on the selected drive from where the data has lost. The scanning process can even be paused at any time if you chose the wrong drive or observe any other issue.

Step 3: Preview and Recover
Once the software completes the scanning, look for the files found during scanning. Select from the list the files that you want to recover. After the selection process completes click on the "recover" button to recover them and save them at your desired but safe path.

Now you are done with the recovery procedure. Here is one thing that requires extra attention; recovered files should always be saved on a location different from the one from where you lost data.
By now you must have understood the various advantages of updating your macOS to Mojave 10.14.4. Although along with the new features the previous versions of Mojave had some bugs, the updated version has fixed all the previous issues. Along with fixing problems of its earlier versions, Mojave Update 10.14.4 also included new features. Update your OS to the latest OS now.
Will Mac update delete your files? During updating the operating system if you accidentally lost your data Recoverit recovery software helps you in easily recovering your important files.
What's Wrong with Mac
- Recover Your Mac
- Fix Your Mac
- Delete Your Mac
- Learn Mac Hacks


 ChatGPT
 Perplexity
 Google AI Mode
 Grok
Grok


Sue Wayne
staff Editor