4 Ways to Fix Couldn't Unmount Disk/Volume for Repair Error on Mac
Resolve the Mac "Couldn't Unmount Disk" error by bypassing active system processes using a USB boot drive, the macOS Recovery Partition, or Terminal commands to force the drive to disconnect.
● Force unmount the problematic drive via Terminal by running "diskutil list" to locate your disk number, followed by the exact command "sudo diskutil unmountDisk force/dev/diskx" customized to your specific drive identifier.
● The Recovery Partition method via Disk Utility First Aid will not work if the target disk and the primary boot partition are located at the exact same location.
● Cease all unmount and repair attempts immediately if the drive produces clicking sounds, frequently disappears, or fails in Recovery Mode, and prioritize data extraction using Recoverit Mac Data Recovery to avoid worsening physical hardware failure.
Ask AI for a summary
Couldn't Unmount Disk/Volume for Repair Error on Mac? 4 Ways to Fix
Mac and its features are excellent unless a data lost and deleted files mess up. This error can occur due to various reasons like disk crashing, unmounting error, partitioning, and others. This article will guide you step by step through various causes and specific ways by which the disk issue can be resolved which will help you to repair the issue of unmounting disk/volume on Mac.

Part 1- What does "couldn't unmount disk" mean?
To know about the solutions, first, let's understand about unmounting and disk utility, and the causes of the disk error.
- Unmounting a disk means disconnecting a disk drive or optical disk from the computer.
- Usually, the error 'Couldn't Unmount Disk' shows up when you try to format, partition, verify or repair internal disk by Disk Utility on Mac system.
What causes the 'Couldn't Unmount Volume' error?
The causes of this error are several, starting with the abrupt shutdown and inconsistent file system. The other reasons for 'Couldn't Unmount Volume' error are:
- Human error: Deleting or formatting the files or data improperly in between the ongoing operations can cause disk error.
- Interrupting Read/Write operations: In the hurry of working or accessing the data, sudden interruption in the system process can result in data loss or data corruption.
- Forced or unintentional formatting of data: Unknowingly deleting some system files or data files can result in data loss or faulty disk error.
- Virus attack: Malicious attacks can harm the data. It can be due to the software or accessing an unauthorized website.
These are a few of the reasons that prompt the 'Couldn't Unmount Disk' error. Other causes can be system related like Error in Bootstrap, Improper Kernel Installation, Hardware or Software crash, and many more.
Related: What is a Disk Volume.
Part 2 - 4 methods to fix "Couldn't Unmount Disk" on mac
There are several ways to fix the disk error. Let's drill down to the four possible solutions that can be used to fix the 'Couldn't Unmount Disk' error on Mac:
- Method 1: Right Steps to Unmount Volume for Repair on Disk Utility
- Method 2: Fix with a USB boot drive
- Method 3: Use the terminal application
- Method 4: Repair with a recovering partition
Method 1: Right Steps to Unmount Volume for Repair on Disk Utility
The simplest solution to unmount volume for repair is to unmount the disk on disk utility.
To unmount the volume, start by accessing the disk utility.
To access the disk utility, follow the step below:
Step 1: Click on the Spotlight icon from the menu bar.
Step 2: Type Disk Utility in the search field.
Step 3: Double-click on the Disk Utility icon.

Step 4: In the Disk-Utility app, select the disk that you want to unmount in the sidebar.
Step 5: Click the unmount button in the toolbar or beside the disk set name.

After following these steps, you can erase the Mac hard drive volume. In case the error still occurs, try repairing the drive using the USB boot drive method.
Method 2: Fix with a USB boot drive
If you're struggling with the 'Couldn't Unmount Disk' error, the way to fix this is to boot the Mac system from another drive and then run Disk Utility on the disk.
Ensure that the USB boot drive is attached to the device. Next, follow the steps below:
Step 1: Insert the USB boot drive to Mac and reboot the system.
Step 2: While rebooting, hold down the Option key button to select the attached boot drive.
Step 3: Next, in the boot menu, select 'Disk Utility' to access it.
Step 4: After selecting the Disk Utility option, go to 'First Aid' and verify the disk.

Once you click on 'First Aid' it will show you the second screen as below and ask for the option. You need to click on the 'Run' option to move forward in the process.

After you 'Run' the First Aid option as shown in the above screen, it will show you the progress and show 'Operation Successful' on the completion. You have to click on the "Done" button once the operation is successful as shown in the below image.

Step 5: The repair is done.
You can start performing the tasks which were halted due to the error. When the first aid could not unmount the volume for repair, try using the "Use the terminal application" method to unmount the disk volume.
Method 3: Use the terminal application
Terminal application allows you to control your Mac operations via the command prompt. Command-line can be used to eradicate 'Can't unmount disk' from Mac.
To access the terminal application (command prompt), here are the steps to be followed:
Step 1: Open the 'Terminal Application' from the 'Utilities' menu.
Step 2: Then, type "diskutil list" on the command prompt to get the list of all the disks on Mac.
Step 3: Now, search for the disk you want to force unmount. For example, the syntax of the disk may be "/dev/diskx"
Step 4: After finding the disk, type "sudo diskutil unmountDisk force/dev/diskx" line and replace "/dev/diskx," i.e. disk number with "/dev/disk1" which is an acceptable disk number.

Method 4: Repair with a recovering partition
Recovering the Partition method is used to recover the disk error while formatting a non-booted partitioning or by First Aid. However, this method will not be feasible if the disk and the primary boot partition is at the same location.
To use the recovering partition method, follow the steps below:
Step 1: Reboot your Mac device by holding the 'Option' key.
Step 2: Then, choose the 'Recovery Partition' option from the Boot menu.
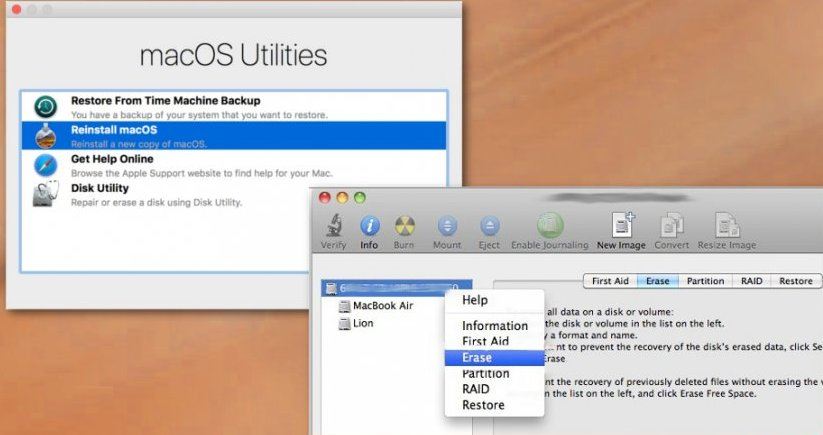
Step 3: From the Boot Menu, select 'Disk Utility' and go to 'First Aid' to verify and repair the disk or go to 'Erase' if you wish to format the disk. With repair partitioning, you can unmount the disk for repair.
Part 3. Recover lost files on Mac after all methods fail
In case all these methods fail to repair the disk, you can use Recoverit to retrieve the data. Recoverit Mac Data Recovery is a one-stop solution to recover all the deleted, or lost files on Windows and Mac.
Step 1. Select the Device:
For the selection of a specific device, you will need to select the specific drive under the tab "Devices'" or Desktop under the "Select Location" tab.
Once you have selected the specific drive, simply click on the 'Start' button to proceed.

Step 2. Scan the location:
Once the previous step is completed, Recoverit will automatically start an all-around scan that will help to find all the lost, deleted, or formatted data on the disk.
Once you have found the data that you were looking for, you can either pause or even stop the scanning process.

Step 3. Preview and recover files:
Recoverit allows previewing the recovered files via thumbnails, preview button, double-clicking a single file, or by toggling between the two preview angles. To recover selected data, you can preview it first and then retrieve it.
To recover the files, select the targeted files and click the 'Recover' button to retrieve your data back.

Using Recoverit, you can recover all your lost or deleted files.
Part 4. Learn "How to use disk utility"
Do you know Mac provides a Disk Utility application found under the 'Utilities' folder to manage internal disks and external storage devices? Using disk utility, you can partition Mac's hard drive without creating any special bootable tools.
The other reasons why you need to access the Disk utility are:
- Easy formatting and managing volumes on physical storage devices.
- To check for and repair errors on your Mac disks and volumes.
Methods to access Disk Utility:
Method 1: To access the Disk Utility in macOS, follow the steps below:
Step 1: Press Command+Space to open Spotlight search,
Step 2: Type 'Disk Utility' into the search box, and then press Enter.
Method 2: You can even access the disk utility via an alternate method:
Step 1: Open a Finder window.
Step 2: Click Applications in the sidebar
Step 3: Double-click the 'Utilities' folder, and then double-click Disk Utility to access it.
After accessing the disk utility, the next step is to use the first aid.

Method to use First Aid
To check and repair file system errors, Disk Utility provides a First Aid function. You can even use the First Aid function as a preventive measure.
To access the first-aid, follow the steps below:
Step 1: To begin with, run First Aid from the software installation DVD
Step 2: Following the first step, you need to insert the DVD and restart your computer
Step 3: Next, select 'Disk Utility' option from the Utilities or Disk Utility menu
Step 4: You can select the volume that you need to repair from the left column and then you can click on 'First Aid' tab from the right
Step 5: Click on 'Verify Disk' to check for any errors or problems
Step 6: Click on 'Repair Disk' to repair if there are any errors or problems found while checking for errors in the previous step

Using these methods, you can access and repair the unmount disk error on Mac.
However, being cautious with the disk and partition can help you avoid later stress of going through all the above mentioned repairing techniques. Check out some useful tips to follow if you don't want to face the 'Couldn't Unmount Disk' error on your Mac.
Useful tips to prevent "Couldn't Unmount Disk" error:
- Do not shut down the system harshly or forcibly.
- Always turn off the Mac properly.
- Keep your Mac system updated with files and fixes.
- Always have a backup of your files and data.
- Use security software to protect the data and the machine from viruses or other threats.
- Stop overwriting the free space created after deleting Mac files.
- Avoid downloading software from suspicious or unauthorized sites.
With these basic steps, you're all set to prevent your machine from errors and repairs.
Sorted with the error 'Couldn't Unmount Disk'?
We are aware that such technical issues at times can be frustrating and can take lots of time and effort to resolve it. However, by the above mentioned simple steps and Recoverit Mac Data Recovery, you're all set to repair and restore your data from your Mac without seeking help from someone with a technical background.
When to Stop: Is Your Drive Failing?
If you've tried all the solutions above, especially in Recovery Mode, and you still can't unmount the disk, it might be a sign of physical hardware failure. Continuous clicking sounds or the drive repeatedly disappearing are also red flags.
At this point, further attempts to force unmount or repair could cause more damage. The top priority should shift from fixing the drive to saving your data. We strongly recommend using a professional data recovery tool like Recoverit to create an image of the drive or recover files immediately.
What's Wrong with Mac
- Recover Your Mac
- Fix Your Mac
- Delete Your Mac
- Learn Mac Hacks


 ChatGPT
 Perplexity
 Gemini
 Claude
 Grok
Grok


Sue Wayne
staff Editor