


Need to hide a folder on Mac without deleting it? The safest method depends on what you actually want to do. To make an ordinary file or folder disappear from normal Finder views, use the chflags hidden command in Terminal. To hide hidden files that are currently visible, press Command + Shift + Period (.) in Finder. For a genuinely private or secret folder, hiding is not enough—use an encrypted disk image instead.
Quick Answer:
- Hide a normal file or folder: Use
chflags hiddenin Terminal. The Finder shortcut does not apply the hidden flag to a normal selected folder. - Hide hidden files again: In Finder, press Command + Shift + Period (.) to toggle already-hidden items out of view.
- Protect a secret folder: Create an encrypted disk image in Disk Utility. A hidden Finder item is not password-protected.
- File seems missing: Reveal hidden items, check the path, Trash, and backups first. Use data recovery only if the file is truly deleted or inaccessible.
In This Article
Part 1. Hide vs. Protect: Choose the Right Method
Mac users often use the word hide for three different tasks: removing an ordinary item from Finder, turning off the display of already-hidden items, or protecting confidential files from other people. Those are not the same thing, so choosing the right method first prevents confusion later.
| Your Goal | Best Method | What It Actually Does | Privacy Level |
| Hide a normal file or folder from Finder | chflags hidden |
Adds the hidden flag so Finder normally does not display the item | Low; not encryption |
| Hide hidden files that are currently visible | Command + Shift + Period (.) | Toggles Finder's display of items that are already hidden | None; display only |
| Create a password-protected secret folder | Encrypted disk image in Disk Utility | Encrypts the contents and requires the password to unlock the image | High when the image is ejected and the password is protected |
| Protect the whole startup disk | FileVault | Protects data on the startup disk; it is not a per-folder hiding tool | Whole-disk protection |
Hide a Normal File or Folder from Finder
If your goal is simply to remove one ordinary file or folder from normal Finder views, apply the hidden flag with Terminal. The item remains on the disk and can still be reached by its exact path or revealed with Finder's hidden-file view. Hiding therefore helps with visual clutter or casual browsing, but it should not be treated as security.
Hide Hidden Files Again
If Finder is already showing dotfiles, system items, or folders you previously hid, you do not need to change their file flags. Press Command + Shift + Period (.) in an active Finder window to toggle those hidden items out of view again. For a deeper guide to showing and hiding existing hidden items, see how to show hidden files on Mac.
Protect a Secret Folder with a Password
For sensitive documents, a hidden flag is too easy to reverse. Apple documents encrypted disk images as a way to protect confidential files with encryption, while FileVault is intended to protect the startup disk rather than one folder. The encrypted disk-image method is covered in Part 4.
Part 2. How to Hide a File or Folder on Mac with Terminal
For the primary intent behind hide a folder in mac and hide files in mac, Terminal is the most direct built-in method because it applies the hidden flag to the exact item you choose. The workflow below avoids typing a long path manually by letting Finder insert it for you.
Hide One File or Folder with chflags hidden
Use this method only on files and folders you own and recognize. Avoid changing visibility flags on unfamiliar items inside macOS system locations.
Step 1. Open Terminal.
Open Spotlight, type Terminal, and launch the app. You can also open it from the Utilities folder in Applications.
Step 2. Enter the hide command.
Type chflags hidden and leave a space after hidden. Do not press Return yet.

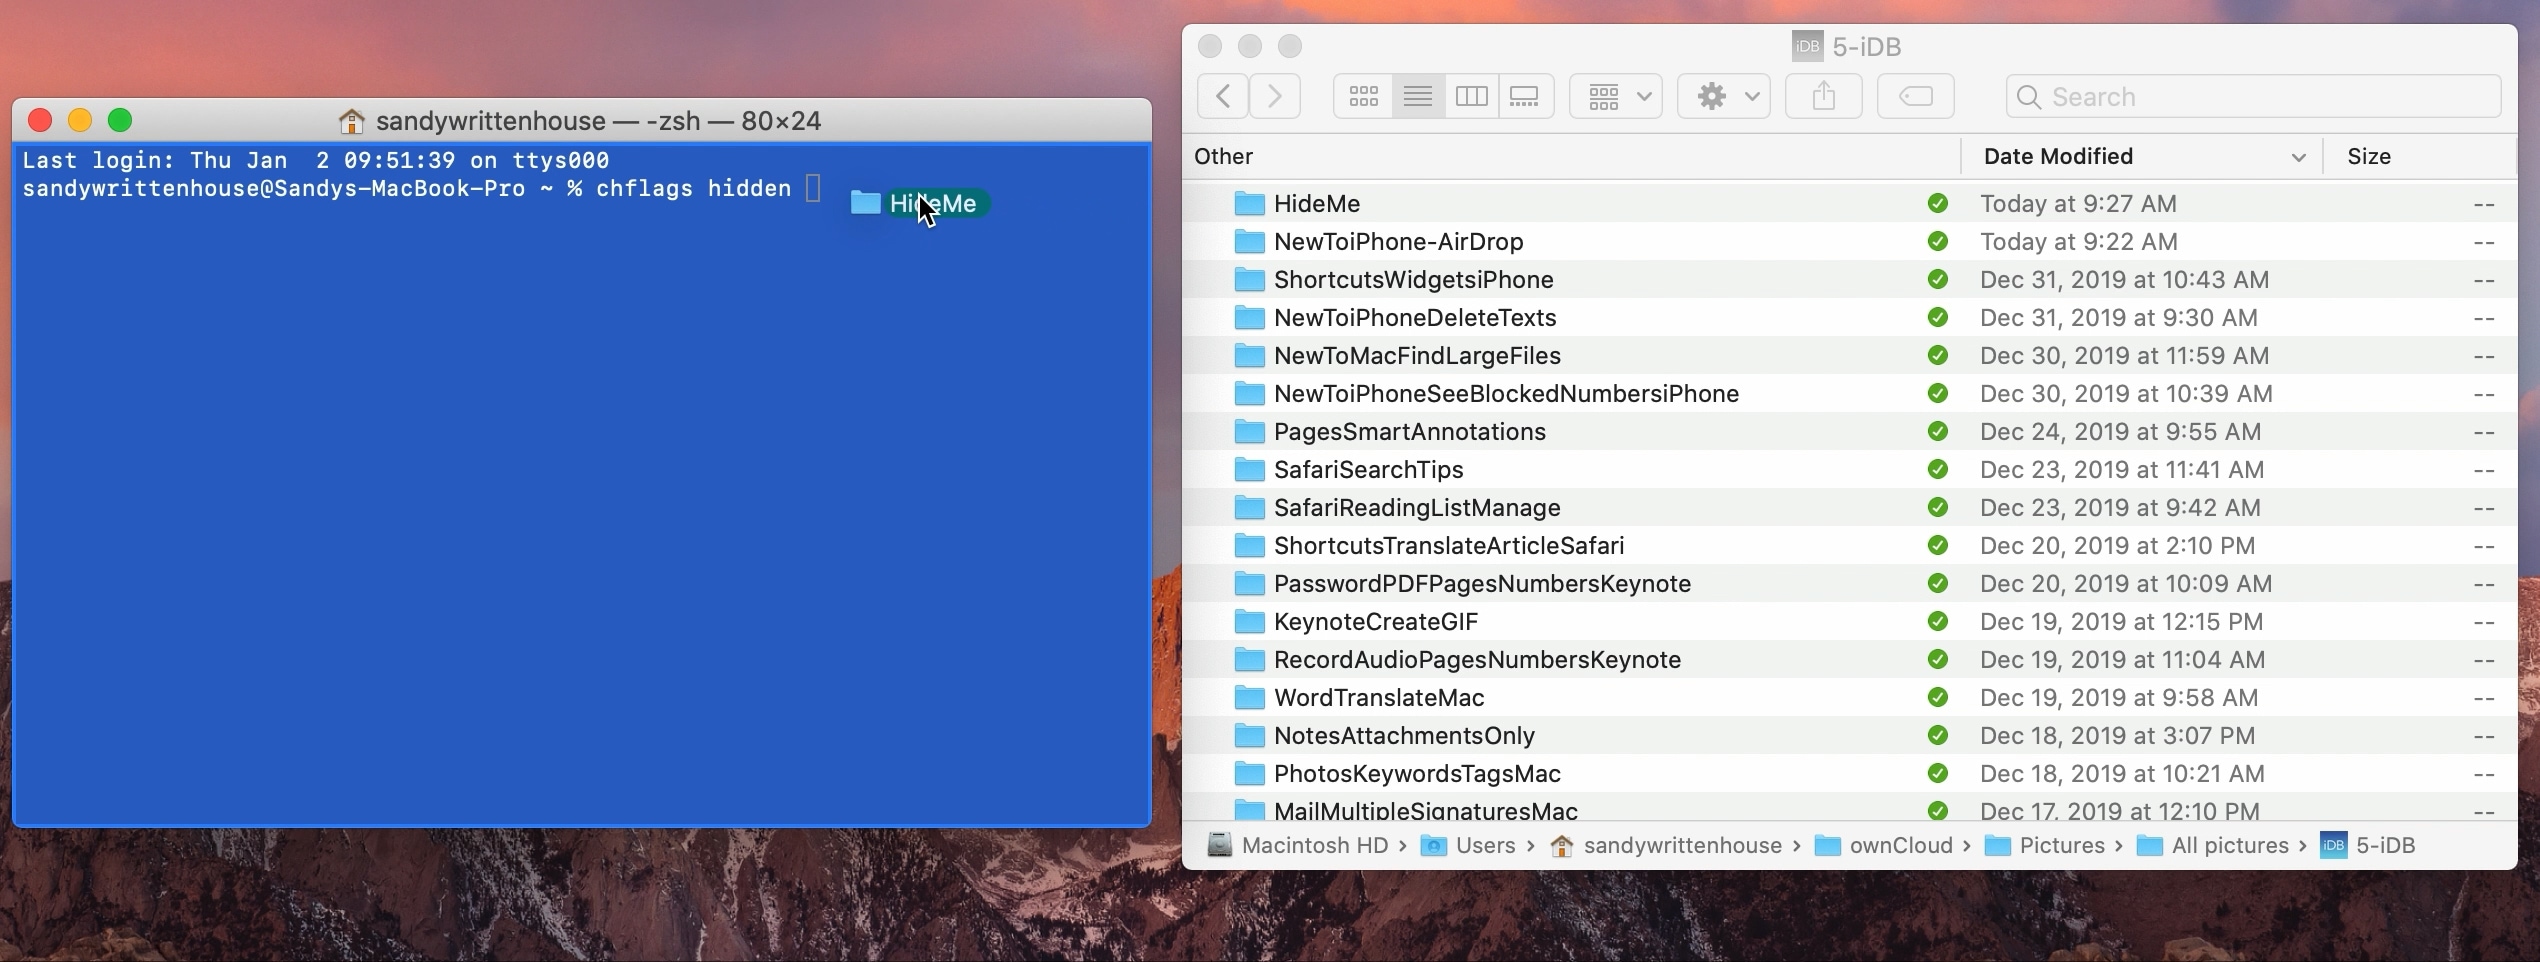
Step 3. Drag the target item into Terminal.
In Finder, drag the file or folder you want to hide into the Terminal window. macOS adds its full path after the command, which reduces the chance of typing the wrong path.
Step 4. Press Return.
Terminal applies the hidden flag. If the item remains visible because Finder is currently set to show hidden files, press Command + Shift + Period (.) once in Finder to hide hidden items from view.
Step 5. Keep track of the location.
Record the folder's original path or keep a simple note of where you hid it. A hidden item is still there, but forgetting its location can make it feel lost later.
The chflags hidden and chflags nohidden workflow is also documented in a current 2026 walkthrough from iDownloadBlog's Mac Terminal guide.
Hide Several Items Without Losing Track of Them
If you have many files to hide, the simplest approach is usually to put them in one clearly named folder and hide that folder. This keeps the number of hidden paths manageable and makes reversal easier. For unrelated items in different locations, run the command one item at a time rather than using broad recursive commands.
- Keep a path note: Save the parent-folder path somewhere you can find later.
- Avoid system folders: Do not hide or modify unknown items in
/System,/Library, or other protected locations just to reduce clutter. - Do not confuse hidden with protected: Anyone who knows how to reveal hidden files may still access the item if they otherwise have permission.
Part 3. How to Hide Hidden Files on Mac Again
The phrase hide hidden files mac usually means the opposite task: Finder is currently showing hidden items and you want them to disappear from view again. In that case, you do not need to run chflags hidden on every file.
Hide Revealed Hidden Files in Finder
When hidden items are visible in Finder, they may look dimmed or semi-transparent. This is a display state, not a sign that the files are damaged.
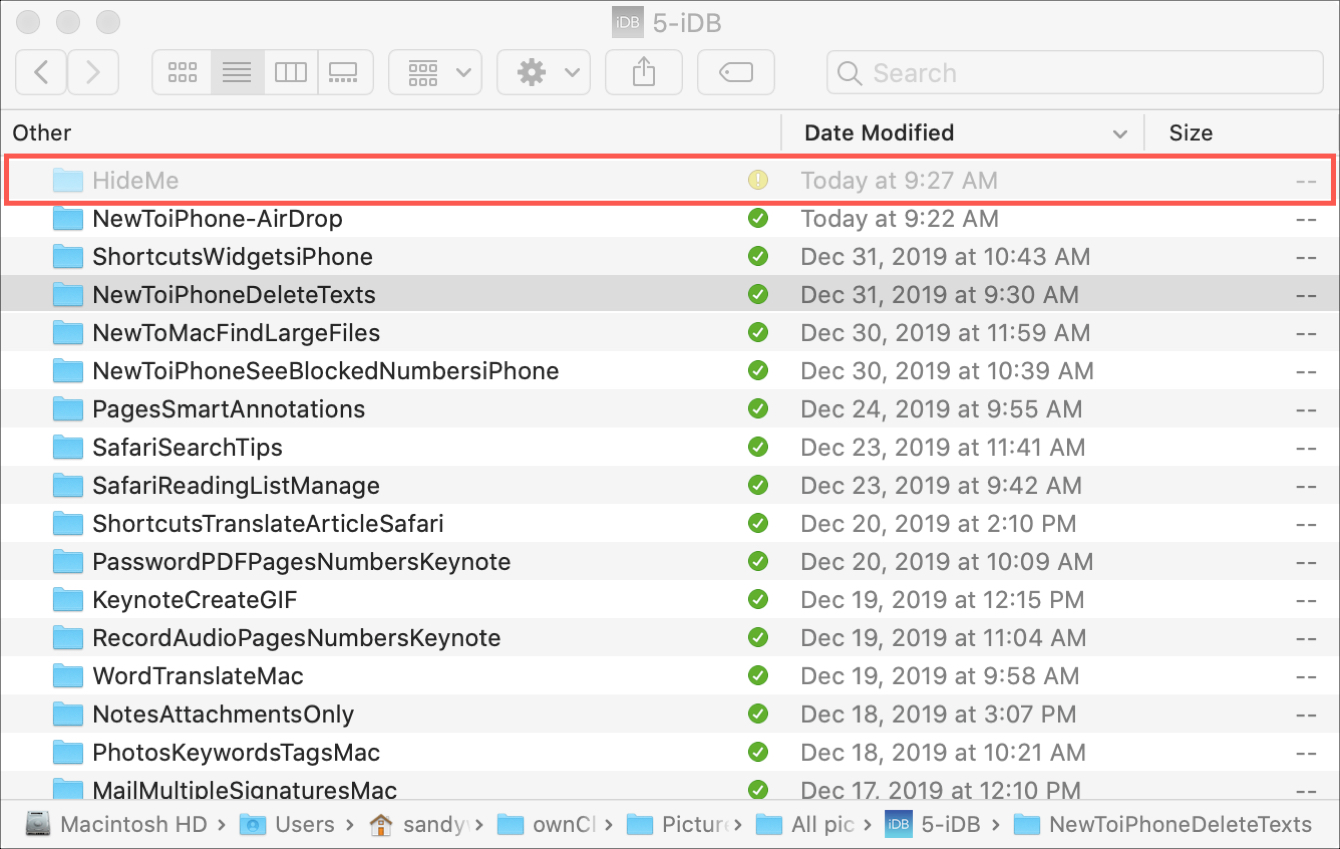
- Click the Finder window so it is active.
- Press Command + Shift + Period (.).
- The hidden items disappear from normal Finder view. Press the same shortcut again whenever you need to reveal them.
This shortcut only changes whether Finder displays items that are already hidden. It does not make a normal selected folder hidden. That distinction is important because the current article's older wording treated the shortcut and the hidden flag as the same operation.
Make a Specific Hidden Folder Visible Again
If you previously used chflags hidden and now want to remove that flag permanently, first reveal hidden items temporarily so you can select the target, then use the reverse Terminal command.
- In Finder, press Command + Shift + Period (.) so the hidden folder becomes visible.
- Open Terminal and type
chflags nohiddenwith a trailing space.

- Drag the hidden folder into Terminal so its path appears after the command.
- Press Return. The hidden flag is removed and the folder can remain visible even after you turn Finder's hidden-file display off.
If your goal is to inspect macOS hidden folders such as ~/Library, rather than hide your own files, use the dedicated hidden-files guide for Mac instead of expanding this page into the same query cluster.
Part 4. How to Create a Password-Protected Secret Folder on Mac
A folder that is merely hidden is still accessible to someone who knows how to reveal hidden files. If secret folder mac means a folder that should require a password, use encryption instead of relying on Finder visibility.
Encrypt an Existing Folder with Disk Utility
Apple's current Disk Utility guide supports creating a disk image from a folder and choosing an encryption option. The resulting image can hold the folder contents in an encrypted container. Protect the password carefully: Apple warns that if you forget the password, you cannot open the encrypted image.
Step 1. Back up important files first.
Before changing how important files are stored, make sure you have a verified backup. Do not delete originals merely because the encrypted image has been created.
Step 2. Open Disk Utility.
Open Disk Utility from Applications > Utilities or find it with Spotlight.
Step 3. Choose Image from Folder.
In Disk Utility, choose File > New Image > Image from Folder, select the folder you want to protect, and click Open.

Step 4. Choose encryption and image format.
Enter a name and destination for the disk image, choose an Encryption option, and choose an image format that matches how you will use the image. If you need to add and edit files later, use a writable image format supported by your current Disk Utility.

Step 5. Save and test the encrypted image.
Finish creating the image, then test that you can open it with the password and access the expected files. When you are finished using it, eject the mounted disk image so the protected contents are not left open on the desktop or in the Finder sidebar.
See Apple's current Disk Utility guide to encrypted disk images for the current options and warnings.
FileVault Protects the Startup Disk, Not One Folder
FileVault should not be presented as an app for hiding selected folders. Apple describes FileVault as protection for data on the Mac's startup disk. On Apple silicon and T2 Macs, data is already encrypted automatically, and turning on FileVault adds an extra layer of protection tied to your login credentials and recovery method. Use Apple's FileVault guidance when your goal is whole-disk protection, not a secret folder.
Part 5. What to Do If a Hidden File or Folder Seems Missing
A hidden file is not the same as a deleted file. Before installing recovery software, first prove that the item is no longer present through normal Finder, hidden-file, Trash, or backup checks. This prevents unnecessary scans and keeps the recovery path focused on real data loss.
Confirm It Is Hidden, Not Deleted
Use this short checklist in order:
- Reveal hidden items: Open the last known Finder folder and press Command + Shift + Period (.).
- Use the exact path if you know it: In Finder choose Go > Go to Folder, then enter the path you recorded before hiding the folder.
- Check Trash: If the item was accidentally deleted, restore it before doing anything more invasive.
- Check backups: Look in Time Machine or another verified backup if you use one.
- Search the Mac: If you remember the name but not the location, use the site's detailed guide on how to find files and folders on Mac.
If the item appears after any of these steps, it was hidden or misplaced rather than lost, and data recovery software is unnecessary.
Recover Truly Deleted or Missing Files with Recoverit
If the file or folder is genuinely deleted, missing from Trash and backups, or inaccessible on a storage device that macOS can still detect, stop adding new data to that source. New writes can overwrite data you are trying to recover. At that point, a recovery scan is reasonable.
For deleted Mac files, Recoverit Mac File Recovery follows a select, scan, preview, and recover workflow. The current product page also documents a three-step Mac recovery path.
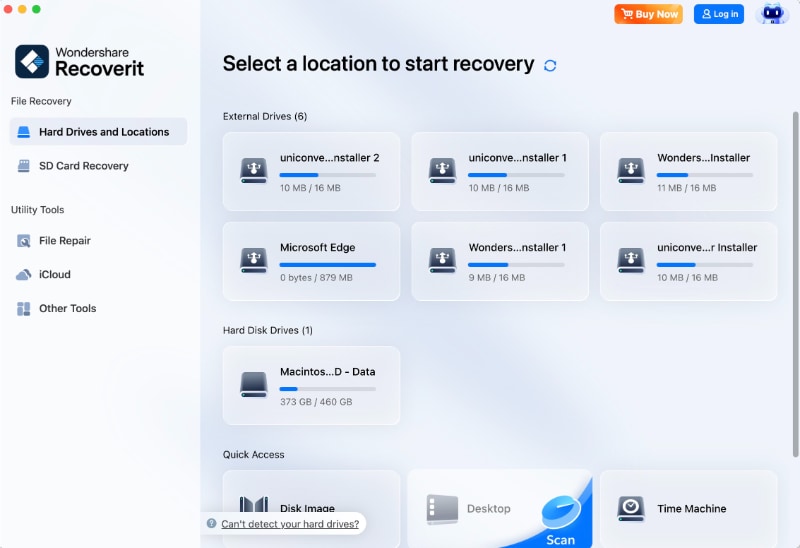
Step 1. Select the original storage location.
Open Recoverit and select the Mac volume, external drive, or location where the file was actually lost. Do not scan unrelated drives.
Step 2. Scan and narrow the results.
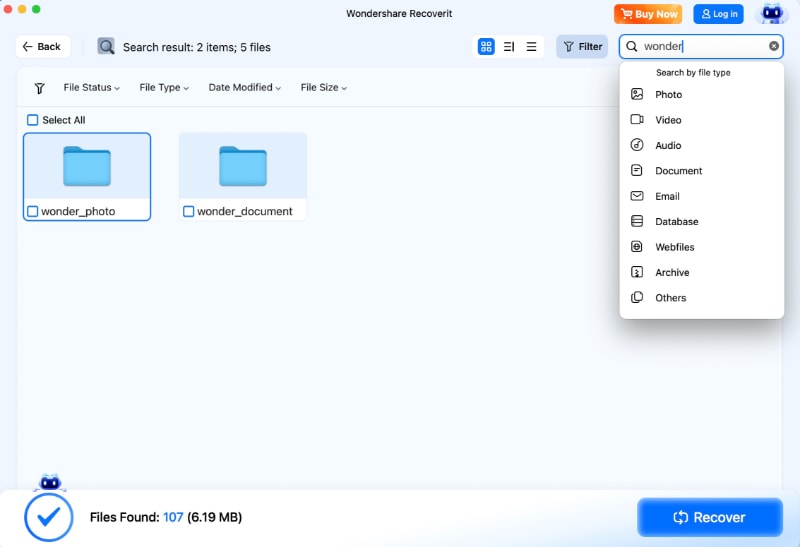
Start the scan and use available path, file-type, name, or date filters to narrow the results. You can stop once you have found and verified the files you need.
Step 3. Preview and recover to a different location.
Preview recoverable files where possible, choose the correct items, and save recovered data to a different healthy drive or location rather than back to the source. No software can guarantee recovery after data has been overwritten.
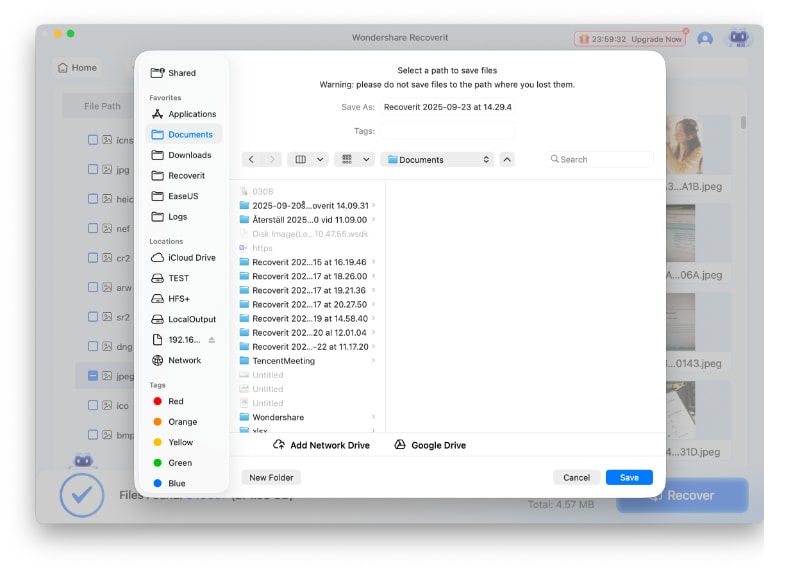
For the complete product workflow, see the Recoverit for Mac user guide.

Part 6. Related Mac Hiding Options
Some searches in this keyword cluster are really about hiding interface elements rather than files. Keep those tasks separate so you do not accidentally change a file's visibility when all you wanted was a cleaner screen.
Hide the Dock on Mac
To make the Dock disappear when it is not in use, choose Apple menu > System Settings > Desktop & Dock, then turn on Automatically hide and show the Dock. To reveal it again temporarily, move the pointer to the screen edge where the Dock is located. Apple documents this setting in the current Desktop & Dock settings guide.

Hiding the Dock does not hide files or folders; it only changes how the Dock is displayed.
Hide Desktop Icons Without Hiding the Files
If your goal is to clear hard-disk, external-disk, server, or other icons from the desktop rather than hide the actual files, use the dedicated guide to hiding desktop icons on Mac. Keeping that task on its own page avoids mixing desktop customization with file privacy.
Conclusion
The best way to hide a normal file or folder on Mac is to apply the hidden flag with chflags hidden. Use Command + Shift + Period (.) only to toggle the visibility of items that are already hidden. If the folder contains information that should genuinely be private, use an encrypted disk image instead of relying on Finder visibility, and remember that FileVault protects the startup disk rather than a single folder.
If a hidden item seems to have disappeared, reveal hidden files, check its path, Trash, and backups before assuming it is deleted. Recoverit belongs only after those checks confirm real data loss and the source storage is still detectable.
FAQ
-
Does Command + Shift + Period hide a normal folder on Mac?
No. The shortcut toggles Finder's display of items that are already hidden. To make an ordinary folder hidden, usechflags hiddenon that specific folder. -
Is a hidden folder on Mac password-protected?
No. A hidden Finder item can be revealed again and should not be treated as secure storage. For confidential files, use an encrypted disk image or another appropriate encryption method. -
How do I create a secret folder on Mac that requires a password?
Use Disk Utility to create an encrypted disk image, choose an encryption option, set a password, and store the confidential files inside the image. Eject the image when you are finished using it. -
Why can I still see a folder after using chflags hidden?
Finder may currently be set to show hidden files. Click the Finder window and press Command + Shift + Period (.) once to hide hidden items from view again. -
How do I unhide a folder that I hid with Terminal?
Reveal hidden items temporarily with Command + Shift + Period (.), then runchflags nohiddenin Terminal, drag the folder into the Terminal window, and press Return. -
Should I use Recoverit if a folder is only hidden?
No. Reveal hidden files and check the path first. Recovery software is appropriate only when the file or folder is actually deleted, lost, or inaccessible rather than merely hidden.


