

 TL;DR:
Use Spotlight (Command-Space) for the fastest system-wide searches by file name or type, and rely on Finder to browse specific paths, apply search criteria, or access your Documents and Applications folders.
● Locate large files consuming disk space via Apple menu > System Settings > General > Storage (on macOS Ventura 13 or later), and manage duplicate media using the Utilities > Duplicates collection inside the Photos app.
● Reveal hidden items in Finder temporarily by pressing Command-Shift-Period, or navigate directly to exact directory paths using Finder's Go to Folder command (Shift-Command-G).
● Check Trash, Time Machine backups, and iCloud Drive—which may display synced folders under Favorites in macOS Tahoe 26 or later—before using recovery software, and always save recovered files to a separate drive to avoid overwriting the source data.
Ask AI for a summary
 ChatGPT
 Perplexity
 Gemini
 Claude
 Grok
Grok
If you are wondering how to find files on Mac, start with Spotlight for a fast system-wide search or Finder when you want to browse a location and narrow results by type, name, date, or other criteria. The same methods work on MacBook Air, MacBook Pro, iMac, Mac mini, and Mac Studio, although some interface details vary by macOS version.
The important distinction is whether a file is simply hard to locate or actually missing. Finder, Spotlight, Storage settings, Photos, iCloud Drive, and hidden-file controls can locate files that still exist. If the item was deleted, check Trash and backups before using recovery software. This guide follows that order so you do not turn a search problem into a data-loss problem.
| What You Need to Find | Best Starting Point | Fastest Path |
| A file, document, app, or folder by name | Spotlight | Press Command-Space, type the name, then select the result. |
| A file inside a known location | Finder | Open Finder, choose the location, then search or sort the folder. |
| Documents or Applications folders | Finder sidebar or Go menu | Open Finder and choose Documents or Applications. |
| Large files using storage space | Storage settings | Apple menu > System Settings > General > Storage. |
| Duplicate photos or videos | Photos | Photos > Utilities > Duplicates. |
| Hidden Finder items | Finder shortcut | Press Command-Shift-Period in the target folder. |
| A file that was deleted or is truly missing | Trash, Time Machine, then recovery | Protect the source first and recover only after built-in options fail. |
In This Article
Part 1. Fastest Ways to Find Files and Folders on Mac
For most searches, you do not need Terminal or a third-party utility. Apple currently positions Spotlight as the fastest broad search and Finder as the main place to browse and organize stored files. Choose the method based on whether you know the filename, the folder, or only part of the file's details.
Use Spotlight for a Fast System-Wide Search
Spotlight is the quickest answer to questions such as how do I find a file on my Mac or how do I find applications on my Mac. Apple's current Mac guide says you can open Spotlight with Command-Space, type what you are looking for, open a result with Return, and hold Command on a selected file to show its location. You can also narrow results by file type such as apps, folders, PDFs, or images. See Apple's current Spotlight search guide.
Step 1. Press Command-Space.
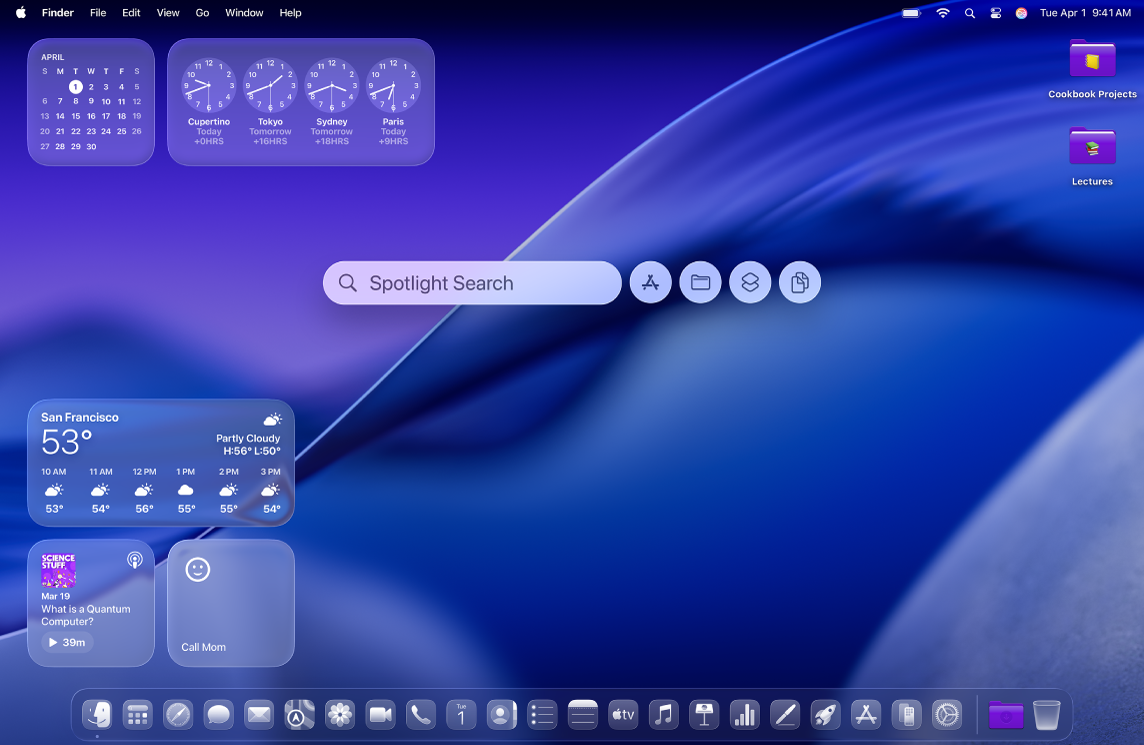
Step 2. Type the filename, a word from the title, an app name, or a file type. If you are looking for a folder, you can use a folder-focused search such as kind:folder. For an application, use kind:application.
Step 3. Select the result. Press Return to open it, or hold Command while the result is selected to see where the file is stored.
Tip: If you only remember part of a document's title, search that phrase first instead of guessing the full filename. Spotlight can also surface files stored in iCloud when they are available to the signed-in account.
Use Finder to Search a Specific Location
Finder is better when you know roughly where the file should be, want to compare files visually, or need search criteria. It is also the clearest way to answer how to find folders on Mac because the sidebar exposes common folders and connected locations in one place. For a deeper Finder walkthrough, see the Recoverit Mac Finder tutorial.
Step 1. Click the Finder icon in the Dock. The current Finder sidebar can show Applications, Desktop, Documents, Downloads, iCloud Drive, external drives, and other locations.
Step 2. Select the folder or drive you want to search. If you want to search the whole Mac, start a Finder search and choose This Mac when that scope appears.
Step 3. Type a search term in Finder's search field and press Return. Apple's current Finder search supports criteria such as Kind and Name, and lets you add more attributes through Other. See Apple's Finder search criteria guide.
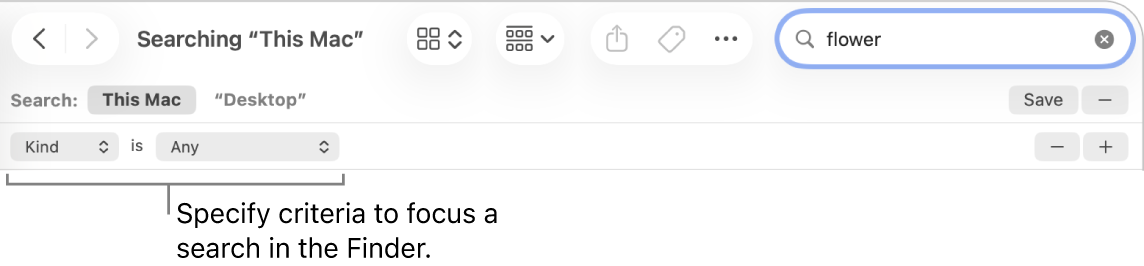
Step 4. Add or remove criteria with the plus and minus controls. You can also save a useful search as a Smart Folder so it updates automatically without moving the original files.
Check Recents, Downloads, and Quick Look
If the file was opened or downloaded recently, browsing can be faster than searching. Finder's Recents view is useful for recently accessed work, while Downloads is the normal first stop for browser downloads and attachments saved to disk.
- Recents: Open Finder and choose Recents, then sort or group by date to narrow the list.
- Downloads: In Finder, choose Go > Downloads or open Downloads from the sidebar.
- Quick Look: Select a file and press Space to preview it without opening the full app. Apple documents this behavior in its current Quick Look guidance.
These checks are especially useful when you know what the file looks like but not its exact name.
Part 2. How to Find Documents, Folders, and Applications on Mac
The keyword "file" can hide several different tasks. A user looking for a Word document, a folder path, or the Applications folder needs a more direct route than a general system search, so the next methods separate those intents.
Find the Documents Folder and Individual Documents
To find a normal local document, open Finder and choose Documents in the sidebar. If Documents is not shown there, choose Go > Home and open the Documents folder from your home folder, or search the document by name in Spotlight.
If you use iCloud Drive for Desktop and Documents, the location can look different. Apple says that in macOS Tahoe 26 or later, Desktop and Documents can appear under iCloud Drive in the Finder sidebar under Favorites, with cloud icons next to them. Earlier macOS versions place them in the iCloud section. See Apple's current iCloud Desktop and Documents guidance.
If the Documents folder itself is missing from the Finder sidebar, use the Recoverit guide to restore a missing Documents folder on Mac before assuming the files were deleted.
Find Any Folder or Open a Folder by Path
If you know a folder's name, Spotlight and Finder both work. If you know its path, Finder's Go to Folder command is faster and avoids browsing through multiple nested folders.
- Activate Finder.
- Choose Go > Go to Folder, or press Shift-Command-G.
- Enter a path such as ~/Documents or ~/Downloads, then press Return.
Use this carefully with system locations. Opening a folder is safe, but deleting or moving unfamiliar system or app-support files can cause software problems.
Find the Applications Folder on Mac
For how to find the application folder on Mac, open Finder and click Applications in the sidebar. You can also choose Go > Applications or press Shift-Command-A. Apple's Finder documentation describes Finder as the place to browse apps, documents, downloads, and other stored items.
If you are looking for one app rather than the folder itself, press Command-Space and type the app name. Spotlight is usually faster than scrolling through the Applications folder.
Part 3. How to Find Large Files on Mac
Large-file searches have a different goal: you usually know the files exist but want to see what is consuming storage. Start with macOS Storage settings because it summarizes categories across the startup disk, then use Finder when you need to inspect a specific folder or narrow candidates.
Use System Settings to Find Storage-Heavy Files
On macOS Ventura 13 or later, Apple directs users to Apple menu > System Settings > General > Storage. The Storage view shows categories and offers additional details for categories such as Applications and Documents. Apple's July 2026 Free up storage space on Mac article confirms this current path.
Step 1. Open Apple menu > System Settings > General > Storage and wait for the categories to calculate.
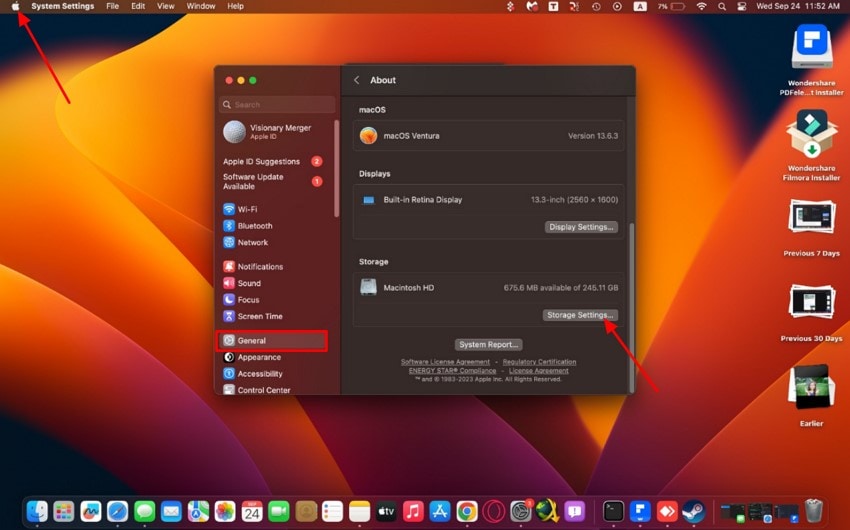
Step 2. Review Documents, Applications, Photos, Trash, and other categories that have useful details. Do not delete an item just because it is large; first confirm that it is a personal file, an app you no longer need, or data you have safely backed up.
Step 3. If a category opens a detailed list, sort or inspect the files before removing anything. Avoid manually deleting unknown files from System Data or system folders.
Use Finder to Narrow and Sort Large Files
Finder is useful when you want to inspect one folder or drive rather than the entire storage summary. Apple's current Finder lets you use List view with file details, group by Size, and build searches using multiple criteria.
- Open the folder or drive in Finder.
- Switch to List view so file sizes are easier to compare.
- Sort or group by Size when that column or grouping option is available.
- For a more targeted search, start a Finder search, click the plus control, and add criteria. Choose Other if the attribute you need is not shown in the first menu.
When freeing storage, move important large files to a verified backup or external drive before deleting the original. Size alone does not tell you whether a file is safe to remove.
Part 4. How to Find Duplicate Files on Mac
Duplicate searches need extra care because two files with the same name or size are not automatically identical. Apple provides a dedicated duplicate detector for photos and videos in Photos. For general documents and other files, Finder is best used to narrow possible duplicates before you manually verify them.
Find Duplicate Photos and Videos in Photos
Apple's Photos app automatically places detected duplicate photos and videos in the Duplicates collection under Utilities. Apple notes that the collection can take time to appear while Photos analyzes a large library. The current workflow is documented in Apple's duplicate photos and videos guide.
Step 1. Open Photos and choose Utilities > Duplicates.
Step 2. Review the pairs or groups. Select the items you want to combine and use Merge only after confirming they are the intended duplicates.
Step 3. Remember that merged-away items go to Recently Deleted, where Apple says they remain recoverable for 30 days unless you permanently delete them sooner.
Find Duplicate File Candidates in Finder
For duplicate PDFs, documents, downloads, or project files, Finder can narrow candidates by name, kind, date, location, and other metadata. A Smart Folder can keep the search updated. However, matching names or sizes are clues, not proof that file contents are identical.
- Open Finder and search This Mac or a specific project folder.
- Add criteria such as Kind, Name, or date, then switch to List view.
- Compare filenames, sizes, dates, and Quick Look previews.
- Open questionable files before deleting either copy, especially for projects, archives, app libraries, and synced folders.
This conservative workflow is slower than blindly deleting matches, but it reduces the chance of removing a version that only looks duplicated.
Part 5. How to See Hidden Files and Folders on Mac
Hidden files are not the same as deleted files. macOS and apps intentionally hide configuration and support data, so the safest approach is to reveal hidden items temporarily and avoid modifying anything you do not recognize.
Reveal Hidden Finder Items Safely
Open Finder, go to the folder you want to inspect, then press Command-Shift-Period. Press the same shortcut again to hide those items when you are done. Recoverit's dedicated guide to showing hidden files on Mac covers the shortcut, the hidden user Library folder, Photos hidden items, and Terminal options in more detail.

If you specifically need the hidden user Library folder, open Finder, click Go in the menu bar, hold Option, and choose Library, or use Go > Go to Folder and enter ~/Library.
Note: Revealing hidden files does not recover deleted data. If the item still does not appear, continue with the location and recovery checks below instead of changing system settings.
Part 6. What to Check When You Still Cannot Find a File
When Finder and Spotlight return nothing, do not immediately conclude that the file was deleted. Sync settings, a different user account, Trash, a backup, or search scope can all explain why an existing file is not appearing where you expect.
Check iCloud Drive and the Correct Mac Account
If Desktop and Documents are synced with iCloud Drive, look in Finder's iCloud Drive area as well as local folders. On macOS Tahoe 26 or later, Apple says those folders can appear under Favorites with cloud icons. Also confirm that you are signed in to the Apple Account and Mac user account that originally stored the file.
If you use more than one Mac with iCloud Desktop and Documents, Apple may place files from another Mac inside a folder named for that Mac. Search iCloud Drive before moving or recreating the file.
Check Trash and Time Machine Before Recovery
If a file was deleted, check Trash first. If it is there, restore it with Put Back. If Trash is empty but you have a Time Machine backup, use the backup before scanning the disk with recovery software. Apple states that Time Machine backups can restore files even after the originals were deleted from the Mac; see Apple's Mac backup and restore guidance.
Using a backup is preferable because it restores a known saved copy without scanning potentially overwritten storage.
Check Search Scope and Spotlight Exclusions
A Finder search can be limited to the current folder instead of This Mac, and Spotlight can exclude locations from its index. If results look incomplete, re-run the search with the correct scope and review Spotlight search settings before assuming the file is gone.
You can also search by type. Apple's current Spotlight search supports terms such as kind:folder, kind:application, and kind:pdf, which are useful when common filenames create too many results.
Part 7. Recover a Deleted or Truly Missing File With Recoverit
Recovery software belongs at the end of the decision path, not at the beginning. Use it only when the file is actually deleted, formatted, inaccessible, or absent from Trash and available backups. If the file still exists but is merely hidden or stored elsewhere, the built-in methods above are safer and faster.
When Recovery Software Is Appropriate
Recoverit for Mac is relevant when a previously saved file is missing because of deletion, formatting, or logical data loss and the storage device is still detected. Wondershare's current Mac guide also states that it does not support physically damaged storage devices or overwritten files.
- Stop writing to the source: Installing apps, copying files, or downloading data to the same storage can overwrite recoverable data.
- Use a different destination: Save recovered files to another healthy drive or location, not back to the source.
- Do not expect a guarantee: Recovery depends on whether the original data has been overwritten and whether the device remains readable.
- Escalate physical damage: If a storage device repeatedly disconnects, makes unusual noises, smells burnt, or has liquid damage, stop scanning and use a professional recovery service.
Recover Missing Files on Mac Step by Step
Once you have ruled out Finder, Spotlight, iCloud, Trash, and backups, the current Recoverit for Mac guide follows a Select - Scan - Preview - Recover workflow.
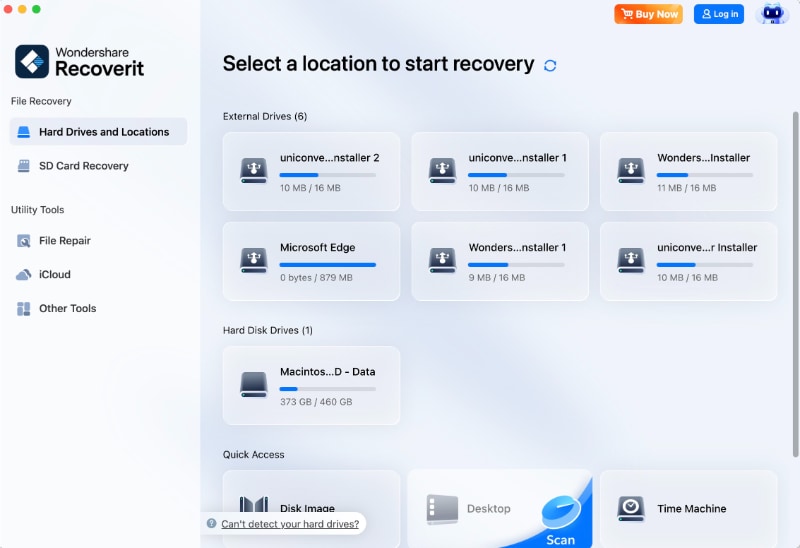
Step 1. Select the source location
Open Recoverit and choose the drive, Desktop, or a specific folder where the file was lost. If you know the old folder path, selecting that narrower location can make the result set easier to review.
Step 2. Scan and narrow the results
Start the scan. The current Mac guide says results can be narrowed by file type, time, file size, and whether files are deleted. Use the search box when you remember part of the filename.

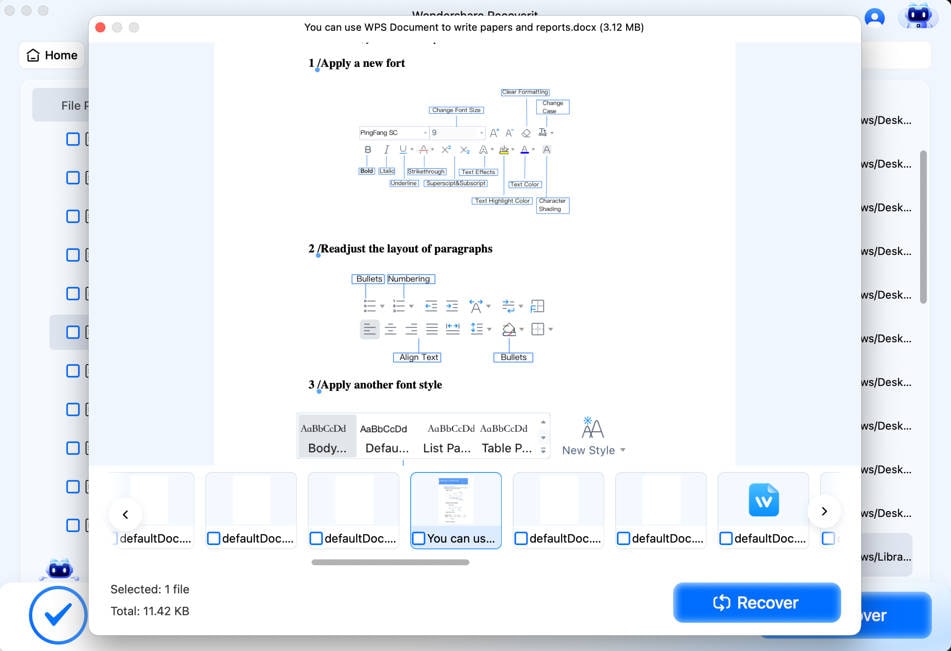
Step 3. Preview the file
Preview a candidate before recovery when the file type supports preview. This helps distinguish similarly named documents and reduces unnecessary restores.
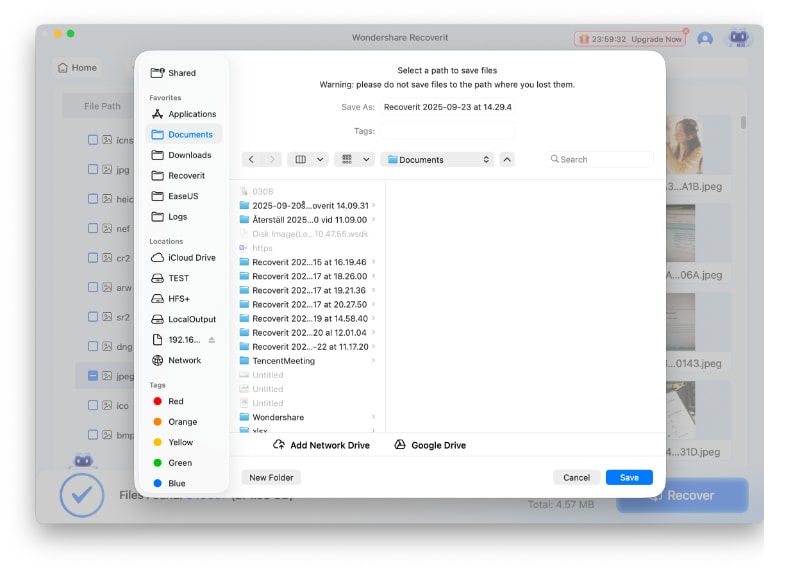
Step 4. Recover to a different healthy location
Select the confirmed files, click Recover, and choose a destination different from the storage where the files were lost. This is the safe-save instruction in Wondershare's current Mac guide.
Conclusion
The fastest way to find a normal file on Mac is usually Spotlight; Finder is better when you know the location or need filters, previews, or folder navigation. Documents and Applications are available through Finder, large-file searches should start in System Settings > General > Storage, duplicate photos belong in Photos > Utilities > Duplicates, and hidden Finder items can be revealed with Command-Shift-Period.
If a file still cannot be found, check iCloud Drive, the correct user account, Trash, Time Machine, and search scope before treating it as lost. Only after those checks fail should you move into data recovery, stop writes to the source, and save recovered files somewhere else.
FAQ
-
How do I find files on a MacBook Air or MacBook Pro?
Press Command-Space to open Spotlight and type the filename, app name, or file type. For a location-based search, open Finder, choose a folder or This Mac, and use the search field. These methods work across current MacBook Air and MacBook Pro models. -
How do I find the Applications folder on Mac?
Open Finder and click Applications in the sidebar. You can also choose Go > Applications or press Shift-Command-A. If you only need one app, Spotlight is usually faster. -
How can I find large files on my Mac?
On macOS Ventura 13 or later, open Apple menu > System Settings > General > Storage and review categories such as Documents and Applications. You can also use Finder List view and search criteria to inspect a specific folder or drive. -
How do I find duplicate files on Mac?
For photos and videos, open Photos > Utilities > Duplicates and review Apple's detected groups. For other file types, use Finder to narrow candidates by name, kind, date, and size, then verify contents before deleting anything. -
How do I see hidden folders on Mac?
Open Finder in the target folder and press Command-Shift-Period. Press the same shortcut again to hide hidden items. For the user Library folder, open Finder's Go menu while holding Option, or use Go to Folder and enter ~/Library. -
Why can Spotlight not find a file that I know exists?
Check whether the file is in iCloud Drive, another user account, an excluded Spotlight location, or a folder outside your current Finder search scope. Re-run the search in This Mac and review Spotlight search settings before assuming the file was deleted.


