

 TL;DR:
Mac users can run Windows operating systems or specific applications by choosing native dual-booting, virtualization, remote access, or translation layers depending on their specific processor architecture and performance needs.
● Boot Camp Assistant provides full native hardware access tailored for gaming and high-performance tasks, but it requires a system reboot, an active Windows license, and is exclusively restricted to Intel-based Macs.
● Virtualization applications like UTM and VMware Fusion support both Intel and Apple Silicon Macs (M1, M2, M3, M4), enabling instant side-by-side OS switching without rebooting, though UTM setup requires at least 100 GB of free storage.
● Wine and CrossOver offer a storage-efficient alternative for casual users needing single-app utilities, allowing the direct execution of Windows .exe files on Mac without installing a full Windows operating system or purchasing a Windows license.
Ask AI for a summary
 ChatGPT
 Perplexity
 Gemini
 Claude
 Grok
Grok
By launching Windows on Mac, users have the powerful flexibility to enjoy the advantages of both operating systems on a single device. Whether you want to download Windows-only software or access specific productivity tools, Mac owners can easily access them after downloading Windows.
With dual booting, Mac users with Intel processors can efficiently run Windows as their primary operating system with complete utility control. If you are exploring how to run windows on mac, this is the right place. In this article, we have listed some of the best methods that you can opt for to turn your macOS into a Windows OS.
Try Recoverit to Perform Mac Data Recovery
 Security Verified. 3,591,664 people have downloaded it.
In this article

Benefits of Choosing to Run Windows on Mac
Before you dive into the best way to run Windows on Mac, first, you should explore what the real benefits of choosing Windows on Mac are:

- Access to Exclusive Applications: Easily use Windows-only programs (like certain engineering, finance, or business tools) that aren’t available or optimally supported on macOS.
- Gaming Possibilities: Many top games and game libraries are designed for Windows, so running Windows on a Mac enables access to them.
- Best of Both Worlds: You can seamlessly switch between macOS and Windows for tasks that each system does best, accordingly.
- No Need for Multiple Devices: After downloading Windows on the same computer, you can cut down the cost of buying an extra computer.
- Enhanced Productivity: By using both OS on the same setup, easily switch between them, and it will eventually boost the overall productivity.
Which is the Best Method to Run Windows on a Mac
Here we have provided a quick breakdown of all the methods mentioned below to Run Windows programs on Mac for your better understanding:
| Features | Boot Camp Assistant | Virtualization | VMware Fusion | Remote Desktop software | Cloud PCs to Run Windows on Mac | Wine & CrossOver |
|---|---|---|---|---|---|---|
| Compatibility | Intel Macs only | Intel & Apple Silicon Macs | Intel & Apple Silicon Macs | All Macs + Windows PC | All Macs (Web/Apps) | Intel & Apple Silicon Macs |
| Setup Complexity | Moderate | Moderate | Easy/Moderate | Easy | Easy | Easy |
| Storage Usage | High (dual OS) | High (VM + OS) | High (VM + OS) | Minimal (client app) | Minimal (browser/app) | Very low |
| Performance | Full native | High (virtualized) | High (virtualized) | Varies (network) | High (cloud-hosted | Moderate |
| Switching | Reboot required | Instant | Instant | Instant | Instant | Instant |
| Key Advantages | Native Windows, hardware access, full compatibility | Mac & Windows side-by-side, easy sharing | Advanced controls, device integration | Secure, no local Windows install, remote control | IT admins, remote work | Enterprises, teams |
| Cost | Free (built-in) | Free (personal)/Paid | Free (personal)/Paid | Free | Paid/subscription | Free (Wine)/Paid (CrossOver) |
| Ease of Use | Moderate (stepwise guide) | Easy-Moderate (GUI-driven) | Easy (wizards & presets) | Easy (app-based setup) | Easy (login and launch | Easy (direct run/install) |
| Best For | Gamers, high-perf apps | Developers, multitaskers | Power users | IT admins, remote work | Enterprises, teams | Casual users, single apps |
6 Ways to Run Windows on Mac | Detailed Guide
Here, we will explore the 6 most efficient methods that you can utilize to Run Windows programs on Mac instantly:
Boot Camp Assistant (Intel Macs Only)
Best For: Gamers and high-performance app users.
Downloading Windows on a Mac with Boot Camp is an efficient method that provides full compatibility with Windows applications. With this method, Mac will allow all hardware devices, including CPU, GPU, and memory, without sharing them between both OS. You can efficiently run features like Bluetooth, Wi-Fi, cameras, and drivers that work just like on Windows. Furthermore, it provides easy switching, so let's drive into its stepwise guide:
Step 1. Go to the Microsoft website, select the Windows edition as "Windows 10 (multi-edition ISO)" and click "Confirm." Afterwards, select the "Product Language" to "English" and hit the "Confirm" button.

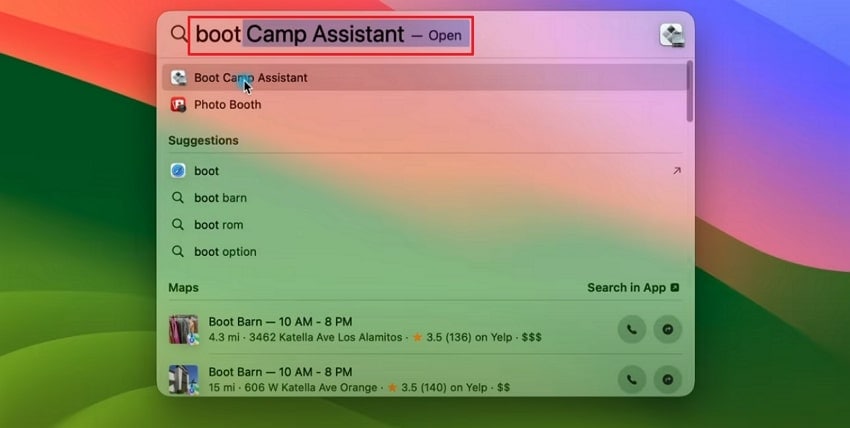
Step 2. Next, connect your USB device to your Mac and open “Boot Camp” using the Finder tool.
Step 3. At the end, tap on the Windows drive and hit the “Continue” button to initiate the process.

Virtualization (Intel & Apple Silicon Macs)
Best For: Developers and multitasking individuals.
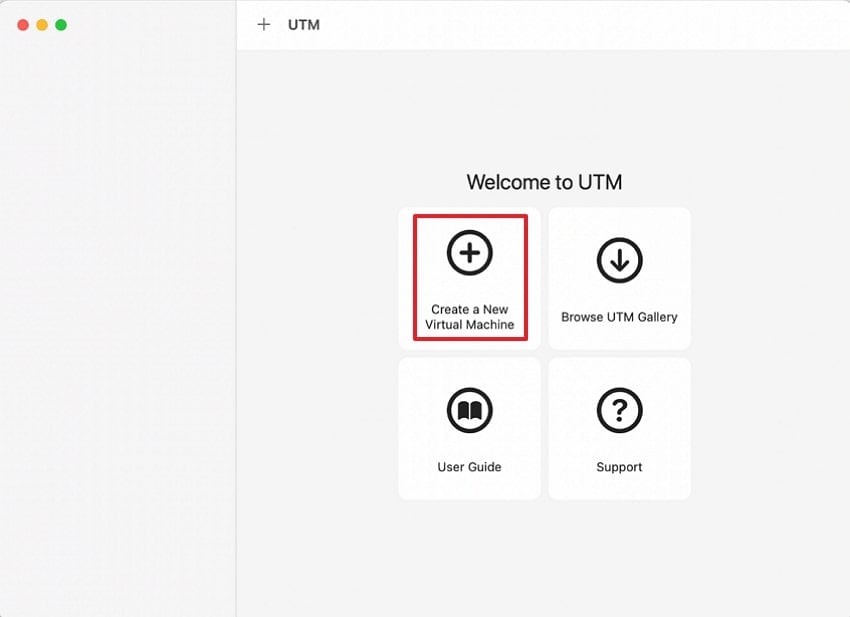
To run a Windows virtual machine for Mac, you need to download an app known as UTM, which consists of all the software, but in a user-friendly GUI. Unlike Boot Camp, virtualization doesn't require rebooting; users can switch between systems instantly without interruption. However, before starting the method, make sure your device has at least 100 GB of free storage. Upon hearing about this method, let's dive into its detailed stepwise guide:
Step 1. Initiate by going to the App Store, downloading the “UTM” app, and clicking on "Download a New Virtual Machine" upon entering the tool.
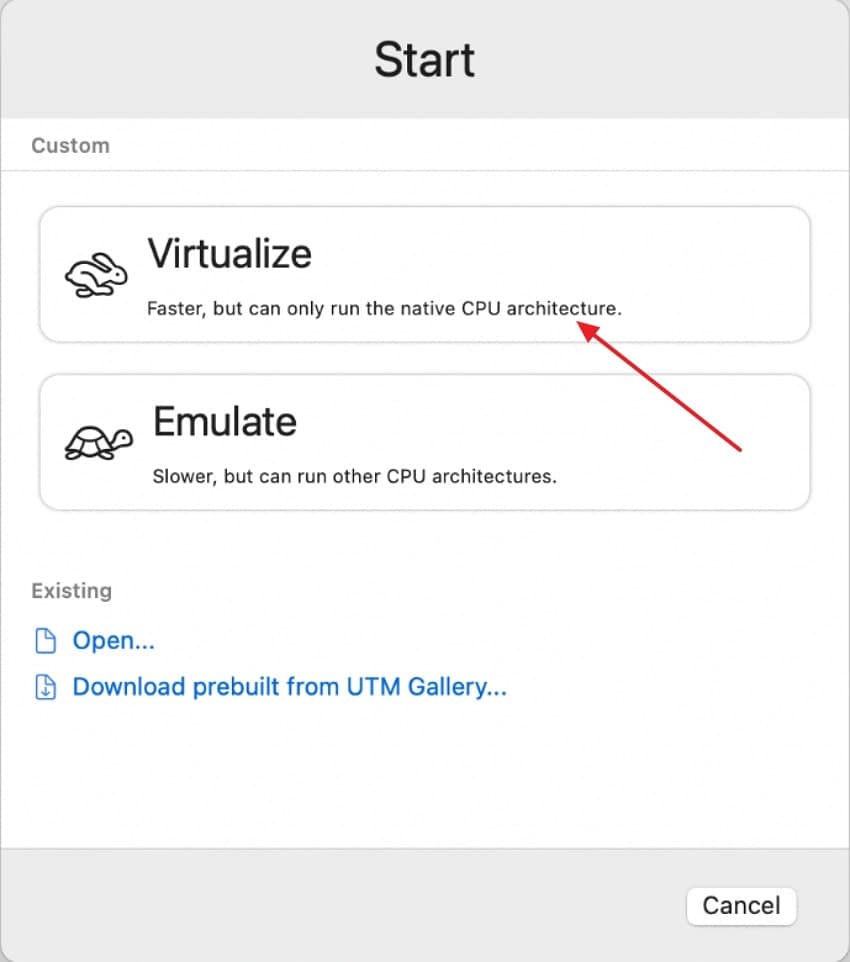
Step 2. Here, a pop-up will appear; tap on the “Virtualize” option available to get to the next screen.
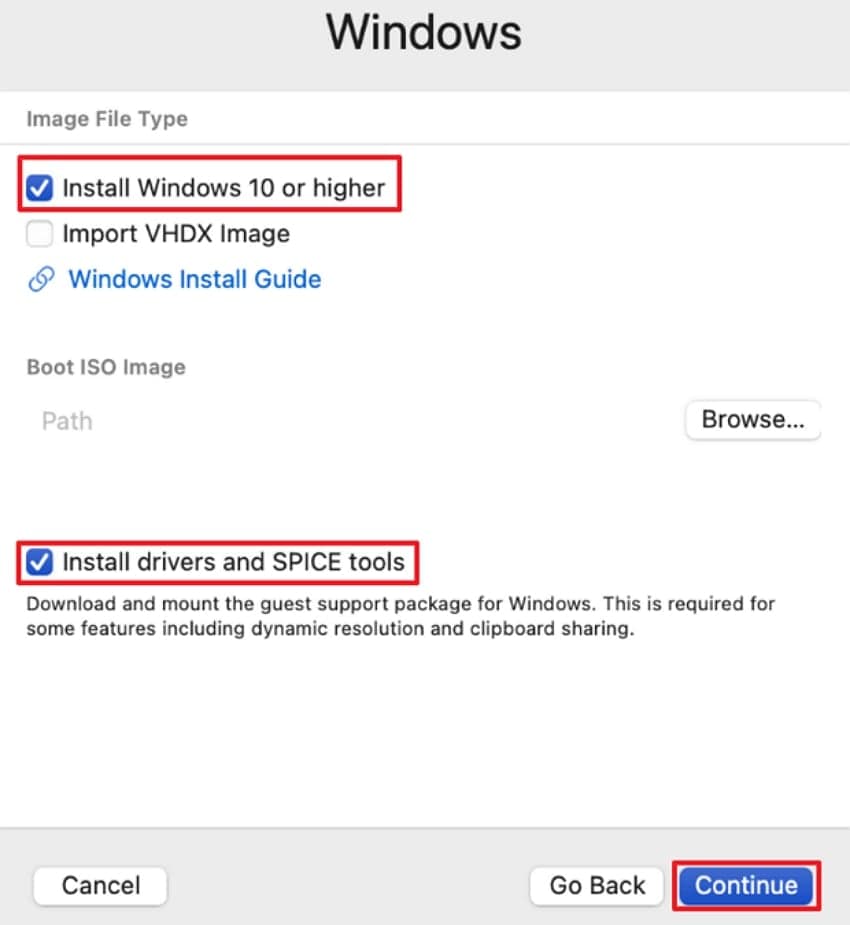
Step 3. Toggle the "Install Windows 10 or Higher" and "Install Drivers and Spice Tools". Next, tap on the "Continue" button available at the bottom.
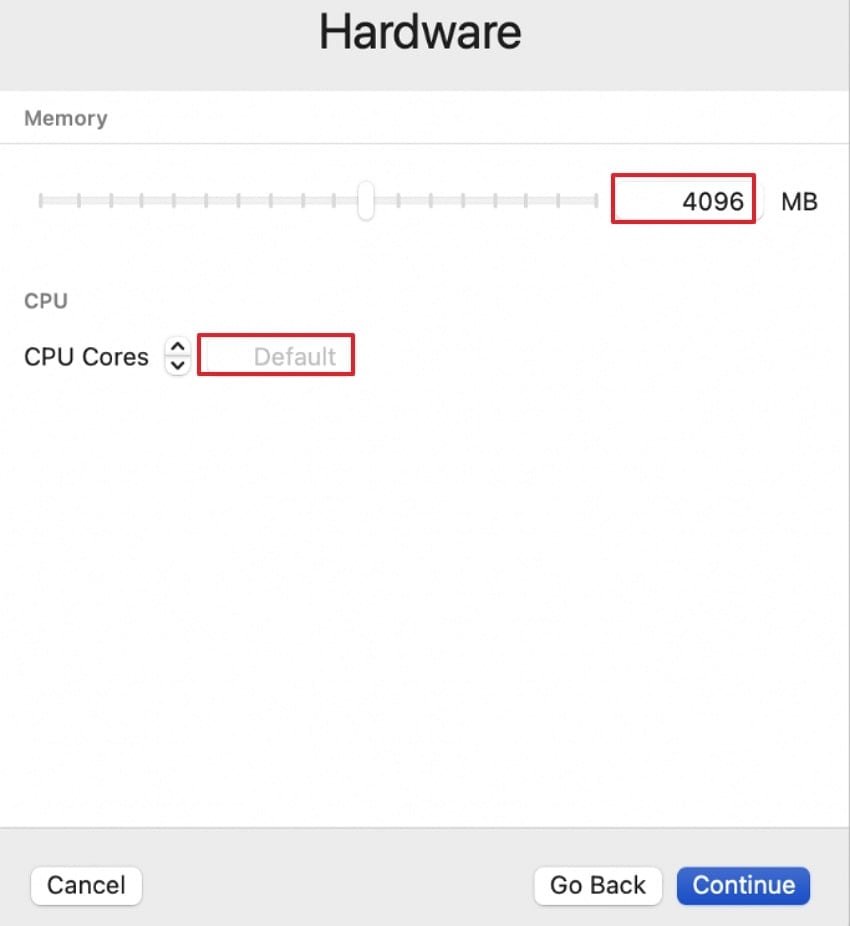
Step 4. Here, select the amount of memory, number of CPU cores, and hit the “Continue” button.
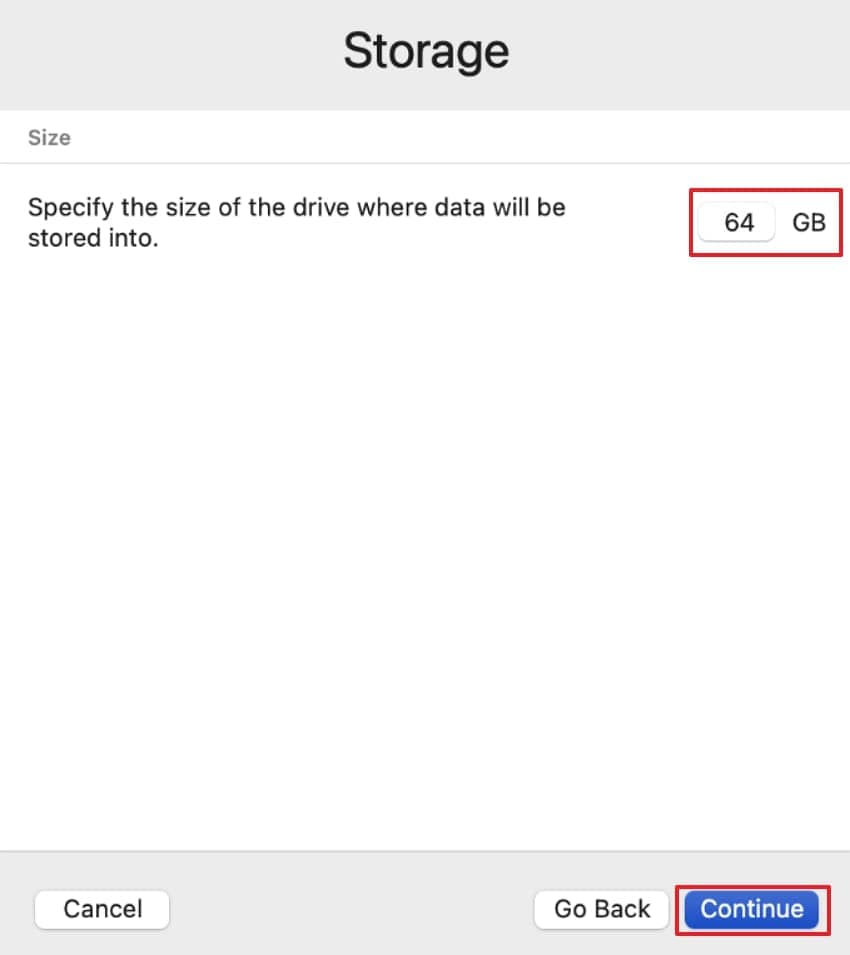
Step 5. Choose the desired “Storage” from the given options and tap on the “Continue” button.
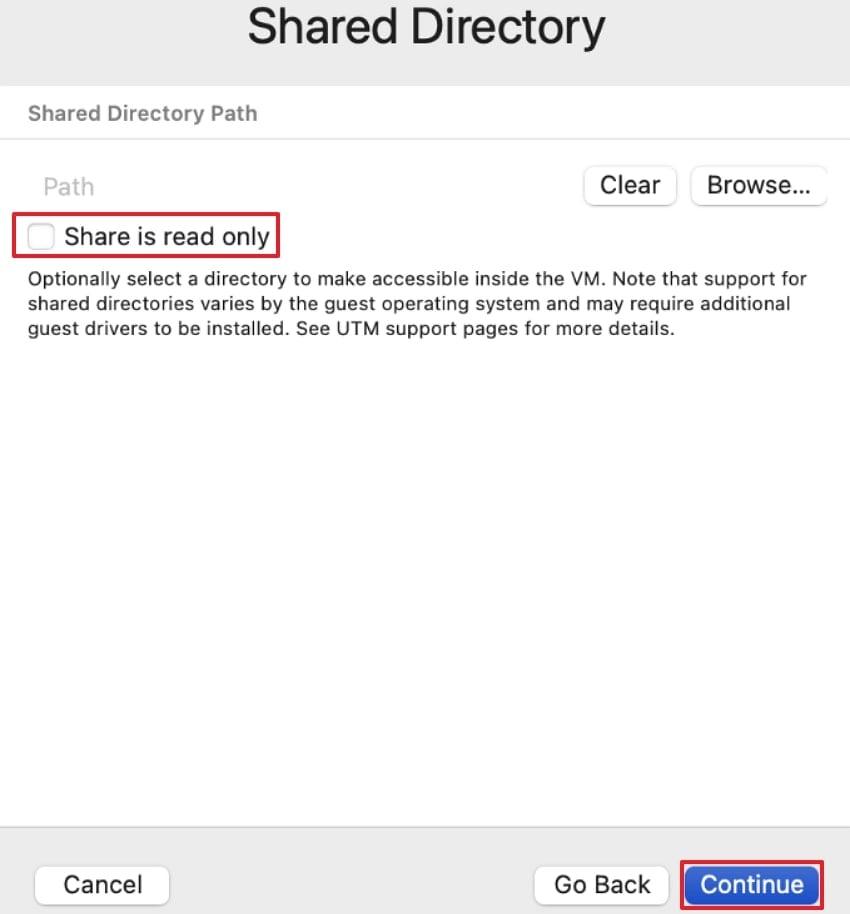
Step 6. Next, it will show you the “Shared Directory” from where you can easily share your data from a Mac to a virtual device and vice versa.
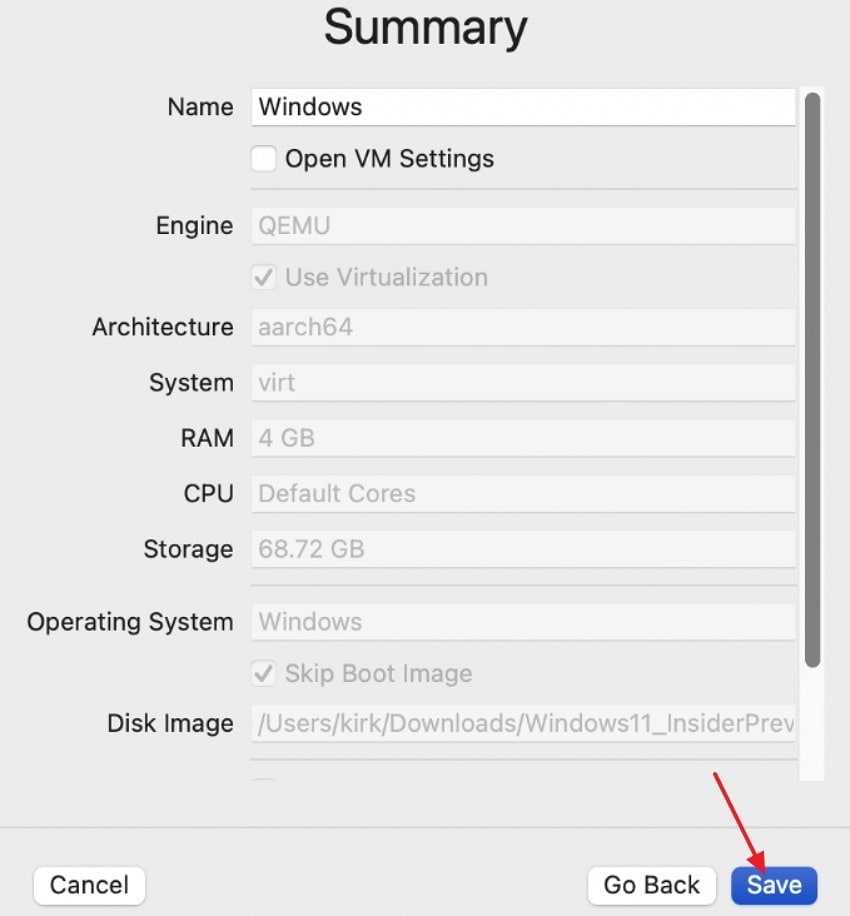
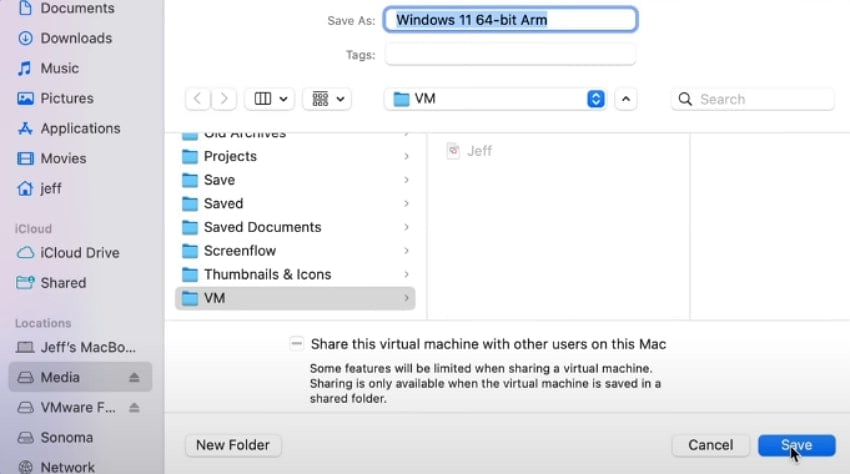
Step 7. At the end, it will show you the whole summary of all your selected settings. Here, write the "Name" and hit the save button to initiate the process.
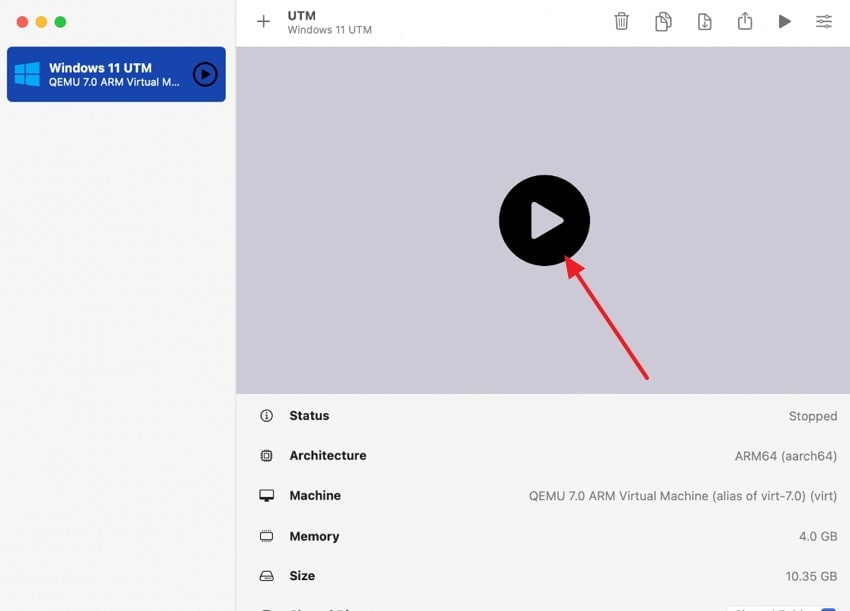
Step 8. Click on the “Arrow” sign available to launch the virtual machine.
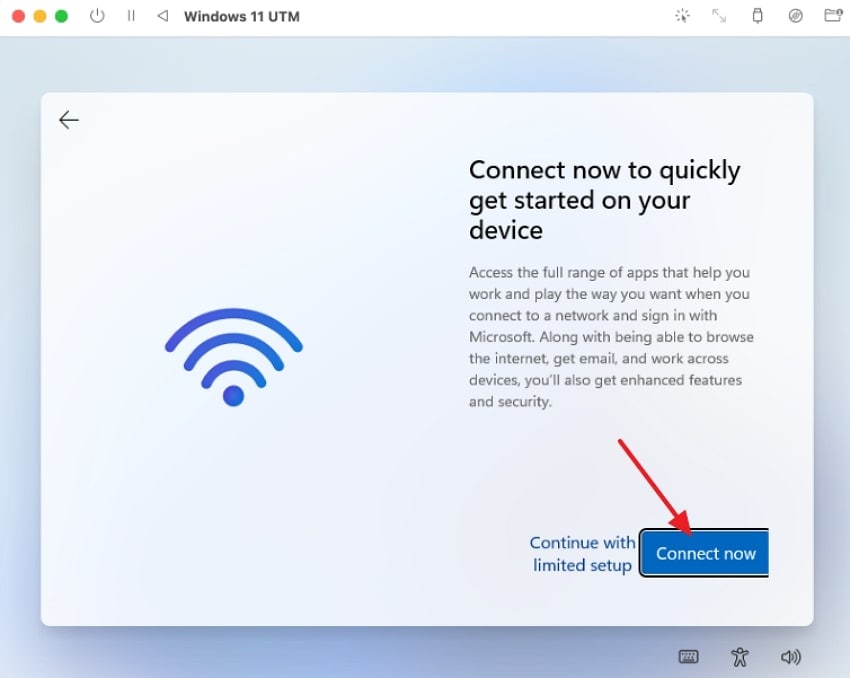
Step 9. Finally, tap on the “Connect Now” button to set up the virtual machine on the device properly.
Use VMware Fusion
Best For: Users with powerful utilities and needs.
If you want full-featured virtualization and want to use Windows and Mac side-by-side, the best way to run Windows on Mac is VMware Fusion. It supports both Intel and Apple Silicon Macs, making it versatile for all Mac users. Furthermore, it provides advanced customization such as allocating RAM, CPU cores, and storage, or connecting a USB. All in all, this method is ideal for multitaskers for managing tasks, so follow the given guide.
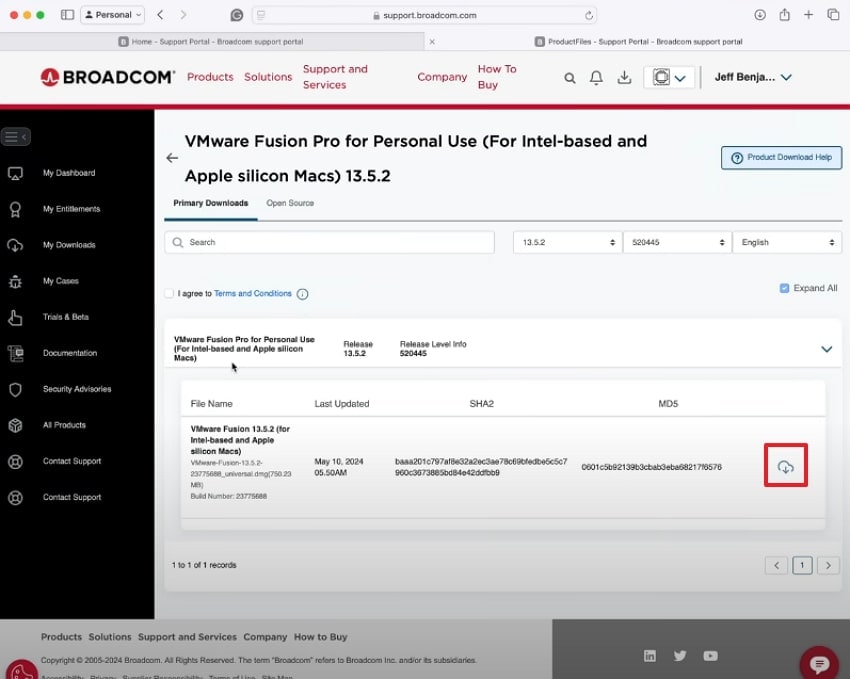
Step 1. Initiate by going to the Broadcom website and downloading VMware software by clicking on the "Download" icon.
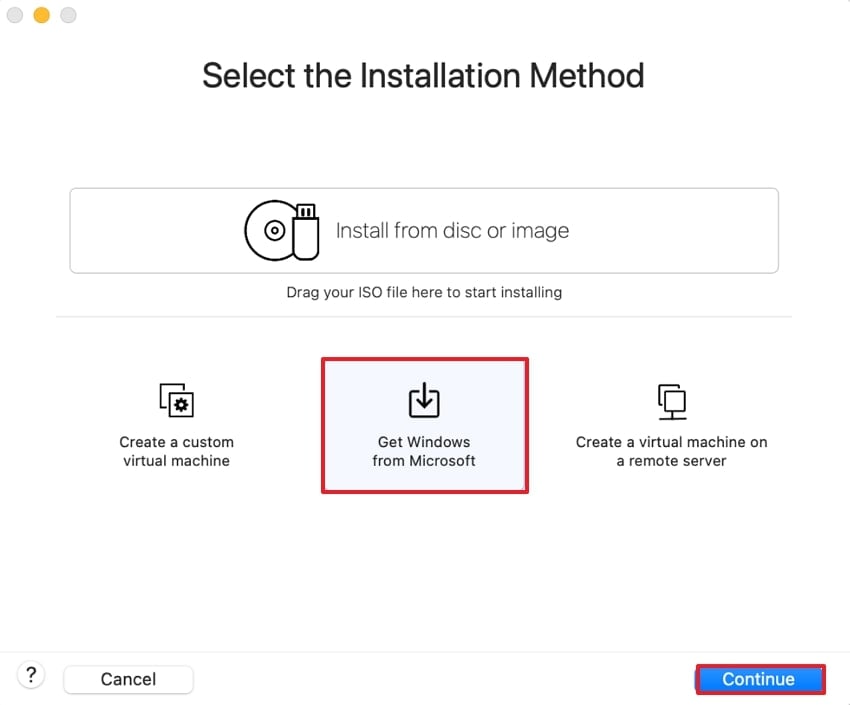
Step 2. Here, click on the "Get Windows from Microsoft" option and hit the “Continue” button.
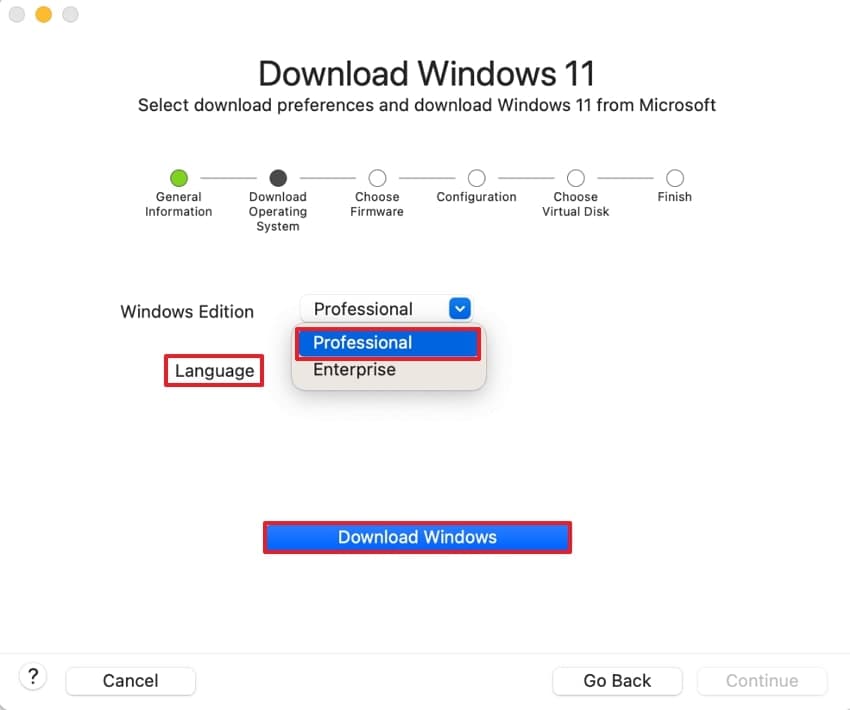
Step 3. Now choose the “Professional” mode, choose the language, and hit the "Download Windows" button. It will take some time to get the process done, and after it is completed, hit the "Continue" button.
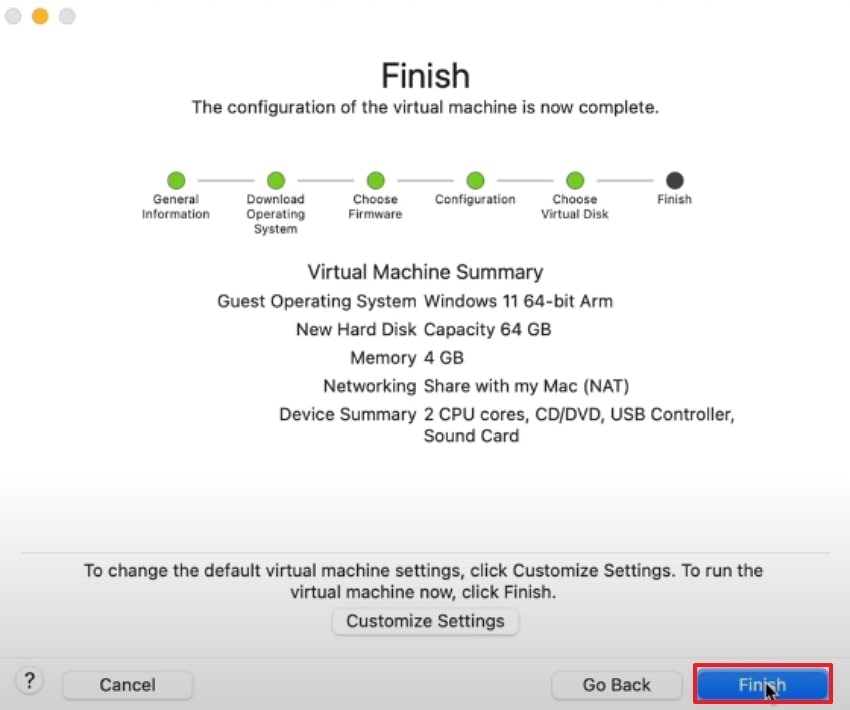
Step 5. Here, click on the “Finish" button to get Windows installed on your Mac device.
Access Windows Remotely Via Remote Desktop Software
Best For: IT admins and individuals working remotely.
To run windows on mac, you can use this method by downloading remote desktop software. It gives full control of a Windows PC from a Mac, even if the two devices are physically distant. Like other methods, it doesn't require downloading another operating system as it can connect through the network instead. It is a secure method as it doesn't allow sharing files over insecure channels, so have a look at the detailed guide:
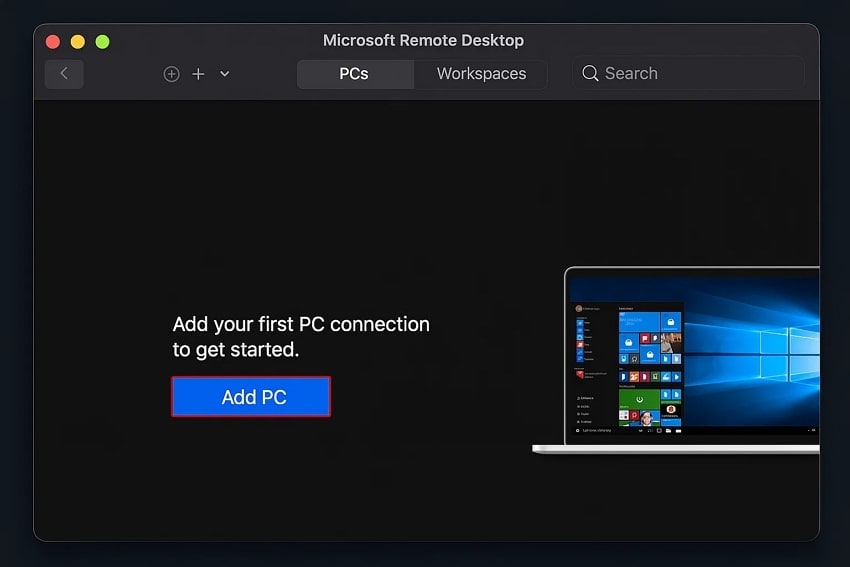
Step 1. From the Mac App Store, download the "Microsoft Remote Desktop or Windows App." Once you enter the app, begin the setup process.
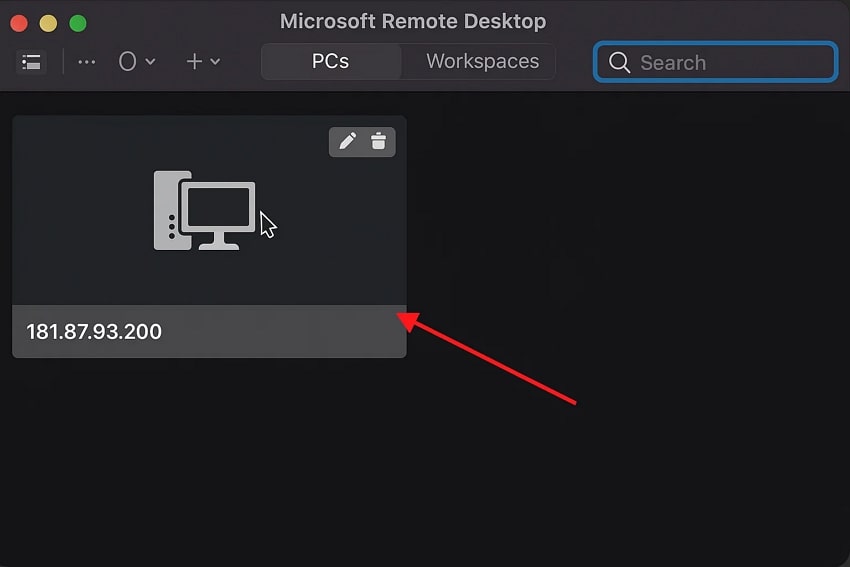
Step 2. Ensure that you have enabled its permission by going to your Mac settings. Within the Remote app, click on “Add files” to add all the credentials of other Windows PCs.
Step 3. After a while, your screen will start showing another screen, so you can switch to another Windows at any time.
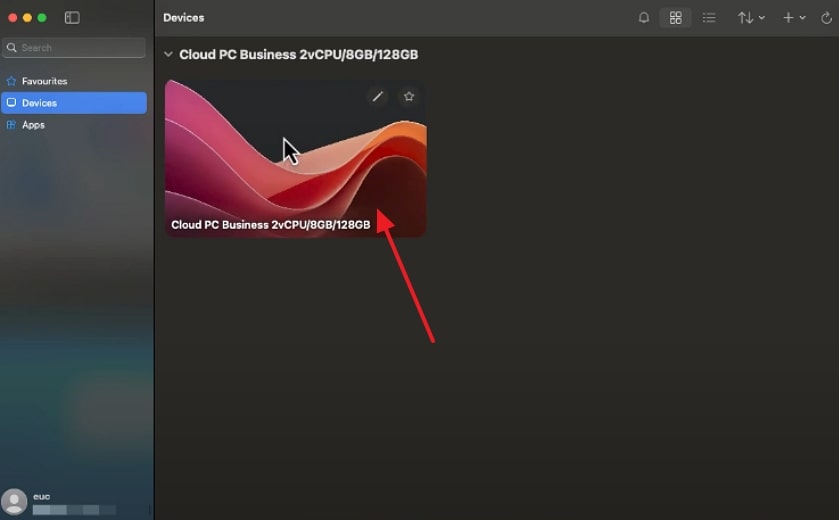
Use Cloud PCs to Run Windows on Mac
Best For: Enterprises and teams for broader connectivity.
Using Cloud services to run windows on mac is ideal for those seeking immediate convenience without having to download a separate operating system. This method allows full Windows access from any Mac, anywhere with an internet connection, and ensures up-to-date performance. By providing complete security data, apps, and user sessions are fully encrypted and stored in the cloud. Furthermore, it provides Microsoft Teams support, so go through the given guide:
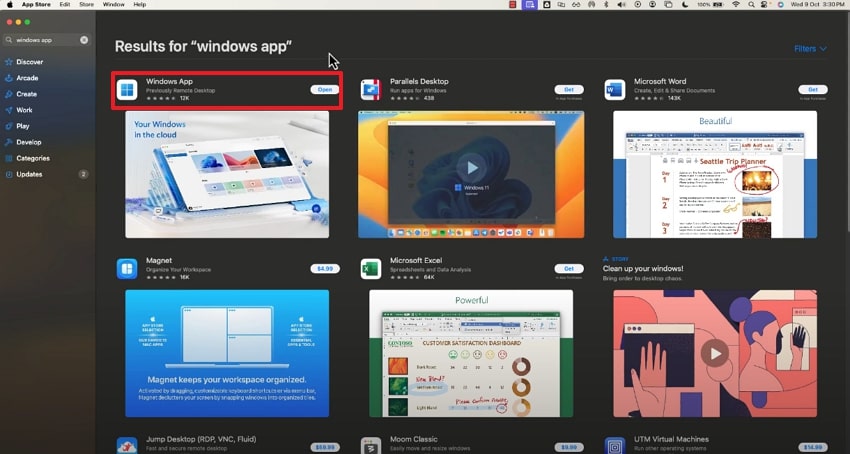
Step 1. To begin, go to the App Store and search for the “Windows” app to download for your Mac device.
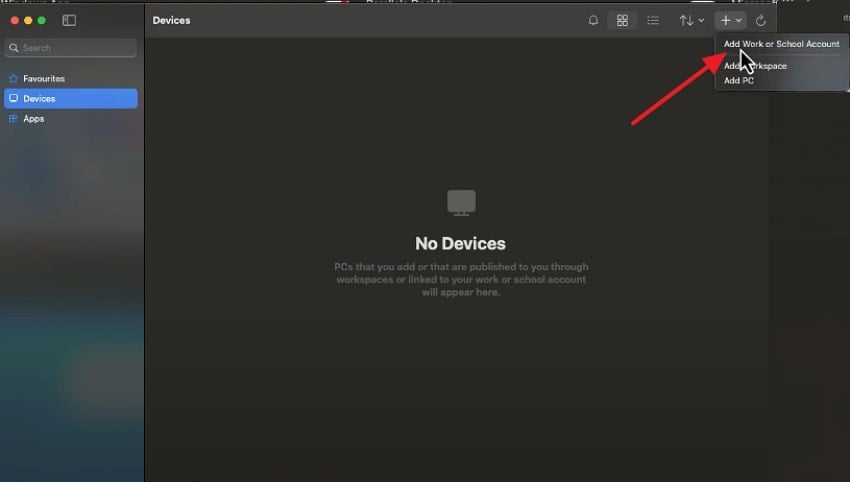
Step 2. Upon entering the tool, click on the "+" icon to further select "Add work or select Account."
Step 3. After adding your credentials, it will start showing a Cloud PC named folder from where you can easily switch to Windows whenever you want.
Wine & Crossover
Best For: Basic users with a single-app utility.
It is one of the fastest ways for users who only need specific Windows programs without installing Windows itself. You simply need to download a file and execute it to run windows on mac without downloading it. The foremost advantage is that it uses very little storage as compared to other methods. Apps load quickly, run smoothly, and seamlessly integrate with Mac’s desktop environment, so have a look at the following detailed guide:
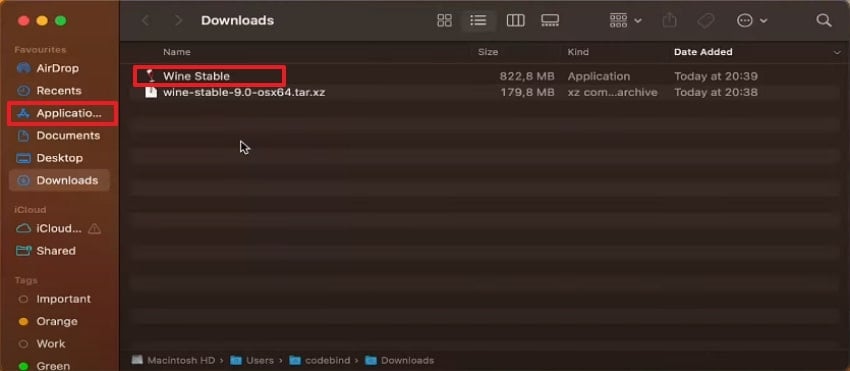
Step 1. Go to the “Wine” website and download the Windows application or .exe file you want to run.

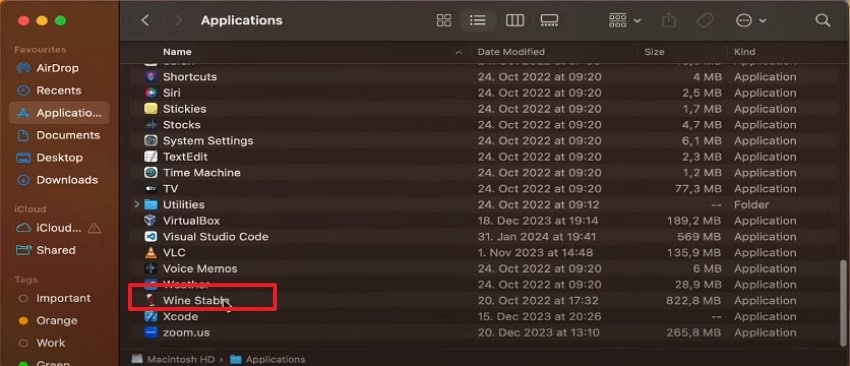
Step 2. As your file is downloaded, go to the Files app, select the Wine Stable file, and drop it into the Applications folder.
Step 3. Now your app is transferred to the “Applications” folder, navigate to it and open it.
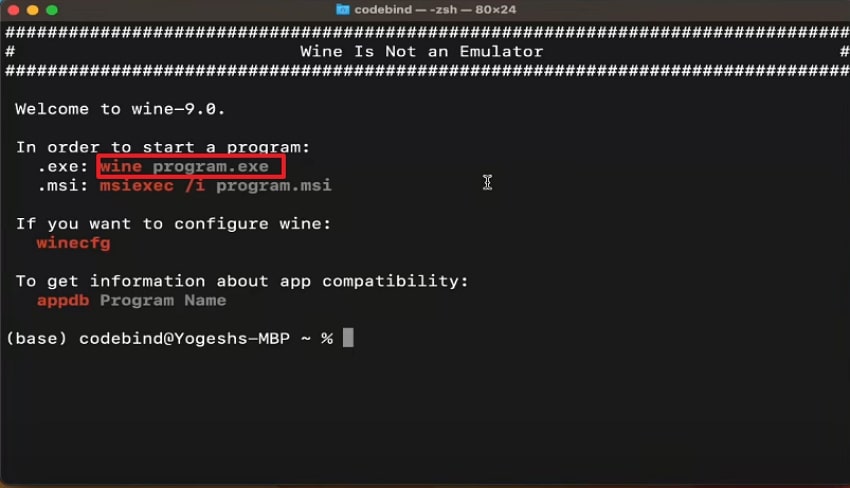
Step 4. Finally, a coding interface will appear; you just have to run the command "wine name-of-app.exe" and it will access the Windows interface.
Bonus Tip. Use Recoverit If You Lose Data When You Run Windows on a Mac
While using one of the above-discussed methods to run windows on mac, you ran into a problem. You might’ve mistakenly deleted an essential file, and you immediately need it. In this situation, we recommend using Recoverit, which lets you retrieve your essential data within seconds. This tool lets you retrieve data from any device, including Windows, Mac, and external devices, by ensuring a success rate of up to 99.5%.
Being an efficient tool, it lets you receive 1000+ file formats along with 2000+ storage device support. Furthermore, it lets you preview the recovered outcome to ensure its accuracy before downloading it to the device. To make your workflow easy, it lets you filter the files by their names or size during the scanning process.
Key Features
- Batch Processing: Recoverit offers you to recover an unlimited number of files by accessing its batch processing system to save plenty of time.
- Multiple Loss Scenarios: This tool is capable of recovering files lost due to any scenario, including power loss, virus attack, or accidental file deletion.
- Scanning Options: While scanning, it gives you both options, a quick scan for easy scenarios and a Deep Scan for recovering data from complex scenarios.
Detailed Stepwise Guide to Recover Lost Data With Recoverit
Now, if you are wondering how to use Recoverit, then go through the following detailed guide to recover your lost data:
Step 1. Access the Tool and Select the Hard Drives and Locations
Upon entering Recoverit, tap on "Hard Drive and Locations" and then select the desired location from where the file is lost.

Step 2. Initiate the Scanning Procedure to Find Lost Files
Upon selecting the location scanning process, it will automatically initiate with Quick Scan. At this point, if it is unable to find the required file, you can select the "Deep Scan".

Step 3. Preview and Export the Recovered Files
Finally, as the lost file is recovered, you can preview it or click on the “Recover” button to restore the file to the device.

Tips to Optimize Performance When You Run Windows on Mac
As you Run Windows programs on Mac, we have listed some efficient tips to boost the overall performance:

- Assign Adequate Resources: Ensure you set optimal CPU cores and RAM allocation for virtualization software, as it avoids macOS starving.
- Use SSD Storage: As Windows runs more smoothly on SSD storage, avoid using virtual machines or Boot Camp on traditional HDDs if possible.
- Keep Software Updated: Make sure your software is always up-to-date, as it will eventually help in security and performance improvements.
- Close Unused Applications: When using Windows, always quit background apps on your Mac to free up CPU and RAM for Windows tasks.
- Tweak Windows Settings: To boost the overall workflow of Windows, you should customize the settings, such as disabling unnecessary Windows services.
Conclusion
Summing up, we have discussed all the most effective and practical methods to run windows on mac with their step-by-step guide. Furthermore, we also provided you with some efficient tips that can boost your Windows workflow on Mac. However, while downloading Windows, if you lose your data, then we recommend using Recoverit, which provides you with both Deep and Quick Scan options according to your needs.
FAQ
-
1. Can I run Windows on all Macs?
No, Boot Camp is only available on Intel-based Macs or later. However, to use Windows on Apple Silicon Macs (M1, M2, M3, M4), you need to use a virtualization method. -
2. Do I need a Windows license?
Yes, you need to have a Windows license to access Windows with Boot Camp and Parallels Desktop. Although Wine and CrossOver are capable of running some Windows apps without a license. -
3. Will running Windows affect my Mac’s performance?
Virtualization may slightly reduce performance compared to native Windows. However, in modern Macs, especially Apple Silicon, it works efficiently. -
4. Can you recover lost files after installing or running Windows on a Mac?
Yes, you can efficiently recover your lost file by using a reliable file recovery tool. Among numerous tools, we recommend using Recoverit, which retrieves your essential data without any data loss.


