

 TL;DR:
To fix an Android phone not detecting an SD card, restart the device and clean the gold contacts, then test the memory card on a PC to identify whether the problem stems from hardware failure, capacity limits, or file system corruption.
● Do not format the card if prompted by your phone; instead, connect it to a PC and use Wondershare Recoverit to extract your files before wiping the data.
● Verify your phone's storage limitations, as older devices may fail to recognize modern SDXC, SDUC, UHS-II, or SD Express cards due to incompatible voltage requirements or improper seating in hybrid SIM trays.
● If a computer can read the card, run the chkdsk X: /R command via Windows PowerShell to repair bad sectors, or reformat the file system to FAT32 for cards under 32GB and exFAT for cards 64GB or larger.
Ask AI for a summary
 ChatGPT
 Perplexity
 Gemini
 Claude
 Grok
Grok
"To extend the storage space of my Android phone, I added an external SD card to save my data such as documents, photos, and videos. However, my phone stopped detecting SD Card when I was trying to access some data saved on the SD Card.
I restarted my phone several times, but it's still not detecting the SD Card."
SD card is a famous extended storage space for Android Phones and other devices (including drones, gopros, cameras etc.) with insufficient built-in memory and for people who like playing games or taking photos and videos. However, "SD Card Not Detected Android" is a common problem due to various reasons such as Fake SD Card, Improper use of SD Card, mishandling, etc.
If the android not detecting/recognizing sd card some solutions can be tried to fix the problem. The foremost thing is the trouble location and then tiring several simple fixes such as rebooting the phone, cleaning the SD Card, formatting an SD Card, etc.
Though if the problem is still unsolved then the Android SD Card Recovery solution is needed to access the files on the SD memory card. Recoverit is one such data recovery software that helps to retrieve the data in three simple steps i.e. Select, Scan, and Recover.
Trouble location for Micro SD Card Not Detected Android
The most important thing to do is to locate the problem location. Whether it is a problem with the micro SD Card, Android phone, or something else. Trouble-location saves time and effort.
1. Causes by SD Card
It is most likely the problem is caused by SD Card. The following are the three tips that help to identify.
- Insert the SD Card into another mobile device that can read the SD Cards. See whether the memory card can be detected.
- Check whether the computer can read SD Card with a card reader.
2. Causes by Android Phone
The problem may lie within the Android phone. Insert another SD card on the phone, which is detectable on another device, and see the results. If the phone cannot detect the new SD Card, the problem lies within the phone at the software or hardware level.
3. Other Reasons
Maybe the Android phone and SD Card are working fine separately but just won't work when combined. It is a rare case but still possible. Some SD cards require a stable power supply. In this case, try an original battery.
You may also be interested in: Mac Not Recognizing SD Card [Easy Fixes!]
| Symptom | Probable Location | Recommended Fix |
| "SD Card Removed" Error | Loose Card Slot | Re-insert / Clean Pins |
| "Unsupported/RAW" Message | File System Corruption | Wondershare Recoverit + Format |
| Card Works on PC, not Phone | Compatibility/Power | Check Phone Capacity Limit |
| No Detection on any device | Physical Hardware Failure | Professional Hardware Repair |
11 Ways to Fix SD Card Not Detected Android Phone?
1. Try Several Simple Tricks
- Reboot Android phone
- Remove the battery and SD card from the phone, and then plug them back in.
2. Clean SD Card Lightly
Poor contact can cause the SD Card not detected or recognized the problem. To make it work again, remove the SD Card and then gently rub the metal piece and if necessary also clean the SD Card slot on the phone.
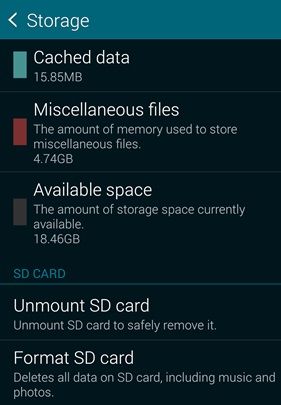
3. Unmount and Remount SD Card
On an Android phone go to Settings > Storage, find the SD Card section. If it shows the "Unmount SD Card" or "Mount SD Card" option, perform these operations to fix the problem. During this process make sure the phone is not connected to Computer.
4. Use the Computer to Diagnose
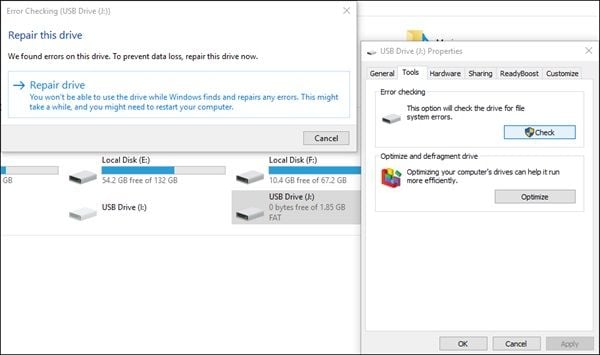
Windows can repair some errors on disk drives, so you can mount your SD Card to the computer to check errors. However, this solution only works if the computer can detect an SD Card.
- Insert the SD card into a card reader, and then connect to a computer.
- Open My Computer, and find the disk drive or SD card.
- Right-click the disk and choose Property.
- Click the Tools tab.
- On the Error-checking section, choose Check> Repair drive.
- When the drive is repaired, eject the SD card and insert it back to the phone.
5. Update SD Card Driver
If you faced the SD card not showing up Android issue, it may be caused by the out-of-dated SD card driver. Follow this way to make your SD card detectable again:
- Connect the memory card or SD card to your computer.
- Right click the Windows icon, and select Device Manager.
- Find the Universal Serial Bus Controllers, right click the corresponding USB drive, and click Update driver.
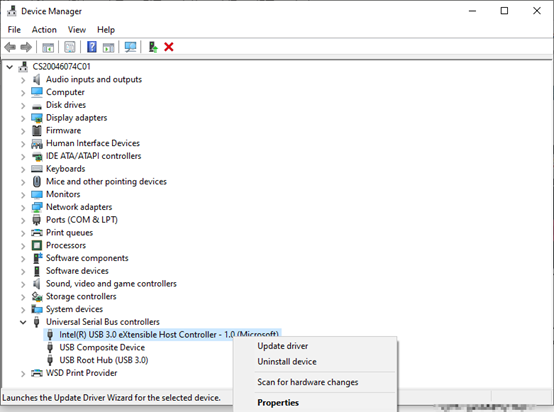
- After that, wait for the driver to be updated. Restart your computer and see if the SD card not showing up Android issue is fixed or not.
6. Check Your Phone Device’s Compatibility
If your Android phone is out of dated, it may be incompatible with your SD card. For instance, the latest MicroSD cards are designed for faster speed and more storage space, which is incompatible with the low-end and older Android devices.
So you can try replacing the SD card with a basic on to check if the problem fixed or not.
Many modern Android devices use a hybrid SIM/SD tray. If you are using dual SIMs, the SD card may not seat properly. Additionally, if you are using the latest UHS-II or SD Express cards in an older phone, the device may fail to recognize the card due to voltage differences. Always verify if your card is a "High Capacity" (SDXC) or "Ultra Capacity" (SDUC) type.
7. Repair SD Card with CHKDSK Command
If there is any internal problems with the SD card, your Android phone may be unable to recognize it. In this way, you can try CHKDSK Command to fix this problem.
- Connect the SD card to your computer.
- Right click the Windows icon and select Windows PowerShell(Admin).
- Now, enter the following command and press Enter: chkdsk X: /R(replace X with the letter assigned to your SD card)

- Wait for CHKDSK to complete the process.
On this way, CHKDSK will check the entire SD card for bad sectors and repair the issue if possible.
8. Access the SD Card in Safe Mode
The SD card not showing up Android may also by caused by the third-party app on your device. We can use the safe mode to diagnose whether that’s the case. If the SD card can be recognized in safe mode, where all the third-party apps are disabled, you can try to delete the apps downloaded recently to fix the problem.
Follow this way to switch your phone to Safe mode(Take Samsung Android phone for example):
- Turn off your Android phone by holding the Volume down key and side key simultaneously. Select Power Off.

- Once the screen turns off, press and hold the Volume down key and side key at the same time to relaunch it.
- As soon as you see the Samsung logo appears on the screen, release the side key, and still holding the Volume down key.

- Now, if you see the Safe mode appears on the lower left corner of the screen, release the Volume down key.

- Check whether SD card not detected Android issue is fixed or not in the safe mode. If it works, Go to Settings->Apps to uninstall the apps that you can’t recognize or appear malicious.

- Press and hold the Volume down key and Side key at the same time, and click the Restart option to switch your phone to the normal mode.

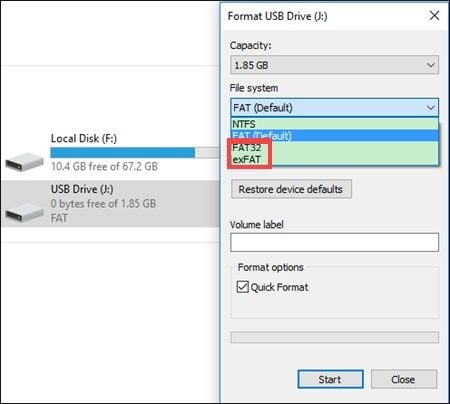
9. Format SD Card
This solution is also only applicable when your computer can recognize the SD card.
- Connect the SD card to the computer via a card reader.
- Create a Backup of the SD Card on the computer.
- Right-click SD card drive, and then choose Format.
- Click Start to format the SD card.
- Insert the SD card in your phone.
10. Factory Reset Android Phone
Sometimes due to software problems on SD card not detected on Android. A factory reset can solve some software errors on Android phones.
11. Repair Hardware Problem
If all of the above-mentioned methods fail to solve the SD Card not detected Android problem for you, then most likely it is a hardware problem. Either the SD Card is damaged or the mobile phone.
How to Recover and Repair Data from SD Card not Detected
If you have lost data due to this issue, don't worry, try the following method to perfectly solve your problem!
1. Introduction to Recoverit Data Recovery
Recoverit Data Recovery is a powerful data recovery software that helps to retrieve lost and deleted files under different scenarios. It recovers all file types including documents, graphics, photos, videos, emails, and other files.
It also retrieves data from all data loss scenarios, including emptied recycle bin, accidental deletion, disk formatting, and corrupted external device, and even crashed computers.
- Recoverit provides different modes of data recovery. A simple scan can be performed to access inaccessible data. And to get more detailed results, "all-around recovery" can be performed as well.
- To selectively recover the data, the application provides the preview of recovered data.
- It recovers all file types including photos, videos, compressed files, etc.
- Supports the data recovery from laptop, internal hardware, and all the major secondary data storage units.
- Recoverit Data recovery desktop application is available for both, Windows and Mac.
- Recoverit Ultimate even helps you recover fragmented video and repair corrupt/broken/damaged video.
2. Steps to Recover data with Recoverit
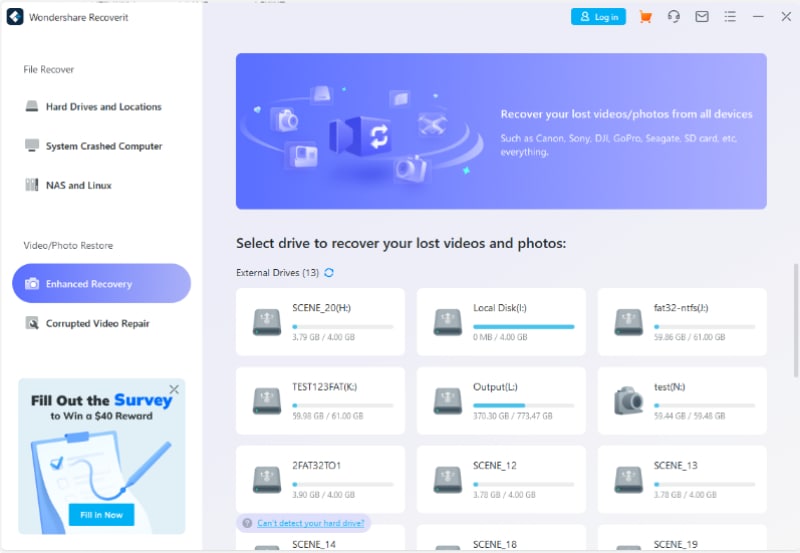
Recoverit helps to recover data lost from an external device on a Windows computer. The external device can be external hardware, memory card, SD Card, USB Flash Drive, and so on.
To recover files it is important to launch Recoverit on Computer.
Steps to recover data
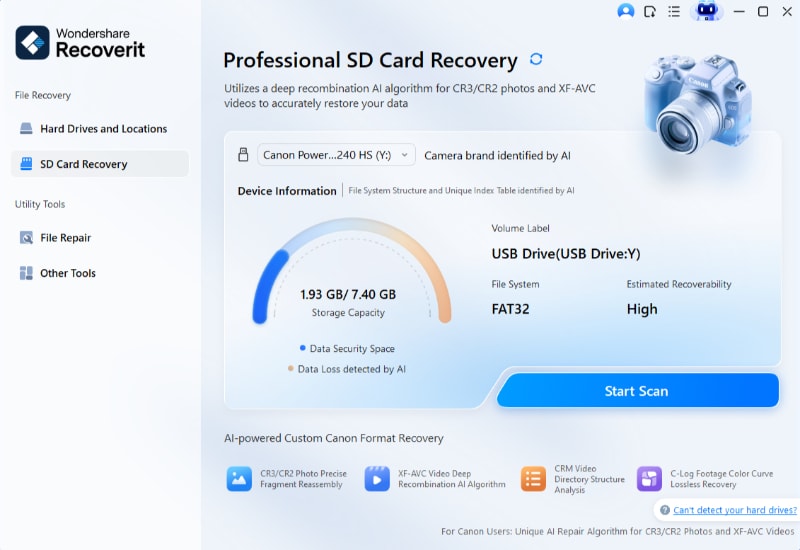
Step 1: Select the Location
To recover lost or deleted files, go to the SD Card section. Select the target SD card device. And click Scan to search for the lost data.
Step 2: Scan the Location
It will start an all-around scan of the targeted location. It will take a few minutes to complete the scanning. During the process, you can pause or stop the scanning process if you find your data at any time.
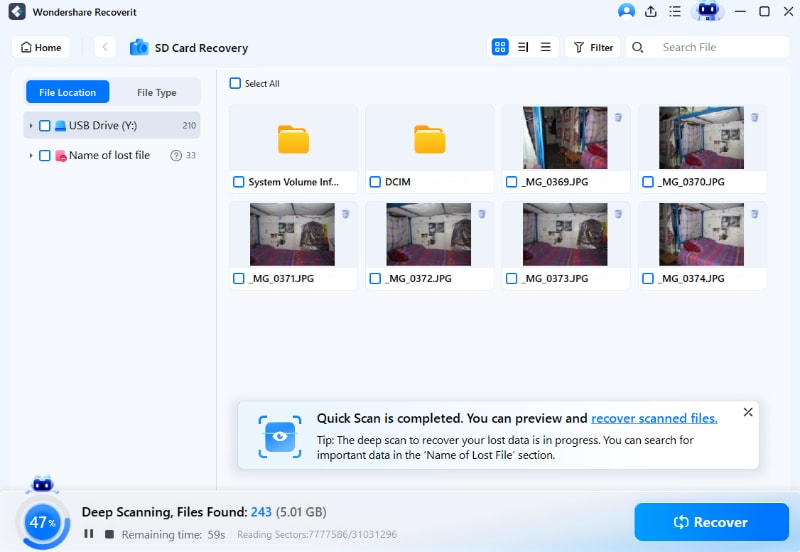
Step 3: Wait for Scanning
Data scanning is in progress. Wait while the scanning process completes.
Step 4: Preview and Recover Files
After scanning it will show you all lost data and you can find and select the target data. Click the recover button and it could be retrieved at once.

Learn more about recovering data from memorycard for free.
3. Introduction to Advanced Video Recovery Function of Recoverit
Recoverit Data Recovery is a powerful video file recovery program, it can easily get deleted videos back. Video files are different from any other type of data. Sometimes, you might find the video corruption after the preview using the software. If so, Recoverit works for you. Recoverit Data Recovery Ultimate supports the Advanced Video Recovery feature. It scans, gathers, and matches the fragments of your corrupt videos, and thus ensures most of your videos are recovered from DSLR, Digital cameras, Drones, Action Cameras, Dashcams, camcorders, SD cards, PC, HDD, etc. Recoverit supports all video formats: AVI, MOV, MP4, 3GP, 3G2, ASF, SWF, etc.
Steps involved in the advanced video recovery process are as follows:
- Scan and match your video fragments
- Merge the fragments from the same video
- Recover your videos and keep 95% of them intact
- Recover unlimited video files without corruption
- Click the Advanced Video Recovery option to recover the fragmented video file.
You may need to refer to this tutorial video
4. Steps to Repair Corrupted Video with Recoverit
Video files can get corrupted for various reasons. For instance, if you are not careful while shutting down the computer and a video file is running in the background then that file will have the risk of corruption. Or if no good antivirus program is installed on your computer. Another reason that might cause corruption of video file is a device error while the video was being recorded.
Repairit is powerful video repair software for repairing corrupt, broken, or damaged MOV, MP4, M2TS, MKV, MTS, 3GP, AVI, and FLV file formats. It supports two repair modes. Quick repair is to repair various video errors. The advanced repair can repair your corrupt videos by analyzing the data and technology of the sample video shot by the same device.
Repairit Video Repair has the following features:
- Repair multiple formats of videos simultaneously.
- Free scan for corrupt videos and preview repaired videos before saving them
- No limitations on the size of Video files for repair
- Repair any number of corrupt Video files
Steps to Recover Corrupted Video
Step 1: Add your corrupted videos
Launch the application on your computer. To repair your corrupted video files, you can add them by clicking the Add button or "Add video and start repairing" area.

Step 2: Repair your videos
As soon as you have added all the corrupted videos, click on the Repair option to start the video repair process.

Step 3: Preview the videos
It will take some time to repair and once it has finished the repair process, a reminder showing info of successful fix will pop up on the screen. Press OK to close the operation.

Step 4: Advance mode for severely corrupted video (optional)
If the videos are severely corrupted and not repaired successfully, please go to the advanced repair mode. Just click the Advanced Repair button.
Then add a sample video and repair it now.

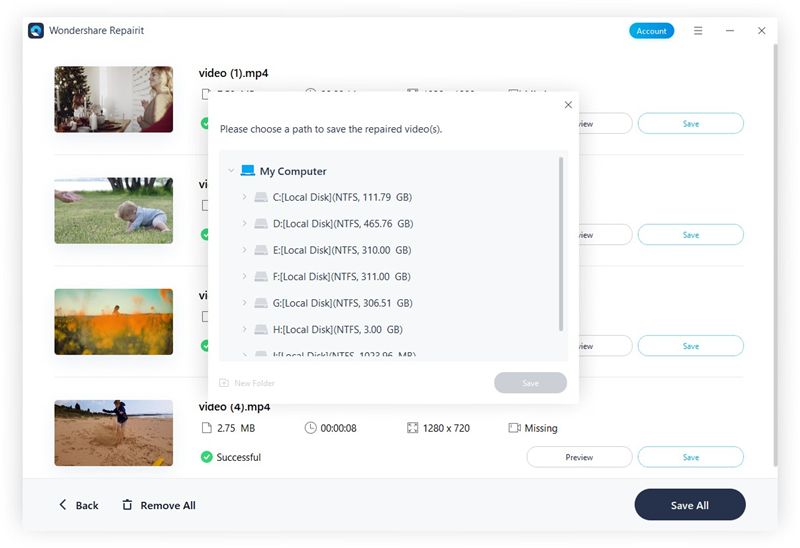
Step 5: Save repaired video
The advanced repair will perform the repairing process and prompt a success message when the process is completely done. Now, you can play these videos and you will not see any error on the screen.
Final Scannable Summary: The SD Card Recovery Checklist
- Clean the Contacts: Use a dry cloth to remove oils from the gold pins.
- Check the File System: Phones prefer FAT32 (under 32GB) or exFAT (64GB+).
- Test on PC: If a PC can’t see the card, the card's controller may be dead.
- Recover Before Formatting: Never click "Format" on your phone until your data is backed up.
- Update Firmware: Ensure your Android OS is updated to the latest version for improved driver support.


