If your iPhone won't factory reset, start by checking what stops the erase: an unavailable option, an Apple Account verification prompt, a managed-device restriction, or a frozen Apple logo. A factory reset deletes the content stored on the device, so confirm you have a usable backup before trying another erase. If your phone is unresponsive, a force restart is different: it restarts the iPhone without intentionally deleting your photos or apps.
Choose the steps that match your symptom rather than repeating a failed reset. You can check account restrictions, use Find My when eligible, restore through a computer, or try Recovery Mode. The nine fixes below separate data-preserving checks from destructive actions and explain when to contact Apple for help.
In this article
-
- Fix 1. Check Restrictions That Block Erase All Content and Settings
- Fix 2. Resolve Apple Account and Stolen Device Protection Prompts
- Fix 3. Erase an Eligible iPhone Remotely with Find My
- Fix 4. Restore the iPhone with Finder or Apple Devices
- Fix 5. Use Recovery Mode for an iPhone Stuck on the Apple Logo
- Fix 6. Consider Dr.Fone for a Supported iOS Software Issue
Part 1. Why Won't My iPhone Factory Reset or Hard Reset?
An iPhone may refuse a factory erase because of organization management, incorrect account credentials, biometric verification, or an iOS error. A force restart can fail for entirely different reasons, including the wrong button sequence, an empty battery, or a damaged button. These actions should not be treated as interchangeable.
| Action | What It Does | Effect on Your Data |
| Erase All Content and Settings | Returns the iPhone to its factory state using Settings | Erases content and settings on the device |
| Force restart (often called hard reset) | Restarts an unresponsive iPhone | Normally keeps files and apps |
| Recovery Mode Update | Attempts to reinstall or update iOS | Designed to preserve data, but a current backup is still important |
| Recovery Mode Restore | Erases the device and reinstalls iOS | Deletes device data |
| Find My remote erase | Erases an iPhone associated with your Apple Account | Deletes device data; Activation Lock remains |
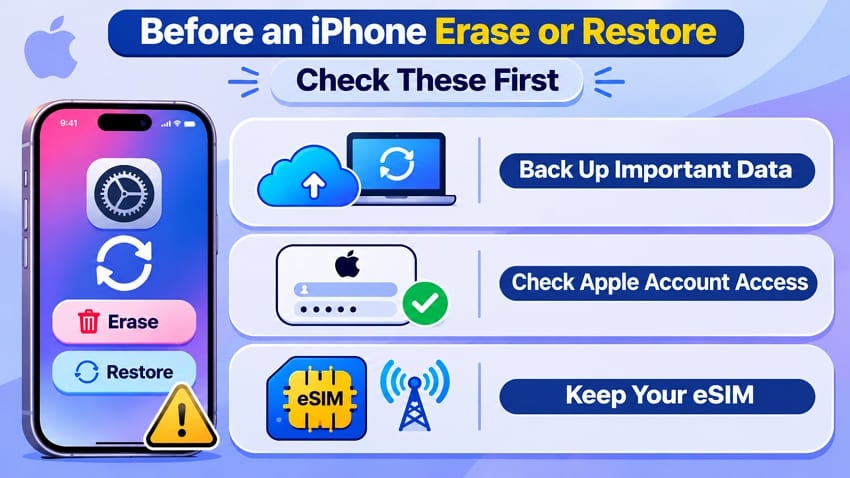
Before any erase or Restore: Check the date of your latest iCloud or computer backup, make sure you can sign in to the Apple Account associated with the iPhone, and decide whether you need to keep its eSIM. If you plan to continue using the same phone and cellular plan, keeping the eSIM during a Settings erase is usually the simpler option. If you erase the eSIM, your carrier may need to reactivate it. You should also be able to satisfy Activation Lock when setting up the phone again.
These instructions apply to an iPhone you own or are authorized to manage. They do not remove a previous owner's Activation Lock or override a company's device-management policy. Apple's erase instructions explain the different settings and computer-based paths.
Part 2. How to Fix an iPhone That Won't Factory Reset
Start with restrictions and account verification while the phone still responds. The later options can erase your data or require a computer. If your goal is only to unfreeze an iPhone, skip to Part 3 before choosing any destructive method.
Fix 1. Check Restrictions That Block Erase All Content and Settings
If the Erase All Content and Settings option is unavailable, first find out whether your iPhone is supervised. Schools and employers can disable the Settings erase command through device management. A personal iPhone can also have Screen Time settings or account restrictions that need attention.
- Open Settings, look for a supervision message near the top, and open General > VPN & Device Management.
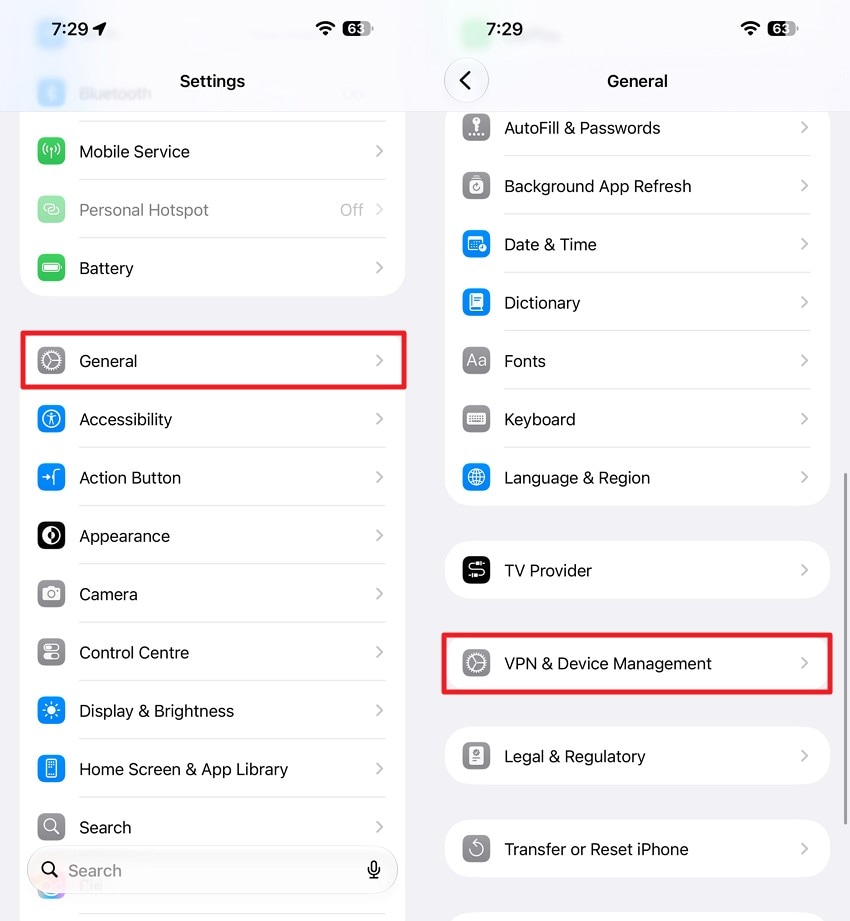
- If the phone is managed by an organization, contact its administrator for the approved erase procedure. Do not remove management profiles or attempt to bypass the restriction without authorization.
- If it is your personal device and you are blocked by a Screen Time passcode, use Apple's official reset help to address that passcode rather than trying to evade it.
If the erase option becomes available, check the backup and account information in Part 1 before confirming the reset. If an Apple Account prompt fails instead, try Fix 2.
Fix 2. Resolve Apple Account and Stolen Device Protection Prompts
A factory erase may ask for your iPhone passcode or Apple Account password. Stolen Device Protection can also require Face ID or Touch ID for sensitive actions, including erasing the device when additional protection applies. Certain account changes have a separate security delay; do not assume the erase itself always requires a one-hour wait.
- Verify that your iPhone can reach Apple services over a reliable Wi-Fi or cellular connection. If you recently changed your password, use the current password for the Apple Account signed in on the phone.
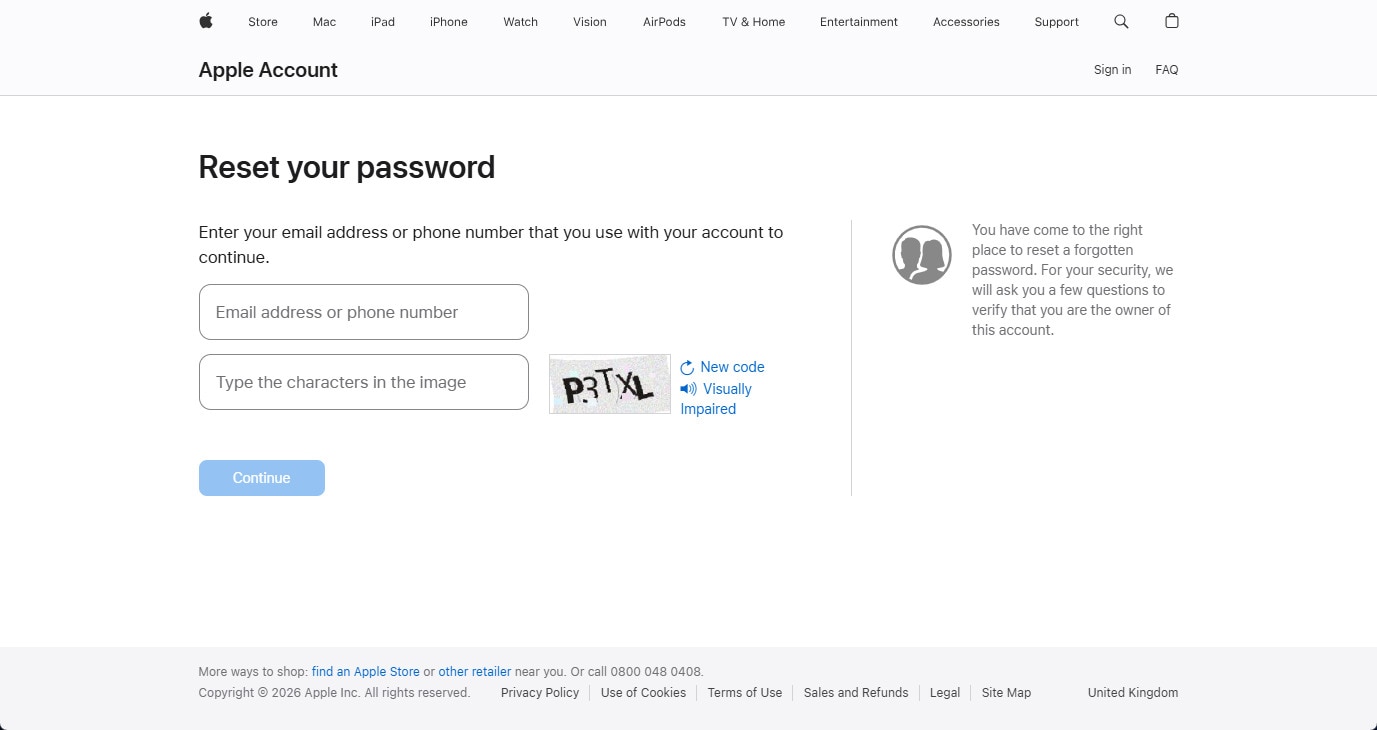
- If you forgot your Apple Account password, reset it through a trusted Apple device or Apple Account recovery.
- Complete the required Face ID or Touch ID confirmation. If Stolen Device Protection is enabled and the action is restricted at your current location, follow the instructions displayed on your iPhone.
- When authentication succeeds, retry Settings > General > Transfer or Reset iPhone > Erase All Content and Settings only after your backup is secured.
If you cannot authenticate as the legitimate account owner, use Apple's Activation Lock guidance; a repair application is not a substitute for account recovery.
Fix 3. Erase an Eligible iPhone Remotely with Find My
This method permanently erases device data. It is appropriate only if Find My was enabled beforehand and the iPhone is linked to an Apple Account you control. You cannot use it to bypass Activation Lock, which stays enabled after a remote erase.
- On another trusted device, visit iCloud Find Devices and sign in to the Apple Account linked to your iPhone.
- Choose the iPhone, select Erase This Device or Erase as displayed, and confirm only when you are ready to lose the data stored on the phone.
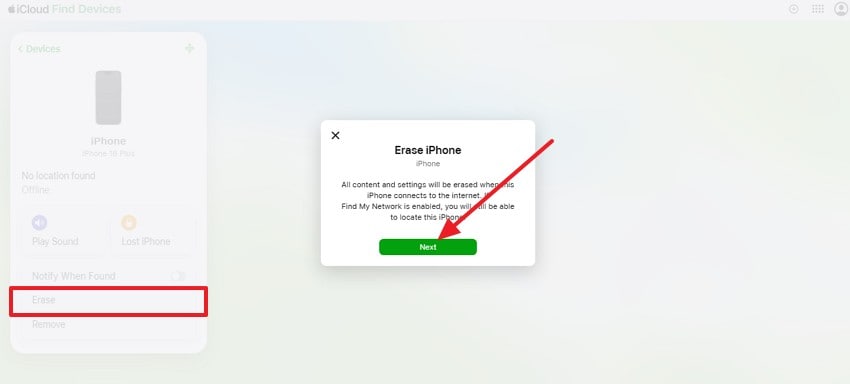
If the iPhone is offline, the erase is pending until it reconnects. Afterward, you still need the original Apple Account credentials to activate the device. If Find My was not enabled or the device is not listed, use another authorized method.
Fix 4. Restore the iPhone with Finder or Apple Devices
If Settings cannot complete a factory erase but the iPhone is recognized by a computer, you can perform an official computer restore. Restore iPhone erases the device and installs iOS again. Make a backup first if possible. If your iPhone responds, Apple also recommends signing out of Find My using your own credentials before a standard restore.
- Connect the iPhone with a working USB-C or Lightning cable. Use Finder on a current Mac, Apple Devices on Windows, or iTunes on supported older systems.
- Select your iPhone in the sidebar and respond to any legitimate Trust prompts.
- Click Restore iPhone and confirm the erasure only when you have preserved everything you can. Wait for the Hello screen, then sign in using your Apple Account.
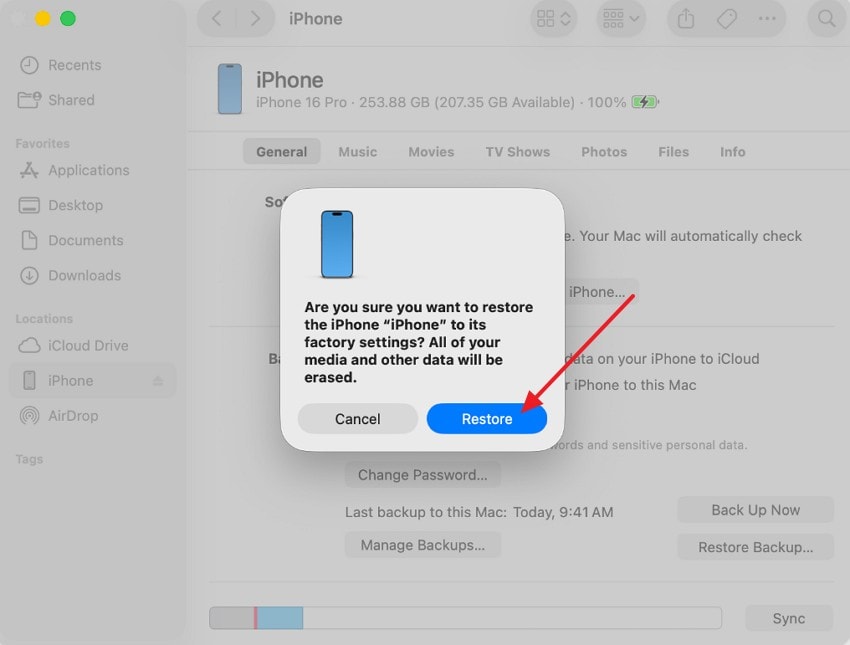
Apple states that a computer factory restore normally preserves the eSIM, while erasing through Settings offers an explicit keep-or-delete choice. If the computer does not detect the iPhone or it is stuck on the Apple logo, continue to Recovery Mode.
Fix 5. Use Recovery Mode for an iPhone Stuck on the Apple Logo
If an Apple logo progress bar has not moved for at least one hour, Apple's guidance recommends using a computer and Recovery Mode. Choose Update first when the goal is to repair iOS without intentionally deleting data. Use Restore only if the non-erasing route is unavailable or fails and you understand that it deletes your data.
- Connect the iPhone to a computer with Finder, Apple Devices, or supported iTunes open. Enter Recovery Mode using the button combination for your model: iPhone 8 or later: press and release Volume Up, press and release Volume Down, then hold Side past the Apple logo until the cable-and-computer screen appears. iPhone 7 series: hold Side and Volume Down. iPhone 6s or earlier: hold Home and Side/Top until the recovery screen appears.
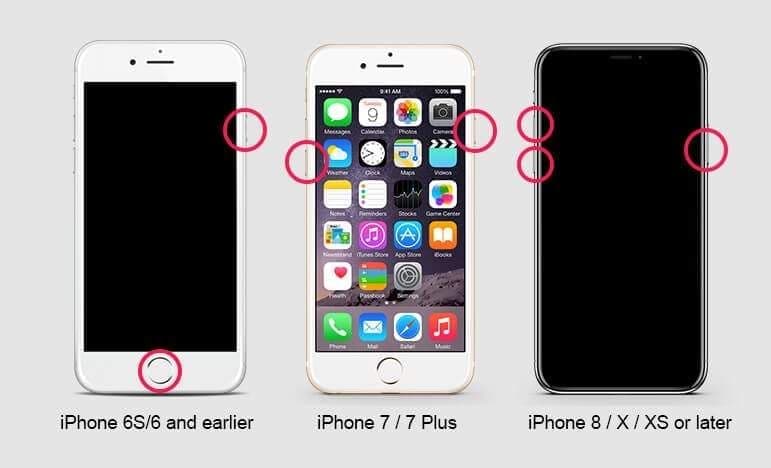
- When your computer offers Update or Restore, try Update if it is available and you want to preserve current data. Let iOS reinstall and see whether the phone starts normally. You can also find these steps in Apple's Apple-logo recovery guidance.
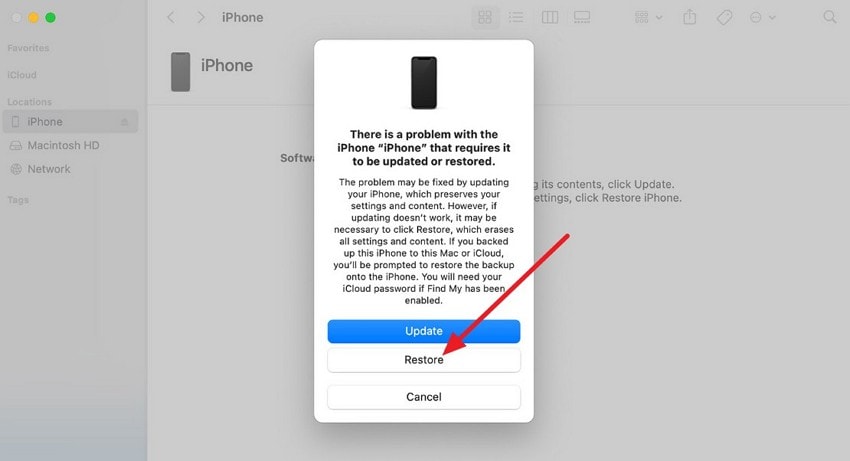
- Only if Update fails, your data has been protected as far as possible, and you accept the loss of local content, choose Restore instead. The screenshot above shows the non-erasing Update option, not Restore.
If an iOS download takes longer than 15 minutes and the phone exits Recovery Mode, let the download finish and re-enter the mode if needed. If the same restore fails repeatedly, do not continue without checking cable, software and possible hardware issues.
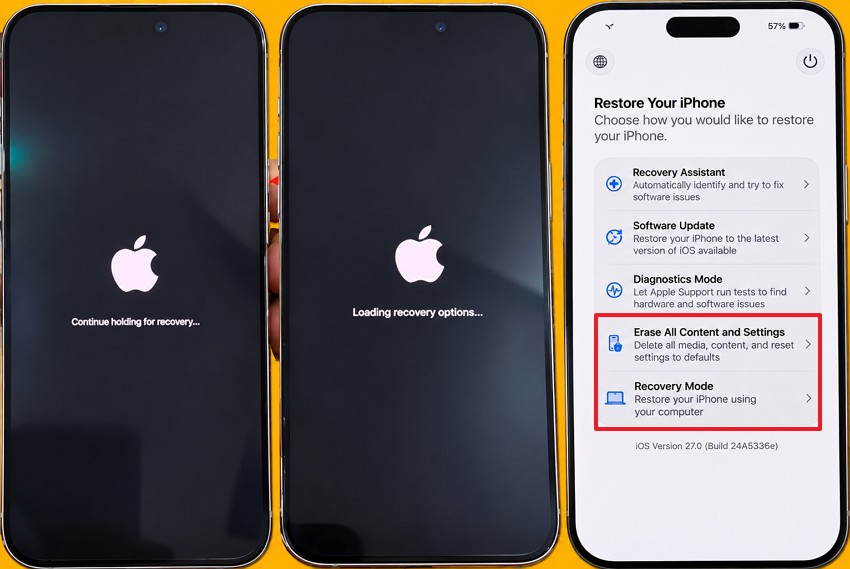
On-device iOS Recovery in iOS 27: If your iPhone supports it, power the device off, disconnect it from power, then hold the Side button until Continue holding for recovery and Loading recovery options appear.
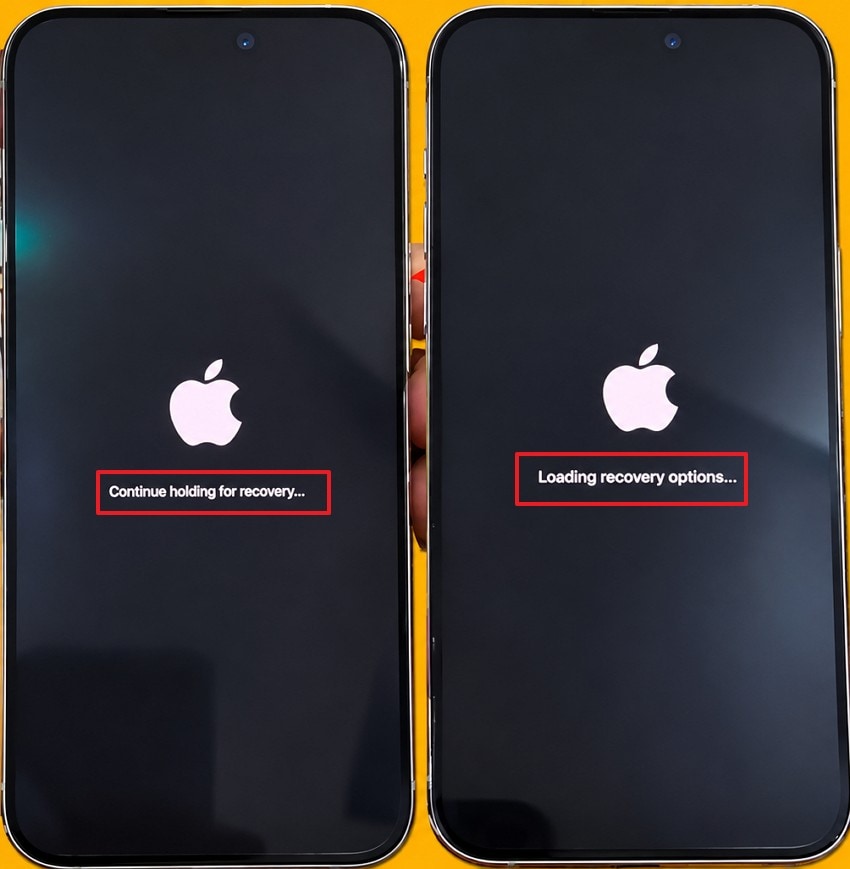
The Restore Your iPhone menu may offer Recovery Assistant, Software Update, Erase All Content and Settings, or Recovery Mode. Try a relevant non-erasing option before any erase; the available choices depend on the issue and device. Apple's iOS Recovery guide lists their prerequisites and data effects.
Fix 6. Consider Dr.Fone for a Supported iOS Software Issue
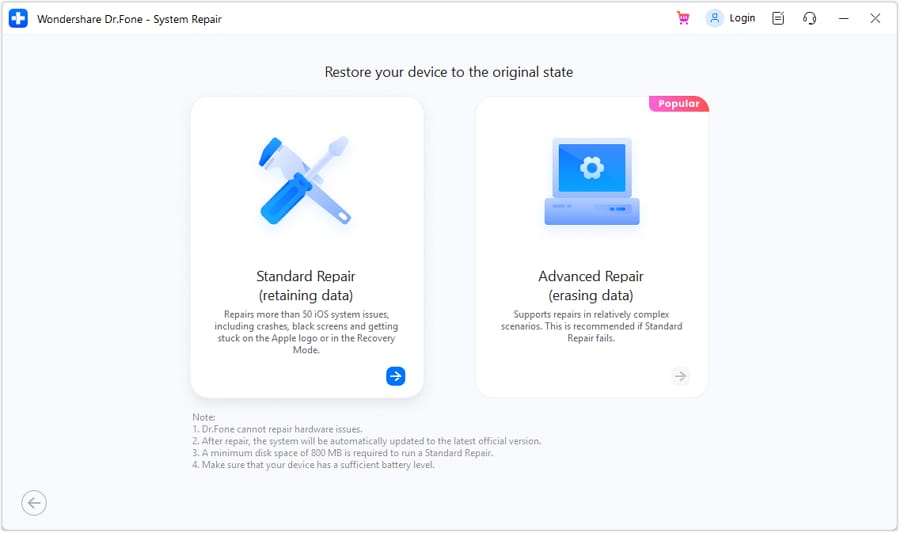
If Apple-supported checks and Recovery Mode Update have not resolved a software-related boot problem, Wondershare Dr.Fone - System Repair (iOS) is an optional third-party tool. Its vendor describes Standard Repair as designed to preserve data and Advanced Repair as a mode that erases data. Neither can guarantee a repair or bypass account ownership, Stolen Device Protection, or Activation Lock.
- On a Mac or Windows PC, open Dr.Fone System Repair, select the iOS repair workflow, connect your iPhone, and review the supported model and current repair-mode notice. Choose Standard Repair if it matches your symptom and you have protected your data as far as possible.
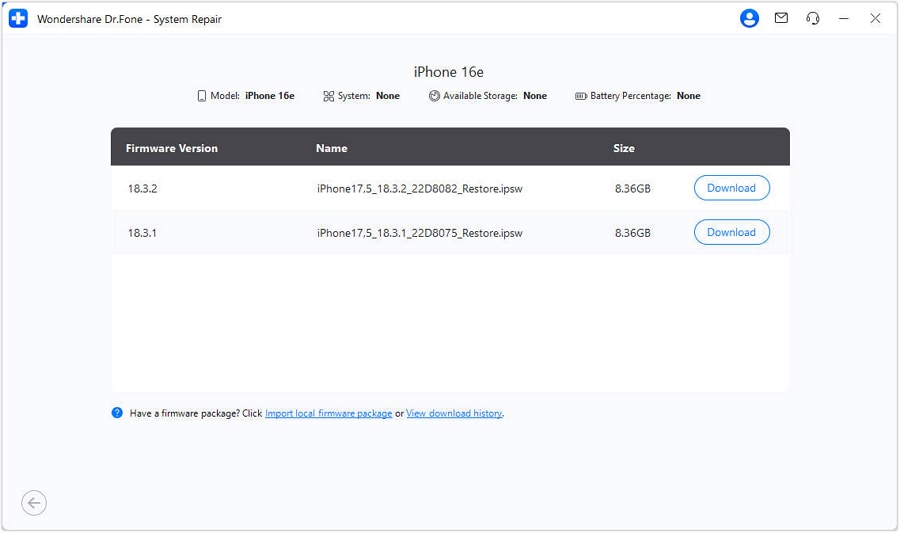
- Follow the current prompts to enter Recovery Mode if requested, then review the compatible iOS firmware offered for your device before downloading it.
- Start the repair using the on-screen control and keep the cable connected until the process finishes. Confirm that your phone boots and that your files remain accessible before considering any other mode.
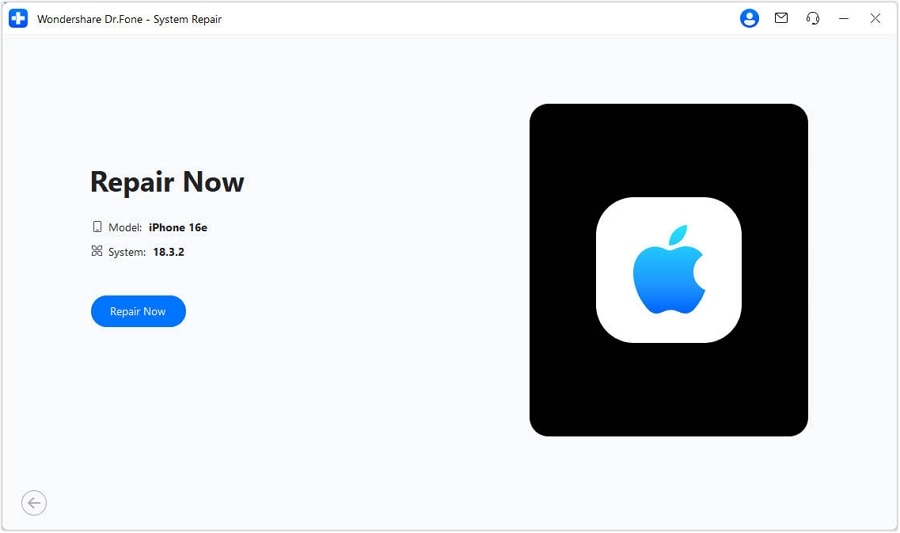
These screenshots illustrate one Dr.Fone interface; menu wording may change with software versions. If Standard Repair fails, do not switch to Advanced Repair without recognizing that it erases device data. Consult Dr.Fone's current repair guide and Apple's service options.
Part 3. How to Fix an iPhone Hard Reset That Is Not Working
A hard reset usually means a force restart. Unlike a factory reset, it does not intentionally remove your apps or media. Use it when the screen is frozen or the buttons appear unresponsive, and work through the checks below before attempting any erasing operation.
Fix 1. Use the Correct Force-Restart Buttons
- iPhone 8 and later, including recent Face ID and SE models: Quickly press Volume Up, quickly press Volume Down, then hold Side until you see the Apple logo. This may take more than 10 seconds. On iPhone Duo, Apple's current guide identifies Volume Up as the button nearest the Side button.
- iPhone 7 or 7 Plus: Hold Side and Volume Down together until the Apple logo appears.
- iPhone 6s, first-generation SE, or earlier: Hold Home and Side (or Top) together until the Apple logo appears.
Release the button when the Apple logo appears for a normal force restart. Keeping the final button held while connected to a computer can instead take the phone toward Recovery Mode. If it still does not start, check power before repeating the combination.
Fix 2. Charge the iPhone and Check the Connection
If the screen is black or the battery is depleted, connect the iPhone to a working wall adapter and cable. Apple recommends charging for up to one hour before trying again if the phone will not start, or charging for at least 30 minutes when a low-battery indicator appears. Check for visible port damage and avoid inserting metal tools into the connector.
After charging, repeat the button combination for your model. If the phone remains dark despite a known-working charger and cable, you may need hardware service rather than another reset attempt.
Fix 3. Try Recovery Mode Update Before Restore
If the force restart still leaves the iPhone frozen on the Apple logo, connect it to a computer and enter Recovery Mode as described in Fix 5 of Part 2. When Finder or Apple Devices offers both actions, choose Update first, not Restore, to attempt reinstalling iOS while preserving your content.
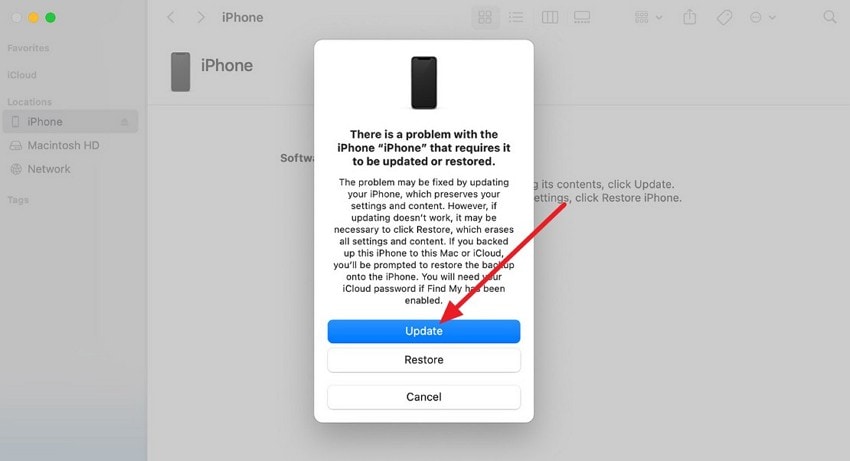
If the Update completes, check that the iPhone starts and that your photos, messages, and apps remain accessible. If Update fails, review available backups and Apple Support options before authorizing a destructive Restore.
Part 4. What If Your iPhone Still Won't Reset?
Stop repeating erase or repair attempts if buttons are physically damaged, the computer repeatedly reports restore errors, or the iPhone cannot stay powered on. Try a known-working cable and USB port, update the computer software, and record any Apple Devices or Finder error code for Apple Support.
If the phone is managed by a school or employer, ask its administrator for the correct process. If it shows Activation Lock, resolve access through the original Apple Account owner or Apple's documented ownership-verification process; reinstalling iOS does not remove Activation Lock. Persistent charging, button, or storage failures may require an Apple Store or authorized service provider. Tell the technician whether your current data is backed up before approving any operation that could erase it.
Pro Tip. Recover iPhone Media Copies Lost from Computer Storage
A factory reset can remove photos and videos stored only on your iPhone. The first place to look for missing originals is a genuine iCloud or computer backup made before the erase. If you previously imported photos or videos to a PC, Mac, or external drive and later lost those separate copies, a computer storage scan may be relevant.
When Wondershare Recoverit Can Help
Wondershare Recoverit Photo Recovery and Recoverit Video Recovery are intended for eligible lost files on readable computer drives and other supported storage. They cannot scan encrypted iPhone internal storage directly, recover a phone's erased encryption keys, or reconstruct photos and videos that existed only on the factory-reset device.
Recover Transferred Photos and Videos in Three Steps
- Open Recoverit and choose the actual computer drive or external device that held the transferred photos and videos. Do not select the iPhone itself.
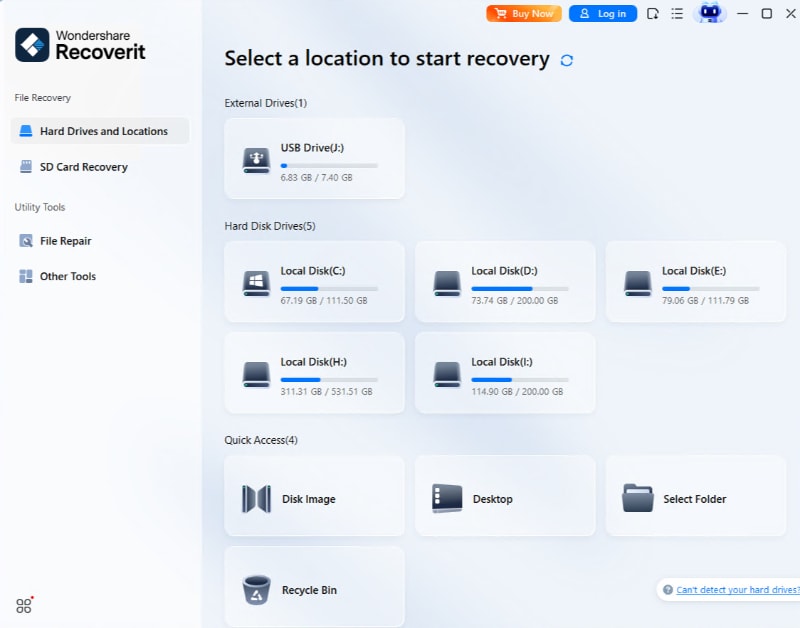
- Scan that storage and narrow the results by photo or video type, filename, or other filters offered by your version. If you are using an SD card or other supported media, its scan screen may differ from a computer-drive scan.
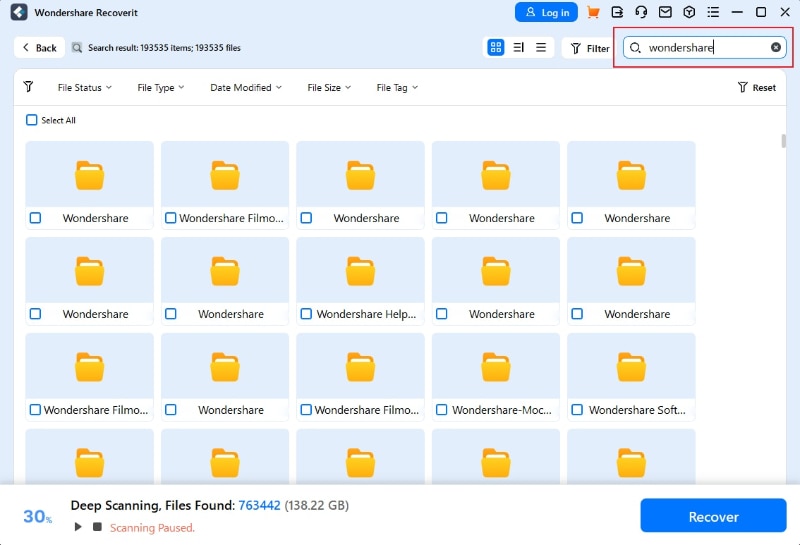
- Preview the files that appear, select the usable items, click Recover, and save them to a different healthy drive. Open the saved photos and play recovered videos to verify the result.

Not every file found during a scan will be intact. If no computer-stored copy exists, Recoverit is not an alternative to an iPhone backup or Apple's account recovery process.
Conclusion
When your iPhone won't factory reset, begin with restrictions, account verification, and a current backup rather than repeating an erase. Find My and computer restores can erase the device, while Recovery Mode Update may resolve a startup problem without intentionally deleting your data. If a force restart fails, check the correct buttons and battery first. Use third-party repair software only for supported software issues, and contact Apple when the device or account remains inaccessible. Recoverit applies only to eligible photos or videos lost from separate, readable computer storage.
FAQ
-
Why is my iPhone stuck on the Apple logo during a factory reset?
A stalled erase, iOS update, or restore can leave the Apple logo on screen. If the progress bar has not moved for at least an hour, Apple recommends connecting the device to a computer and entering Recovery Mode. Try Update first when available to avoid intentionally erasing your data; Restore deletes device content. -
Can I factory reset my iPhone if Erase All Content and Settings is disabled?
First check whether your iPhone is supervised or controlled by an organization and whether you can satisfy Apple Account and Screen Time requirements. Your organization's administrator must authorize changes to a managed iPhone. On an eligible personal phone, Finder or Apple Devices may offer a computer restore, but that process erases the device and does not bypass Activation Lock. -
Can Dr.Fone - System Repair fix an iPhone without deleting data?
Dr.Fone describes Standard Repair as designed to preserve data during supported iOS software repairs. That is not a guarantee that every repair will succeed or that data loss is impossible. The vendor says Advanced Repair erases the device. Make a backup when possible, review the exact mode before starting, and do not use it to bypass account security. -
What should I do if both factory reset and force restart fail?
Charge the phone, check the correct model-specific button sequence, and try a known-working cable and computer. If the phone stays stuck on the Apple logo, use Recovery Mode Update when offered. If the buttons are damaged, account ownership is unresolved, or computer restores repeatedly fail, contact Apple Support or an authorized service provider before attempting further destructive operations.


