
 TL;DR:
Protect high-resolution filmmaking originals by maintaining checksum-verified backups of unmodified camera folders, and if files disappear, immediately halt all writing to the affected storage medium to prevent overwriting.
● Prioritize relinking offline media or resuming incomplete offloads before attempting a Wondershare Recoverit scan; if recovery is necessary, you must scan the specific CFexpress card, SD card, or external USB SSD that actually recorded the footage rather than the editing computer's local drive.
● Establish a strict storage workflow that separates high-resolution originals from proxies, utilizes checksum verification reports rather than simple file copying, and requires explicit personnel approval before any camera medium is cleared for reuse.
● Do not rely on a playable thumbnail as proof of success; thoroughly validate any recovered MOV or MXF clips in a duplicate editing project to confirm full-duration playback, audio synchronization, and accurate timecode, as software cannot restore overwritten data or recreate frames that were never recorded.
Ask AI for a summary
 ChatGPT
 Perplexity
 Gemini
 Claude
 Grok
Grok
A clip appearing in your editing timeline does not prove that its camera original is safely backed up. Protect high-resolution filmmaking footage by preserving complete recording folders, verifying copies against their source, and keeping independent backups. When footage disappears, first establish whether the original is actually deleted, merely offline, or still available on another device.
The goal is not simply to recover a playable thumbnail or a file with the right name. It is to recover the footage, sound, and identifying information needed to finish the film.
In This Article
Part 1. What the VF-GFXC2 Announcement Means for Footage Protection
Fujifilm's September 8, 2026 announcement introduced the development of the VF-GFXC2, a dedicated electronic viewfinder for the GFX ETERNA 55. Fujifilm expects its release by the end of 2026. It is an accessory, not a new camera body.
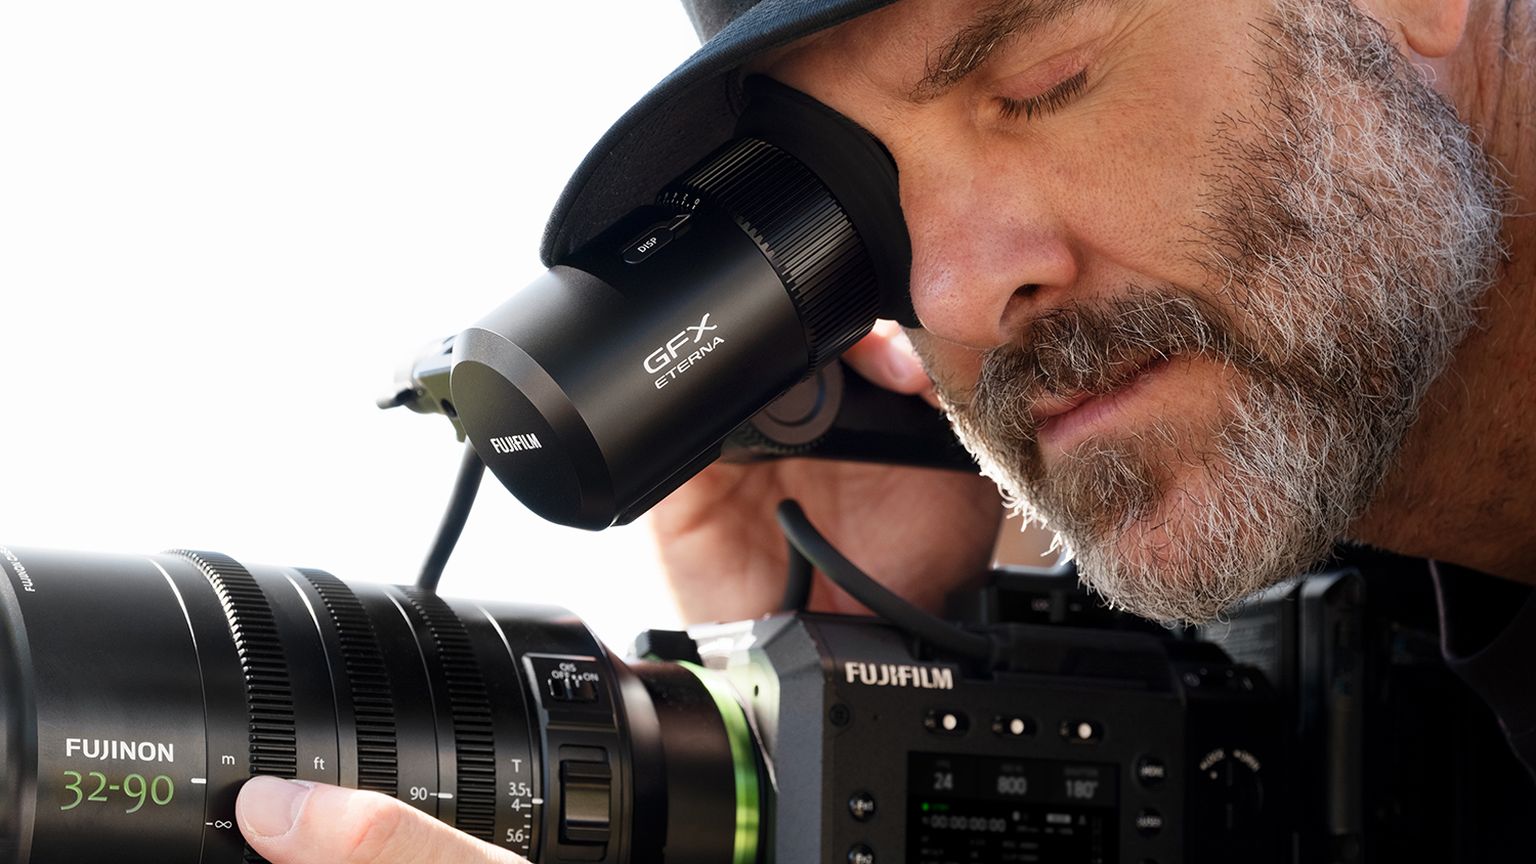
That distinction matters here: better monitoring helps an operator assess the shot, but it is not evidence that an independent copy of the recording exists. The recording destination and the backup destination still need separate attention.
1.1 Identify the Actual Recording Medium
The GFX ETERNA 55 media instructions describe CFexpress Type B, SD-family cards, and external USB SSD recording. The camera also offers different recording-destination modes. Do not assume that two inserted cards mean two full-quality originals: confirm the selected mode and its restrictions.
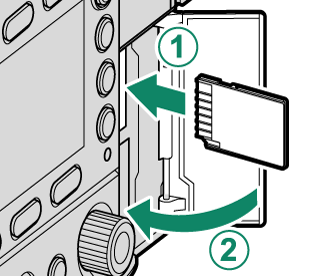
Check Fujifilm's recording-media compatibility list against the exact medium, capacity, and codec combination. A device that works for one recording setting is not automatically approved for every other setting.
An external SSD used as the recording destination is a source device, not automatically a backup. If it holds the only original, protecting that SSD matters just as much as protecting a camera card.
1.2 Keep Originals Separate From Proxies
The camera's PROJECT menu distinguishes recording destinations, MOV or MXF containers, codecs including H.265 and Apple ProRes, and proxy settings. Record the actual settings used; searching only for MP4 files could miss the relevant originals.
Adobe describes proxies as lower-resolution copies for editing. Keep them clearly labeled. A proxy can preserve a reference to the performance, but its availability does not establish that the full-quality original is safe.
Part 2. Diagnose Missing Footage Before Attempting Recovery
Start with a storage map: which card or SSD recorded the material, where was it copied, and which location does the editor reference? Compare that map with the symptoms below. These are different problems, even when all of them look like "lost footage" during an edit.
| What You See | What to Establish | First Action |
| Media Offline in the editor | Whether the original still exists under another path or drive name | Locate and relink the intact file; do not begin with an undelete scan. |
| Clips missing after an interrupted offload | Whether the recording medium still contains complete originals | Make a fresh, verified copy from the intact source to healthy storage. |
| Only proxies or review exports remain | Where camera originals were last stored | Search the original-media backups and recording device, not just the proxy folder. |
| Files deleted or a medium formatted | Which device lost the files and whether it has been reused | Stop writes; consider recovery from that device if it remains stable and detectable. |
| A file exists but will not play | Whether it is incomplete, damaged, or unsupported by the application | Preserve a copy and compare against an intact original before attempting repair. |
| The drive repeatedly disconnects or shows physical damage | Whether continued access is safe | Stop repeated scans and seek professional assessment. |
2.1 Rule Out a Broken Link or Incomplete Transfer
Adobe's offline-media guidance explains that moved, renamed, or deleted source files can trigger an offline state. Confirm the original's location before deciding which problem you have. When relinking, match more than the filename: repeated clip names from different cards can point to different takes.
In Premiere, select the offline clip in the Project panel and open "File > Link Media". In the Link Media dialog, use "Locate" to find the intact source. Check the folder path and matching file properties so a repeated clip name does not reconnect the wrong take.

Example: a shoot SSD still contains the complete recording, but a laptop copy stopped halfway through. The priority is a new verified offload from the SSD, not recovery software on the incomplete laptop folder. Likewise, a disconnected editing drive may need reconnection and relinking rather than file recovery.
Check the Trash or Recycle Bin and any approved backup version history. Restore an intact copy to a separate location first, then confirm it is the original-quality media you need.
2.2 Preserve the Affected Source
Stop recording, copying, rendering, or downloading to the affected storage. Microsoft's file recovery guidance explains that normal computer use can overwrite space previously occupied by deleted files.
For a normally functioning camera, stop recording and let writing finish before powering down and removing the medium; follow the camera's handling instructions. Do not format, initialize, run CHKDSK, or run Disk Utility First Aid on the source before protecting the footage. Those are not substitutes for recovery.
For a stable but unreadable CFexpress card, use a suitable reader and consult the CFexpress Type B recovery guide. If there are repeated disconnects, abnormal HDD noises, water damage, or no reliable device detection, stop experimenting. Irreplaceable footage warrants professional assessment before further reads.
Part 3. Build a Backup Workflow That Survives Card Reuse
A high-resolution video backup plan needs a clear release condition: what must be true before someone erases the recording medium? Set that condition before the shoot, while there is still time to arrange storage and responsibilities.
3.1 Preserve the Complete Recording Package
Organize each card or recording SSD as its own source package. A practical approach is to place the unchanged camera-created folders inside a uniquely named outer folder, such as "Day03_CamA_Roll023". Do not flatten several cards into one folder of identically named clips.
Keep associated files when the recording workflow creates them: sidecars, metadata, and companion audio may belong with the clips. Archive separately recorded sound, camera reports, look files, and the editing project alongside the relevant production records. Do not assume every camera generates the same companion files.
Keep names and folder organization on the original camera medium unchanged. Fujifilm's handling guidance specifically cautions against renaming or deleting its recording folders and files from a computer. Apply organizational labels outside the preserved camera folder tree instead.
Practical rule: maintain separate categories for camera originals, sound originals, proxies, project files, and exports. Treat each as an asset to protect rather than counting a project autosave or finished export as proof that the camera originals are backed up.
3.2 Verify Copies, Not Just Transfer Completion
ARRI's data-transfer guidance recommends checksum-verified backups rather than relying on ordinary file copying. A checksum comparison tests whether the copied file matches the source data. Keep the resulting verification report; an MHL, or Media Hash List, can carry file-identification and hash information through later transfers.
Use an offload tool that verifies the destinations and retains reports. For example, Pomfort Offload Manager documents checksum verification, multiple destinations, and MHL reporting. The important requirement is the verified result, not a particular application's brand.
Run verification for each destination that will count as a backup. Investigate missing files or mismatches rather than dismissing them because the main clip opens. Keep the source unchanged until the discrepancy is resolved.
In an offload interface, distinguish the copy stage from verification. A completed copy whose verification is still waiting is not yet a verified backup.

A matching checksum answers "Did this copy match its source?" It does not answer "Did the camera capture the entire intended take?" Copy verification and picture-and-sound checks therefore have different jobs.
3.3 Separate Copies by Device and Location
The traditional 3-2-1 backup rule calls for three copies, two storage types, and one offsite copy. For a small production, an implementation could be a working SSD, an independent backup HDD, and an approved offsite backup containing the camera originals.
Two folders on one SSD do not provide protection against that SSD failing. Two drives traveling in the same bag do not address loss of the bag. A recording card counts as an additional source copy only while its footage remains intact; after erasure, it no longer counts.
RAID redundancy is not an independent backup, as Seagate's backup guidance emphasizes. Retain a separate recovery path even when editing from shared or redundant storage.
For cloud delivery, confirm what actually uploaded: camera originals, proxies, or review exports. Check completed transfers, access permissions, retention, and the ability to restore an original. A queued upload is not a completed offsite copy.
3.4 Budget Capacity and Approve Card Release
Plan around bitrate and recording time rather than resolution alone. As an illustrative calculation, a sustained 1,000 Mbps recording rate produces approximately 450 GB per hour: 1,000 megabits per second multiplied by 3,600 seconds, divided by eight and then by 1,000. Three complete copies require about 1.35 TB before additional audio, proxies, overhead, and working space. This is a planning example, not a stated GFX ETERNA 55 recording mode.
Allow time to verify copies as well as transfer them. Build the offload schedule from a test using the intended media, readers, cables, destinations, and recording settings; do not assume a drive's advertised peak speed is your verified-copy throughput.
Use a release record for every source medium:
- Copies: the required independent original-media copies exist and their verification reports show no unresolved mismatch.
- Content: the expected rolls, takes, and companion assets are accounted for, with picture or sound problems recorded.
- Approval: a named person signs off the card or recording SSD for reuse under the production's backup policy.
If the required offsite copy is still uploading, retain the source or another protected copy according to that policy. Storage pressure alone should not silently change the release criteria.
Part 4. Recover Deleted Footage From the Correct Card or Drive
When no intact copy is available and the source remains stable and detectable, Wondershare Recoverit Video Recovery is an option for logical loss on camera cards and computer-connected storage. Its relevant role is finding recoverable media, including supported fragmented-video workflows, not replacing an offload or backup system.
4.1 Prepare a Recovery Destination Before Scanning
Use a healthy computer and a separate healthy destination with room for the recovered material. Check that the destination can store your largest individual clip. Do not install software or save recovered files onto the source that lost them.
Identify whether the loss occurred on the recording medium, an offload drive, or the editing computer. For missing files on a detectable external disk, the hard-drive recovery page covers that storage scenario. A scan of an unrelated computer disk cannot recover bytes that were only recorded to an external SSD.
Recovery after SSD deletion is especially conditional: overwrite, TRIM, and device behavior can make data unavailable. Review the SSD recovery limitations; do not rely on a fixed recovery window or a promise that software can reverse erasure.
4.2 Scan, Review, and Save With Recoverit
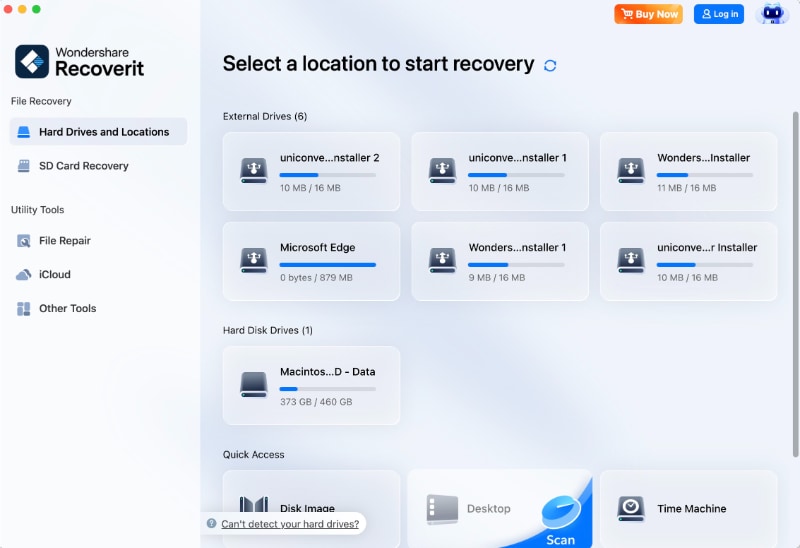
The official Recoverit Mac guide documents location selection, scanning, filtering, preview, and saving. Use the installed edition's available controls; interface labels can differ between versions.
Step 1. Select the Source That Held the Missing Footage
Connect the card through a compatible reader, or connect the affected external drive. Select that source in Recoverit. Confirm its identity against your media log rather than choosing a disk simply because it appears first.
Step 2. Scan for the Relevant Original Media
Run the scan and narrow results with the available file-type, name, date, or size filters. For a GFX ETERNA 55 job, use the recorded MOV or MXF setting to guide the search; do not assume the originals must be MP4.
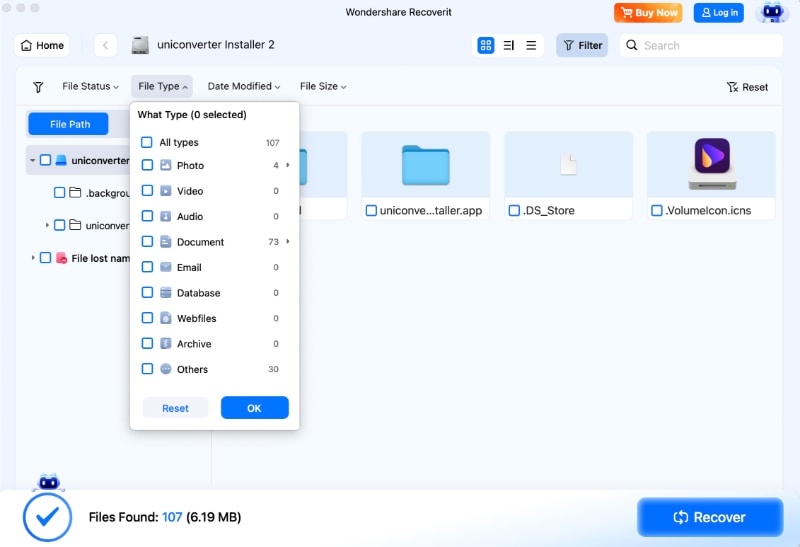
For supported video-fragment recovery, the guide describes "Enhanced Recovery" and a format-selection stage. Choose the relevant offered formats. This feature is not evidence that every GFX ETERNA 55 codec, recording mode, or damaged clip can be reconstructed.
Step 3. Preview Candidates and Save to Another Drive
Preview supported clips and select the required material. Check the current edition's saving and licensing conditions; a scan result is not an unrestricted export entitlement.
Click "Recover" and choose the separate healthy destination drive. Do not save recovered files back to the source card or drive. Preserve associated assets where available.
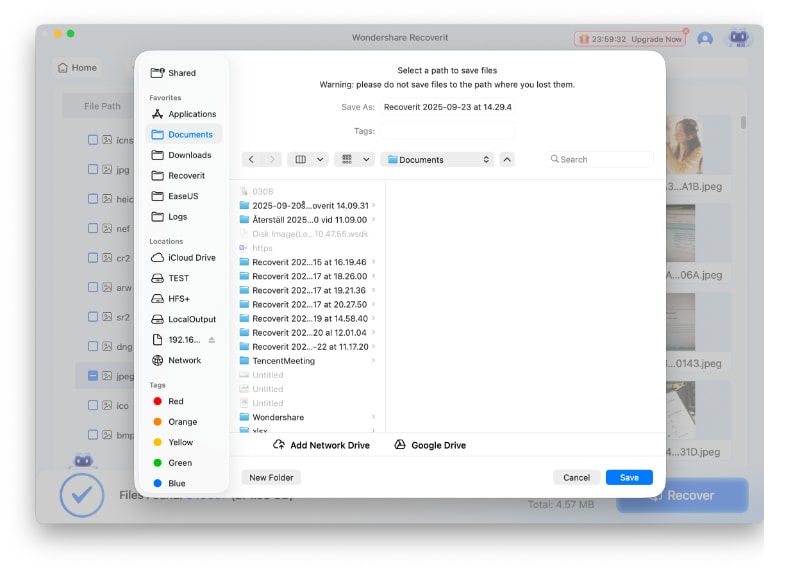
Step 4. Validate the Saved Files in Your Editing Workflow
Use the checks in Part 5 before calling the recovery complete. Do not erase the source because a short preview played successfully. Keep the recovered copy unchanged while testing duplicates in your editing application.
Recover Deleted Footage From the Correct Card or Drive
 Security Verified. Over 7,302,189 people have downloaded it.
Recovery limits: software cannot guarantee restoration of overwritten data, repair a physically failed storage device, or recreate frames that were never recorded. File-extension support does not establish that a particular damaged production clip will recover intact.
Part 5. Check Whether Recovered Footage Is Ready for Editorial
Keep three separate acceptance questions: Was a file recovered? Does it match an earlier verified original? Can the production use it? A filename, thumbnail, or brief preview cannot answer all three.
5.1 Check the Clip, Not Just Its Extension
Use the camera report, sound report, original-media manifest, and editing project as comparison points. Apply this acceptance checklist to the saved recovery results:
| Check | Compare Against | What to Flag |
| Identity and completeness | Roll, take, expected clip count, and recording duration | A similarly named take, absent companion file, or truncated recording |
| Image dimensions and framing | The recorded resolution and aspect ratio | A proxy, cropped review export, or lower-resolution substitute |
| Codec and recorded characteristics | Container, codec, frame rate, and available bit-depth information | An unexpected transcode or a file the chosen application cannot decode |
| Picture across the clip | Full-duration playback or appropriate technical quality control | Decode errors, freezes, black sections, or a missing ending |
| Sound | Expected tracks, channel content, and synchronization | Missing channels, silent sections, or audio drifting out of sync |
| Editorial identity | Timecode, reel or clip identifiers, and associated metadata where present | A relink to the wrong source or metadata needed for conforming the edit |
Checking the start, middle, and end is useful triage, not proof that the intervening footage is intact. Give critical takes full-duration review or suitable technical QC, then confirm the required creative content is present.
If a clip fails in one application, confirm that the application supports the actual codec and recording profile before labeling the file corrupt. Keep testing and any conversion work off the recovery source.
5.2 Distinguish Verification From a New Baseline
If a trusted pre-loss checksum exists for the exact unchanged original, compare the recovered file with it. A matching result provides evidence of byte-level agreement with that earlier file. If recovery or repair changed the file, do not present a new checksum as a match to the original.
When no earlier manifest exists, create a checksum after validating the recovered material and retain it for future transfers. That establishes a baseline from this point forward; it does not retrospectively prove that every original byte was recovered.
Record uncertainty explicitly. "Recovered and plays through, no original checksum available" is a more useful handoff note than an unqualified "100% recovered."
5.3 Relink a Duplicate Project and Preserve the Recovery Copy
Test recovered media in a duplicate editing project before replacing links in the working master. Confirm the correct take, duration, timecode, sound, and framing at the affected edits. Do not overwrite an intact original with an unverified recovery candidate.
When a recovered file needs repair, work on a duplicate after recovery. Recoverit's video guidance separates these tasks: recovery locates retrievable data; repair addresses damage in an available file. Neither should be described as a way to restore information that no longer exists.
If only a proxy survives, preserve it and label it as a fallback. Any decision to use that lower-quality material for final delivery should be explicit, not hidden behind a recovered original's filename.
Part 6. Hand Off Evidence Alongside the Footage
Give the editor or post-production supervisor enough information to understand what was recovered and what remains uncertain. A useful handoff contains the validated media location, source card or SSD identifiers, available verification reports, associated sound and project assets, and a list of incomplete or questionable clips.
For a Pomfort offload workflow, export the offload report for the relevant source or group and keep it with the production handoff. That report documents the backup transfer; it does not certify the quality of a later recovery.

Keep the source medium protected until the responsible person accepts the recovery outcome or approves the next professional recovery step. Update the media log so nobody mistakes "recovery finished" for "safe to format."
For future shoots, rehearse one restore before production begins: retrieve an original from the backup destination, validate it, and open it in the intended editing workflow. A backup procedure should include the route back to usable media, not end when the upload or offload finishes.
Conclusion
Protecting high-resolution filmmaking footage is a chain of decisions: identify the real recording source, preserve complete originals, verify independent copies, and control when media can be reused. When loss occurs, restore an intact backup first; consider Recoverit for recoverable logical loss on stable storage, and save results elsewhere.
The final milestone is editorial acceptance, not a populated recovery folder. Keep the evidence that connects a recovered clip to the original take, and make any remaining limitations visible before the footage returns to production.
FAQ
-
Can high-resolution footage be recovered after a camera card is formatted?
Sometimes, but resolution alone does not determine recoverability. Formatting behavior, subsequent recording, remaining file data, and device condition matter. Stop using the card, check independent originals first, and assess recovery only while the source can be accessed safely. -
Is an external SSD recording the camera feed also a backup?
Not when it holds the only original. Treat it as acquisition media until another complete, independently stored copy has been verified. Confirm the camera's actual recording mode rather than assuming that an inserted card also contains the same recording. -
Can a proxy restore the original resolution of missing camera footage?
A lower-resolution proxy is not a full-quality original. It may serve as reference or an approved fallback, but upscaling it does not recover the original camera file. Search the acquisition medium and original-media backups separately. -
Does a successful video preview prove the whole recording was recovered?
No. A preview may cover only part of a clip and does not establish full-duration picture, sound, or metadata integrity. Save the candidate to another drive and validate it against the production records and intended editing workflow. -
Can Recoverit recover GFX ETERNA 55 footage from CFexpress cards or SSDs?
Recoverit lists recovery workflows for readable camera cards and drives, including common formats such as MOV and MXF. That is not a guarantee for every GFX ETERNA 55 recording mode or damaged clip. Evaluate the actual source, recorded format, and recovered files before accepting the result.


