

Windows Automatic Maintenance is a tool that comes with Windows that does important tasks in the background to keep your system running smoothly. In order to improve speed and security, it runs updates, security scans, disk optimization, and other maintenance tasks automatically. In order to minimize disruption to your work, these tasks are scheduled to run when your computer is idle.
To avoid system errors, slowdowns, and security risks, it's important to know how Windows Automatic Maintenance works. You can change its schedule or disable it if necessary, even though it runs by default. In this guide, we'll talk about how it works, what its benefits are, and how to manage it well. You can make your PC run faster by learning how to improve this feature, whether you're a casual user or a tech nerd.
Try Recoverit to Perform Data Recovery
 Security Verified. 3,591,664 people have downloaded it.
In this article

What Is Windows Automatic Maintenance?
By carrying out important computer tasks in the background, Windows Automatic Maintenance is a feature designed to keep your computer running smoothly. Automatically running updates, disk optimization, and security scans help keep the system running well and safely. To ensure minimal disruption to your activities, these tasks are scheduled to run when your computer is idle.
Because it stops slowdowns, system crashes, and security flaws, Automatic Maintenance is an essential component of Windows. Several maintenance tasks are rolled into one automated process, such as Windows updates, software updates, and checking for errors. Without the need for manual intervention, this makes sure that your PC stays in good shape.
Automatic Maintenance works in the background without making a sound, which is one of its best features. You don't have to worry about running disk cleanup tools manually or scheduling disk updates. While the computer is not being used, Windows takes care of these tasks when it is convenient for it. The user can change the schedule, or they can disable it.
If you know how Automatic Maintenance works, you can get the most out of your PC. If your computer seems slow or unresponsive, you might want to check the maintenance settings to make it work better. When necessary, you can also initiate manual upkeep.
We'll look at what Automatic Maintenance does, how it helps your system, and how to manage its settings in this guide. Do you want to have full control over your PC, or are you just a casual user? Knowing how to use this feature can help your system run smoothly.
How to Start or Stop Automatic Maintenance Manually?
By running updates and performance tasks in the background, PC Automatic Maintenance helps keep your system running at its best. You may want to start or stop it manually for better control, even though it runs automatically. Here, we'll show you how to manage PC Automatic Maintenance so that your computer runs smoothly and without unanticipated slowdowns or breaks.
Method 1: Using Control Panel
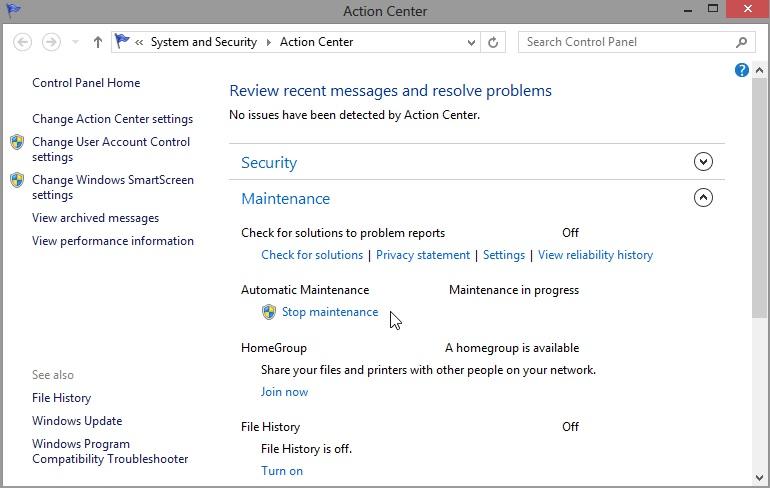
You can use the Control Panel to manage Automatic Maintenance Windows 10 and keep your system running smoothly. You can manually start or stop maintenance tasks like disk optimization and updates in this way. You can make sure your PC stays at its best without any problems by going to the Security and Maintenance settings. If you follow these steps, it will be easy to control Automatic Maintenance.
Steps:
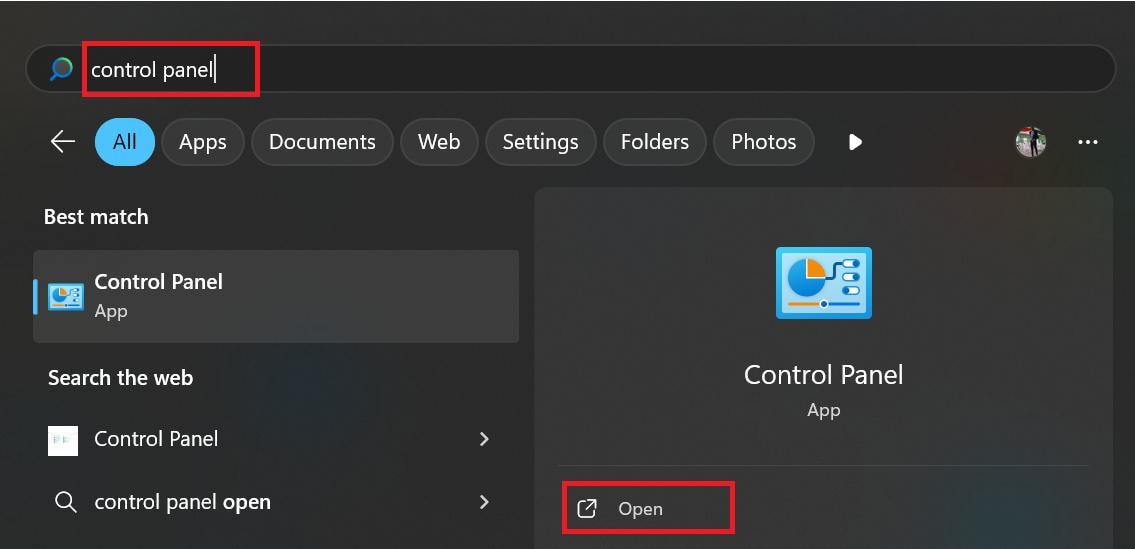
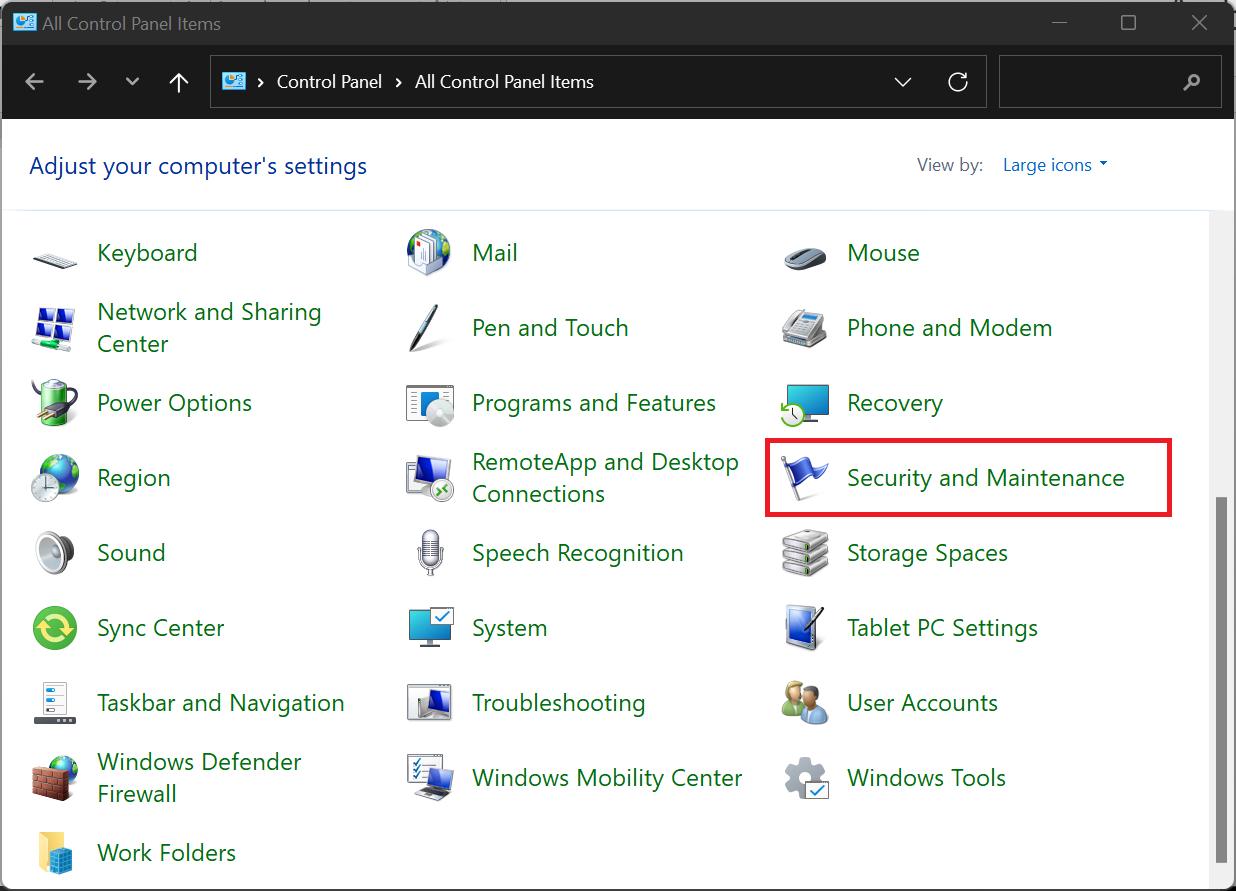
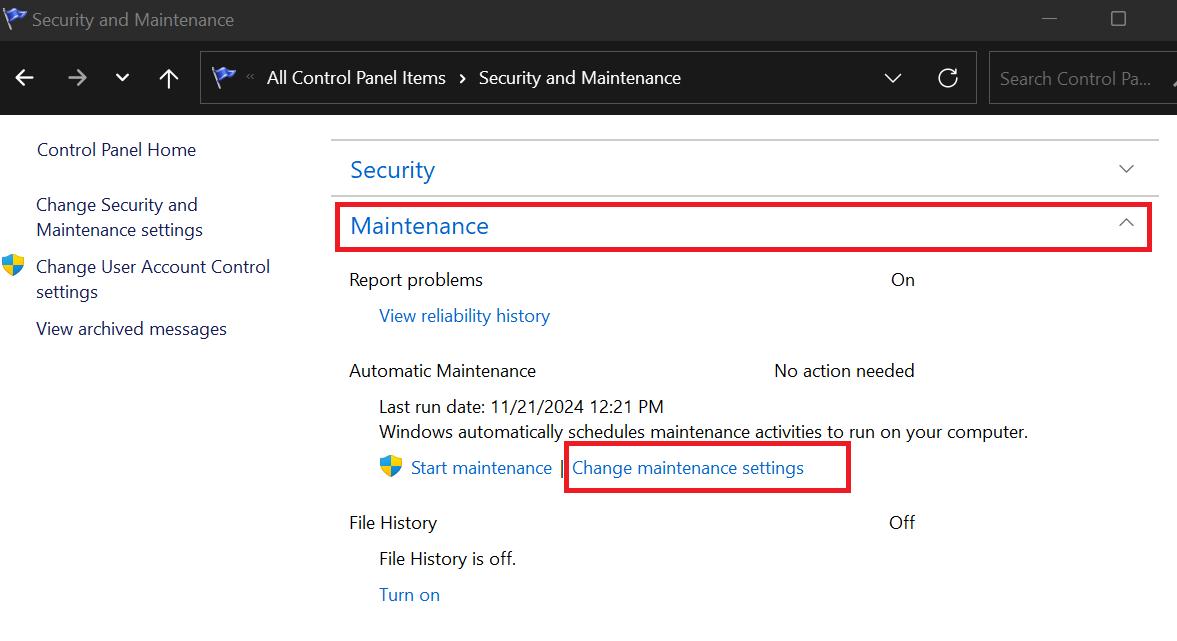
1. Open the Control Panel by typing "Control Panel" in the Windows Search bar and pressing Enter.
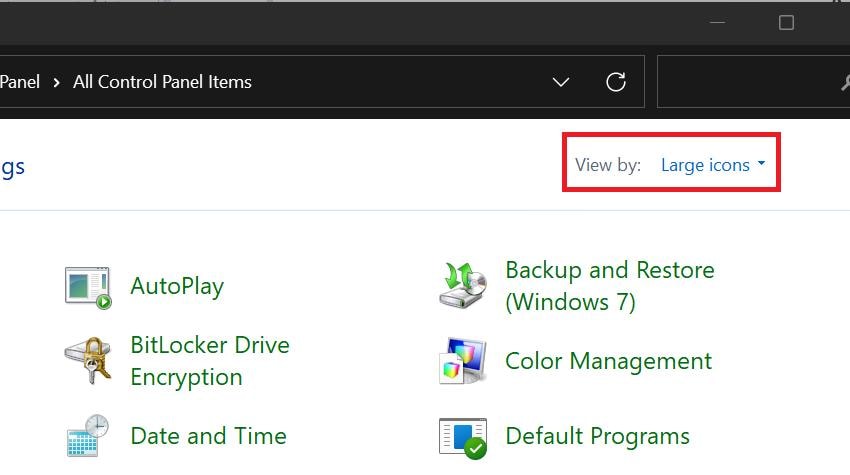
2. In the View by dropdown menu, select Large icons to see all available options.
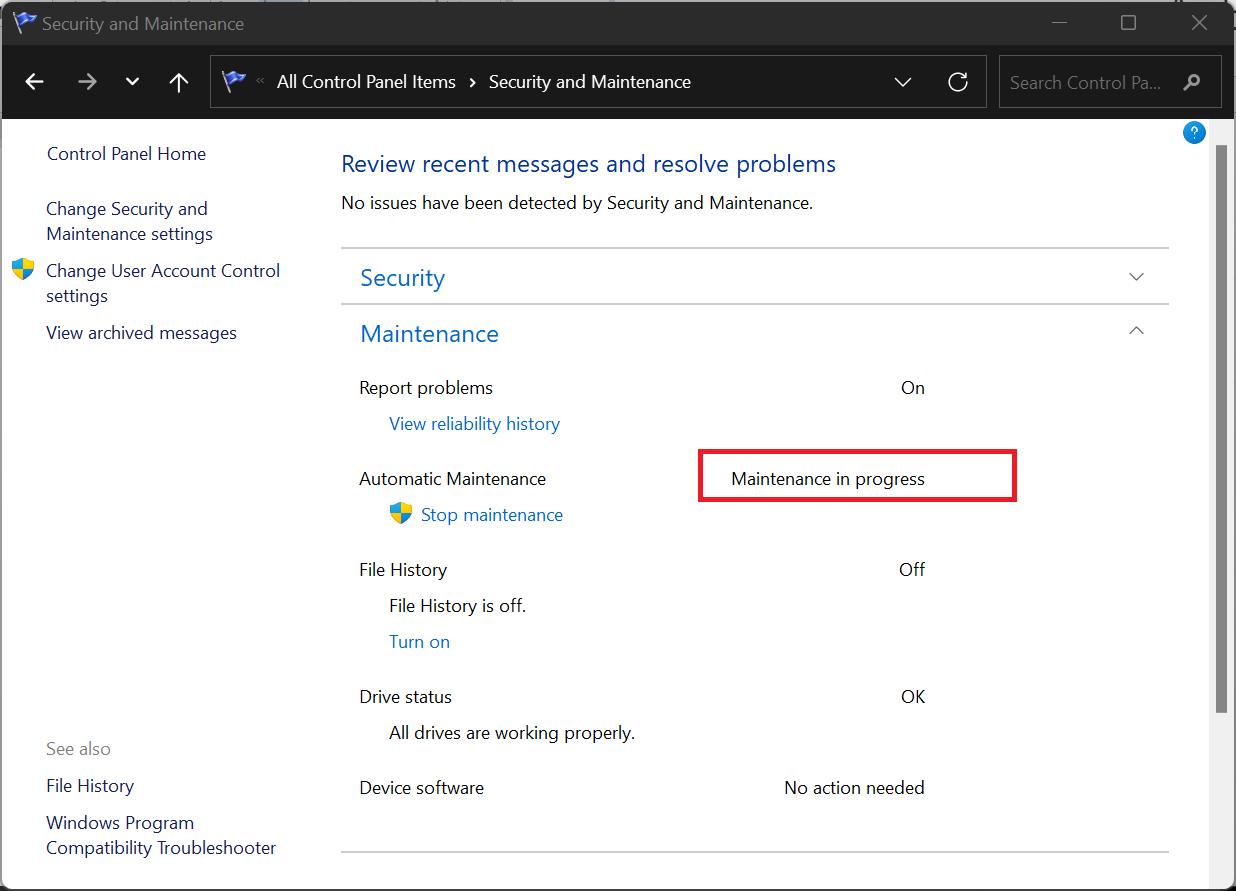
3. Scroll down and click on Security and Maintenance in the lower right section.

4. Expand the Maintenance section by clicking the arrow, then click Start Maintenance under Automatic Maintenance.

5. The maintenance runs in the background. You may notice slight system slowdowns, but once complete, your PC's performance should improve.
Method 2: Using the Command Prompt
The Command Prompt provides a quick way to manage Automatic Maintenance Windows 11 without navigating through menus. You can personally start or stop maintenance tasks to keep your system running at its best with just a few simple commands. Advanced users who like command-line control can use this way. If you want to use the Command Prompt to manage Automatic Maintenance effectively, follow these steps.
Steps:
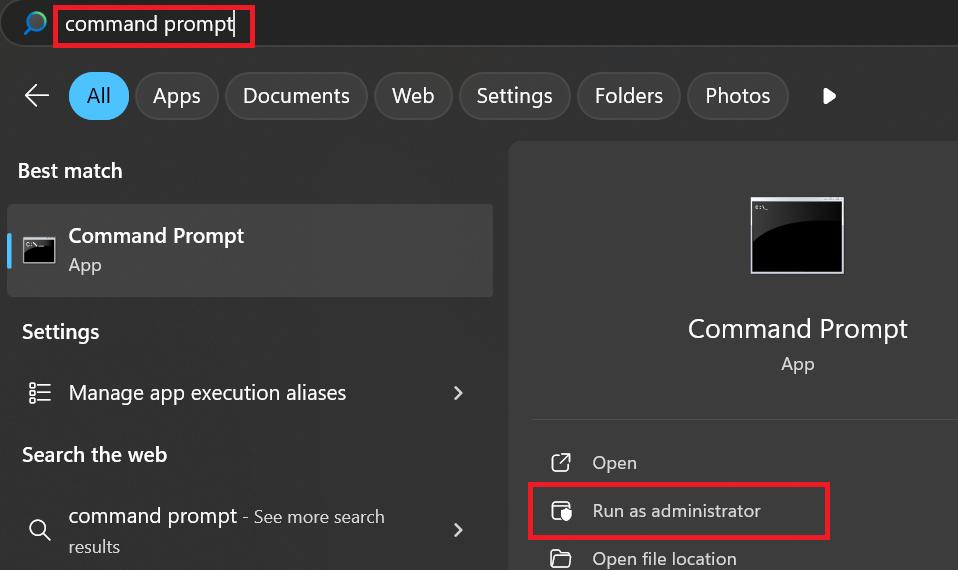
1. Open Command Prompt by typing it into the Windows Search bar, then right-click and select Run as administrator. Confirm the admin prompt that appears by clicking Yes.
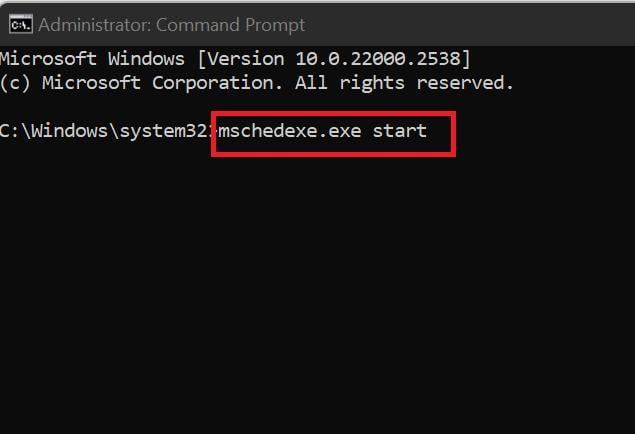
2. In the Command Prompt window, type mschedexe.exe start and press Enter to initiate the automatic maintenance process on your system.
How to Customize Automatic Maintenance in Windows 10/11?
Customizing Automatic Maintenance Windows 10 or Windows 11 allows you to control when and how maintenance tasks occur, helping optimize system performance. You can change the schedule, initiate or stop maintenance directly, or even completely disable automatic maintenance in Windows 10. Here are the steps you need to take to make the maintenance settings fit your needs.
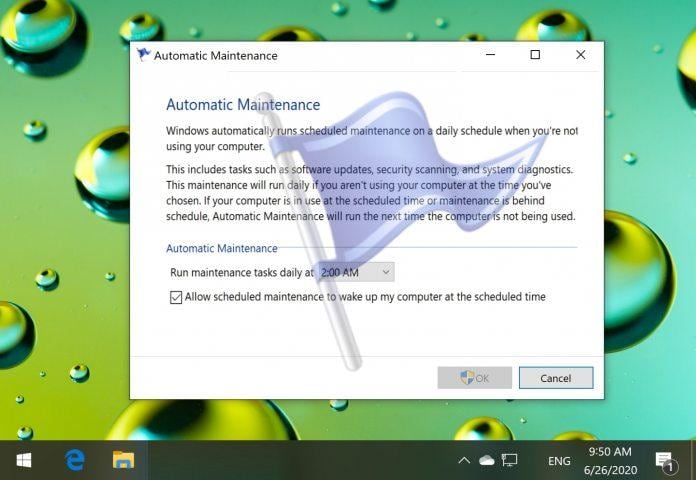
Tip 1: Set maintenance time using Control Panel
What is Windows Automatic Maintenance? It's a feature that keeps your system running smoothly by carrying out important tasks like updates and system optimization. The Control Panel lets you schedule maintenance so that these tasks happen at a good time for you. This guide will show you how to set up and schedule automatic maintenance so that it works at its best.
Steps:
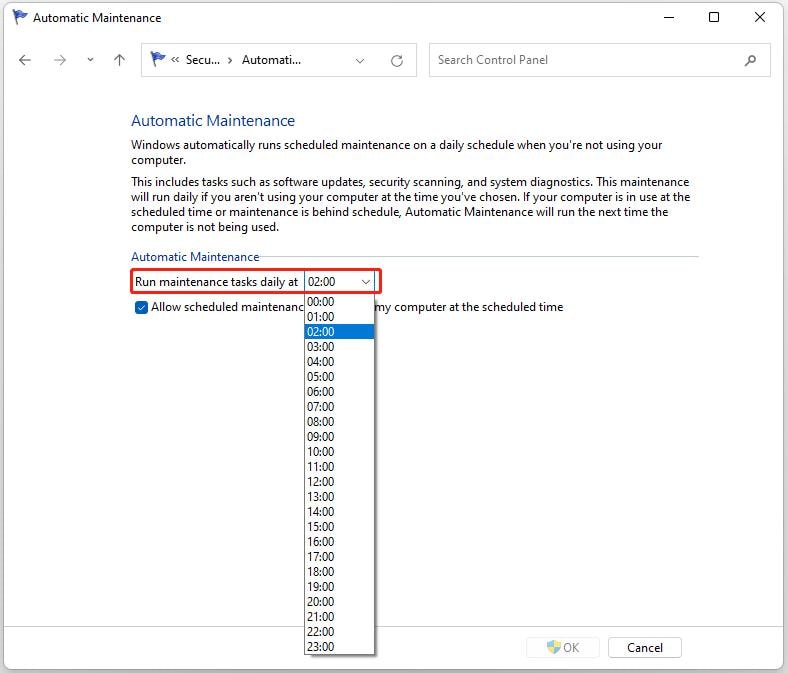
1. Open the Control Panel and navigate to Security and Maintenance.
2. In the Security and Maintenance window, click on the Maintenance section to expand it, then select Change Maintenance settings from the options below.
3.new window will appear where you can click on the default scheduled time. Choose a more convenient time from the list of available options to suit your needs.
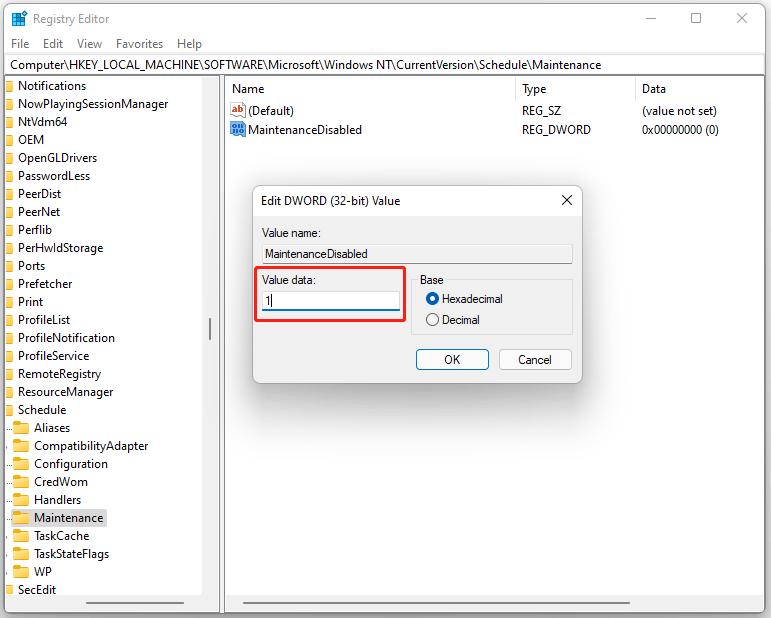
Tip 2: Set maintenance time using the Registry Editor
You can customize Windows Automatic Maintenance by setting a specific maintenance time through the Registry Editor. This advanced method allows you to fine-tune the maintenance schedule to fit your preferences. Here are the steps to modify the maintenance time using the Registry Editor for better control over system optimization tasks.
Steps:
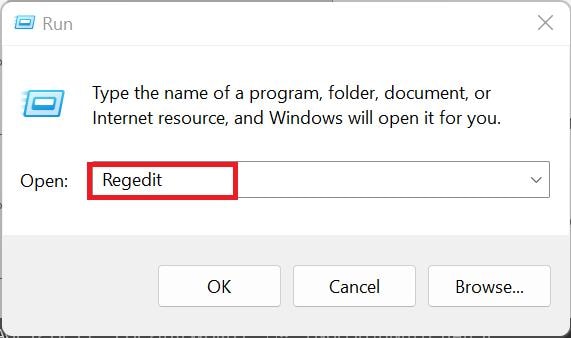
1. Open Run by typing it into the Windows Search and clicking Open.
2. In the Run box that appears, type Regedit and click OK or press Enter. If prompted by the User Account Control (UAC), click Yes.
3. In the Registry Editor, paste the following path into the navigation pane: Computer\HKEY_LOCAL_MACHINE\SOFTWARE\Microsoft\Windows NT\CurrentVersion\Schedule\Maintenance
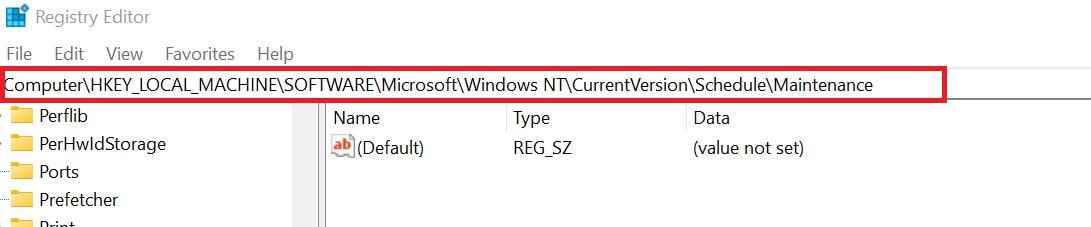
4. In the right pane, double-click on Activation Boundary and enter the desired time for maintenance in the Value data field.
Essential Tasks Windows Automatic Maintenance Carries Out
By running important tasks without user intervention, Windows Automatic Maintenance is a built-in feature designed to improve system performance and security. By doing necessary maintenance in the background while you're not using the computer, this function keeps your PC optimized and up to date. To make sure your Automatic Maintenance system runs smoothly, let's look at some of the most important tasks it performs.
1. Windows Updates
Your PC will always have the most recent Windows updates thanks to Automatic Maintenance. This includes both updates for security and better features. Updating your system helps protect against security holes and makes sure that your device has the newest features and security fixes. Regular updates lower the chance of errors and generally make the system work better.
2. Security Scans
In automatic PC maintenance, running security scans is one of the most important tasks. There are malware, viruses, and other possible threats that could damage your system, which it checks for. Windows makes sure that your PC is safe by running security scans automatically without any manual work on your part.
3. Disk Optimization
If you want to keep your hard drive running smoothly and avoid slowdowns, Automatic Maintenance will do disk optimization tasks on a regular basis. This includes rearranging and defragmenting files to make them easier to get to. Slower PCs can get disk fragmentation over time. Automatic Maintenance takes care of this problem for you without you having to do anything.
4. Error Checking
System errors, like corrupted files or problems with the system that could cause crashes or poor performance, are also checked for by Automatic Maintenance. It makes sure that your system doesn't break down without warning by automatically finding and fixing these errors.
5. System Performance Monitoring
This function checks your system's general performance on a regular basis, looking at things like disk space, memory usage, and processing power. If it finds problems that need to be fixed, like not enough disk space, it tells users what they need to do to make the system work better.
Windows Automatic Maintenance Problems
There are times when Automatic Maintenance Windows 10 and Automatic Maintenance Windows 11 might not work properly, but they are easy to use to keep your system working well. Among these issues are maintenance features that don't work at all and speed slowdowns. Knowing about these problems can help you fix Automatic Maintenance and make sure it's working right. Let us look more closely at some of the most usual issues.
1. Windows Automatic Maintenance Stops Running
One of the most annoying things is when Automatic Maintenance stops working all of a sudden. The reason for this could be damaged system files, software issues, or changes made to the system settings. Automatic Maintenance may not be able to do important tasks like updates or security scans if it is not running. This could leave your PC open to threats. Often, this can be fixed by running the System File Checker or looking for software conflicts.
2. Automatic Maintenance Starts at the Wrong Time
Automatic Maintenance often starts up at bad times, which is another common issue. The maintenance tasks are typically scheduled to run when your system is not in use, but this can occasionally cause problems. Unexpected slowdowns or breaks in your work may result from this. Using the Control Panel or Task Scheduler, you can change the time that Automatic Maintenance runs in Windows 10 and 11. This way, it will happen at a more convenient time for you.
3. Automatic Maintenance Takes Too Long to Complete
Automatic maintenance might sometimes take longer than planned to finish its tasks. This could be because your hard drive is too fragmented, you have a lot of updates that need to be installed, or your disk is full. Your system can slow down when a repair takes longer than planned. Checking the health of the disk often and freeing up a room can help the process go faster.
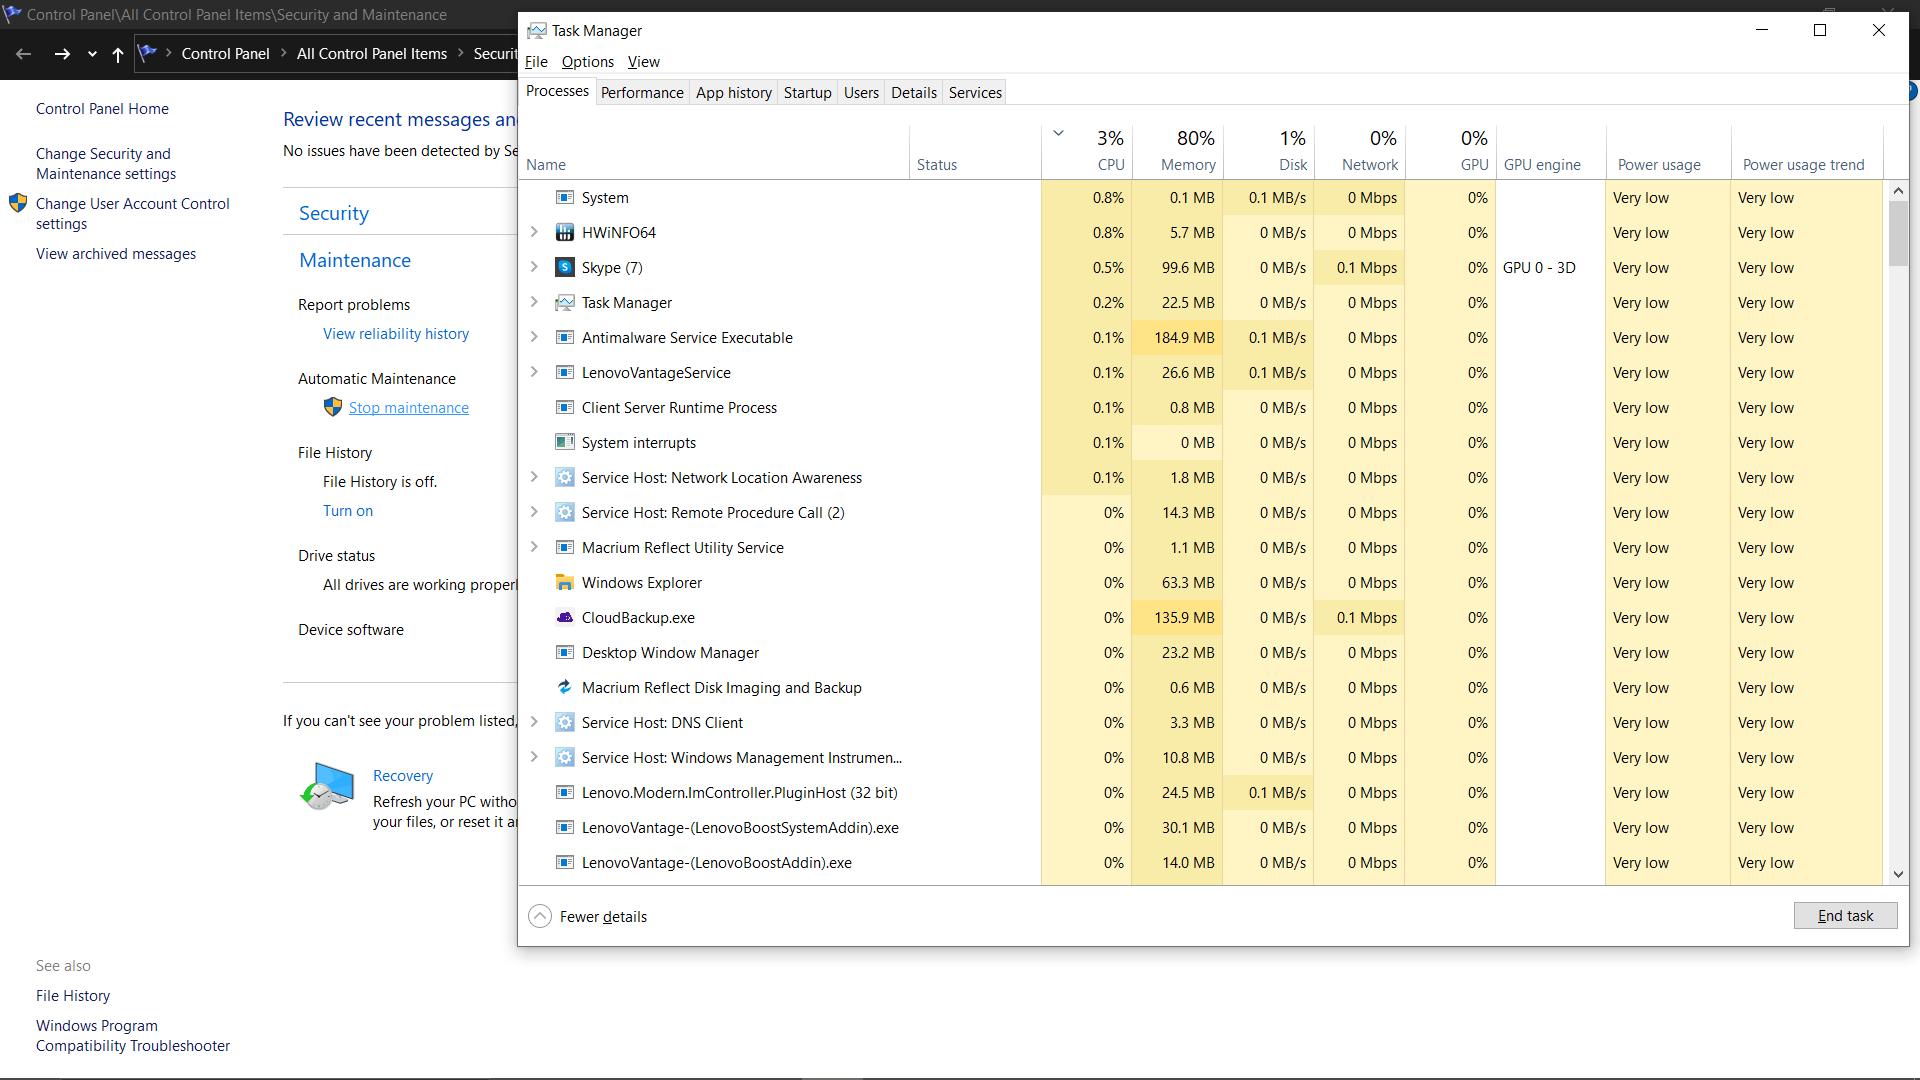
4. Windows Automatic Maintenance Causes High CPU Usage
Another problem is when Automatic Maintenance uses a lot of CPU power, which makes your PC run slower. This might happen if your system is running low on resources or if many tasks are being done at once. Keeping an eye on your system's task manager during maintenance can help you find and get rid of any processes that aren't needed and use too much CPU power.
The Role of Data Recovery Software Wondershare Recoverit in System Maintenance
Amazing Share Recoverit is a powerful piece of software for recovering lost or inaccessible files that was designed with the user in mind. It uses complex scanning techniques to find files based on their metadata and get them back. When you delete important files by mistake, or your system crashes, Recoverit can help you get them back. This guide will show you how to add Recoverit to your system maintenance routine if you want to disable automatic maintenance Windows 10.
Steps:
1. Begin by downloading Wondershare Recoverit from the official website and installing it on your computer.

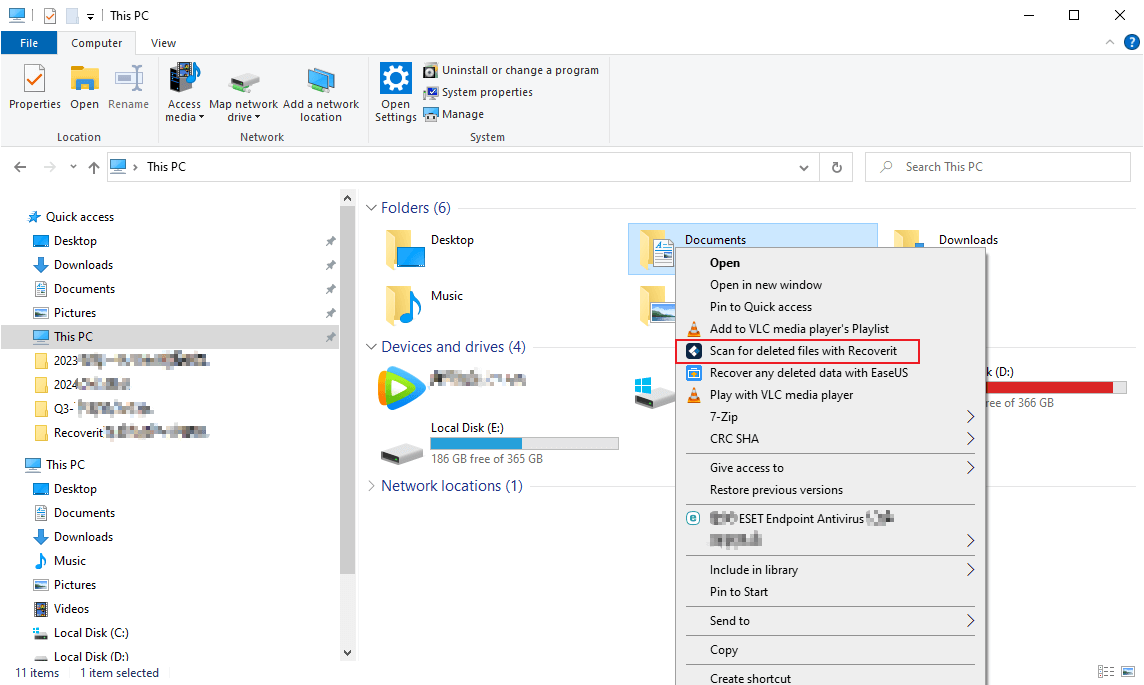
2. Open the program and select the location to start data recovery. You can scan the entire disk, a specific partition, or an external device. If you're looking for a particular folder, navigate to Quick Access and select Desktop, Select Folder, or Recycle Bin to scan specific locations.
3. Alternatively, find the folder where data loss occurred, right-click on it, and choose Scan for deleted files with Recoverit.
4. The scan will start automatically, and you can track its progress through the progress bar at the bottom of the screen. Watch as the results appear in real time.

5. You can filter results by File Type, Time, and File Size. To find specific files, simply type keywords into the search bar in the top right corner.

6. Once you find a file you'd like to recover, double-click it or hit the Preview button. This allows you to verify that the file is intact and not damaged.
7. Click the Recover button in the Preview window, or go back to the scan results to select multiple files. Choose a new location for recovery and click Recover.

8. If you're not ready to recover files, save the scan results for later. Click the save button in the top right corner of the screen.

With these simple steps, Recoverit makes data recovery easy and efficient, offering a user-friendly interface and powerful features for quick and effective file restoration.
Conclusion
In conclusion, Windows Automatic Maintenance is a useful feature that helps keep your system running smoothly by handling tasks like disk optimization, security scans, and system updates. But problems can happen, like maintenance not running or CPU usage being too high. Tools like Wondershare Recoverit are very important for keeping systems running because they make it easy to get back lost info. By understanding what is Windows Automatic Maintenance, users can effectively manage and troubleshoot their system for better performance.
FAQ
1. Should I disable Windows Automatic Maintenance?
If you turn off Automatic Maintenance, important system tasks like updates and security scans might not get done, which could cause the system to run less quickly or leave security holes. Most of the time, leaving it on is best.2. Is it necessary to keep Automatic Maintenance on?
Yes, turning on Automatic Maintenance will keep your system up-to-date, safe, and running at its best. Without the need for manual intervention, it automatically handles tasks like updates, security scans, and disk optimization.3. What happens if the Automatic Maintenance feature is disabled?
If you turn off Automatic Maintenance, you might miss updates, get more system errors, and see your computer run slower. It can take a lot of time to manually manage updates, security scans, and other maintenance tasks.
 ChatGPT
 Perplexity
 Google AI Mode
 Grok
Grok


