How to Fix Bootrec Fixboot Access is Denied
You can bypass the "bootrec fixboot access is denied" error on Windows 10 by using Diskpart to assign a drive letter to the hidden EFI partition and rebuilding the BCD file.
● The access denial is triggered primarily when using Windows 10 version 1707, 1709, or 1803 installation media, whereas version 1703 executes the command without conflict.
● Disabling Fast Boot and Secure Boot in the BIOS settings and modifying the system boot mode from UEFI to Legacy can eliminate access restrictions during the repair process.
● If standard rebuilding fails, completely repair the bootloader by using a Windows 10 installation disc to format the EFI partition to the FAT32 file system and recreate the boot files via the bcdboot command.
Ask AI for a summary
Many times, users will run bootrec /fixboot command when they experienced a failure in the booting process. However, you might get "bootrec fixboot access is denied" error. If such a thing has happened on your system, you have landed at the right platform to get the possible solutions to fix it.
The Error "bootrec fixboot access is denied" – How does it occurs
If a user tries to execute bootrec/ fixboot command, then he or she might end up in getting the "bootrec fixboot access is denied" error. Bootrec command acts as the best way to fix some startup issues like BSOD, missing of bootmgr, etc. It follows the process of rebuilding the BCD file for resolving the error. However, this error "bootrec fixboot access is denied" occurs due to various reasons. We discussed three main causes that are shared below:
- If there is a startup setting that you want to avoid or remove, but the Boot manager processes it by using bootrec/fixboot command in the CMD, then the Access is denied error will be display on the screen.
- A corrupted or damaged BCD and Windows file is another cause behind the error.
- The most probable cause is your Windows version. If your system has been updated to Windows 10 1707 or Windows 10 1709, the risk of getting the error is high. These two versions of Windows are not suitable for the bootrec/fixboot command.
The error "bootrec fixboot access is denied" will sometimes appear while trying to solve any startup problem by running bootrec/fixboot command in the command prompt. Keep in mind that the issue "bootrec fixboot access is denied" is mainly due to the disk partition, BCD file, and boot manager problems.
Solutions to help resolve: bootrec fixboot access is denied
Solution 1: Name the Hidden Boot Partition on Your Drive
Before moving to the solution, make sure that there is no reserved partition in the HDD, or SSD drives o your laptop or computer. If you are not aware of this, get some more information from Google. If it exists, you are not allowed to repair due to the lack of name. Even after this, you can provide the name by using Diskpart and repair it effortlessly with some simple steps. Assuming that your computer is facing boot issues and you are not able to get access to the operating system, we are sharing these steps to help you in naming a hidden boot partition.
Step 1: Download the Media Creation tool from Microsoft's site. Open and accept terms and conditions.
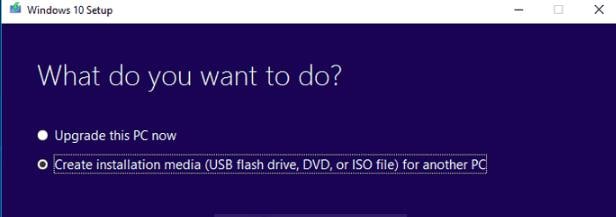
Step 2: Choose "Create installation media (USB flash drive, DVD, or ISO File)" for another PC
Step 3: Uncheck "Use the recommended options for this PC" to set the right setting for the PC along with the password. Depending on your computer settings, language, architecture, and other settings of the bootable drive will be selected.
Step 4: Click on "Next" and then USB Drive or DVD when asked to choose for storing the image.
Step 5: Again, click "Next" and select USB or DVD drive from the given list that will display the connected storage media to your PC.
Step 6: Hit "Next" and the Media Creation tool will start downloading files for installation.
Step 7: As you have the recovery media now, begin solving the booting issue by running command prompt from the recovery drive, which you wish to boot from. Now, insert your recently created installation drive and boot the PC.

Step 8: As the command prompt has opened, type the following commands and hit "Enter" after typing each one
- diskpart
- sel disk 0
- list vol
Step 9: Check if the EFI partition is utilizing a FAT32 file system and give a drive letter to it. Use the subsequent command but remember to replace <number of volumes> with the number written next to EFI partition. In the <drive letter>, choose according to your wish.
- set vol <number of volumes>
- assign letter = <drive letter> :
- exit
Step 10: Open the boot folder, type the command "cd /d <drive letter>:\EFI\Microsoft\Boot\." Replace the drive letter with the one you used for the EFI partition above.
Step 11: Type the command "bootrec/Fixboot for fixing EFI partition
Step 12: At last, rebuild the BCD using these commands:
- ren BCD BCD.old
- bcdboot c:\Windows/ 1 en-us/ s <boot letter> : All
Solution 2: Disable Fast Boot in BIOS
Disabling Fast Boot in BIOS will help you in dealing with the access is denied error. It empowers you to enhance the speed of the booting process. Let's find out what you need to do.
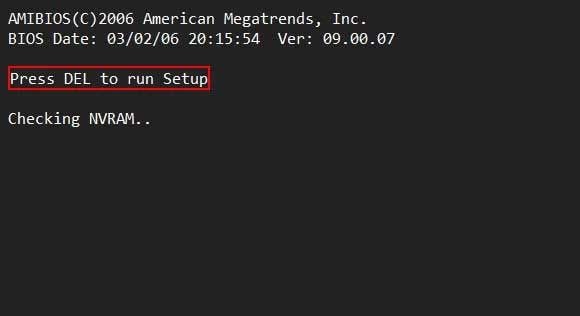
Step 1: Enter into the BIOS setting using the key displayed on the boot screen. Usually, F1, F2, Del, and so on can be used.
Step 2: Under the Boot tab or advanced BIOS features tab, find the Fast Boot, Quick Power on Self-Test, or Quick Boot option. After finding the right setting, turn it off or disable it.
Step 3: Besides, disable the secure boot option by hitting on the right arrow key and select the security menu in the BIOS setting windows. The down key can be used for the Secure Boot Configuration menu and hit "Enter".
Step 4: Avoid the warning and press F10. Choose Secure Boot with down arrow key and change it with the right arrow key.
Step 5: Last, modify the boot mode from UEFI to Legacy. It might be located in various tabs based on your PC's manufacturer.
Step 6: When you find the Boot Mode option, click on it, and tweak the value to Legacy. Also, change UEFT/BIOS Boot Mode as Legacy.
Step 7: Exit now and select "Exit Saving Changes".
No Solution Worked? – Try This Bonus Tip!
Got frustrated with trying all the above solutions and still facing the same problem? Try this bonus tip because these steps are known to handle the "bootrec fixboot access is denied" in the best way. You need to repair the bootloader.
Step 1: Use a Windows 10 installation disc to boot your PC. Press on any key to continue.
Step 2: Click on "Repair your computer"> "Troubleshoot"> "Advanced Options">" Command Prompt".
Step 3: Enter diskpart in the command prompt.
Step 4: Start typing the following command and hit enter after each one of them
- List disk
- Sel disk 0
- List vol
- Sel vol 4
- Assign letter = N:
- Exit
Step 5: Type N: (assigned drive letter and press Enter)
Step 6: Format EFI Partition with the command "N: /FS: FAT32"
Step 7: Type "bcdboot C:\windows /s N: /f UEFI" and press "Enter." It will repair your bootloader.
How to Recover Data from the Computer when All Solutions Fail to Fix the Issue?
Updating your Windows 10 to its latest version may enhance your working experience, but it can be buggy too. The booting process gets poorly affected, which can result in loss of data. For this scenario, you must use a third-party tool. Recoverit Data Recovery tool is the most useful data recovery application that we have ever seen. When no solution works, you should follow the steps given below to recover data from the computer:
Video Tutorial: How to Recover Deleted Files on Windows 10/8/7 Easily?
Step 1: Run Recoverit on your system. If you haven't installed it yet, visit the official link to download. Run and choose a data recovery mode. If your Windows 10 is not booting, select the "Recover from Crash Computer" mode. Next, click on the "Start" button.

Step 2: Choose a mode for creating bootable drive from USB bootable drive.

Click on "Create" >" Format now" for confirmation. A pop up will appear asking you to format USB drive.
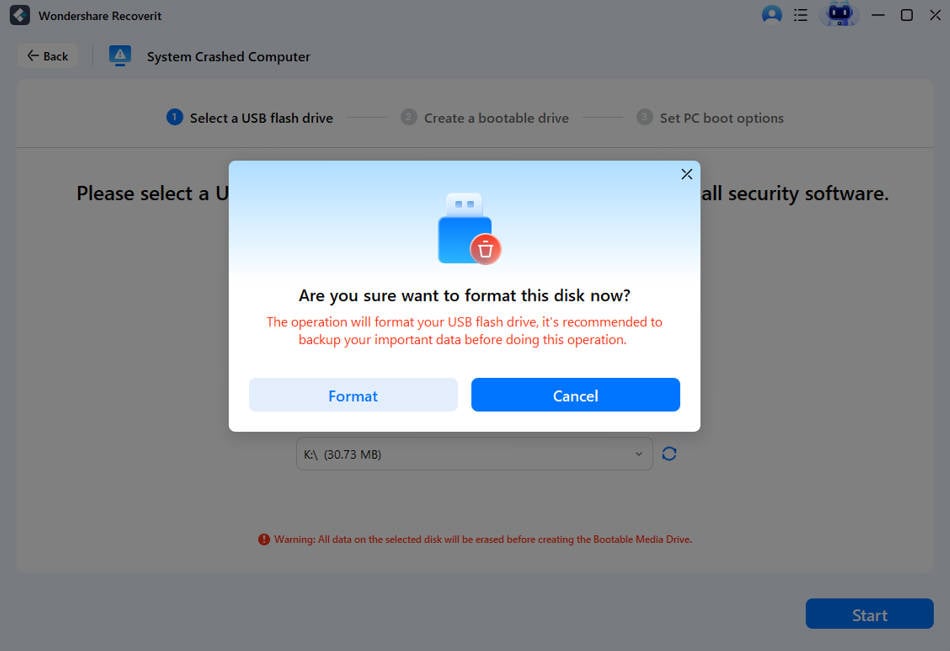
Keep the backup of all the relevant data first before proceeding to this step. The process of formulating a bootable drive will begin.
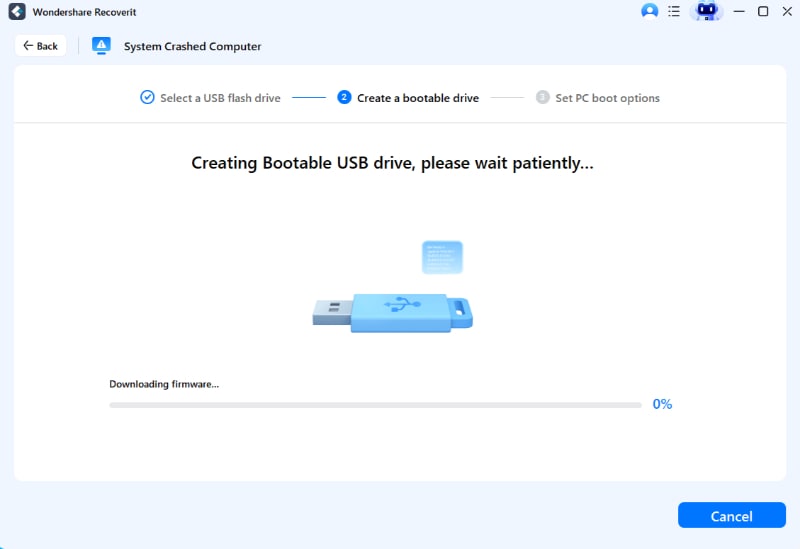
Do not remove the USB flash drive. You can view the three necessary steps required for data recovery solution.
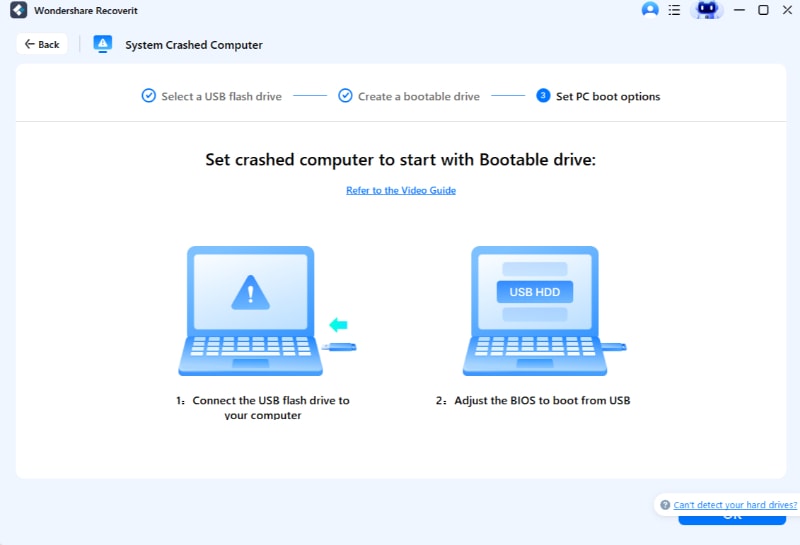
Before recover data from unbootable Windows 10, change the boot sequence on your PC. For more detailed steps, check out how to set computer to boot from usb drive.

Once the entire booting system is done from the bootable drive, the Recoverit program will start automatically. From here on, recovering and copying your data from your unbootable Windows 10 program is quite simple.

Why Do So Many People Experience This Issue For Different Reasons?
Windows 10 users experience "bootrec/fixboot access is denied" issue because of endless reasons. Most of them occur because of Windows 10 installation media. The problem mainly arises due to the Windows 10 1707, 1709, or 1803 media installation. Using Windows 10 1703 installation media files, the bootrec command will run correctly without any error without demoting it to Windows 10 1703. Besides, missing or corrupted BCD file is also the cause behind the issue we have talked in this content.
Computer Troubleshooting
- Win System Crash
- Windows Tips
- Computer Problems
- Blue Screen Errors


 ChatGPT
 Perplexity
 Gemini
 Claude
 Grok
Grok


Theo Lucia
chief Editor