Hard Drive Recovery
- Recovers deleted or lost files from hard drive effectively, safely and completely.
- Supports data recovery from 500+ data loss scenarios, including computer crash, partition loss, accidental human error, etc.
- Supports 1000+ file formats recovery with a high success rate and without any quality loss.
What Should You Do If Your Hard Drive Shows Up in Disk Management But Not Your Computer

Oct 22, 2026 • Filed to: Windows Computer Solutions • Proven solutions
People generally complain that the hard drive is not visible on the system, but it is visible in the Disk Management. Imagine you are working in the office and you face the same problem. How annoying would it be to someone when they have work to complete and an issue to resolve simultaneously?
If you are among those problem sufferers, then you are in the right place because we will tell you what agents aid this problem. Moreover, a solution guide has been compiled for all the readers that have multiple implementable solutions regarding the problem under study. Also, the article provides with few tips and tricks that can be adopted to avoid the problematic situation.
Part 1: What Are the Factors that Cause the Trouble?
Several people face the problem that the hard drive shows up in Disk Management, but it does not show on the computer. They generally don't know the factors that cause this problem. Before taking you any further and discussing more this, let's firstly talk about the causing agents;
- Connectivity Problem: Most of the time, the hard drive is not visible on the computer because of connection issues. The device is not connected correctly to the computer. It is possible that the USB port or the cable might be problematic.
- Initialization of Hard Drive: If the hard drive is not initialized, then it will not appear on the system. The user can check a disk from Disk Management; if it is marked as 'Unknown, Not Initialized,' then the system will not show it.
- Disk Does Not Have a Drive Letter: Another agent that causes trouble is when the hard disk does not have a drive letter. Any volume partition that does not have a drive letter will not show in the File Explorer.
- Driver is Not Updated: If the system cannot recognize a connected device, then it might be possible that the disk driver is not updated and is not compatible with the operating system.
| Disk Management Status | Technical Meaning | Primary Fix |
| Unallocated | The drive lacks a partition or file system. | New Simple Volume. |
| Not Initialized | Partition table (MBR/GPT) is missing or corrupted. | Initialize Disk. |
| No Drive Letter | Drive is healthy but has no "address" (E:, F:, etc.). | Change Drive Letter. |
| RAW | File system is unrecognized or damaged. | Format or use Recoverit. |
Part 2: What Are the Possible Solutions to Resolve the Problem?
Now that the users know about the factors that cause the problem, let us shed light on possible solutions that the user can adopt to resolve the problem of why the hard disk is not showing up on the computer and is just visible in the Disk Management;
Method 1: Check the Connection
It is possible that the connection might be the reason behind this problem so, first of all, the user is suggested to check the connection of the hard drive with the motherboard and power supply. If the connection is not correct, then;
- Firstly, the user should open the computer case.
- The user can now check if the data cable is connected to the correct port on the motherboard and the power cable is connected to the power supply.
If the problem is due to the connections, then after checking the connections, the problem should be resolved, and now the disk should appear on the system.
Sometimes your hard drive is "present" but invisible because Windows is trying to assign it a letter (like Z:) that is already reserved for a Network Map or a hidden Virtual Drive. In Disk Management, right-click the volume and select "Change Drive Letter and Paths." Choose a letter from the end of the alphabet (like X or Y) to ensure there is no conflict with your system's pre-assigned resources.
Method 2: Uninstall the Drivers
The problem might be due to problematic drivers. What could be done in such a situation? Let us tell you. If the drivers are problematic, uninstall them.
- Firstly, the user should open 'Device Manager.'
- After that, the user is supposed to locate the portable hard drive. Once found, right-click on it and then, from the menu, choose the option of 'Uninstall Device.'
- Click on ‘Uninstall’ and let the system remove the driver.

- After that, the user is requested to click on the 'Scan for hardware changes' icon. This will make sure that Windows install a default driver for the portable hard drive.

Method 3: Hardware Troubleshooter
Another possible and implementable solution for this problem is to Run the Hardware Troubleshooter;
- Firstly, the user should open the setting app by pressing 'Windows key + I.'
- Once the setting window is opened, the user should click on 'Update and Security.'

- From this window, the user should firstly select ‘Troubleshoot’ from the left menu.
- After that, from the right pane, the user should select 'Hardware and Devices' and click on the button ‘Run the troubleshooter.'

Once the process of troubleshooting is complete, the user should check that if the problem is still there or not.
Method 4: Update the Drivers
The problem can also be resolved by updating the drivers. This is how you can do it;
- To start the process, the user needs to open the Win + X menu by pressing 'Windows key + X.' From the menu list, the user should choose the 'Device Manager.'

- After that, the user should locate the 'Disk Drives' section and expand it.
- Check the list carefully. If any listed device has a yellow exclamation mark next to them, then that means there is a driver issue.
- The user is suggested to right-click on that device and select 'Update Driver.'

- After that, select 'Search automatically for driver software.'

Windows will now search and install a suitable driver automatically. After the driver has been installed, check again if the problem is resolved or not.
Method 5: Check Windows Storage Spaces "Pools"
In Windows 11 and the latest 2026 updates, a drive might be missing because it was accidentally added to a Storage Pool. If a drive is part of a pool, it will show up in Disk Management as "Healthy" but will be invisible in "This PC." To fix this, search for "Manage Storage Spaces" in the Start menu. If your drive appears there, you must "Remove" it from the pool to allow File Explorer to assign it a standard drive letter. Note: Removing a drive from a pool will wipe its data, so use Wondershare Recoverit beforehand if the drive contains important files.
Part 3: Best Way to Recover Lost Data From the Hard Drive
People often complain and suffer from the problem that they have lost data from the hard drive. They think that they can never have it back and it's impossible to recover it. Let us share something that will help users to recover lost data within few minutes. The magic is done by Wondershare Recoverit.
Wondershare Recoverit can recover deleted or lost files, photos, or emails. The amazing thing is that you can recover 100MB files for free; you don't need any subscription for that. Let us tell you some more benefits and features of Wondershare Recoverit;
- Users can preview the files before recovering them to check that the data is still intact and is recoverable.
- It recovers lost data from RAW, formatted, or even damaged partitions.
- It allows users to recover data from any internal or external hard drive or SSD.
- Wondershare Recoverit allows you to filter the files and gives you the fastest access to your desired file.
People who don’t know about it must be confused regarding how to use it. Well, for all such beginners, we are here to provide you with a step-by-step guideline from which you can learn to use it;
First of all, the user should install and download Wondershare Recoverit Data Recovery Software. Once that is done, it is ready to use.
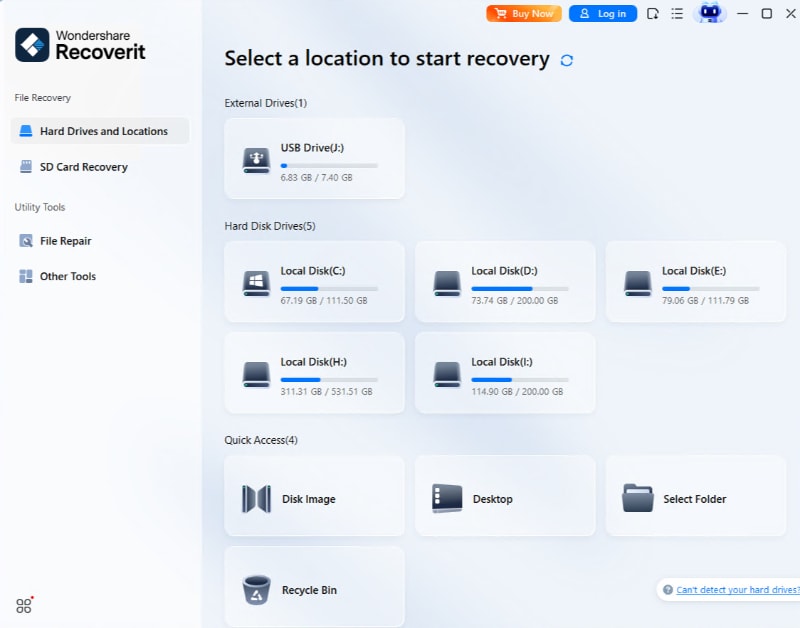
Step 1: Choose the Location
To start the recovery process, the user needs to choose a location from where the data was lost. Once the user has selected the location, click on the 'Start' button in the bottom right corner to start the scanning process of the targeted location.
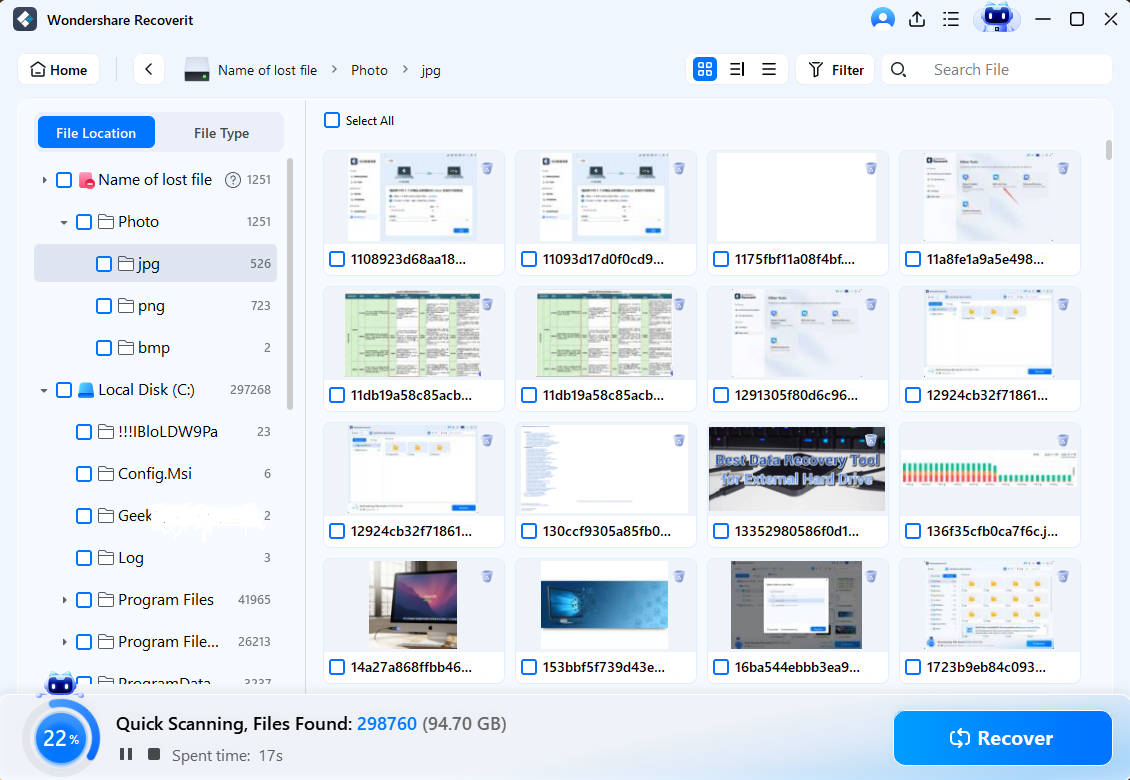
Step 2: Scanning the Drive
After initiating the scanning process, Wondershare Recoverit will do an all-around scan. The scanning time usually depends upon the size of the file. It might take few hours if the files are large-sized and a few minutes if the files are small. The scanning results are displayed on the screen to the user.
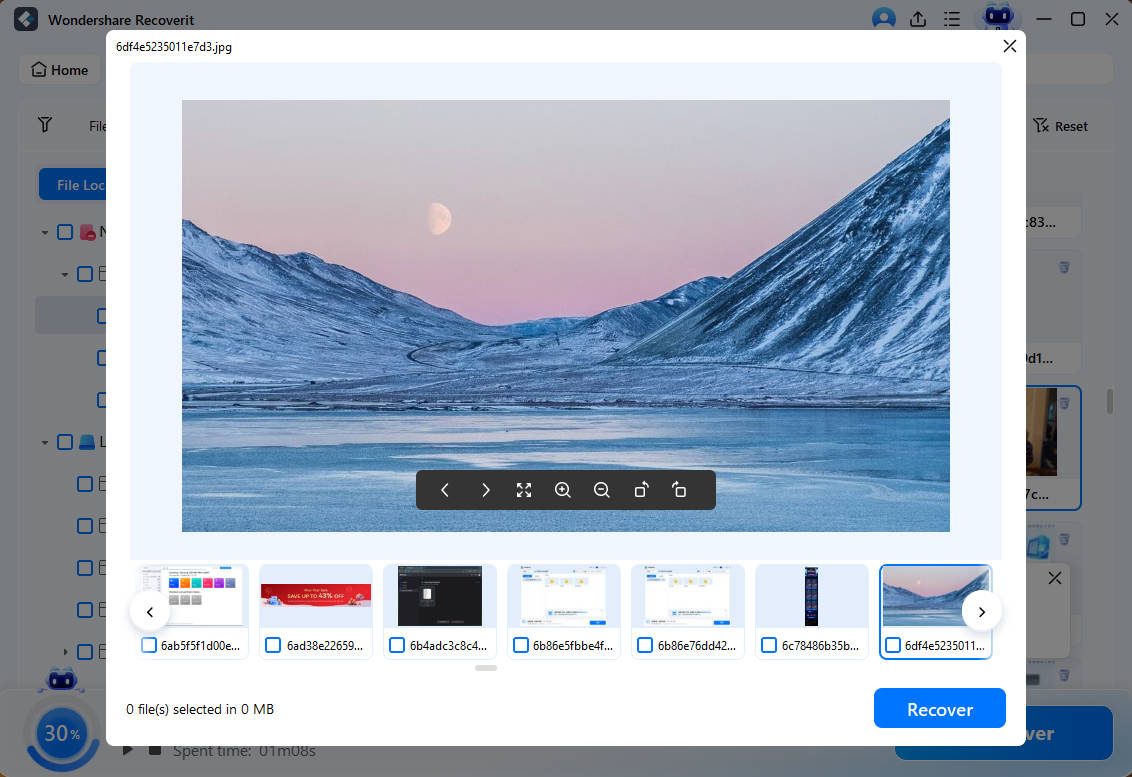
Step 3: Preview and then Recover
Wondershare Recoverit allows its user to preview the files that are scanned and displayed. This way, they can select the files they actually want to recover. Once the selection is made, they can click on the 'Recover' button in the bottom right corner to complete the process.
Data Recovery Success Matrix
| Drive Condition | Recovery Potential | Recommended Action |
| Formatted Partition | High (98%) | Run Recoverit Deep Scan. |
| RAW File System | High (95%) | Do NOT format; Scan RAW directly. |
| Deleted Partition | Moderate (85%) | Use Recoverit "Lost Partition" mode. |
Part 4: Tips and Tricks to Prevent this Situation
The section below will provide readers with a few tips and tricks. Adopting those tips will help users to prevent themselves from such situations. The tips are;
- The most important tip that people should know is to update the driver timely. People mostly forget to do that, so hence, never forget to update the driver.
- Checking your hard drive, either internal or external, before connecting it is very necessary. A lot of the time, the drive is damaged and causes trouble. For such situations, it is recommended to replace the damaged drive.
- Another trick to avoid the problem is to check the connection carefully that the drive is connected in the right port and the power supply is given.
- It is suggested to check the initialization of the drive beforehand to avoid the problem. This way, the user already knows if the drive is not initialized.
Conclusion
If someone is facing the invisible hard drive on their systems, you can now help them confidently. The article has provided the reader with a sufficient level of detail to learn deeply about the problem. Also, solution methods have been discussed that can be adopted to get over the trouble. In addition to the solution, tips have also been discussed to prevent the problem.
Hard Drive Detection & Troubleshooting FAQ
-
Why doesn’t the hard drive show on Mac?
The reasons why a hard drive fails to appear on a Mac are often similar to Windows issues. Common causes include a faulty USB port, a corrupted file system, or physical connection issues between the drive and the computer. Checking Disk Utility is the first step for Mac users. -
Why is my hard drive not recognized in BIOS?
If a drive is missing from the BIOS, it typically indicates a hardware-level problem. This could be due to a damaged SATA/power cable, an incorrect connection, or the drive not receiving enough power to spin up. -
Is it possible to fix an unresponsive external hard drive?
Yes. You can often fix an unresponsive drive using built-in troubleshooting methods in Windows 10/11, such as Disk Management, thechkdskcommand, or updating the Disk Drivers. If the data is inaccessible, professional recovery software is recommended.
Computer Troubleshooting
- Win System Crash
- Crack Bios Password
- Fix Run Dll Errors
- Fix Taskbar Disappeared Error
- Fix BootMGR Image Corrupt
- MBR Errors Fixed
- Windows Tips
- How to Edit DLL Files
- How to Test Hard Drive Speed
- Bootcamp Windows 10 No Sound Issue
- Download iCloud on PC
- Difference between File Systems
- Fix Computer Overheat
- Computer Problems
- Best Bad Sector Repair Tools
- Audio Not Working in Windows 10
- Fix Windows 10/11 Error Code 0xc000014c
- Fix Windows 10 Error Code 0xc0000034
- SMART Status Bad Error
- Fix Grub Loading Error
- Remove Admin Password
- Blue Screen Errors
 > Resources > Windows Computer Solutions > What Should You Do If Your Hard Drive Shows Up in Disk Management But Not Your Computer


Recoverit Editorial Team
chief Editor